Documentation
Overview
Documentation for Eucalyptus Cloud, the open source software for building AWS-compatible private and hybrid clouds.
Guides
This documentation consists of the following guides:
Resources
Documentation for earlier releases can be found here:
Related guides:
Copyright for portions of this documentation are held by Ent. Services Development Corporation LP, 2017. All other copyright for this documentation is held by AppScale Systems, Inc 2020
1 - Installation Guide
Installation Guide
This section describes concepts and tasks you need to successfully install Eucalyptus.
1.1 - Installation Overview
This topic helps you understand, plan for, and install Eucalyptus. If you follow the recommendations and instructions in this guide, you will have a working version of Eucalyptus customized for your specific needs and requirements. This guide walks you through installations for a few different use cases.
Note
Upgrading to Eucalyptus version 5 from earlier versions is not currently supported.You can choose from one of the installation types listed in the following table.
| What Do You Want to Do? | Installation Type |
|---|
| Quickly deploy on one machine | If you have a CentOS 7.9 minimal install and a few IP addresses to spare, try the FastStart script. Run the following command as root: bash <(curl -Ls https://get.eucalyptus.cloud) |
| Create a development or production environment | See the Automated Eucalyptus Installation section for installation using Ansible |
| Manually create a development or production environment | See the Manual Eucalyptus Installation section for manual deployment steps |
We recommend that you read the section you choose in the order presented. To customize your installation, you have to understand what Eucalyptus is, what the installation requirements are, what your network configuration and restrictions are, and what Eucalyptus components and features are available based on your needs and requirements.
1.2 - Introduction to Eucalyptus
Introduction to Eucalyptus
Eucalyptus is open source software for building AWS-compatible private and hybrid clouds.
As an Infrastructure as a Service (IaaS) product, Eucalyptus allows your users to provision your compute and storage resources on-demand.
You can install Eucalyptus on the following Linux distributions:
- CentOS 7.9
- Red Hat Enterprise Linux (RHEL) 7.9
Note
References to RHEL in this guide apply equally to CentOS unless otherwise specified.1.2.1 - Eucalyptus Overview
Eucalyptus was designed to be easy to install and as non-intrusive as possible. The software framework is modular, with industry-standard, language-agnostic communication.
Eucalyptus provides a virtual network overlay that both isolates network traffic of different users and allows two or more clusters to appear to belong to the same Local Area Network (LAN). Also, Eucalyptus offers API compatibility with Amazon’s EC2, S3, IAM, ELB, Auto Scaling, CloudFormation, and CloudWatch services. This offers you the capability of a hybrid cloud.
1.2.2 - Eucalyptus Components
This topic describes the various components that comprise a Eucalyptus cloud.The following image shows a high-level architecture of Eucalyptus with its main components.
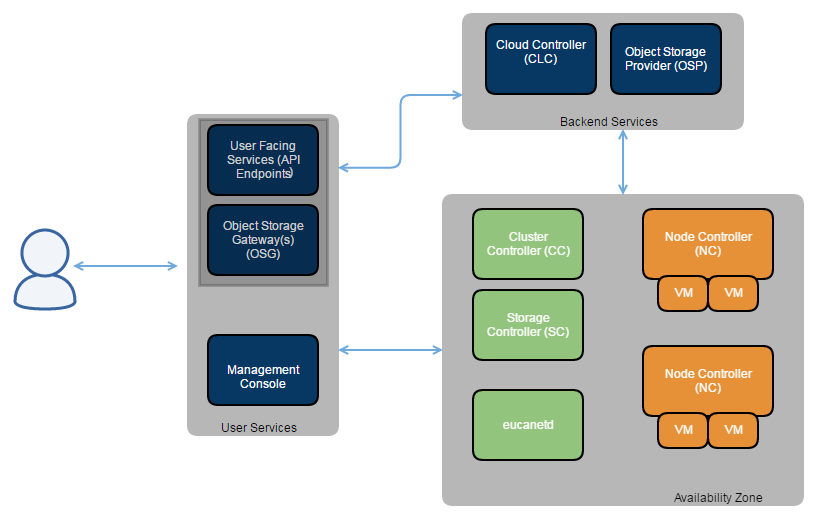 A detailed description of each Eucalyptus component follows.
Cloud Controller
In many deployments, the Cloud Controller (CLC) service and the User-Facing Services (UFS) are on the same host machine. This server is the entry-point into the cloud for administrators, developers, project managers, and end-users. The CLC handles persistence and is the backend for the UFS. A Eucalyptus cloud must have exactly one CLC.
User-Facing Services
The User-Facing Services (UFS) serve as endpoints for the AWS-compatible services offered by Eucalyptus : EC2 (compute), AS (AutoScaling), CW (CloudWatch), ELB (LoadBalancing), IAM (Euare), and STS (tokens). A Eucalyptus cloud can have several UFS host machines.
Object Storage Gateway
The Object Storage Gateway (OSG) is part of the UFS. The OSG passes requests to object storage providers and talks to the persistence layer (DB) to authenticate requests. You can use Walrus, Riak CS, or Ceph-RGW as the object storage provider.
Object Storage Provider
The Object Storage Provider (OSP) can be either the Eucalyptus Walrus backend, Riak CS, or Ceph-RGW. Walrus is intended for light S3 usage and is a single service. Riak is an open source scalable general purpose data platform; it is intended for deployments with heavy S3 usage. Ceph-RGW is an object storage interface built on top of Librados.
Note
Management Console
The Eucalyptus Management Console is an easy-to-use web-based interface that allows you to manage your Eucalyptus cloud. The Management Console is often deployed on the same host machine as the UFS. A Eucalyptus cloud can have multiple Management Console host machines.
Cluster Controller
The Cluster Controller (CC) service must run on a host machine that has network connectivity to the host machines running the Node Controllers (NCs) and to the host machine for the CLC. CCs gather information about a set of NCs and schedules virtual machine (VM) execution on specific NCs. All NCs associated with a single CC must be in the same subnet.
Storage Controller
The Storage Controller (SC) service provides functionality similar to Amazon Elastic Block Store (Amazon EBS). The SC can interface with various storage systems. Elastic block storage exports storage volumes that can be attached by a VM and mounted or accessed as a raw block device. EBS volumes can persist past VM termination and are commonly used to store persistent data. An EBS volume cannot be shared between multiple VMs at once and can be accessed only within the same availability zone in which the VM is running. Users can create snapshots from EBS volumes. Snapshots are stored by the OSG and made available across availability zones.
Node Controller
The Node Controller (NC) service runs on any machine that hosts VM instances. The NC controls VM activities, including the execution, inspection, and termination of VM instances. It also fetches and maintains a local cache of instance images, and it queries and controls the system software (host OS and the hypervisor) in response to queries and control requests from the CC.
Eucanetd
The eucanetd service implements artifacts to manage and define Eucalyptus cloud networking. Eucanetd runs alongside the CLC or NC services, depending on the configured networking mode.
1.2.3 - System Requirements
To install Eucalyptus, your system must meet the baseline requirements described in this topic.
Note
The specific requirements of your deployment, including the number of physical machines, structure of the physical network, storage requirements, and access to software are ultimately determined by the features you choose for your cloud and the availability of infrastructure required to support those features.Compute Requirements
- Physical Machines: All services must be installed on physical servers, not virtual machines.
- Central Processing Units (CPUs): We recommend that each host machine in your cloud contain either an Intel or AMD processor with a minimum of 4 2GHz cores.
- Operating Systems: supports the following Linux distributions: CentOS 7.9 and RHEL 7.9. supports only 64-bit architecture.
- Machine Clocks: Each host machine and any client machine clocks must be synchronized (for example, using NTP). These clocks must be synchronized all the time, not only during the installation process.
Storage and Memory Requirements
- Each machine needs a minimum of 100GB of storage.
- We recommend at least 500GB for Walrus and SC hosts.
- We recommend 200GB per NC host running Linux VMs. Note that larger available disk space enables a greater number of VMs.
- Each machine needs a minimum of 16GB RAM. However, we recommend more RAM for improved caching and on NCs to support more instances.
Network Requirements
- For VPCMIDO, Eucalyptus needs MidoNet to be installed.
- The network connecting machines that host components (except the CC and NC) must support UDP multicast for IP address 239.193.7.3. Note that UDP multicast is not used over the network that connects the CC to the NCs.
Once you are satisfied that your systems requirements are met, you are ready to plan your Eucalyptus installation.
1.3 - Automated Eucalyptus Installation
Automated Eucalytpus installation uses an Ansible playbook.
Note
Before starting the automated installation CentOS 7.9 should be installed on all hosts. RHEL is not currently supported for automated installs.To install Eucalyptus you will need to have Ansible and the Eucalyptus playbooks available and to create an inventory file that describes your deployment.
Install Packages
The host performing the installation must have the EPEL YUM repository available (for Ansible):
and a Eucalyptus YUM repository, either the release repository:
yum install https://downloads.eucalyptus.cloud/software/eucalyptus/5/rhel/7/x86_64/eucalyptus-release-5-1.11.as.el7.noarch.rpm
or the master repository for the latest nightly build:
yum install https://downloads.eucalyptus.cloud/software/eucalyptus/master/rhel/7/x86_64/eucalyptus-release-5-1.15.as.el7.noarch.rpm
Create Inventory
The Ansible inventory file describes both the hosts that will run your Eucalyptus cloud and the options for your installation.
---
all:
  hosts:
    cloud.example.com:
    node[01:10].example.com:

  vars:
    vpcmido_public_ip_range: "1.X.Y.128-1.X.Y.254"
    vpcmido_public_ip_cidr: "1.X.Y.128/25"

  children:
    cloud:
      hosts:
        cloud.example.com:
    zone:
      hosts:
        cloud.example.com:
    node:
      hosts:
        node[01:10].example.com:
There are three main sections to an inventory file:
- hosts : the hosts to deploy
- vars : variables providing options for the deployment
- children : host groupings that describe where to install Eucalyptus components
Minimal Install
The minimum inventory for a deployment must specify one host and have a children/cloud section that includes that host.
For VPCMIDO the vars for vpcmido_public_ip_range and vpcmido_public_ip_cidr must also be provided.
When the zone and node children are not specified they are assumed to be the same host as the cloud.
Customization
Settings that are often used in an inventory are described in this section.
The DNS domain to be used should be set in the vars section:
cloud_system_dns_dnsdomain: "mycloud.example.com"
The NTP server to use with services in your deployment can also be specifed:
    cloud_properties:
      services.imaging.worker.ntp_server: "time.cloudflare.com"
      services.loadbalancing.worker.ntp_server: "time.cloudflare.com"
Note
The cloud_properties section allows you configure any settings that you would later set using euctlTo specify region and zone names for your deployment add the vars:
    cloud_region_name: "us-euca-1"
    cloud_zone_1_name: "us-euca-1a"
    cloud_zone_2_name: "us-euca-1b"
    cloud_zone_3_name: "us-euca-1c"
You can follow AWS naming conventions or can use your own naming scheme. To specify which hosts belong to which zone update the hosts section:
  hosts:
    node01.example.com:
      host_cluster_ipv4: "10.111.10.101"
      host_public_ipv4: "1.X.Y.101"
      host_zone_key: 1
The host_zone_key value of 1 specifes that node01 would be part of the us-euca-1a zone. This example also shows how to configure the public and cluster IP addresses for a host.
To specify the port for web sevices use:
If using port 443 for web services, the management console should be deployed as a service to avoid a port conflict.
To enable a firewall on the public/cluster interfaces use:
    cloud_firewalld_configure: yes
    cloud_firewalld_cluster_cidr: "10.111.0.0/16"
    cloud_firewalld_cluster_interface: "en2"
    cloud_firewalld_public_interface: "en1"
Interfaces must be named consistently on all hosts.
The default install uses overlay for block storage, to use das you must have an LVM volume group available on all storage (zone) hosts and set:
cloud_storage_dasdevice: "storage_vg"
To deploy the management console as service running on an instance in your Eucalyptus cloud:
    eucalyptus_console_cloud_deploy: yes
    cloud_service_image_rpm: no
This will also create a DNS entry for the console such as console.mycloud.example.com. When deploying the console on an instance it is recommended to also set cloud_service_image_rpm to no so that the service image for loadbalancing and imaging is installed using the same approach rather than from the rpm.
MidoNet NSDB
For VPCMIDO deployments the MidoNet NSDB (Network State Database) should be deployed on multiple hosts:
    midonet-nsdb:
      hosts:
        midonet-nsdb[01:03].example.com:
These could be distinct hosts, or could be hosts running cloud and zone components (for example)
Using Ceph
To use Ceph for block and object storage configure the settings:
    ceph_release: "nautilus"
    ceph_osd_data_path: "storage_vg/storage_lv"
    ceph_public_network: "10.111.0.0/16"
the ceph_osd_data_path should reference either an existing LVM volume available on all hosts or a device.
The hosts for ceph must be in the ceph group under children:
    ceph:
      hosts:
        ceph[01:03].example.com:
There must be three or more hosts to have redundancy.
Using MinIO
To deploy MinIO as the objectstorage provider you specify minio under children:
    minio:
      hosts:
        minio.example.com:
This will deploy MinIO on those hosts and also configure MinIO as the objectstorage provider when Ceph is not being deployed. There must be three or more hosts to have redundancy.
Enabling Certbot Integration
To enable Let’s Encrypt for HTTPS via certbot set the following vars:
    eucaconsole_certbot_configure: yes
    eucalyptus_console_certbot_enable: yes
    eucalyptus_services_certbot_enable: yes
To use this functionality the cloud must be public so that it can be reached for DNS (services) or HTTP (console) challenges. See the Let’s Encrypt Challenge Types for details.
The eucaconsole_certbot_configure setting should be used when deploying the console on a physical host. The eucalyptus_console_certbot_enable setting applies when deploying the console on the cloud (i.e. when you specifed eucalyptus_console_cloud_deploy)
Test Connectivity
Before starting a deployment, test that the installation host can access all hosts in the inventory by running:
ansible --inventory inventory.yml -m ping all
If this fails, ensure that you have configured SSH access to all inventory hosts (e.g. configure passwordless SSH access) before proceeding to the installation.
To start a VPCMIDO installation:
ansible-playbook --inventory inventory.yml /usr/share/eucalyptus-ansible/playbook_vpcmido.yml
To start an EDGE installation:
ansible-playbook --inventory inventory.yml /usr/share/eucalyptus-ansible/playbook_edge.yml
See the Find More Information page for next steps.
1.4 - Manual Eucalyptus Installation
Manual Eucalyptus Installation
This section details steps to install Eucalyptus manually. To install Eucalyptus, perform the following tasks in the order presented.
1.4.1 - Plan Your Installation
Plan Your Installation
Before you install Eucalyptus components on your machines, we recommend that you take the time to plan how you want to install it.
To successfully plan for your Eucalyptus installation, you must determine two things:
- Think about the application workload performance and resource utilization tuning. Think about how many machines you want on your system.
- Use your existing architecture and policies to determine the networking features you want to enable: EC2 Classic Networking or EC2 VPC Networking.
This section describes how to evaluate each tradeoff to determine the best choice to make, and how to verify that the resource environment can support the features that are enabled as a consequence of making a choice.
By the end of this section, you should be able to specify how you will deploy Eucalyptus in your environment, any tradeoffs between feature set and flexibility, and where your deployment will integrate with existing infrastructure systems.
1.4.1.1 - Eucalyptus Architecture Overview
This topics describes the relationship of the components in a Eucalyptus installation.
 The cloud components: Cloud Controller (CLC) and Walrus, as well as user components: User-Facing Services (UFS) and the Management Console, communicate with cluster components: the Cluster Controllers (CCs) and Storage Controllers (SCs). The CCs and SCs, in turn, communicate with the Node Controllers (NCs). The networks between machines hosting these components must be able to allow TCP connections between them.
Ceph provides an alternative to Walrus as an object storage provider, and can also be used as a block storage provider (EBS).
1.4.1.2 - Plan Your Hardware
This topic describes ways you can install Eucalyptus services on your physical servers.You can run Eucalyptus services in any combination on the various physical servers in a data center. For example, you can install the Cloud Controller (CLC), Walrus, CC, and SC on one host machine, and NCs on one or more host machines. Or you can install each service on an independent physical server. This gives each service its own local resources to work with.
Often in installation decisions, you must trade deployment simplicity for performance. For example, if you place all cloud (CLC) and zone (CC) services on a single machine, it makes for simple administration. This is because there is only one machine to monitor and control for the Eucalyptus control services. But, each service acts as an independent web service; so if they share a single machine, the reduced physical resources available to each service might become a performance bottleneck.
1.4.1.3 - Plan Services Placement
Cloud Services
The main decision for cloud services is whether to install the Cloud Controller (CLC) and Walrus on the same server. If they are on the same server, they operate as separate web services within a single Java environment, and they use a fast path for inter-service communication. If they are not on the same server, they use SOAP and REST to work together.
Sometimes the key factor for cloud services is not performance, but server cost and data center configuration. If you only have one server available for the cloud, then you have to install the services on the same server.
All services should be in the same data center. They use aggressive time-outs to maintain system responsiveness so separating them over a long-latency, lossy network link will not work.
User Services
The User Facing Services (UFS) handle all of the AWS APIs and provide an entry point for clients and users interacting with the Eucalyptus cloud. The UFS and the Management Console are often hosted on the same machine since both must be accessible from the public, client-facing network.
You may optionally choose to have redundant UFS and Management Console host machines behind a load balancer.
Zone Services
The Eucalyptus services deployed in the zone level of a Eucalyptus deployment are the Cluster Controller (CC) and Storage Controller (SC).
You can install all zone services on a single server, or you can distribute them on different servers. The choice of one or multiple servers is dictated by the demands of user workload in terms of number of instances (CC) and EBS volume access (SC).
Things to consider for CC placement:
Place the CC on a server that has TCP/IP connectivity to the front-end servers and the NC servers in its zone.
Each CC can manage a maximum of 4000 instances.
Things to consider for SC placement:
The SC host machine must always have TCP/IP connectivity to the CLC and be able use multicast to the CLC.
The SC must have TCP/IP connectivity to the UFS/OSG hosts for uploading snapshots into the object store. (The SC does not require connectivity directly to users, it is an internal component and does not serve user EBS API requests; that job is done by the UFS.)
The SC must be reachable via TCP/IP from all NCs in the zone within which the SC is registered. The SC and NC exchange tokens to authorize volume attachment, so they must be able to directly communicate. The SC provides the NCs with network access to the dynamic block volumes on the SC’s storage (if the SC is configured for overlay local filesystem or DAS-JBOD).
IF using Ceph the SC must also have TCP/IP connectivity to the Ceph cluster.
If you are going to use overlay local filesystem or DAS-JBOD configurations to export local SC storage for EBS, then SC storage should consist of a fast, reliable disk pool (either local file-system or block-attached storage) so that the SC can create and maintain volumes for the NCs. The capacity of the disk pool should be sufficient to provide the NCs with enough space to accommodate all dynamic block volumes requests from end users.
Node Services
The Node Controllers are the services that comprise the Eucalyptus backend. All NCs must have network connectivity to whatever machine(s) host their EBS volumes. Hosts are either a Ceph deployment or the SC.
1.4.1.4 - Plan Disk Space
We recommend that you choose a disk for the Walrus that is large enough to hold all objects and buckets you ever expect to have, including all images that will ever be registered to your system, plus any Amazon S3 application data. For heavy S3 usage, Riak CS is a better choice for object storage.
Note
We recommend that you use LVM (Logical Volume Manager). If you run out of disk space, LVM allows you to add disks and migrate the data.| Service | Directory | Minimum Size |
|---|
| Cloud Controller (CLC)CLC logging | /var/lib/eucalyptus/db/var/log/eucalyptus | 20GB2GB |
| WalrusWalrus logging | /var/lib/eucalyptus/bukkits/var/log/eucalyptus | 250GB2GB |
| Storage Controller (SC) (EBS storage) This disk space on the SC is only required if you are not using Ceph. For DAS the space must not be used by an existing filesystem. | /var/lib/eucalyptus/volumes/var/log/eucalyptus | 250GB |
| User-Facing Services (UFS)UFS logging | /var/lib/eucalyptus/var/log/eucalyptus | 5GB 2GB |
| Management ConsoleConsole logging | /var/log/eucalyptus-console | 5GB 2GB |
| Cluster Controller (CC)CC logging | /var/lib/eucalyptus/CC/var/log/eucalyptus | 5GB2GB |
| Node Controller (NC)NC logging | /var/lib/eucalyptus/instances/var/log/eucalyptus | 250GB2GB |
If necessary, create symbolic links or mount points to larger filesystems from the above locations. Make sure that the ’eucalyptus’ user owns the directories.
1.4.1.5 - Plan Eucalyptus Features
Plan Features
Before you install Eucalyptus , we recommend that you think about the features you plan to implement with Eucalyptus. These features are detailed in the following sections.
1.4.1.5.1 - Availability Zone Support
Eucalyptus offers the ability to create multiple local availability zones.An availability zone for AWS denotes a large subset of their cloud environment. Eucalyptus refines this definition to denote a subset of the cloud that shares a local area network. Each Eucalyptus zone has its own Cluster Controller and Storage Controller.
1.4.1.5.2 - Object Storage
Eucalyptus supports Walrus and Riak CS as its object storage backend. There is no extra planning if you use Walrus. If you use Riak CS, you can use a single Riak CS cluster for several Eucalyptus clouds. Basho (the vendor of RiakCS) recommends five nodes for each Riak CS cluster. This also means that you have to set up and configure a load balancer between the Riak CS nodes and the object storage gateway (OSG).
1.4.1.6 - Plan Networking Modes
Plan Networking Modes
These networking modes are designed to allow you to choose an appropriate level of security and flexibility for your cloud. The purpose is to direct Eucalyptus to use different network features to manage the virtual networks that connect VMs to each other and to clients external to Eucalyptus .
Eucalyptus networking modes are generally modeled after AWS networking capabilities. In legacy AWS accounts, you have the ability to choose EC2 Classic network mode or VPC network mode. New AWS accounts do not have this flexibility and are forced into using VPC. Eucalyptus VPCMIDO mode is similar to AWS VPC in that it allows users to fully manage their cloud network, including the definition of a Classless Inter-Domain Routing (CIDR) block, subnets, and security groups with rules for additional protocols beyond the default three (UDP, TCP, and ICMP) available in EC2 Classic networking.
Your choice of networking mode depends on the following considerations:
- Does your cloud need to mimic behavior in your AWS account? If you need EC2-Classic behavior, select EDGE mode. If you need EC2-VPC behavior, select VPCMIDO mode.
- Do you need to create security group rules with additional protocols (e.g., all protocols, RDP, XTP, etc.)? If so, choose VPCMIDO mode.
- If there is no specific requirement for either mode, then VPCMIDO mode is recommended given its flexibility and networking features.
Each networking mode is described in the following sections.
1.4.1.6.1 - About Eucanetd
The eucanetd service implements artifacts to manage and define Eucalyptus cloud networking. Eucanetd runs alongside the CLC or NC services, depending on the configured networking mode. Eucanetd manages network functionality. For example:
- Installs network artifacts (iptables, ipsets, ebtables, dhcpd)
- Performs state management for the installed network artifacts
- Updates network artifact configuration as needed
- In VPCMIDO mode:
- Interacts with MidoNet via the MidoNet API
- Defines network artifacts in MidoNet
Where to deploy eucanetd
Deploy eucanetd depending on the selected network mode:
| Host Machine | EDGE mode | VPCMIDO mode |
|---|
| CLC | No | Yes |
| NC | Yes | No |
When required for a mode eucanetd should be deployed on all hosts for that service.
1.4.1.6.2 - Understanding Eucalyptus EDGE Mode
In EDGE networking mode, the components responsible for implementing Eucalyptus VM networking artifacts are running at the edge of a Eucalyptus deployment: the Linux host machines acting as Node Controllers (NCs). On each NC host machine, a Eucalyptus stand-alone service, eucanetd, runs side-by-side with the NC service. The eucanetd service receives dynamically changing Eucalyptus networking views and is responsible for configuring the Linux networking subsystem to reflect the latest view.
EDGE networking mode integrates with your existing network infrastructure, allowing you to inform Eucalyptus , through configuration parameters for EDGE mode, about the existing network, which Eucalyptus then will consume when implementing the networking view.
EDGE networking mode integrates with two basic types of pre-existing network setups:
- One flat IP network used to service component systems, VM public IPs (elastic IPs), and VM private IPs.
- Two networks, one for components and VM public IPs, and the other for VM private IPs.
Note
EDGE networking mode integrates with networks that already exist. If the network, netmask, and router don’t already exist, you must create them outside before configuring EDGE mode.EDGE Mode Requirements
- Each NC host machine must have an interface configured with an IP on a VM public and a VM private network (which can be the same network).
- There must be IP connectivity from each NC host machine (where eucanetd runs) and the CLC host machine, so that network path from instances to the metadata server (running on the CLC host machine) can be established.
- There must be a functioning router in place for the private network. This router will be the default gateway for VM instances.
- The private and public networks can be the same network, but they can also be separate networks.
- The NC host machines need a bridge configured on the private network, with the bridge interface itself having been assigned an IP from the network.
- If you’re using a public network, the NC host machines need an interface on the public network as well (if the public and private networks are the same network, then the bridge needs an IP assigned on the network).
- If you run multiple zones, each zone can use the same network as its private network, or they can use separate networks as private networks. If you use separate networks, you need to have a router in place that is configured to route traffic between the networks.
- If you use private addressing only, the CLC host machine must have a route back to the VM private network.
EDGE Mode Limitations
- Global network updates (such as security group rule updates, security group VM membership updates, and elastic IP updates) are applied through an “eventually consistent” mechanism, as opposed to an “atomic” mechanism. That is, there may be a brief period of time where one NC has the new state implemented but another NC has the previous state implemented.
- Mappings between VM MAC addresses and private IPs are strictly enforced. This means that instances cannot communicate using addresses the cloud has not assigned to them.
1.4.1.6.3 - Understanding VPCMIDO and MidoNet
This topic describes MidoNet components and their Eucalyptus deployment options, which provide support for VPC on Eucalyptus. Eucalyptus VPCMIDO mode resembles the Amazon Virtual Private Cloud (VPC) product wherein the network is fully configurable by users. In Eucalyptus, it is implemented with a Software-Defined Networking (SDN) technology called MidoNet. MidoNet is a network virtualization platform for Infrastructure-as-a-Service (IaaS) clouds that implements and exposes virtual network components as software abstractions, enabling programmatic provisioning of virtual networks.
This network mode requires configuration of MidoNet in order to make cloud networking functional. It offers the most advanced networking capabilities and therefore it is recommended to be used on all new Eucalyptus installations.
MidoNet Components
A MidoNet deployment consists of four types of nodes (according to their logical functions or services offered), connected via four IP networks as depicted in Figure 1. MidoNet does not require any specific hardware, and can be deployed in commodity x86_64 servers. Interactions with MidoNet are accomplished through Application Programming Interface (API) calls, which are translated into (virtual) network topology changes. Network state information is stored in a logically centralized data store, called the Network State Database (NSDB), which is implemented on top of two open-source distributed coordination and data store technologies: ZooKeeper and Cassandra. Implementation of (virtual) network topology is realized via cooperation and coordination among MidoNet agents, which are deployed in nodes that participate in MidoNet.
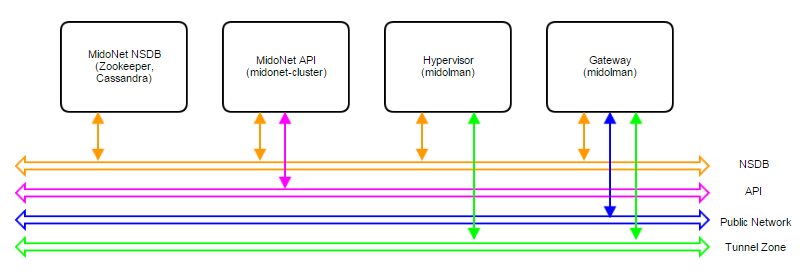 Figure 1: Logical view of a MidoNet deployment. Four components are connected via four networks.
Node types:
- MidoNet Network State Database (NSDB): consists of a cluster of ZooKeeper and Cassandra. All MidoNet nodes must have IP connectivity with NSDB.
- MidoNet API: consists of MidoNet web app. Exposes MidoNet REST APIs.
- Hypervisor: MidoNet agent (Midolman) are required in all Hypervisors to enable VMs to be connected via MidoNet overlay networks/SDN.
- Gateway: Gateway nodes are connected to the public network, and enable the network flow from MidoNet overlays to the public network.
Physical Networks:
- NSDB: IP network that connects all nodes that participate in MidoNet. While NSDB and Tunnel Zone networks can be the same, it is recommended to have an isolated (physical or VLAN) segment.
- API: in deployments only eucanetd/CLC needs access to the API network. Only “special hosts/processes” should have access to this network. The use of “localhost” network on the node running CLC/eucanetd is sufficient and recommended in deployments.
- Tunnel Zone: IP network that transports the MidoNet overlay traffic ( VM traffic), which is not “visible” on the physical network.
- Public network: network with access to the Internet (or corporate/enterprise) network.
MidoNet Deployment Scale
Three reference architectures are presented in this document, ordered by complexity and size:
- Proof-of-Concept (PoC)
- Production: Small
- Production: Large
Production: Large reference architecture represents the most complete and recommended deployment model of MidoNet for Eucalyptus. Whenever possible (such as when resources are available), deployments should closely match with the Production: Large reference architecture (even on small scale clouds).
All MidoNet components are designed and implemented to horizontally scale. Therefore, it is possible to start small and add resources as they become available.
Eucalyptus with MidoNet
A Eucalyptus with MidoNet deployment consists of the following components:
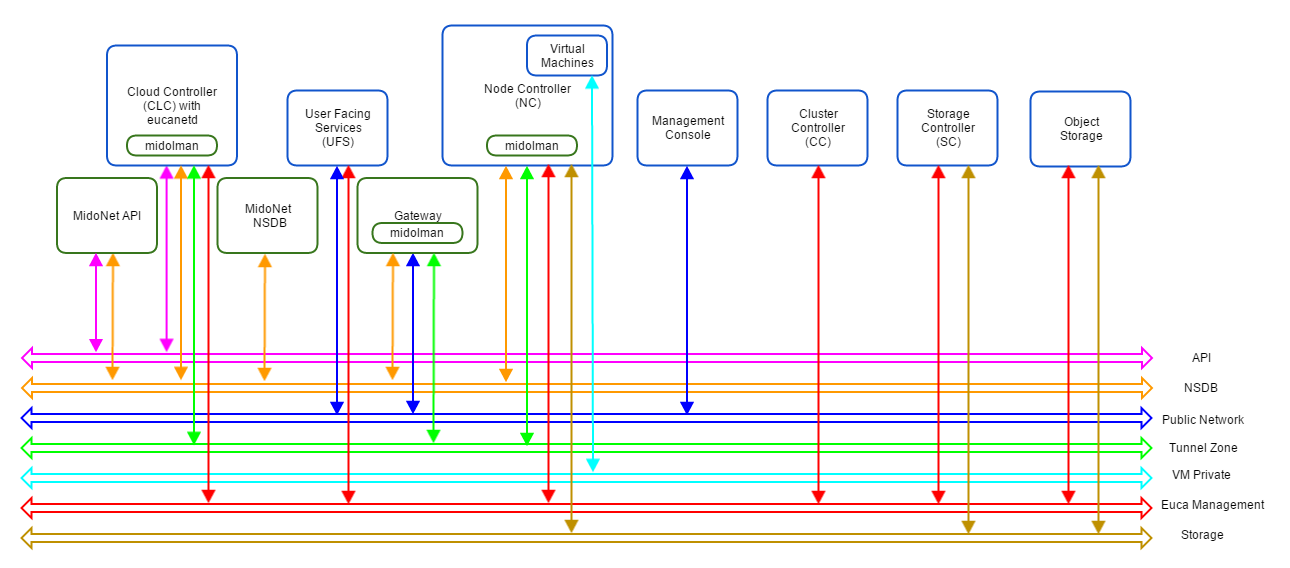 Figure 2: Logical view of a Eucalyptus with MidoNet deployment. VM private network is created/virtualized by MidoNet, and ‘software-defined’ by eucanetd. Ideally, each component and network should have its own set of independent resources. In practice, components are grouped and consolidated into a set of servers, as detailed in different reference architectures.
MidoNet components, Eucalyptus components, and three extra networks are present.
Proof of Concept (PoC)
The PoC reference architecture is designed for very small and transient workloads, typical in development and testing environments. Quick deployment with minimal external network requirements are the key points of PoC reference architecture.
Requirements
Servers:
- Four (4) or more modern Intel cores or AMD modules - exclude logical cores that share CPU resources from the count (Hyperthreads and AMD cores within a module)
- 2GB of RAM reserved for MidoNet Agent (when applicable)
- 4GB of RAM reserved for MidoNet NSDB (when applicable)
- 4GB of RAM reserved for MidoNet API (when applicable)
- 30GB of free disk space for NSDB (when applicable)
Physical Network:
- One (1) 1Gbps IP Network
- A range or list of public IP addresses (Euca_public_IPs)
- Internet Gateway
Limits:
- Ten (10) MidoNet agents (i.e., 1 Gateway node, 1 CLC, and 8 NCs)
- One (1) MidoNet Gateway
- No fail over, fault tolerance, and/or network load balancing/sharing
Deployment Topology
- Single server with all MidoNet components (NSDB, API, and Midolman), and with CLC/eucanetd
- A server acting as MidoNet Gateway - when BGP terminated links are used, this node must not be co-located with CLC/eucanetd (in a proxy_arp setup described below, it is possible to consolidate CLC/eucanetd with MidoNet Gateway). This is due to incompatibilities in CentOS/RHEL7 netns (used by eucanetd), and bgpd (started by Midolman when BGP links are configured).
- Hypervisors with Midolman
- One IP network handling NSDB, Tunnel Zone, and Public Network traffic
- API communication via loopback/localhost network
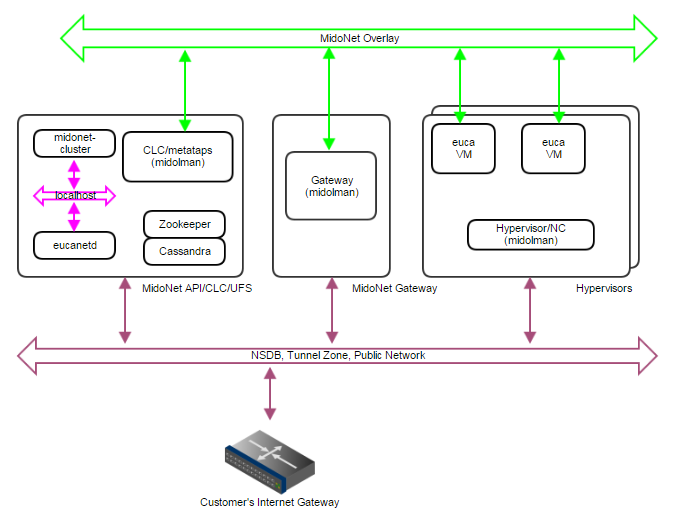 Figure 3: PoC deployment topology. A single IP network carries NSDB, Tunnel Zone, and Public Network traffic. A single server handles MidoNet NSDB, API (and possibly Gateway) functionality.
MidoNet Gateway Bindings
Three ways to realize MidoNet Gateway bindings are discussed below, starting with the most recommended setup.
Public CIDR block(s) allocated for Eucalyptus (Euca_Public_IPs) needs to be routed to MidoNet Gateway by the customer network - this is an environment requirement, outside of control of both MidoNet and Eucalyptus systems. One way to accomplish this is to have a BGP terminated link available. MidoNet Gateway will establish a BGP session with the customer router to: (1) advertise Euca_Public_IPs to the customer router; and (2) get the default route from the customer router.
If a BGP terminated link is not available, but the routing of Euca_Public_IPs is delegated to MidoNet Gateway (configuration of customer routing infrastructure), similar setup can be used. In such scenario, static routes are configured on the customer router (to route Euca_Public_IPs to MidoNet Gateway), and on MidoNet (to use the customer router as the default route).
 Figure 4: How servers are bound to MidoNet in a PoC deployment with BGP. A BGP terminated link is required: the gateway node eth device is bound to MidoNet virtual router (when BGP is involved, the MidoNet Gateway and Eucalyptus CLC cannot be co-located). Virtual machine tap devices are bound to MidoNet virtual bridges.
If routed Euca_Public_IPs are not available, static routes on all involved nodes (L2 connectivity is required among nodes) can be used as illustrated below.
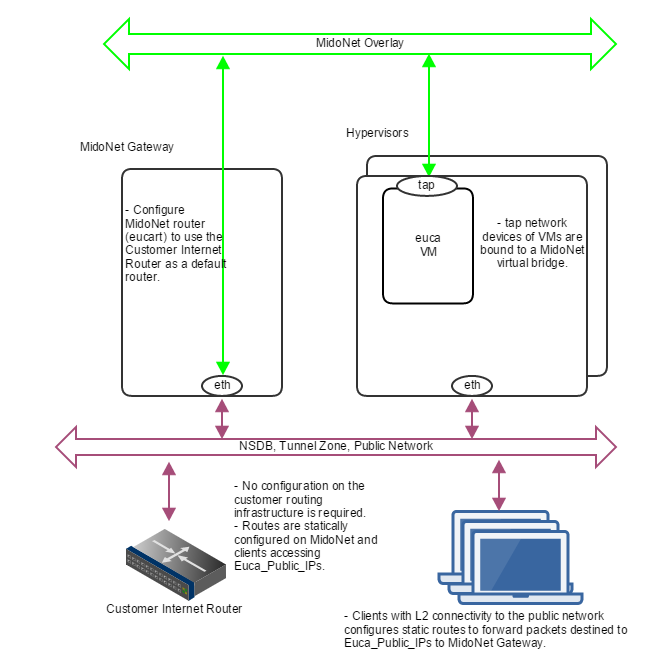 Figure 5: How servers are bound to MidoNet in a PoC deployment without routed Euca_Public_IPs. Clients that need communication with Euca_Public_IPs configure static routes using MidoNet Gateway as the router. MidoNet Gateway configures a static default route to customer router.
In the case nodes outside the public network broadcast domain (L2) needs to access Euca_Public_IPs, a setup using proxy_arp, as illustrated below, can be used.
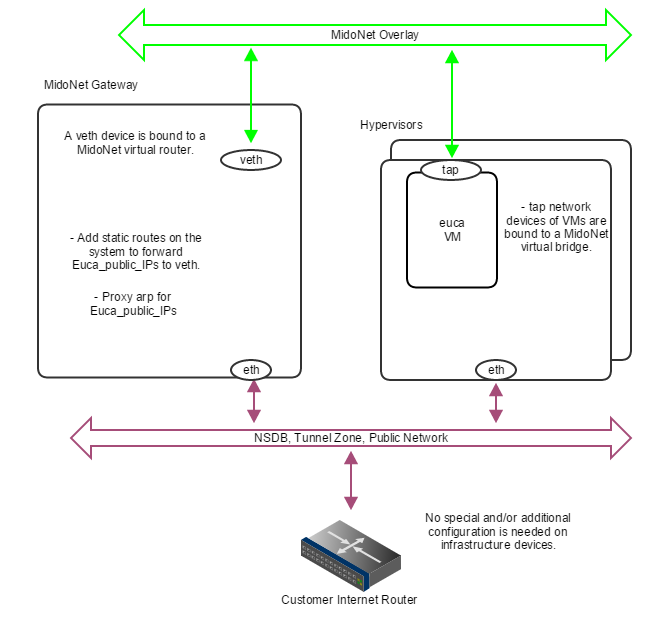 Figure 6: How servers are bound to MidoNet in a PoC deployment with proxy_arp. When routed Euca_Public_IPs are not available, the gateway node should proxy arp for public IP addresses allocated for Eucalyptus , and forward to a veth device that is bound to a MidoNet virtual router. Virtual machine tap devices are bound to MidoNet virtual bridges.
Production: Small
The Production: Small reference architecture is designed for small scale production quality deployments. It supports MidoNet NSDB fault tolerance (partial failures), and limited MidoNet Gateway failover and load balancing/sharing.
Border Gateway Protocol (BGP) terminated uplinks are recommended for production quality deployments.
Requirements
Servers:
- Four (4) or more modern Intel cores or AMD modules - exclude logical cores that share CPU resources from the count (Hyperthreads and AMD cores within a module) - for gateway nodes, 4 or more cores should be dedicated to MidoNet agent (Midolman)
- 4GB of RAM reserved for MidoNet Agent (when applicable), 8GB for Gateway nodes
- 4GB of free RAM reserved for MidoNet NSDB (when applicable)
- 4GB of free RAM reserved for MidoNet API (when applicable)
- 30GB of free disk space for NSDB (when applicable)
- Two (2) 10Gbps NICs per server
- Three (3) servers dedicated to MidoNet NSDB
- Two (2) servers as MidoNet Gateways
Physical Network:
- One (1) 10Gbps IP Network for public network (if upstream links are 1Gbps, this could be 1Gbps)
- One (1) 10Gbps IP Network for Tunnel Zone and NSDB
- Public Classless Inter-Domain Routing (CIDR) block (Euca_public_IPs)
- Two (2) BGP terminated uplinks
Limits:
- Thirty two (32) MidoNet agents (i.e., 2 Gateway nodes and 30 Hypervisors)
- Two (2) MidoNet Gateways
- Tolerate 1 NSDB server failure
- Tolerate 1 MidoNet Gateway/uplink failure
- Limited uplinks load sharing/balancing
Deployment Topology
- A 3-node cluster for NSDB (co-located ZooKeeper and Cassandra)
- eucanetd co-located with MidoNet API Server
- Two (2) MidoNet Gateway Nodes
- Hypervisors with Midolman
- One 10Gbps IP network handling NSDB and Tunnel Zone traffic
- One 10Gbps IP Network handling Public Network traffic
- API communication via loopback/localhost network
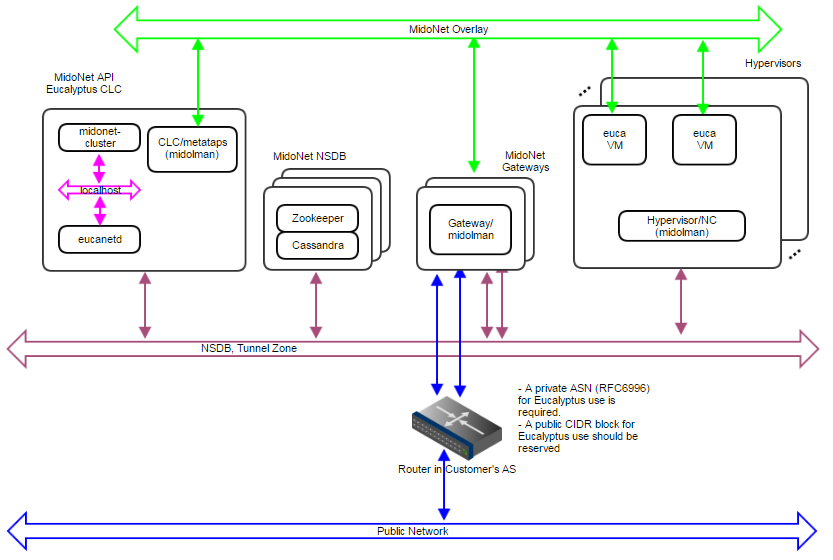 Figure 7: Production:Small deployment topology. A 10Gbps IP network carries NSDB and Tunnel Zone traffic. Another 10Gbps IP network carries Public Network traffic. A 3-node cluster for NSDB tolerates 1 server failure, and 2 gateways enable network failover and limited load balancing/sharing.
 Figure 8: How servers are bound to MidoNet in a Production:Small deployment. Gateway Nodes have physical devices bound to a MidoNet virtual router. These devices should have L2 and L3 connectivity to the Customer’s Router, and with BGP terminated links. Virtual machine tap devices are bound to MidoNet virtual bridges.
NSDB Data Replication
- NSDB is deployed in a cluster of 3 nodes
- ZooKeeper and Cassandra both have built-in data replication
- One server failure is tolerated
MidoNet Gateway Failover
- Two paths are available to and from MidoNet, and failover is handled by BGP
MidoNet Gateway Load Balancing and Sharing
- Load Balancing from MidoNet is implemented by MidoNet agents (Midolman): ports in a stateful port group with default routes out are used in a round-robin fashion.
- Partial load sharing from the Customer’s router to MidoNet can be accomplished by:
Production: Large
The Production:Large reference architecture is designed for large scale (500 to 600 MidoNet agents) production quality deployments. It supports MidoNet NSDB fault tolerance (partial failures), and MidoNet Gateway failover and load balancing/sharing.
Border Gateway Protocol (BGP) terminated uplinks are required. Each uplink should come from an independent router.
Requirements:
- Eight (8) or more modern Intel cores or AMD modules - exclude logical cores that share CPU resources from the count (Hyperthreads and AMD cores within a module) - for gateway nodes, 8 or more cores should be dedicated to MidoNet agent (Midolman)
- 4GB of RAM reserved for MidoNet Agent (when applicable), 16GB for Gateway nodes
- 4GB of free RAM reserved for MidoNet NSDB (when applicable)
- 4GB of free RAM reserved for MidoNet API (when applicable)
- 30GB of free disk space for NSDB (when applicable)
- One 1Gbps and 2 10Gbps NICs per server
- Five (5) servers dedicated to MidoNet NSDB
- Three (3) servers as MidoNet Gateways
Physical Network:
- One 1Gbps IP Network for NSDB
- One 10Gbps IP Network for public network (if upstream links are 1Gbps, this could be 1Gbps)
- One 10Gbps IP Network for Tunnel Zone
- Public Classless Inter-Domain Routing (CIDR) block (Euca_public_IPs)
- Three (3) BGP terminated uplinks, each of which coming from an independent router
- ZooKeeper performance recommendations:
Limits:
- 500 to 600 MidoNet agents
- Three (3) MidoNet Gateways
- Tolerate 1 to 2 NSDB server failures
- Tolerate 1 to 2 MidoNet Gateway/uplink failures
Deployment Topology
- A 5-node cluster for NSDB (co-located ZooKeeper and Cassandra)
- eucanetd co-located with MidoNet API Server
- Three (3) MidoNet Gateway Nodes
- Hypervisors with Midolman
- One 1Gbps IP network handling NSDB traffic
- One 10Gbps IP network handling Tunnel Zone traffic
- One 10Gbps IP network handling Public Network traffic
- API communication via loopback/localhost network
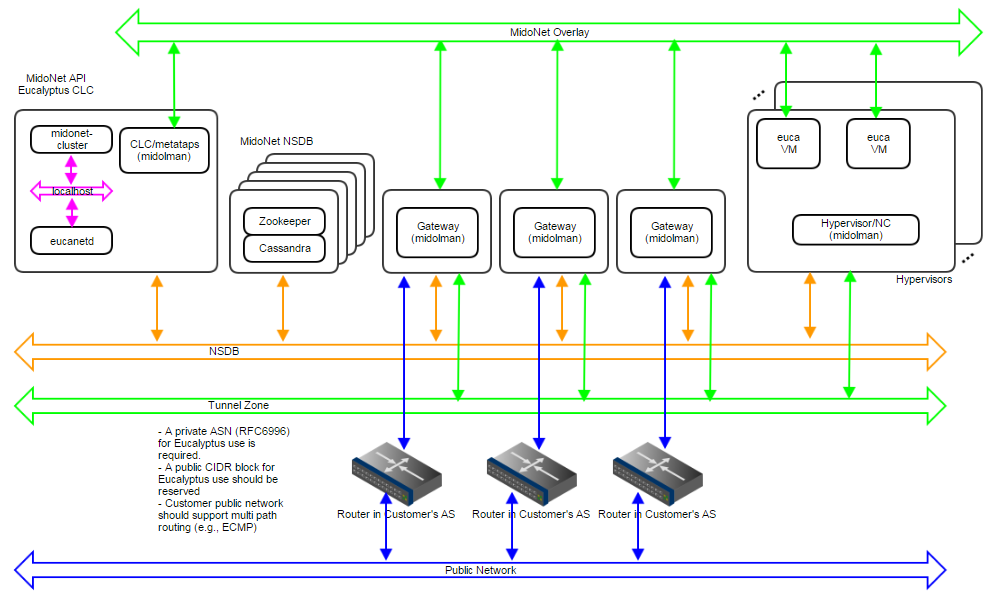 Figure 9: Production:Large deployment topology. A 1Gbps IP network carries NSDB; a 10Gbps IP network carries Tunnel Zone traffic; and another 10Gbps IP network carries Public Network traffic. A 5-node cluster for NSDB tolerates 2 server failures, and 3 gateways enable network failover and load balancing/sharing. Servers are bound to MidoNet in a way similar to Production:Small.
NSDB Data Replication
- NSDB is deployed in a cluster of 5 nodes
- ZooKeeper and Cassandra both have built-in data replication
- Up to 2 server failures tolerated
MidoNet Gateway Failover
- Three paths are available to and from MidoNet, and failover is handled by BGP
MidoNet Gateway Load Balancing/Sharing
- Load Balancing from MidoNet is implemented by MidoNet agents (Midolman): ports in a stateful port group with default routes out are used in a round-robin fashion.
- The customer AS should handle multi path routing in order to support load sharing/balancing to MidoNet; for example, Equal Cost Multi Path (ECMP).
1.4.1.7 - Prepare the Network
Prepare the Network
1.4.1.7.1 - Reserve Ports
| Port | Description |
|---|
| TCP 5005 | DEBUG ONLY: This port is used for debugging (using the –debug flag). |
| TCP 8772 | DEBUG ONLY: JMX port. This is disabled by default, and can be enabled with the –debug or –jmx options for CLOUD_OPTS. |
| TCP 8773 | Web services port for the CLC, user-facing services (UFS), object storage gateway (OSG), Walrus SC; also used for external and internal communications by the CLC and Walrus. Configurable with euctl. |
| TCP 8774 | Web services port on the CC. Configured in the eucalyptus.conf configuration file |
| TCP 8775 | Web services port on the NC. Configured in the eucalyptus.conf configuration file. |
| TCP 8777 | Database port on the CLC |
| TCP 8779 (or next available port, up to TCP 8849) | jGroups failure detection port on CLC, UFS, OSG, Walrus SC. If port 8779 is available, it will be used, otherwise, the next port in the range will be attempted until an unused port is found. |
| TCP 8888 | The default port for the Management Console. Configured in the /etc/eucalyptus-console/console.ini file. |
| TCP 16514 | TLS port on Node Controller, required for instance migrations |
| UDP 7500 | Port for diagnostic probing on CLC, UFS, OSG, Walrus SC |
| UDP 8773 | Membership port for any UFS, OSG, Walrus, and SC |
| UDP 8778 | The bind port used to establish multicast communication |
| TCP/UDP 53 | DNS port on UFS |
| UDP 63822 | eucanetd binds to localhost port 63822 and uses it to detect and avoid running multiple instances (of eucanetd) |
Note
For information about ports used by MidoNet, see the (Category OpenStack can be ignored).1.4.1.7.2 - Verify Connectivity
Note
Any firewall running on the CC must be compatible with the dynamic changes performed by when working with security groups. will flush the ‘filter’ and ’nat’ tables upon boot.Verify component connectivity by performing the following checks on the machines that will be running the listed Eucalyptus components.
Verify connection from an end-user to the CLC on TCP port 8773 Verify connection from an end-user to Walrus on TCP port 8773 Verify connection from the CLC, SC, and NC to SC on TCP port 8773 Verify connection from the CLC, SC, and NC to Walrus on TCP port 8773 Verify connection from Walrus and SC to CLC on TCP port 8777 Verify connection from CLC to CC on TCP port 8774 Verify connection from CC to NC on TCP port 8775 Verify connection from NC to Walrus on TCP port 8773. Or, you can verify the connection from the CC to Walrus on port TCP 8773, and from an NC to the CC on TCP port 8776 Verify connection from public IP addresses of Eucalyptus instances (metadata) and CC to CLC on TCP port 8773 Verify TCP connectivity between CLC, Walrus, and SC on TCP port 8779 (or the first available port in range 8779-8849) Verify connection between CLC, Walrus, and SC on UDP port 7500 Verify multicast connectivity for IP address 239.193.7.3 between CLC and UFS, OSG, Walrus, and SC on UDP port 8773 If DNS is enabled, verify connection from an end-user and instance IPs to DNS ports If you use tgt (iSCSI open source target) for EBS in DAS or Overlay modes, verify connection from NC to SC on TCP port 3260
1.4.2 - Configure Dependencies
Before you install Eucalyptus , ensure you have the appropriate dependencies installed and configured.
1.4.2.1 - Configure Bridges
To configure a bridge on CentOS 7 or RHEL 7, you need to create a file with bridge configuration (for example, ifcfg-brX) and modify the file for the physical interface (for example, ifcfg-ethX). The following steps describe how to set up a bridge on both CentOS 7 and RHEL 7. We show examples for configuring bridge devices that either obtain IP addresses using DHCP or statically.
Install the bridge-utils package.
yum install bridge-utils
Go to the /etc/sysconfig/network-scripts directory:
cd /etc/sysconfig/network-scripts
Open the network script for the device you are adding to the bridge and add your bridge device to it. The edited file should look similar to the following:
DEVICE=eth0
# change the hardware address to match the hardware address your NIC uses
HWADDR=00:16:76:D6:C9:45
ONBOOT=yes
BRIDGE=br0
NM_CONTROLLED=no
Note
The device name may vary. See the .Create a new network script in the /etc/sysconfig/network-scripts directory called ifcfg-br0 or something similar. The br0 is the name of the bridge, but this can be anything as long as the name of the file is the same as the DEVICE parameter, and the name is specified correctly in the previously created physical interface configuration (ifcfg-ethX).
Note
Choose names and use them consistently for all NCs (both the file name and the in the file).If you are using DHCP, the configuration will look similar to:
DEVICE=br0
TYPE=Bridge
BOOTPROTO=dhcp
ONBOOT=yes
DELAY=0
If you are using a static IP address, the configuration will look similar to:
DEVICE=br0
TYPE=Bridge
BOOTPROTO=static
IPADDR=static_IP_address
NETMASK=netmask
GATEWAY=gateway
ONBOOT=yes
Enter the following command:
systemctl restart network.service
1.4.2.2 - Disable FirewallD on RHEL 7
This topic describes how to stop and disable FirewallD on RHEL 7.Prerequisites
For more information, see FirewallD on RHEL 7 or FirewallD on CentOS .
To stop and disable FirewallD Check the status of the firewalld service:
systemctl status firewalld.service
The status displays as active (running) or inactive (dead) . If the firewall is active / running, enter this command to stop it:
systemctl stop firewalld.service
To completely disable the firewalld service, so it does not reload when you restart the host machine:
systemctl disable firewalld.service
Verify the status of the firewalld service:
systemctl status firewalld.service
The status should display as disabled and inactive (dead) .
firewalld.service - firewalld - dynamic firewall daemon
  Loaded: loaded (/usr/lib/systemd/system/firewalld.service; disabled; vendor preset: enabled)
  Active: inactive (dead)
Repeat these steps for all host machines. The firewalld service is stopped and disabled. You can now start the CLC and other host machines.
Postrequisites
- You should re-enable the firewall after installation is complete.
1.4.2.3 - Configure NTP
To use NTP:
Install NTP on the machines that will host Eucalyptus components.
yum install ntp
Open the /etc/ntp.conf file and add NTP servers, if necessary, as in the following example.
server 0.pool.ntp.org
server 1.pool.ntp.org
server 2.pool.ntp.org
Save and close the file. Synchronize your server.
ntpdate -u YOUR_NTP_SERVER
Configure NTP to run at reboot.
systemctl enable ntpd.service
Start NTP.
systemctl start ntpd.service
Synchronize your system clock, so that when your system is rebooted, it does not get out of sync.
hwclock --systohc
Repeat on each host machine that will run a Eucalyptus service.
1.4.2.4 - Configure Java
For the supported version of the Java Virtual Machine (JVM), see the Compatibility Matrix in the Release Notes .
As of Eucalyptus 4.3, JVM 8 is required. Eucalyptus RPM packages require java-1.8.0-openjdk, which will be installed automatically.
Note
If your network mode is VPCMIDO, MidoNet will install JVM 1.7 as a dependency (it is acceptable to have both JVM 1.7 and JVM 1.8 installed).To use Java with Eucalyptus cloud:
Open the /etc/eucalyptus/eucalyptus.conf file. Verify that the CLOUD_OPTS setting does not set –java-home , or that –java-home points to a supported JVM version.
Note
Although it is possible to set , we do not recommend it unless there is a specific reason to do so.If you are upgrading to Eucalyptus 4.3, note that Java 8 does not have permanent generation memory. Remove any JAVA_OPTS MaxPermSize settings at upgrade time. Save and close the file. Repeat on each host machine that will run a Eucalyptus service.
1.4.2.5 - Configure an MTA
You can use Sendmail, Exim, postfix, or something simpler. The MTA server does not have to be able to receive incoming mail.
Many Linux distributions satisfy this requirement with their default MTA. For details about configuring your MTA, go to the documentation for your specific product.
To test your mail relay for localhost, send email to yourself from the terminal using mail .
1.4.2.6 - Install MidoNet
Install MidoNet
Eucalyptus requires MidoNet for VPC functionality. This section describes how to install MidoNet for use with Eucalyptus.
Before you begin:
- See the Planning your Network section of the guide to create a map of how MidoNet / will be deployed into your environment.
- See the MidoNet Installation Guide to become familiar with the general MidoNet installation procedure and concepts.
1.4.2.6.1 - Prerequisites
This topic discusses the prerequisites for installing MidoNet 5.2.
You need to configure software repositories and install Network State Database (NSDB) services: ZooKeeper and Cassandra.
Repository Access
In order to use MidoNet with Eucalyptus you need to configure the MidoNet repositories.
Create /etc/yum.repos.d/midonet.repo and /etc/yum.repos.d/midonet-misc.repo on all host machines that will run MidoNet components including ZooKeeper and Cassandra. For example:
[midonet]
name=MidoNet
baseurl=http://builds.midonet.org/midonet-5.2/stable/el7/
enabled=1
gpgcheck=1
gpgkey=https://builds.midonet.org/midorepo.key
and:
[midonet-misc]
name=MidoNet 3rd Party Tools and Libraries
baseurl=http://builds.midonet.org/misc/stable/el7/
enabled=1
gpgcheck=1
gpgkey=https://builds.midonet.org/midorepo.key
See MidoNet Repository Configuration.
ZooKeeper
MidoNet uses Apache ZooKeeper to store critical path data about the virtual and physical network topology.
For a simple single-server installation, install ZooKeeper on any server that is IP accessible from all Midolman agents (for example: on the CLC host machine itself). You can also cluster ZooKeeper for fault tolerance. See MidoNet NSDB ZooKeeper Installation.
Enable and start the ZooKeeper service before installing the other MidoNet services.
Cassandra
MidoNet uses Apache Cassandra to store flow state information.
For a simple single-server installation, install Cassandra on any server that is IP accessible from all Midolman agents (for example: on the CLC host machine itself). You can also cluster Cassandra for fault tolerance. See MidoNet NSDB Cassandra Installation.
Enable and start the Cassandra service before installing the other MidoNet services.
1.4.2.6.2 - MidoNet Component Topology
This topic lists topology recommendations for installing MidoNet.
Note
See [Understanding VPCMIDO and MidoNet]https://www.eucastack.io/docs/install_guide/eucalyptus/planning/planning_networking_modes/preparing_vpc_midonet/ for more information on MidoNet.- The midonet-api must run co-located with the Cloud Controller (CLC).
- Each Node Controller (NC) must run a Midolman agent.
- The Cloud Controller (CLC) must run a Midolman agent.
- It is recommended that your User Facing Services (UFS) host be used as the MidoNet Gateway (i.e., running a Midolman agent) when configuring .
- The network interface(s) specified as * (in the configuration file) should be dedicated for /MidoNet (for configuration/operation/use).
- /MidoNet expects exclusive use of the network interface specified in .
- If the main network interface of a server is specified in , most likely the connectivity to that server will be lost once is deployed.
Network YAML Example
Note
The older (JSON) network configuration format is still accepted, however the YAML format is recommended.The following Eucalyptus network YAML file shows a sample VPCMIDO mode configuration:
Mode: VPCMIDO

InstanceDnsServers:
- "10.10.10.1"

PublicIps:
- "1.A.B.1-1.A.B.255"

Mido:
  Gateways:
  - ExternalCidr: "172.19.0.0/30"
    ExternalDevice: "veth1"
    ExternalIp: "172.19.0.2"
    ExternalRouterIp: "172.19.0.1"
    Ip: "10.10.10.1"
Where 1.A.B.1-1.A.B.255 represents the public IP address range for your cloud.
1.4.2.6.3 - Install MidoNet for Eucalyptus
This topic shows how to install MidoNet for use in your Eucalyptus cloud.
Install the MidoNet Cluster on the Cloud Controller (CLC)
This topic describes how to install the MidoNet Cluster. MidoNet Cluster services provide a means to manage MidoNet functions that MidoNet agents (Midolman) are unable to perform on their own. MidoNet Cluster services include state synchronization of VxLAN gateways and the MidoNet REST API. A MidoNet v5 deployment requires at least one MidoNet cluster node, and it must be co-located on the CLC host machine in Eucalyptus deployments. For security reasons, the MidoNet REST API is accessed only on the CLC (localhost interface).
To install the MidoNet Cluster on the CLC
Add the MidoNet repo file as described in Prerequisites . Install MidoNet Cluster packages.
yum install midonet-cluster python-midonetclient
Edit the /etc/midonet/midonet.conf file to set the ZooKeeper host IP(s). Replace ZOOKEEPER_HOST_IP in the following example:
[zookeeper]
zookeeper_hosts = ZOOKEEPER_HOST_IP:2181
Configure cloud-wide access to the NSDB services:
cat << EOF | mn-conf set -t default
zookeeper {
  zookeeper_hosts = “ZOOKEEPER_HOST:2181"
}

cassandra {
  servers = “CASSANDRA_HOST"
}
EOF
Enable and start the MidoNet Cluster:
systemctl enable midonet-cluster.service
systemctl start midonet-cluster.service
Set the midonet-api end point:
mn-conf set cluster.rest_api.http_port=8080
mn-conf set cluster.rest_api.http_host="127.0.0.1"
Restart the Midonet Cluster so the rest_api parameters take effect:
systemctl restart midonet-cluster.service
Install Midolman on components
This topic describes how to install the Midolman agent. Midolman is the MidoNet Agent, which is a daemon that runs on all hosts where traffic enters and leaves MidoNet. The Midolman agent is required on the Cloud Controller (CLC), Node Controllers (NCs), and any host that is a MidoNet Gateway node (e.g., UFS).
To install Midolman agent
Edit the /etc/midolman/midolman.conf file to set the ZooKeeper host IP(s). Replace ZOOKEEPER_HOST_IP in the following example:
[zookeeper]
zookeeper_hosts = ZOOKEEPER_HOST_IP:2181
Enable and start Midolman:
systemctl enable midolman.service
systemctl start midolman.service
Configure a Midolman resource usage template. For large Eucalyptus clouds, use the agent-compute-large template. For standard (small or medium) Eucalyptus clouds, use the default template. For gateway nodes, use the agent-gateway templates.
Note
For production environments, large templates are recommended.See the Midolman Installation documentation for more information.
Choose the Midolman resource usage template name, based on the size and type of installation:
agent-compute-large
agent-compute-medium
agent-gateway-large
agent-gateway-medium
default
Run this command, replacing TEMPLATE_NAME with your chosen template:
mn-conf template-set -h local -t TEMPLATE_NAME
Create a tunnel zone in MidoNet and add hosts
This topic describes how to create a MidoNet tunnel zone. In MidoNet, a tunnel zone is an isolation zone for hosts. Physical hosts that are members of a given tunnel zone communicate directly with one another and establish network tunnels as needed, and on demand. These network tunnels are used to transport overlay traffic (e.g., inter-VM communication) and isolate the underlay physical network communication (i.e., inter-physical hosts communication). On a Eucalyptus deployment, one MidoNet tunnel zone is expected with the IP address on the physical network designated to carry VM traffic being used when configuring its members. Eucalyptus accepts the following tunnel zone names:
- eucatz
- euca-tz
- midotz
- mido-tz
For more information, see What are Tunnel Zones?
To create a tunnel zone in MidoNet
Log into the MidoNet shell. For example:
midonet-cli -A --midonet-url=http://127.0.0.1:8080/midonet-api
Create a GRE tunnel zone:
[root@clcfrontend mido-docs]# midonet-cli -A --midonet-url=http://127.0.0.1:8080/midonet-api
midonet> tunnel-zone add name eucatz type gre
midonet> tunnel-zone list
tzone tzone0 name eucatz type gre
midonet> host list
host host0 name node1 alive true
host host1 name clcfrontend alive true
host host2 name node2 alive true
You should see a host listed for each of your Node Controllers and for your User Facing Service host; if not, check the /var/log/midolman/midolman.log log file on the missing hosts to ensure there are no error messages.
After verifying all your hosts are listed, add each host to your tunnel zone as follows. Replace HOST_N_IP with the IP of your Node Controller or User Facing Service host that you used to register the component with Eucalyptus :
midonet> tunnel-zone tzone0 add member host host0 address HOST_0_IP
midonet> tunnel-zone tzone0 add member host host1 address HOST_1_IP
midonet> tunnel-zone tzone0 add member host host2 address HOST_2_IP
You are now ready to install and configure Eucalyptus to use this MidoNet installation.
Additional ZooKeeper Configuration
Ongoing data directory cleanup is required for ZooKeeper. The following parameters should be added in /etc/zookeeper/zoo.cfg for automatic purging of the snapshots and corresponding transaction logs:
autopurge.snapRetainCount=3  # The number of snapshots to retain in dataDir
autopurge.purgeInterval=1  # Purge task interval in hours
For more information, see ZooKeeper Admin Guide, Ongoing Data Directory Cleanup.
1.4.3 - Install Repositories
Install Repositories
This section guides you through installing Eucalyptus from RPM package downloads.The first step to installing Eucalyptus is to download the RPM packages. When you’re ready, continue to Software Signing .
The following terminology might help you as you proceed through this section.
Eucalyptus open source software — Eucalyptus release packages and dependencies, which enable you to deploy a Eucalyptus cloud.
Euca2ools CLI — Euca2ools is the Eucalyptus command line interface for interacting with web services. It is compatible with many Amazon AWS services, so can be used with Eucalyptus as well as AWS.
RPM and YUM and software signing — Eucalyptus CentOS and RHEL download packages are in RPM (Red Hat Package Manager) format and use the YUM package management tool. We use GPG keys to sign our software packages and package repositories.
EPEL software — EPEL (Extra Packages for Enterprise Linux) are free, open source software, which is fully separated from licensed RHEL distribution. It requires its own package.
1.4.3.1 - Software Signing
This topic describes Eucalyptus software signing keys.We use a number of GPG keys to sign our software packages and package repositories. The necessary public keys are provided with the relevant products and can be used to automatically verify software updates. You can also verify the packages or package repositories manually using the keys on this page.
Use the rpm --checksig command on a download file to verify a RPM package for an Eucalyptus product. For example:
rpm --checksig -v myfilename.rpm
Follow the procedure detailed on Debian’s SecureApt web page to verify a deb package for an Eucalyptus product.
Please do not use package signing keys to encrypt email messages.
The following keys are used for signing Eucalyptus software:
c1240596: Eucalyptus Systems, Inc. (release key) security@eucalyptus.com
This key is used for signing Eucalyptus products released after July 2011 and their updates.
0260cf4e: Eucalyptus Systems, Inc. (pre-release key) security@eucalyptus.com
This key is used for signing Eucalyptus pre-release products due for release after July 2011.
9d7b073c: Eucalyptus Systems, Inc. (nightly release key) security@eucalyptus.com
This key is used for signing nightly builds of Eucalyptus products published after July 2011.
1.4.3.2 - Install Eucalyptus Release Packages
To install Eucalyptus from release packages, perform the tasks listed in this topic.
Prerequisites
- The prerequisite hardware and software should be in place.
To install Eucalyptus from release packages
Configure the Eucalyptus package repository on each host machine that will run a Eucalyptus service:
yum install https://downloads.eucalyptus.cloud/software/eucalyptus/5/rhel/7/x86_64/eucalyptus-release-5-1.11.as.el7.noarch.rpm
Enter y when prompted to install this package.
Configure the Euca2ools package repository on each host machine that will run a Eucalyptus service or Euca2ools:
yum install https://downloads.eucalyptus.cloud/software/euca2ools/3.4/rhel/7/x86_64/euca2ools-release-3.4-2.2.as.el7.noarch.rpm
Enter y when prompted to install this package.
Configure the EPEL package repository on each host machine that will run a Eucalyptus service or Euca2ools:
yum install epel-release
Enter y when prompted to install this package.
If you are installing on RHEL 7, you must enable the Optional repository in Red Hat Network for each NC, as follows: Go to http://rhn.redhat.com and navigate to the system that will run the NC. Click Alter Channel Subscriptions . Make sure the RHEL Server Optional check-box is selected. Click Change Subscriptions .
On CentOS enable the QEMU Enterprise Virtualization repository for each NC:
yum install centos-release-qemu-ev
The following steps should be performed on each NC host machine. Install the Eucalyptus Node Controller software on each NC host:
yum install eucalyptus-node
Remove the default libvirt network. This step allows the eucanetd dhcpd server to start.
virsh net-destroy default
virsh net-autostart default --disable
Check that the KVM device node has proper permissions. Run the following command:
ls -l /dev/kvm
Verify the output shows that the device node is owned by user root and group kvm.
crw-rw-rw- 1 root kvm 10, 232 Nov 30 10:27 /dev/kvm
If your KVM device node does not have proper permissions, you need to reboot your NC host.
On each CLC host machine, install the Eucalyptus Cloud Controller software.
yum install eucalyptus-cloud
Install the backend service image package on the machine hosting the CLC:
yum install eucalyptus-service-image
This installs worker images for both the load balancer and imaging services. On the UFS host machine, install the Eucalyptus Cloud Controller software.
yum install eucalyptus-cloud
(Optional) On the UFS host machine, also install the Management Console.
yum install eucaconsole
The Management Console can run on any host machine, even one that does not have other Eucalyptus services . Install the software for the remaining Eucalyptus services. The following example shows services being installed on the same host machine.
yum install eucalyptus-cluster eucalyptus-sc eucalyptus-walrus
This installs the cloud controller (CC), storage controller (SC), and Walrus Backend (Optional) services.
Your package installation is complete. You are now ready to Configure Eucalyptus .
1.4.4 - Configure Eucalyptus
This section describes the parameters you need to set in order to launch Eucalyptus for the first time.
The first launch of Eucalyptus is different than a restart of a previously running Eucalyptus deployment in that it sets up the security mechanisms that will be used by the installation to ensure system integrity.
Eucalyptus configuration is stored in a text file, /etc/eucalyptus/eucalyptus.conf, that contains key-value pairs specifying various configuration parameters.
Note
Perform the following tasks after you install software, but before you start the services.1.4.4.1 - Configure SELinux
We recommend enabling SELinux on host systems running Eucalyptus 4.4 services to improve their security on RHEL 7. Enabling SELinux, as described in this topic, can help contain break-ins. For more information, see RedHat SELinux documentation.
You need to set boolean values on Storage Controller (SC) and Management Console host machines. If your network mode is VPCMIDO, you also set a boolean value on the Cloud Controller (CLC) host machines. To configure SELinux on Eucalyptus 4.4 :
On each Storage Controller (SC) host machine, run the following command:
setsebool -P eucalyptus_storage_controller 1
This allows Eucalyptus to manage EBS volumes.
On each Management Console host machine, run the following command:
setsebool -P httpd_can_network_connect 1
This allows the Management Console’s HTTP proxy to access the back end.
Note
If you can’t access the console after starting it, this KB article might help: .If your cloud uses VPCMIDO networking mode, on the Cloud Controller (CLC), run the following command:
setsebool -P httpd_can_network_connect 1
This allows the CLC’s HTTP proxy to access the back end.
SELinux is now configured and ready to use with your Eucalyptus 4.4 cloud.
1.4.4.2 - Configure Network Modes
This section provides configuration instructions for Eucalyptus networking modes. Eucalyptus overlays a virtual network on top of your existing network. In order to do this, Eucalyptus supports these networking modes: EDGE (AWS EC2 Classic compatible) and VPCMIDO (AWS VPC compatible).
1.4.4.2.1 - Configure EDGE Network Mode
This topic provides configuration instructions for Eucalyptus EDGE network mode. Eucalyptus requires network connectivity between its clients (end-users) and the cloud components (e.g., CC, CLC, and Walrus).
To configure Eucalyptus for EDGE mode, most networking configuration is handled through settings in a global Cloud Controller (CLC) property file.
The /etc/eucalyptus/eucalyptus.conf file contains some network-related options in the “Networking Configuration” section. These options use the prefix VNET_. The most commonly used VNET options are described in the following table.
The most commonly used VNET options are described in the following table.
| Option | Description | Component |
|---|
| VNET_BRIDGE | This is the name of the bridge interface to which instances’ network interfaces should attach. A physical interface that can reach the CC must be attached to this bridge. Common setting for KVM is br0. | Node Controller |
| VNET_DHCPDAEMON | The ISC DHCP executable to use. This is set to a distro-dependent value by packaging. The internal default is /usr/sbin/dhcpd3. | Node Controller |
| VNET_MODE | The networking mode in which to run. The same mode must be specified on all CCs and NCs in your cloud. Valid values: EDGE | All CCs and NCs |
| VNET_PRIVINTERFACE | The name of the network interface that is on the same network as the NCs. Default: eth0 | Node Controller |
| VNET_PUBINTERFACE | This is the name of the network interface that is connected to the same network as the CC. Depending on the hypervisor’s configuration this may be a bridge or a physical interface that is attached to the bridge. Default: eth0 | Node Controller |
You must edit eucalyptus.conf on the Cluster Controller (CC) and Node Controller (NC) hosts. You must also create a network configuration file and upload it the Cloud Controller (CLC).
CC Configuration
Log in to the CC and open the /etc/eucalyptus/eucalyptus.conf file. Go to the Network Configuration section, uncomment and set the following:
VNET_MODE="EDGE"
Save the file. Repeat on each CC in your cloud.
NC Configuration
Log into an NC machine and open the /etc/eucalyptus/eucalyptus.conf file. Go to the Network Configuration section, uncomment and set the following parameters:
VNET_MODE
VNET_PRIVINTERFACE
VNET_PUBINTERFACE
VNET_BRIDGE
VNET_DHCPDAEMON
For example:
VNET_MODE="EDGE"
VNET_PRIVINTERFACE="br0"
VNET_PUBINTERFACE="br0"
VNET_BRIDGE="br0"
VNET_DHCPDAEMON="/usr/sbin/dhcpd"
Save the file. Repeat on each NC.
Cloud Configuration
To configure the rest of the EDGE mode parameters, you must create a network.yaml configuration file. Later in the installation process you will Upload the Network Configuration to the CLC.
Create the network configuration file. Open a text editor. Create a file similar to the following structure.
# A list of servers that instances receive to resolve DNS names
InstanceDnsServers:
- ""

# List of public IP addresses or address ranges
PublicIps:
- ""

# A list of cluster objects that define each availability zone (AZ) in your cloud
Clusters:
-
  # Name of the cluster as it was registered
  Name: ""

  # Subnet definition that this cluster will use for private addressing
  Subnet:
    # Arbitrary name for the subnet
    Name: ""

    # The subnet that will be used for private addressing
    Subnet: ""

    # Netmask for the subnet defined above
    Netmask: ""

    # Gateway that will route packets for the private subnet
    Gateway: ""

  # List of Private IP addresses or address ranges for instances
  PrivateIps:
  - ""
Save the network.json file. The following example is for a setup with one cluster (AZ), called PARTI00, with a flat network topology.
InstanceDnsServers:
- "10.1.1.254"

PublicIps:
- "10.111.101.84"
- "10.111.101.91-10.111.101.93"

Clusters:
- Name: PARTI00

  Subnet:
    Name: "10.111.0.0"
    Subnet: "10.111.0.0"
    Netmask: "255.255.0.0"
    Gateway: "10.111.0.1"

  PrivateIps:
  - "10.111.101.94"
  - "10.111.101.95"
For a multi-cluster deployment, add an additional cluster to your configuration for each cluster you have. The following example has an two clusters, PARTI00 and PARTI01.
InstanceDnsServers:
- "10.1.1.254"

PublicIps:
- "10.111.101.84"
- "10.111.101.91-10.111.101.93"

Clusters:
- Name: PARTI00

  Subnet:
    Name: "10.111.0.0"
    Subnet: "10.111.0.0"
    Netmask: "255.255.0.0"
    Gateway: "10.111.0.1"

  PrivateIps:
  - "10.111.101.94"
  - "10.111.101.95"

- Name: PARTI01

  Subnet:
    Name: "10.111.0.0"
    Subnet: "10.111.0.0"
    Netmask: "255.255.0.0"
    Gateway: "10.111.0.1"

  PrivateIps:
  - "10.111.101.96"
  - "10.111.101.97"
1.4.4.2.2 - Configure VPCMIDO Network Mode
This topic provides configuration instructions for Eucalyptus VPCMIDO network mode. Eucalyptus requires network connectivity between its clients (end-users) and the cloud components (e.g., CC, CLC, and storage).
To configure VPCMIDO mode parameters, you must create a network.yaml configuration file. Later in the installation process you will Upload the Network Configuration to the CLC.
Create the network configuration file. Open a text editor. Create a file similar to the following structure. This example demonstrates two gateways and two BGP peers (sections relevant to VPCMIDO are shown here).
Mode: VPCMIDO

PublicIps:
- "10.116.150.10-10.116.150.254"
- "10.117.150.10-10.117.150.254"

Mido:
  BgpAsn: "64512"
  Gateways:
  - Ip: "10.111.5.11"
    ExternalDevice: "em1.116"
    ExternalCidr: "10.116.128.0/17"
    ExternalIp: "10.116.133.11"
    BgpPeerIp: "10.116.133.173"
    BgpPeerAsn: "65000"
    BgpAdRoutes:
    - "10.116.150.0/24"
  - Ip: "10.111.5.22"
    ExternalDevice: "em1.117"
    ExternalCidr: "10.117.128.0/17"
    ExternalIp: "10.117.133.22"
    BgpPeerIp: "10.117.133.173"
    BgpPeerAsn: "65001"
    BgpAdRoutes:
    - "10.117.150.0/24"
Save the network.yaml file. The following example demonstrates a gateway with static routing configuration.
Mode: VPCMIDO

PublicIps:
- "10.116.150.10-10.116.150.254"

Mido:
  Gateways:
  - Ip: "10.111.5.11"
    ExternalDevice: "em1.116"
    ExternalCidr: "10.116.128.0/17"
    ExternalIp: "10.116.133.11"
    ExternalRouterIp: "10.116.133.173"
1.4.4.2.2.1 - VPCMIDO Gateway Configuration Parameters
This topic provides detailed configuration parameter information for Eucalyptus VPCMIDO network mode.
VPCMIDO Gateway Configuration
The following table provides a list of VPCMIDO parameters.
| Parameter | Description | Validation |
|---|
| BgpAsn | (Optional) Global BGP configuration *BGP Autonomous System Number assigned (to be decided by administrator/installer) for this VPCMIDO deployment. Private ASN range should be used:16-bit: 64512 - 6553432-bit: 131072 - 4199999999 (RFC6996) | Private use blocks recommended, but owners of public ASNs can use public ASNs or other blocks if they wish.Valid range is 1 - 4294967295. |
| Gateways | (The VPCMIDO gateway parameters are below.) | Per MidoNet/BGP limitation, a maximum of 6 MidoGateways can be used. |
| Ip | Internal IP address of Mido Gateway (not to be confused with the IP address of the gateway interface used in external communications). Note: Replaces 4.3 GatewayHost parameter. | Must be a valid IP address.Must be a live IP address configured on the machine. |
| ExternalDevice | Device name of Mido Gateway interface that is physically connected to the external network (i.e., has L2 connectivity to the infrastructure router or BGP peer). This interface is dedicated for MidoNet use (Mido Gateway Operating System should not have control of this device). Note: Replaces 4.3 GatewayInterface parameter. | Must be a valid network interface connected to the network where L2 communication with BgpPeerIp (or ExternalRouterIp) can be established. |
| ExternalCidr | CIDR block used in the external routing. Note: Replaces 4.3 PublicNetworkCidr parameter. | Must be a valid CIDR block. |
| ExternalIp | IP address to be configured on ExternalDevice by eucanetd. Its subnet is as specified in ExternalCidr (ExternalCidr must contain ExternalIp). Note: Replaces 4.3 GatewayIP parameter. | Must be a valid and unused IP address.Must be within ExternalCidr.Must not be a network or broadcast address. |
| ExternalRouterIp | IP address of an external router (for static configuration). This is the router IP address used in default routes for traffic originating from MidoNet. Note: Partially replaces 4.3 PublicGatewayIp parameter. | Must be a valid and unused IP address.Must be within ExternalCidr.Must not be a network or broadcast address.Either ExternalRouterIp or BgpPeerIp is required. |
| BgpPeerIp | (Optional) BGP configuration * IP address of a BGP peer. This is the IP address to where MidoNet router will attempt to establish a BGP session.Note: Partially replaces 4.3 PublicGatewayIp parameter. | Must be a valid and unused IP address.Must be within ExternalCidr.Must not be a network or broadcast address.Either ExternalRouterIp or BgpPeerIp is required. |
| BgpPeerAsn | (Optional) BGP configuration * BGP peer ASN for this MidoGateway. | Valid range is 1 - 4294967295. |
| BgpAdRoutes | (Optional) BGP configuration * A list of CIDR blocks delegated to this VPCMIDO deployment. VPCMIDO BGP will be configured to advertise these routes. public IPs must be within these CIDR blocks. The same list can be used for all MidoGateways. The advantage of having a separate list per MidoGateway is that it allows different MidoGateways to be responsible for different CIDR blocks. If the same list of CIDR blocks is used for all MidoGateways, MidoNet built-in load sharing/balancing mechanism is used. | Each entry must be a valid CIDR block. |
| PublicIps | The public IP address ranges associated with VPCMIDO. | With BGP: Each public IP must be within one of the CIDR blocks in the union of all BgpAdRoutes entries.Must be a valid IP address range.Must not contain network or broadcast address of the CIDR blocks in the union of all BgpAdRoutes.Without BGP: On-premise infrastructure must route all PublicIps to one of the MidoGateways. |
Gateways with BGP require BgpPeerAsn , BgpAdRoutes , and BgpAsn . If all gateways are static (no BGP), BgpAsn is optional. A gateway with BGP has BgpPeerAsn and BgpAdRoutes parameters; a static gateway does not.
1.4.4.3 - Create Scheduling Policy
This topic describes how to set up the Cluster Controller (CC) to choose which Node Controller (NC) to run each new instance.In the CC, open the /etc/eucalyptus/eucalyptus.conf file. In the SCHEDPOLICY= parameter, set the value to one of the following: GREEDY When the CC receives a new instance run request, it runs the instance on the first NC in an ordered list of NCs that has capacity to run the instance. At partial capacity with some amount of churn, this policy generally results in a steady state over time where some nodes are running many instances, and some nodes are running few or no instances. ROUNDROBIN (Default) When the CC receives a new instance run request, it runs the instance on the next NC in an ordered list of NCs that has capacity. The next NC is determined by the last NC to have received an instance. At partial capacity with some amount of churn, this policy generally results in a steady state over time where instances are more evenly distributed across the set of NCs. Save the file.
1.4.5 - Start Eucalyptus
Start
Start the Eucalyptus services in the order presented in this section. Make sure that each host machine you installed a Eucalyptus service on resolves to an IP address. Edit the /etc/hosts file if necessary.
1.4.5.1 - Start the CLC
Prerequisites You should have installed and configured Eucalyptus before starting the CLC.
To initialize and start the CLC
Log in to the Cloud Controller (CLC) host machine. Enter the following command to initialize the CLC:
Note
If you are upgrading and you just restored your cloud data, do not initialize the CLC; skip this step.Note
Make sure that the process is running before executing this command.clcadmin-initialize-cloud
This command might take a minute or more to finish. If it fails, check /var/log/eucalyptus/cloud-output.log . If you want the CLC service to start at each boot-time, run this command:
systemctl enable eucalyptus-cloud.service
Enter the following command to start the CLC:
systemctl start eucalyptus-cloud.service
If you are running in VPCMIDO networking mode: If you want the eucanetd service to start at each boot-time, run this command:
systemctl enable eucanetd.service
Start the eucanetd service:
systemctl start eucanetd.service
1.4.5.2 - Start the UFS
Prerequisites You should have installed and configured Eucalyptus before starting the UFS.
To start the UFS
Log in to the User-Facing Services (UFS) host machine. If you want the UFS service to start at each boot-time, run this command:
systemctl enable eucalyptus-cloud.service
Enter the following command to start the UFS:
systemctl start eucalyptus-cloud.service
Repeat for each UFS host machine.
1.4.5.3 - Start Walrus
Prerequisites
You should have installed and configured Eucalyptus before starting the Walrus Backend.
Note
If you not using Walrus as your object storage backend, or if you installed Walrus on the same host as the CLC, you can skip this.To start the Walrus
If you want the Walrus Backend service to start at each boot-time, run this command:
systemctl enable eucalyptus-cloud.service
Log in to the Walrus Backend host machine and enter the following command:
systemctl start eucalyptus-cloud.service
1.4.5.4 - Start the CC
Prerequisites
You should have installed and configured Eucalyptus before starting the CC.
To start the CC
Log in to the Cluster Controller (CC) host machine. If you want the CC service to start at each boot-time, run this command:
systemctl enable eucalyptus-cluster.service
Enter the following command to start the CC:
systemctl start eucalyptus-cluster.service
If you have a multi-zone setup, repeat this step on the CC in each zone.
1.4.5.5 - Start the SC
Prerequisites
You should have installed and configured Eucalyptus before starting the SC.
Note
If you are re-installing the SC, restart the tgt (iSCSI open source target) daemon.Note
If you installed SC on the same host as the CLC, you can skip this.To start the SC
Log in to the Storage Controller (SC) host machine. If you want the SC service to start at each boot-time, run this command:
systemctl enable eucalyptus-cloud.service
If you want the tgtd service to start at each boot-time, run this command:
systemctl enable tgtd.service
Note
depends on tgtd to create and manage block storage volumes when the storage provider is either DAS or Overlay.Enter the following commands to start the SC:
systemctl start tgtd.service

systemctl start eucalyptus-cloud.service
If you have a multi-zone setup, repeat this step on the SC in each zone.
1.4.5.6 - Start the NC
Prerequisites You should have installed and configured Eucalyptus before starting the NC.
To start the NC
Log in to the Node Controller (NC) host machine. If you want the NC service to start at each boot-time, run this command:
systemctl enable eucalyptus-node.service
Enter the following command to start the NC:
systemctl start eucalyptus-node.service
If you are running in EDGE networking mode: If you want the eucanetd service to start at each boot-time, run this command:
systemctl enable eucanetd.service
Start the eucanetd service:
systemctl start eucanetd.service
Repeat for each NC host machine.
1.4.5.7 - Start the Management Console
Note
If you plan on running multiple Management Console host machines, we recommend turning off the default memcached in your console.ini file.Log in to the Management Console host machine. If you want the console service to start at each boot-time, run this command:
systemctl enable eucaconsole.service
Enter the following command to start the console:
systemctl start eucaconsole.service
Repeat for each Management Console host machine.
1.4.5.8 - Verify the Startup
At this point, all Eucalyptus services are enabled and starting up. Some of these services perform intensive initialization at start-up, particularly the first time they are started. You might have to wait a few minutes until they are fully operational.
One quick way to determine if the components are running is to run netstat on the various hosts and look to see when the service ports are allocated to a process. Specifically, the CLC, Walrus, and the SC allocate ports 8773. The CC listens to port 8774, and the NC uses port 8775.
Verify that everything has started without error. Expected outcomes include:
- The CLC is listening on port 8773
- Walrus is listening on port 8773
- The SC is listening on port 8773
- The CC is listening on port 8774
- The NCs are listening on port 8775
- Log files are being written to
1.4.6 - Register Eucalyptus Services
Register Services
This section describes how to register Eucalyptus services.
Note
If you are upgrading, proceed to the section. (You don’t need to register the rest (e.g., UFS, Walrus, etc.) during the non-NC upgrade, because those registrations are already listed in the cloud database, which you recovered before getting here.)Eucalyptus implements a secure protocol for registering separate services so that the overall system cannot be tricked into including a service run by an unauthorized administrator or user.
You need only register services once. Most registration commands run on the CLC server.
Note that each registration command will attempt an SSH as root to the remote physical host where the registering service is assumed to be running. The registration command also contacts the service so it must be running at the time the command is issued. If a password is required to allow SSH access, the command will prompt the user for it.
Registration commands need the following information:
- The of service you are registering. Required. For example: .
- The of the service being registered. Required. The host must be specified by IP address to function correctly.
- The the service belongs to. This is roughly equivalent to the availability zone in AWS.
- The you assign to each instance of a service, up to 256 characters. Required. This is the name used to identify the service in a human-friendly way. This name is also used when reporting system state changes that require administrator attention.
1.4.6.1 - Register User-Facing Services
This topic describes how to register the User-Facing Services (UFS) with the Cloud Controller (CLC).
Prerequisites
- The Cloud Controller must be properly installed and started.
- The User-Facing Services must be properly installed and started.
To register the User-Facing Services with the Eucalyptus cloud
On the CLC host machine, obtain your temporary access keys for the Eucalyptus set up by running the following command:
eval `clcadmin-assume-system-credentials`
Note
You will create longer-lived and fully functional access keys later.Also on the CLC host machine, run the following command:
euserv-register-service -t user-api -h IP SVCINSTANCE
where:
SVCINSTANCE is the IP address of the UFS you are registering.- must be a unique name for the User-Facing service.
For example:
euserv-register-service -t user-api -h 10.111.5.183 user-api-1
Repeat for each UFS host, replacing the UFS IP address and UFS name. Copy the security credentials from the CLC to each machine running User-Facing Services. Run this command on the CLC host machine:
clcadmin-copy-keys HOST [HOST ...]
For example:
clcadmin-copy-keys 10.111.5.183
Verify that the User-Facing service is registered with the following command for each instance of the UFS:
euserv-describe-services SVCINSTANCE
The registered UFS instances are now ready for your cloud.
1.4.6.2 - Register the Walrus Backend
This topic describes how to register the Walrus Backend service with the Cloud Controller (CLC).
Prerequisites
- You must be using the Walrus Backend service as your object storage provider.
- The Cloud Controller must be properly installed and started.
To register the Walrus Backend service with the Eucalyptus cloud
Note
This task is not necessary if you are using Riak CS instead of Walrus.On the CLC host machine, run the following command:
euserv-register-service -t walrusbackend -h IP SVCINSTANCE
where:
SVCINSTANCE is the IP of the Walrus Backend you are registering with this CLC.- must be a unique name for the Walrus Backend service. We recommend that you use a short-hand name of the hostname or IP address of the machine.
For example:
euserv-register-service -t walrusbackend -h 10.111.5.182 walrus-10.111.5.182
Copy the security credentials from the CLC to each machine running a Walrus Backend service. Run this command on the CLC host machine:
clcadmin-copy-keys HOST [HOST ...]
For example:
clcadmin-copy-keys 10.111.5.182
Verify that the Walrus Backend service is registered with the following command:
euserv-describe-services SVCINSTANCE
The registered Walrus Backend service is now ready for your cloud.
1.4.6.3 - Register the Cluster Controller
This topic describes how to register a Cluster Controller (CC) with the Cloud Controller (CLC).
Prerequisites
- The Cloud Controller must be properly installed and started.
- The Cluster Controller service must be properly installed and started.
To register the Cluster Controller service with the Eucalyptus cloud
On the CLC host machine, run the following command:
euserv-register-service -t cluster -h IP -z ZONE SVCINSTANCE
where:
SVCINSTANCE is the IP address of the CC you are registering with this CLC.- name should be a descriptive name for the zone controlled by the CC. For example: .
- must be a unique name for the CC service. We recommend that you use the IP address of the machine
For example:
euserv-register-service -t cluster -h 10.111.5.182 -z zone-1 cc-10.111.5.182
Copy the security credentials from the CLC to each machine running Cluster Controller services. Run this command on the CLC host machine:
clcadmin-copy-keys -z ZONE HOST
For example:
clcadmin-copy-keys -z zone-1 10.111.5.182
Repeat the above steps for each Cluster Controller in each zone. Verify that the Cluster Controller service is registered with the following command:
euserv-describe-services SVCINSTANCE
The registered Cluster Controller service is now ready for your cloud.
1.4.6.4 - Register the Storage Controller
This topic describes how to register a Storage Controller (SC) with the Cloud Controller (CLC).
Prerequisites
- The Cloud Controller must be properly installed and started.
- The Storage Controller service must be properly installed and started.
To register the Storage Controller service with the Eucalyptus cloud
Copy the security credentials from the CLC to each machine running Storage Controller services. Run this command on the CLC host machine:
clcadmin-copy-keys -z ZONE HOST
For example:
clcadmin-copy-keys -z zone-1 10.111.5.182
On the CLC host machine, run the following command:
euserv-register-service -t storage -h IP -z ZONE SVCINSTANCE
where:
SVCINSTANCE is the IP address of the SC you are registering with this CLC.- name should be a descriptive name for the zone controlled by the CC. For example: . An SC must have the same name as the CC in the same zone.
- must be a unique name for the SC service. We recommend that you use a short-hand name of the IP address or hostname of the machine.
Note
We recommend that you use IP addresses instead of DNS names when registering services.For example:
euserv-register-service -t storage -h 10.111.5.182 -z zone-1 sc-10.111.5.182
Note
The SC automatically goes to the state after being registered with the CLC; it will remain in that state until you explicitly configure the SC by configuring the backend storage provider (later). For more information, see .Repeat the above steps for each Storage Controller in each zone. Verify that the Storage Controller service is registered with the following command:
euserv-describe-services SVCINSTANCE
The registered Storage Controller service is now ready for your cloud.
1.4.6.5 - Register the Node Controllers
This topic describes how to register a Node Controller (NC) with a Cluster Controller (CC).
Prerequisites
- The Cluster Controller service must be properly installed and started.
- The Node Controller service must be properly installed and started.
- If you are upgrading, you should understand that:
- If you’re upgrading an NC, just register that NC (on the CC that had it registered before).
- If you’re upgrading the set of non-NC host machines, register all the NCs (on each CC that had NCs registered).
To register the Node Controller service with the Eucalyptus cloud
SSH to the Cluster Controller in the zone. On the CC, register all NCs using the following command with the IP address of each NC host machine:
clusteradmin-register-nodes node0_IP_address ... [nodeN_IP_address]
For example:
clusteradmin-register-nodes 10.111.5.160 10.111.5.161 10.111.5.162
Copy the CC’s security credentials using the following command:
clusteradmin-copy-keys node0_IP_address ... [nodeN_IP_address]
For example:
clusteradmin-copy-keys 10.111.5.160 10.111.5.161 10.111.5.162
Repeat the steps for each zone in your cloud. The registered Node Controller service is now ready for your cloud.
1.4.7 - Configure the Runtime Environment
After Eucalyptus is installed and registered, perform the tasks in this section to configure the runtime environment.Now that you have installed Eucalyptus , you’re ready to begin configuring and using it.
1.4.7.1 - Configure Eucalyptus DNS
Eucalyptus provides a DNS service that maps service names, bucket names, and more to IP addresses. This section details how to configure the Eucalyptus DNS service.
Note
administration tools are designed to work with DNS-enabled clouds, so configuring this service is highly recommended. The remainder of this guide is written with the assumption that your cloud is DNS-enabled.The DNS service will automatically try to bind to port 53. If port 53 cannot be used, DNS will be disabled. Typically, other system services like dnsmasq are configured to run on port 53. To use the Eucalyptus DNS service, you must disable these services.
Configure the Domain and Subdomain
Before using the DNS service, configure the DNS subdomain name that you want Eucalyptus to handle using the steps that follow.
Log in to the CLC and enter the following:
euctl system.dns.dnsdomain=mycloud.example.com
You can configure the load balancer DNS subdomain. To do so, log in to the CLC and enter the following:
euctl services.loadbalancing.dns_subdomain=lb
Turn on IP Mapping
To enable mapping of instance IPs to DNS host names:
Enter the following command on the CLC:
euctl bootstrap.webservices.use_instance_dns=true
When this option is enabled, public and private DNS entries are created for each launched instance in Eucalyptus . This also enables virtual hosting for Walrus. Buckets created in Walrus can be accessed as hosts. For example, the bucket mybucket is accessible as mybucket.objectstorage.mycloud.example.com .
Instance IP addresses will be mapped as euca-A-B-C-D.eucalyptus.mycloud.example.com , where A-B-C-D is the IP address (or addresses) assigned to your instance.
If you want to modify the subdomain that is reported as part of the instance DNS name, enter the following command:
euctl cloud.vmstate.instance_subdomain=.custom-dns-subdomain
When this value is modified, the public and private DNS names reported for each instance will contain the specified custom DNS subdomain name, instead of the default value, which is eucalyptus . For example, if this value is set to foobar , the instance DNS names will appear as euca-A-B-C-D.foobar.mycloud.example.com .
Note
The code example above correctly begins with “.” before .Enable DNS Delegation
DNS delegation allows you to forward DNS traffic for the Eucalyptus subdomain to the Eucalyptus CLC host. This host acts as a name server. This allows interruption-free access to Eucalyptus cloud services in the event of a failure. The CLC host is capable of mapping cloud host names to IP addresses of the CLC and UFS / OSG host machines.
For example, if the IP address of the CLC is 192.0.2.5 , and the IP address of Walrus is 192.0.2.6 , the host compute.mycloud.example.com resolves to 192.0.2.5 and objectstorage.mycloud.example.com resolves to 192.0.2.6 .
To enable DNS delegation:
Enter the following command on the CLC:
euctl bootstrap.webservices.use_dns_delegation=true
Set up your master DNS server to delegate the Eucalyptus subdomain to the UFS host machines, which act as name servers.
The following example shows how the Linux name server bind is set up to delegate the Eucalyptus subdomain.
Open /etc/named.conf and set up the example.com zone. For example, your /etc/named.conf may look like the following:
zone "example.com" IN {
	      type master;
	      file "/etc/bind/db.example.com";
	      };
Create /etc/bind/db.example.com if it does not exist. If your master DNS is already set up for example.com , you will need to add a name server entry for UFS host machines. For example:
$ORIGIN example.com.
$TTL 604800

@ IN    SOA ns1 admin.example.com 1 604800 86400 2419200 604800
        NS  ns1
ns1     A   MASTER.DNS.SERVER_IP
ufs1    A   UFS1_IP
mycloud NS  ufs1
After this, you will be able to resolve your instances’ public DNS names such as euca-A-B-C-D.eucalyptus.mycloud.example.com .
Restart the bind nameserver service named restart . Verify your setup by pointing /etc/resolv.conf on your client to your primary DNS server and attempt to resolve compute.example.com using ping or nslookup. It should return the IP address of a UFS host machine.
Advanced DNS Options
Recursive lookups and split-horizon DNS are available in Eucalyptus .
To enable any of the DNS resolvers, set dns.enabled to true . To enable the recursive DNS resolver, set dns.recursive.enabled to true . To enable split-horizon DNS resolution for internal instance public DNS name queries, set dns.split_horizon.enabled to true .
You can configure instances to use AWS region FQDNs for service endpoints by enabling DNS spoofing.
Set up a Eucalyptus cloud with Eucalyptus DNS and HTTPS endpoints. When creating CSR, make sure and add Subject Alternative Names for all the supported AWS services for the given region that’s being tested. For example:
$ openssl req -in wildcard.c-06.autoqa.qa1.eucalyptus-systems.com.csr
						-noout -text | less X509v3 Subject Alternative Name:
     DNS:ec2.us-east-1.amazonaws.com, DNS:autoscaling.us-east-1.amazonaws.com,
     DNS:cloudformation.us-east-1.amazonaws.com, DNS:monitoring.us-east-1.amazonaws.com,
     DNS:elasticloadbalancing.us-east-1.amazonaws.com, DNS:s3.amazonaws.com,
     DNS:sts.us-east-1.amazonaws.com
Set DNS spoofing:
[root@d-17 ~]#  euctl dns.spoof_regions --region euca-admin@future
dns.spoof_regions.enabled = true
dns.spoof_regions.region_name =
dns.spoof_regions.spoof_aws_default_regions = true
dns.spoof_regions.spoof_aws_regions = true
Launch an instance, and allow SSH access. SSH into the instance and install AWS CLI.
ubuntu@euca-172-31-12-59:~$ sudo apt-get install -y python-pip
ubuntu@euca-172-31-12-59:~$ sudo -H pip install --upgrade pip
ubuntu@euca-172-31-12-59:~$ sudo -H pip install --upgrade awscli
Run aws configure and set access and secret key information if not using instance profile. Confirm AWS CLI works with HTTPS Eucalyptus service endpoint:
ubuntu@euca-172-31-12-59:~$ aws --ca-bundle euca-ca-0.crt
--endpoint-url https://ec2.c-06.autoqa.qa1.eucalyptus-systems.com/ ec2 describe-key-pairs
{
    "KeyPairs": [
        {
            "KeyName": "devops-admin",
            "KeyFingerprint": "ee:4f:93:a8:87:8d:80:8d:2c:d6:d5:60:20:a3:2d:b2"
        }
    ]
}
Test against AWS FQDN service endpoint that matches one of the SANs in the signed certificate:
ubuntu@euca-172-31-12-59:~$ aws --ca-bundle euca-ca-0.crt
--endpoint-url https://ec2.us-east-1.amazonaws.com ec2 describe-key-pairs{
    "KeyPairs": [
        {
            "KeyName": "devops-admin",
            "KeyFingerprint": "ee:4f:93:a8:87:8d:80:8d:2c:d6:d5:60:20:a3:2d:b2"
        }
    ]
}
1.4.7.2 - Create the Eucalyptus Cloud Administrator User
After your cloud is running and DNS is functional, create a user and access key for day-to-day cloud administration.
Prerequisites
- cloud services must be installed and registered.
- DNS must be configured.
Note
This is where you would begin using the admin role, if you want to use that feature.Create a cloud admin user
Eucalyptus admin tools and Euca2ools commands need configuration from ~/.euca . If the directory does not yet exist, create it:
Choose a name for the new user and create it along with an access key:
euare-usercreate -wld DOMAIN USER >~/.euca/FILE.ini
where:
- DOMAIN must match the DNS domain for the cloud.
- USER is the name of the new admin user.
- FILE can be anything; we recommend a descriptive name that includes the user’s name.
This creates a file with a region name that matches that of your cloud’s DNS domain; you can edit the file to change the region name if needed.
Note
This creates an admin user in the built-in eucalyptus account. The admin user has full control of all aspects of the cloud. For additional security, you might instead want to create a new account and grant it access to a more limited administration role.Switch to the new admin user:
# eval `clcadmin-release-credentials`
# export AWS_DEFAULT_REGION=REGION
where:
- REGION must match the region name from the previous step. By default, this is the same as the cloud’s DNS domain.
As long as this file exists in ~/.euca , you can use it by repeating the export command above. These euca2ools.ini configuration files are a flexible means of managing cloud regions and users.
Alternatively you can configure the default region in the global section of your Euca2ools configuration:
# cat ~/.euca/global.ini
[global]
default-region = REGION
setting the REGION to the one from the earlier step means you do not have to use export to select the region.
User impersonation
The eucalyptus account can act as other accounts for administrative purposes. To act as the admin user in the account-1 account run:
# eval `clcadmin-impersonate-user -a account-1 -u admin`
Impersonating an account allows you to view and modify resources for that account. For example, you can clean up resources in an account before deleting it.
To stop impersonating run:
clcadmin-release-credentials
Next steps
The remainder of this guide assumes you have completed the above steps.
Use these credentials after this point.
1.4.7.3 - Upload the Network Configuration
This topic describes how to upload the network configuration created earlier in the installation process. To upload your networking configuration:
Run the following command to upload the configuration file to the CLC (with valid Eucalyptus admin credentials):
euctl cloud.network.network_configuration=@/path/to/your/network_config_file
To review the existing network configuration run:
euctl --dump --format=raw cloud.network.network_configuration
When you use the Ansible playbook for deployment a network configuration file is available at /etc/eucalyptus/network.yaml on the CLC.
1.4.7.4 - Configure Eucalyptus Storage
These are the types of storage available for your Eucalyptus cloud. Object storage Eucalyptus provides an AWS S3 compatible object storage service that provides users with web-based general purpose storage, designed to be scalable, reliable and inexpensive. You choose the object storage backend provider: Walrus or Ceph RGW. The Object Storage Gateway (OSG) provides access to objects via the backend provider you choose.
Block storage Eucalyptus provides an AWS EBS compatible block storage service that provides block storage for EC2 instances. Volumes can be created as needed and dynamically attached and detached to instances as required. EBS provides persistent data storage for instances: the volume, and the data on it, can exist beyond the lifetime of an instance. You choose the block storage backend provider for a deployment.
1.4.7.4.1 - Configure Block Storage
This topic describes how to configure block storage on the Storage Controller (SC) for the backend of your choice.
The Storage Controller (SC) provides functionality similar to the Amazon Elastic Block Store (Amazon EBS). The SC can interface with various storage systems. Eucalyptus block storage (EBS) exports storage volumes that can be attached to a VM and mounted or accessed as a raw block device. EBS volumes can persist past VM termination and are commonly used to store persistent data.
Eucalyptus provides the following open source (free) backend providers for the SC:
- Overlay, using the local file system
- DAS-JBOD (just a bunch of disks)
- Ceph
You must configure the SC to use one of the backend provider options.
1.4.7.4.1.1 - Use Ceph-RBD
Use Ceph-RBD
This topic describes how to configure Ceph-RBD as the block storage backend provider for the Storage Controller (SC).Prerequisites
Successful completion of all the install sections prior to this section.
The SC must be installed, registered, and running.
You must execute the steps below as a administrator.
You must have a functioning Ceph cluster.
Ceph user credentials with the following privileges are available to SCs and NCs (different user credentials can be used for the SCs and NCs).
Hypervisor support for Ceph-RBD on NCs. Node Controllers (NCs) are designed to communicate with the Ceph cluster via libvirt. This interaction requires a hypervisor that supports Ceph-RBD. See to satisfy this prerequisite.
To configure Ceph-RBD block storage for the zone, run the following commands on the CLC Configure the SC to use Ceph-RBD for EBS.
euctl ZONE.storage.blockstoragemanager=ceph-rbd
The output of the command should be similar to:
one.storage.blockstoragemanager=ceph-rbd
Verify that the property value is now ceph-rbd :
euctl ZONE.storage.blockstoragemanager
Check the SC to be sure that it has transitioned out of the BROKEN state and is in the NOTREADY , DISABLED or ENABLED state before configuring the rest of the properties for the SC. The ceph-rbd provider will assume defaults for the following properties for the SC:
euctl ZONE.storage.ceph

PROPERTY        one.storage.cephconfigfile  /etc/ceph/ceph.conf
DESCRIPTION     one.storage.cephconfigfile  Absolute path to Ceph configuration (ceph.conf) file. Default value is '/etc/ceph/ceph.conf'

PROPERTY        one.storage.cephkeyringfile /etc/ceph/ceph.client.eucalyptus.keyring
DESCRIPTION     one.storage.cephkeyringfile Absolute path to Ceph keyring (ceph.client.eucalyptus.keyring) file. Default value is '/etc/ceph/ceph.client.eucalyptus.keyring'

PROPERTY        one.storage.cephsnapshotpools       rbd
DESCRIPTION     one.storage.cephsnapshotpools       Ceph storage pool(s) made available to  for EBS snapshots. Use a comma separated list for configuring multiple pools. Default value is 'rbd'

PROPERTY        one.storage.cephuser        eucalyptus
DESCRIPTION     one.storage.cephuser        Ceph username employed by  operations. Default value is 'eucalyptus'

PROPERTY        one.storage.cephvolumepools rbd
DESCRIPTION     one.storage.cephvolumepools Ceph storage pool(s) made available to  for EBS volumes. Use a comma separated list for configuring multiple pools. Default value is 'rbd'
The following steps are optional if the default values do not work for your cloud: To set the Ceph username (the default value for Eucalyptus is ’eucalyptus’):
euctl ZONE.storage.cephuser=myuser
To set the absolute path to keyring file containing the key for the ’eucalyptus’ user (the default value is ‘/etc/ceph/ceph.client.eucalyptus.keyring’):
euctl ZONE.storage.cephkeyringfile='/etc/ceph/ceph.client.myuser.keyring'
Note
If cephuser was modified, ensure that cephkeyringfile is also updated with the location to the keyring for the specific cephuser:To set the absolute path to ceph.conf file (default value is ‘/etc/ceph/ceph.conf’):
euctl ZONE.storage.cephconfigfile=/path/to/ceph.conf
To change the comma-delimited list of Ceph pools assigned to Eucalyptus for managing EBS volumes (default value is ‘rbd’) :
euctl ZONE.storage.cephvolumepools=rbd,myvolumes
To change the comma-delimited list of Ceph pools assigned to Eucalyptus for managing EBS snapshots (default value is ‘rbd’) :
euctl ZONE.storage.cephsnapshotpools=mysnapshots
If you want to enable snapshot deltas for your Ceph backend:
Note
Snapshot deltas are supported only on Ceph-RBD.Note
Verify that snapshots are enabled:
euctl ZONE.storage.shouldtransfersnapshots=true
Set the maximum number of deltas to be created before creating a new full snapshot:
euctl ZONE.storage.maxsnapshotdeltas=NON_ZERO_INTEGER
Note
This variable applies to all Ceph volumes.Note
If you need to create a non-Ceph volume from a Ceph snapshot, this value would need to be set to zero (at least temporarily).Every NC will assume the following defaults:
CEPH_USER_NAME="eucalyptus"
CEPH_KEYRING_PATH="/etc/ceph/ceph.client.eucalyptus.keyring"
CEPH_CONFIG_PATH="/etc/ceph/ceph.conf"
To override the above defaults, add/edit the following properties in the /etc/eucalyptus/eucalyptus.conf on the specific NC file:
CEPH_USER_NAME="ceph-username-for-use-by-this-NC"
CEPH_KEYRING_PATH="path-to-keyring-file-for-ceph-username"
CEPH_CONFIG_PATH="path-to-ceph.conf-file"
Repeat this step for every NC in the specific Eucalyptus zone. Your Ceph backend is now ready to use with Eucalyptus .
1.4.7.4.1.1.1 - Configure Hypervisor Support for Ceph-RBD
This topic describes how to configure the hypervisor for Ceph-RBD support.The following instructions will walk you through steps for verifying and or installing the required hypervisor for Ceph-RBD support. Repeat this process for every NC in the Eucalyptus zone
Verify if qemu-kvm and qemu-img are already installed.
rpm -q qemu-kvm qemu-img
Proceed to the preparing the RHEV qemu packages step if they are not installed.
Verify qemu support for the ceph-rbd driver.
qemu-img --help
qemu-img version 0.12.1, Copyright (c) 2004-2008 Fabrice Bellard
...
Supported formats: raw cow qcow vdi vmdk cloop dmg bochs vpc vvfat qcow2 qed vhdx parallels nbd blkdebug host_cdrom
host_floppy host_device file gluster gluster gluster gluster rbd
Note
If ‘rbd’ is listed as one of the supported formats, no further action is required; otherwise proceed to the next step.If the
eucalyptus-node service is running, terminate/stop all instances. After all instances are terminated, stop the eucalyptus-node service.
systemctl stop eucalyptus-node.service
Prepare the RHEV qemu packages:
If this NC is a RHEL system and the RHEV subscription to qemu packages is available, consult the RHEV package procedure to install the qemu-kvm-ev and qemu-img-ev packages. Blacklist the RHEV packages in the repository to ensure that packages from the RHEV repository are installed.
If this NC is a RHEL system and RHEV subscription to qemu packages is unavailable, built and maintained qemu-rhev packages may be used. These packages are available in the same yum repository as other packages. Note that using built RHEV packages voids the original RHEL support for the qemu packages.
If this NC is a non-RHEL (CentOS) system, -built and maintained qemu-rhev packages may be used. These packages are available in the same yum repository as other packages.
If you are not using the RHEV package procedure to install the qemu-kvm-ev and qemu-img-ev packages, install Eucalyptus -built RHEV packages: qemu-kvm-ev and qemu-img-ev , which can be found in the same yum repository as other Eucalyptus packages.
yum install qemu-kvm-ev qemu-img-ev
Start the libvirtd service.
systemctl start libvirtd.service
Verify qemu support for the ceph-rbd driver.
qemu-img --help
qemu-img version 0.12.1, Copyright (c) 2004-2008 Fabrice Bellard
...
Supported formats: raw cow qcow vdi vmdk cloop dmg bochs vpc vvfat qcow2 qed vhdx parallels nbd blkdebug host_cdrom
host_floppy host_device file gluster gluster gluster gluster rbd
Make sure the eucalyptus-node service is started.
systemctl start eucalyptus-node.service
Your hypervisor is ready for Eucalyptus Ceph-RBD support. You are now ready to configure Ceph-RBD for Eucalyptus .
1.4.7.4.1.2 - About the BROKEN State
This topic describes the initial state of the Storage Controller (SC) after you have registered it with the Cloud Controller (CLC).The SC automatically goes to the broken state after being registered with the CLC; it will remain in that state until you explicitly configure the SC by telling it which backend storage provider to use.
You can check the state of a storage controller by running euserv-describe-services --expert and note the state and status message of the SC(s). The output for an unconfigured SC looks something like this:
SERVICE	storage        	ZONE1        	SC71           	BROKEN    	37  	http://192.168.51.71:8773/services/Storage	arn:euca:eucalyptus:ZONE1:storage:SC71/
SERVICEEVENT	6c1f7a0a-21c9-496c-bb79-23ddd5749222	arn:euca:eucalyptus:ZONE1:storage:SC71/
SERVICEEVENT	6c1f7a0a-21c9-496c-bb79-23ddd5749222	ERROR
SERVICEEVENT	6c1f7a0a-21c9-496c-bb79-23ddd5749222	Sun Nov 18 22:11:13 PST 2012
SERVICEEVENT	6c1f7a0a-21c9-496c-bb79-23ddd5749222	SC blockstorageamanger not configured. Found empty or unset manager(unset). Legal values are: das,overlay,ceph
Note the error above: SC blockstoragemanager not configured. Found empty or unset manager(unset). Legal values are: das,overlay,ceph .
This indicates that the SC is not yet configured. It can be configured by setting the ZONE.storage.blockstoragemanager property to ‘das’, ‘overlay’, or ‘ceph’.
You can verify that the configured SC block storage manager using:
euctl ZONE.storage.blockstoragemanager
to show the current value.
1.4.7.4.1.3 - Use Direct Attached Storage (JBOD)
This topic describes how to configure the DAS-JBOD as the block storage backend provider for the Storage Controller (SC).Prerequisites
Successful completion of all the install sections prior to this section.
The SC must be installed, registered, and running.
Direct Attached Storage requires that have enough space for locally cached snapshots.
You must execute the steps below as a administrator.
To configure DAS-JBOD block storage for the zone, run the following commands on the CLC Configure the SC to use the Direct Attached Storage for EBS.
euctl ZONE.storage.blockstoragemanager=das
The output of the command should be similar to:
one.storage.blockstoragemanager=das
Verify that the property value is now: ‘das’
euctl ZONE.storage.blockstoragemanager
Set the DAS device name property. The device name can be either a raw device (/dev/sdX, for example), or the name of an existing Linux LVM volume group.
euctl ZONE.storage.dasdevice=DEVICE_NAME
For example:
euctl one.storage.dasdevice=/dev/sdb
Your DAS-JBOD backend is now ready to use with Eucalyptus .
1.4.7.4.1.4 - Use the Overlay Local Filesystem
This topic describes how to configure the local filesystem as the block storage backend provider for the Storage Controller (SC).Prerequisites
- Successful completion of all the install sections prior to this section.
- The SC must be installed, registered, and running.
- The local filesystem must have enough space to hold volumes and snapshots created in the cloud.
- You must execute the steps below as a administrator.
In this configuration the SC itself hosts the volume and snapshots for EBS and stores them as files on the local filesystem. It uses standard Linux iSCSI tools to serve the volumes to instances running on NCs.
To configure overlay block storage for the zone, run the following commands on the CLC Configure the SC to use the local filesystem for EBS.
euctl ZONE.storage.blockstoragemanager=overlay
The output of the command should be similar to:
one.storage.blockstoragemanager=overlay
Verify that the property value is now: ‘overlay’
euctl ZONE.storage.blockstoragemanager
Your local filesystem (overlay) backend is now ready to use with Eucalyptus .
1.4.7.4.2 - Configure Object Storage
This topic describes how to configure object storage on the Object Storage Gateway (OSG) for the backend of your choice. The OSG passes requests to object storage providers and talks to the persistence layer (DB) to authenticate requests. You can use Walrus, MinIO, or Ceph-RGW as the object storage provider.
Walrus - the default backend provider. It is a single-host Eucalyptus -integrated provider which provides basic object storage functionality for the small scale. Walrus is intended for light S3 usage.
MinIO - a high performing scalable object storage provider. MinIO implements the S3 API which is used by the OSG, not directly by end users. Distributed MinIO provides protection against multiple node/drive failures and bit rot using erasure code.
Ceph-RGW - an object storage interface built on top of Librados to provide applications with a RESTful gateway to Ceph Storage Clusters. Ceph-RGW uses the Ceph Object Gateway daemon (radosgw), which is a FastCGI module for interacting with a Ceph Storage Cluster. Since it provides interfaces compatible with OpenStack Swift and Amazon S3, the Ceph Object Gateway has its own user management. Ceph Object Gateway can store data in the same Ceph Storage Cluster used to store data from Ceph Filesystem clients or Ceph Block Device clients. The S3 and Swift APIs share a common namespace, so you may write data with one API and retrieve it with the other.
You must configure the OSG to use one of the backend provider options.
Note
If OSG has been registered but not yet properly configured, it will be listed in the state when listed with the euserv-describe-services command.Example showing unconfigured objectstorage:
# euserv-describe-services --show-headers --filter service-type=objectstorage
SERVICE  TYPE              	ZONE    	NAME                   	  STATE
SERVICE  objectstorage      user-api-1  user-api-1.objectstorage  broken
1.4.7.4.2.1 - Use Ceph-RGW
This topic describes how to configure Ceph Rados Gateway (RGW) as the backend for the Object Storage Gateway (OSG).
Prerequisites
- Successful completion of all the install sections prior to this section.
- The UFS must be registered and enabled.
- A Ceph storage cluster is available.
- The ceph-radosgw service has been installed (on the UFS or any other host) and configured to use the Ceph storage cluster. recommends using civetweb with ceph-radosgw service. is a lightweight web server and is included in the ceph-radosgw installation. It is relatively easier to install and configure than the alternative option – a combination of Apache and Fastcgi modules.
For more information on Ceph-RGW, see the Ceph-RGW documentation.
You must execute the steps below as a administrator.
Configure ceph-rgw as the storage provider using the euctl command:
euctl objectstorage.providerclient=ceph-rgw
Configure objectstorage.s3provider.s3endpoint to the ip:port of the host running the ceph-radosgw service:
Note
Depending on the front end web server used by ceph-radosgw service, the default port is 80 for apache and 7480 for civetweb.euctl objectstorage.s3provider.s3endpoint=<radosgw-host-ip>:<radosgw-webserver-port>
Configure objectstorage.s3provider.s3accesskey and objectstorage.s3provider.s3secretkey with the radosgw user credentials:
euctl objectstorage.s3provider.s3accesskey=<radosgw-user-accesskey>
euctl objectstorage.s3provider.s3secretkey=<radosgw-user-secretkey>
The Ceph-RGW backend and OSG are now ready for production.
1.4.7.4.2.2 - Use MinIO Backend
This topic describes how to configure MinIO as the object storage backend provider for the Object Storage Gateway (OSG).
Prerequisites
- The UFS must be registered and enabled.
- Install and start MinIO
For more information on MinIO installation and configuration see the MinIO Server Documentation
You must execute the steps below as a administrator.
Configure minio as the storage provider using the euctl command:
euctl objectstorage.providerclient=minio
Configure objectstorage.s3provider.s3endpoint to the ip:port of a host running the minio server:
euctl objectstorage.s3provider.s3endpoint=<minio-host-ip>:<minio-port>
Note
The default port for MinIO is 9000Configure objectstorage.s3provider.s3accesskey and objectstorage.s3provider.s3secretkey with credentials for minio:
euctl objectstorage.s3provider.s3accesskey=<minio-accesskey>
euctl objectstorage.s3provider.s3secretkey=<minio-secretkey>
Configure the expected response code for minio:
euctl objectstorage.s3provider.s3endpointheadresponse=400
The MinIO backend and OSG are now ready for production.
1.4.7.4.2.3 - Use Walrus Backend
This topic describes how to configure Walrus as the object storage backend provider for the Object Storage Gateway (OSG).
Prerequisites
- Successful completion of all the install sections prior to this section.
- The UFS must be registered and enabled.
You must execute the steps below as a administrator.
Configure walrus as the storage provider using the euctl command.
euctl objectstorage.providerclient=walrus
Check that the OSG is enabled.
If the state appears as disabled or broken , check the cloud-*.log files in the /var/log/eucalyptus directory. A disabled state generally indicates that there is a problem with your network or credentials. See Log File Location and Content for more information.
The Walrus backend and OSG are now ready for production.
1.4.7.5 - Install and Configure the Imaging Service
The Eucalyptus Imaging Service, introduced in Eucalyptus 4.0, makes it easier to deploy EBS images in your Eucalyptus cloud and automates many of the labor-intensive processes required for uploading data into EBS images.
The Eucalyptus Imaging Service is implemented as a system-controlled “worker” virtual machine that is monitored and controlled via Auto Scaling. Once the Imaging Service is configured, the Imaging Service VM will be started automatically upon the first request that requires it: such as an EBS volume ingress. Specifically, in this release of Eucalyptus , these are the usage scenarios for the Eucalyptus Imaging Service:
- Importing a raw disk image as a volume: If you have a raw disk image (containing either a data partition or a full operating system with a boot record, e.g., an HVM image), you can use the Imaging Service to import this into your cloud as a volume. This is accomplished with the
euca-import-volume command. If the volume was populated with a bootable disk, that volume can be snapshotted and registered as an image. - Importing a raw disk image as an instance: If you have a raw disk image containing a bootable operating system, you can import this disk image into as an instance: the Imaging Service automatically creates a volume, registers the image, and launches an instance from the image. This is accomplished with the
euca-import-instance command, which has options for specifying the instance type and the SSH key for the instance to use.
Install and Register the Imaging Worker Image
Eucalyptus provides a command-line tool for installing and registering the Imaging Worker image. Once you have run the tool, the Imaging Worker will be ready to use.Run the following commands on the machine where you installed the eucalyptus-service-image RPM package (it will set the imaging.imaging_worker_emi property to the newly created EMI of the imaging worker):
esi-install-image --region localhost --install-default
Consider setting the imaging.imaging_worker_keyname property to an SSH keyname (previously created with the euca-create-keypair command), so that you can perform troubleshooting inside the Imaging Worker instance, if necessary:
euctl services.imaging.worker.keyname=mykey
Managing the Imaging Worker Instance
Eucalyptus automatically starts Imaging Worker instances when there are tasks for workers to perform.The cloud administrator can list the running Imaging Worker instances, if any, by running the command:
euca-describe-instances --filter tag-value=euca-internal-imaging-workers
To delete / stop the imaging worker:
esi-manage-stack -a delete imaging
To create / start the imaging worker:
esi-manage-stack -a create imaging
Consider setting the imaging.imaging_worker_instance_type property to an Instance Type with enough ephemeral disk to convert any of your paravirtual images. The Imaging Worker root filesystem takes up about 2GB, so the maximum paravirtual image that the Imaging Worker will be able to convert is the disk allocation of the Instance Type minus 2GBs.
euctl services.imaging.worker.instance_type=m3.xlarge
Troubleshooting Imaging Worker
If the Imaging Worker is configured correctly, users will be able to import data into EBS volumes with euca-import-* commands, and paravirtual EMIs will run as instances. In some cases, though, paravirtual images may fail to convert (e.g., due to intermittent network failures or a network setup that doesn’t allow the Imaging Worker to communicate with the CLC), leaving the images in a special state. To troubleshoot:If the Imaging Worker Instance Type does not provide sufficient disk space for converting all paravirtual images, the administrator may have to change the Instance Type used by the Imaging Worker. After changing the instance type, the Imaging Worker instance should be restarted by terminating the old Imaging Worker instance:
euctl services.imaging.worker.instance_type=m2.2xlarge
euca-terminate-instances $(euca-describe-instances --filter tag-value=euca-internal-imaging-workers | grep INSTANCE | cut -f 2)
If the status of the conversion operation is ‘Image conversion failed’, but the image is marked as ‘available’ (in the output of euca-describe-images), the conversion can be retried by running the EMI again:
euca-run-instances ...
1.4.7.6 - Configure the Load Balancer
Install and Register the Load Balancer Image
Eucalyptus provides a tool for installing and registering the Load Balancer image. Once you have run the tool, your Load Balancer will be ready to use.
Run the following commands on the machine where you installed the eucalyptus-service-image RPM package (it will set the imaging.imaging_worker_emi property to the newly created EMI of the imaging worker):
esi-install-image --install-default
Verify Load Balancer Configuration
If you would like to verify that Load Balancer support is enabled you can list installed Load Balancers. The currently active Load Balancer will be listed as enabled. If no Load Balancers are listed, or none are marked as enabled, then your Load Balancer support has not been configured properly.Run the following command to list installed Load Balancer images:
esi-describe-images
This will produce output similar to the followin:
SERVICE     VERSION  ACTIVE     IMAGE      INSTANCES
    imaging       2.2      *     emi-573925e5      0
 loadbalancing    2.2      *     emi-573925e5      0
    database      2.2      *     emi-573925e5      0
You can also check the enabled Load Balancer EMI with:
euctl services.loadbalancing.worker.image
If you need to manually set the enabled Load Balancer EMI use:
euctl services.loadbalancing.worker.image=emi-12345678
1.4.7.7 - Configure Node Controller
On some Linux installations, a sufficiently large amount of local disk activity can slow down process scheduling. This can cause other operations (e.g., network communication and instance provisioning) appear to stall. Examples of disk-intensive operations include preparing disk images for launch and creating ephemeral storage.
- Log in to an NC server and open the /etc/eucalyptus/eucalyptus.conf file.
- Change the
CONCURRENT_DISK_OPS parameter to the number of disk-intensive operations you want the NC to perform at once.- Set
CONCURRENT_DISK_OPS to 1 to serialize all disk-intensive operations. Or … - Set it to a higher number to increase the amount of disk-intensive operations the NC will perform in parallel.
1.5 - Client Installation
The AWS CLI and Euca2ools are two command line interfaces that work well with Eucalyptus. See the relevant section for instructions to install each client.
1.5.1 - AWS CLI Installation
The AWS CLI is the official client for AWS. The CentOS and RHEL 7 official repositories provide a packaged AWS CLI version 1 that works well with Eucalyptus.
To allow easy use of the AWS CLI with Eucalyptus a plug-in is provided that understands how to access Eucalyptus services.
Install
To install the Eucalyptus plug-in a Eucalyptus YUM repository must first be enabled, either the release repository:
yum install https://downloads.eucalyptus.cloud/software/eucalyptus/5/rhel/7/x86_64/eucalyptus-release-5-1.11.as.el7.noarch.rpm
or the master repository for the latest nightly build:
yum install https://downloads.eucalyptus.cloud/software/eucalyptus/master/rhel/7/x86_64/eucalyptus-release-5-1.15.as.el7.noarch.rpm
Once a repository is configured, install the plugin and client:
yum install eucalyptus-awscli-plugin
Which will install the plug-in and version 1 of the AWS CLI.
Configuration
AWS provides general instructions on Configuring the AWS CLI which includes configuration for credentials. This section covers Eucalyptus plugin specific configuration.
An example configuration for the AWS CLI is:
# cat .aws/config
[plugins]
eucalyptus = awscli_plugin_eucalyptus

[default]
ufshost = mycloud.example.com
ufsport = 8773
verify_ssl = yes
output = text
region = eucalyptus
The configuration enables the plugin and sets the ufshost and ufsport to enable Eucalyptus service endpoints to be derived.
If your cloud does not have a valid HTTPS certificate then you will need to change verify_ssl to no, but note that this is less secure.
1.5.2 - Euca2ools Standalone Installation
Euca2ools is the Eucalyptus command line interface for interacting with Eucalyptus. This topic discusses how to perform a standalone installation of Euca2ools. If you’re running recent versions of Fedora, Debian, or Ubuntu, you can install Euca2ools using yum or apt.
If you’re running RHEL/CentOS, you can use the following instructions to install Euca2ools.
To perform a standalone installation of Euca2ools on RHEL/CentOS:
Configure the EPEL package repository:
Configure the Euca2ools package repository:
yum install http://downloads.eucalyptus.cloud/software/euca2ools/3.4/rhel/7/x86_64/euca2ools-release-3.4-2.2.as.el7.noarch.rpm
Install Euca2ools:
You’ve now performed a standalone installation of Euca2ools.
1.6 - Find More Information
This topic explains what to do once you have installed Eucalyptus, including further reading and other resources for understanding your cloud.
Read More
Eucalyptus has the following guides to help you with more information:
- The Administration Guide details ways to manage your Eucalyptus deployment. Refer to this guide to learn more about managing your Eucalyptus services, like the Cloud Controller; and resources, like instances and images.
- The Identity and Access Management (IAM) Guide provides information to help you securely control access to services and resources for your Eucalyptus cloud users. Refer to this guide to learn more about managing identities, authentication and access control best practices, and specifically managing your users and groups.
- The User Guide details ways to use Eucalyptus for your computing and storage needs. Refer to this guide to learn more about getting and using euca2ools, creating images, running instances, and using dynamic block storage devices.
- The Image Management Guide describes how to create and manage images for your cloud.
2 - Administration Guide
Administration Guide
This section contains concepts and tasks to help you manage your Eucalyptus cloud.
2.1 - Management Overview
Management Overview
The section shows you how to access Eucalyptus with a web-based console and with command line tools. This section also describes how to perform common management tasks. This document is intended to be a reference. You do not need to read it in order, unless you are following the directions for a particular task.
2.1.1 - Overview of Eucalyptus
Eucalyptus is a Linux-based software architecture that implements scalable, efficiency-enhancing private and hybrid clouds within an enterprise’s existing IT infrastructure. Because Eucalyptus provides Infrastructure as a Service (IaaS), you can provision your own resources (hardware, storage, and network) through Eucalyptus on an as-needed basis.
A Eucalyptus cloud is deployed across your enterprise’s on-premise data center. As a result, your organization has a full control of the cloud infrastructure. You can implement and enforce various level of security. Sensitive data managed by the cloud does not have to leave your enterprise boundaries, keeping data completely protected from external access by your enterprise firewall.
Eucalyptus was designed from the ground up to be easy to install and non-intrusive. The software framework is modular, with industry-standard, language-agnostic communication. Eucalyptus is also unique in that it provides a virtual network overlay that isolates network traffic of different users as well as allows two or more clusters to appear to belong to the same Local Area Network (LAN).
Eucalyptus also is compatible with Amazon’s EC2, S3, and IAM services. This offers you hybrid cloud capability.
2.1.2 - Command Line Interface
Eucalyptus supports two command line interfaces (CLIs): the administration CLI and the user CLI.The administration CLI is installed when you install Eucalyptus server-side components. The administration CLI is for maintaining and modifying Eucalyptus.
The other user CLI, called Euca2ools, can be downloaded and installed on clients. Euca2ools is a set of commands for end users and can be used with both Eucalyptus and Amazon Web Services (AWS).
2.2 - Manage Your Cloud
Manage Your Cloud
After you install and initially configure Eucalyptus, there are some common administration tasks you can perform. This section describes these tasks and associated concepts.
2.2.1 - Cloud Overview
This topic presents an overview of the components in Eucalyptus. Eucalyptus is comprised of several components: Cloud Controller, Walrus, Cluster Controller, Storage Controller, and Node Controller. Each component is a stand-alone web service. This architecture allows Eucalyptus both to expose each web service as a well-defined, language-agnostic API, and to support existing web service standards for secure communication between its components.
Cloud Controller
The Cloud Controller (CLC) is the entry-point into the cloud for administrators, developers, project managers, and end-users. The CLC queries other components for information about resources, makes high-level scheduling decisions, and makes requests to the Cluster Controllers (CCs). As the interface to the management platform, the CLC is responsible for exposing and managing the underlying virtualized resources (servers, network, and storage). You can access the CLC through command line tools that are compatible with Amazon’s Elastic Compute Cloud (EC2).
Walrus
Walrus allows users to store persistent data, organized as buckets and objects. You can use Walrus to create, delete, and list buckets, or to put, get, and delete objects, or to set access control policies. Walrus is interface compatible with Amazon’s Simple Storage Service (S3). It provides a mechanism for storing and accessing virtual machine images and user data. Walrus can be accessed by end-users, whether the user is running a client from outside the cloud or from a virtual machine instance running inside the cloud.
Cluster Controller
The Cluster Controller (CC) generally executes on a machine that has network connectivity to both the machines running the Node Controller (NC) and to the machine running the CLC. CCs gather information about a set of NCs and schedules virtual machine (VM) execution on specific NCs. The CC also manages the virtual machine networks. All NCs associated with a single CC must be in the same subnet.
Storage Controller
The Storage Controller (SC) provides functionality similar to the Amazon Elastic Block Store (Amazon EBS). Elastic block storage exports storage volumes that can be attached by a VM and mounted or accessed as a raw block device. EBS volumes persist past VM termination and are commonly used to store persistent data. An EBS volume cannot be shared between VMs and can only be accessed within the same availability zone in which the VM is running. Users can create snapshots from EBS volumes. Snapshots may be stored in Walrus and made available across availability zones.
Node Controller
The Node Controller (NC) executes on any machine that hosts VM instances. The NC controls VM activities, including the execution, inspection, and termination of VM instances. It also fetches and maintains a local cache of instance images, and it queries and controls the system software (host OS and the hypervisor) in response to queries and control requests from the CC. The NC is also responsible for the management of the virtual network endpoint.
2.2.2 - Cloud Best Practices
Cloud Best Practices
This section details Eucalyptus best practices for your private cloud.
2.2.2.1 - Synchronize Clocks
Eucalyptus checks message timestamps across components in the cloud infrastructure. This assures command integrity and provides better security.Eucalyptus components receive and exchange messages using either Query or SOAP interfaces (or both). Messages received over these interfaces are required to have some form of a time stamp (as defined by AWS specification) to prevent message replay attacks. Because Eucalyptus enforces strict policies when checking timestamps in the received messages, for the correct functioning of the cloud infrastructure, it is crucial to have clocks constantly synchronized (for example, with ntpd) on all machines hosting Eucalyptus components. To prevent user command failures, it is also important to have clocks synchronized on the client machines.
Following the AWS specification, all Query interface requests containing the Timestamp element are rejected as expired after 15 minutes of the timestamp. Requests containing the Expires element expire at the time specified by the element. SOAP interface requests using WS-Security expire as specified by the WS-Security Timestamp element.
When checking the timestamps for expiration, Eucalyptus allows up to 20 seconds of clock drift between the machines. This is a default setting. You can change this value for the CLC at runtime by setting the bootstrap.webservices.clock_skew_sec property as follows:
euctl bootstrap.webservices.clock_skew_sec=<new_value_in_seconds>
For additional protection from the message replay attacks, the CLC implements a replay detection algorithm and rejects messages with the same signatures received within 15 minutes. Replay detection parameters can be tuned as described in Configure Replay Protection .
2.2.2.2 - Configure SSL
In order to connect to Eucalyptus using SSL/TLS, you must have a valid certificate for the Cloud Controller (CLC)
If you have more than one host (other than node controllers), note the following:
- The keystore must be updated on each host running the eucalyptus-cloud service
- The [key_alias] must be the same on each host
- Use a wildcard certificate (i.e. *.<system.dns.dnsdomain>), since UFS is responsible for all service API endpoints
Create a keystore
Eucalyptus uses a PKCS12-format keystore. If you are using a certificate signed by a trusted root CA, use the following command to convert your trusted certificate and key into an appropriate format:
openssl pkcs12 -export -in [YOURCERT.crt] -inkey [YOURKEY.key] \
  -out tmp.p12 -name [key_alias]
Note
The above command will request an export password, which is used in the following steps.Save a backup of the Eucalyptus keystore, at /var/lib/eucalyptus/keys/euca.p12 , and then import your keystore into the Eucalyptus keystore as follows:
keytool -importkeystore \
  -srckeystore tmp.p12 -srcstoretype pkcs12 -srcstorepass [export_password] \
  -destkeystore /var/lib/eucalyptus/keys/euca.p12 -deststoretype pkcs12 \
  -deststorepass eucalyptus -alias [key_alias] \
  -srckeypass [export_password]
Enable the Cloud Controller to use this keystore
Run the following commands on the Cloud Controller (CLC):
euctl bootstrap.webservices.ssl.server_alias=[key_alias]
Optional: Redirect Requests to use Port 443
To allow user facing services requests on port 443 instead of the default 8773, run the following commands on the CLC:
euctl bootstrap.webservices.port=443
2.2.2.3 - Storage Volumes
Eucalyptus manages storage volumes for your private cloud. Volume management strategies are application specific, but this topic includes some general guidelines.When setting up your Storage Controller, consider whether performance (bandwidth and latency of read/write operations) or availability is more important for your application. For example, using several smaller volumes will allow snapshots to be taken on a rolling basis, decreasing each snapshot creation time and potentially making restore operations faster if the restore can be isolated to a single volume. However, a single larger volume allows for faster read/write operations from the VM to the storage volume.
An appropriate network configuration is an important part of optimizing the performance of your storage volumes. For best performance, each Node Controller should be connected to a distinct storage network that enables the NC to communicate with the SC or Ceph, without interfering with normal NC/VM-instance network traffic.
Eucalyptus includes configurable limits on the size of a single volume, as well as the aggregate size of all volumes on an SC. The SC can push snapshots from Ceph, where the volumes reside, to object storage, where the snapshots become available across multiple clusters. Smaller volumes will be much faster to snapshot and transfer, whereas large volumes will take longer. However, if many concurrent snapshot requests are sent to the SC, operations may take longer to complete.
EBS volumes are created from snapshots on the SC or Ceph, after the snapshot has been downloaded from object storage to the device. Creating an EBS volume from a snapshot on the same cluster as the source volume of the snapshot will reduce delays caused by having to transfer snapshots from object storage.
2.2.3 - Cloud Tasks
Cloud Tasks
This section contains a listing of your Eucalyptus cloud-related tasks.
2.2.3.1 - Inspect System Health
Eucalyptus provides access to the current view of service state and the ability to manipulate the state. You can inspect the service state to either ensure system health or to identify faulty services. You can modify a service state to maintain activities and apply external service placement policies.
View Service State
Use the euserv-describe-services command to view the service state. The output indicates:
- Component type of the service
- Partition in which the service is registered
- Unique name of the service
- Current view of service state
- Last reported epoch (this can be safely ignored)
- Service URI
- Fully qualified name of the service (This is needed for manipulating services that did not get unique names during registration. For example: internal services like DNS)
The default output includes the services that are registered during configuration, as well as information about the DNS service, if present. You can obtain additional service state information, such as internal services, by providing the
-a flag.
You can also make requests to retrieve service information that is filtered by either:
- current state (for example, )
- host where service is registered
- partition where service is registered
- type of service (for example, CC or Walrus)
When you investigate service failures, you can specify
-events to return a summary of the last fault. You can retrieve extended information (primarily useful for debugging) by specifying -events -events-verbose .
Heartbeat Service
http://CLCIPADDRESS:8773/services/Heartbeat provides a list of components and their respective statuses. This allows you to find out if a service is enabled without requiring cloud credentials.
Modify Service State
To modify a service:
Enter the following command on the CLC, Walrus, or SC machines:
systemctl stop eucalyptus-cloud.service
On the CC, use the following command:
systemctl stop eucalyptus-cluster.service
If you want to shut down the SC for maintenance. The SC is SC00 is ENABLED and needs to be DISABLED for maintenance.
To stop SC00 first verify that no volumes or snapshots are being created and that no volumes are being attached or detached, and then enter the following command on SC00:
systemctl stop eucalyptus-cloud.service
To check status of services, you would enter:
euserv-describe-services
When maintenance is complete, you can start the eucalyptus-cloud process on SC00 , which will enter the DISABLED state by default.
systemctl start eucalyptus-cloud.service
Monitor the state of services using euserv-describe-services until SC00 is ENABLED .
2.2.3.2 - View User Resources
To see resource use by your cloud users, Eucalyptus provides the following commands with the flag.
- : Returns information about security groups in your account, including output type identifier, security group ID, security group name, security group description, output type identifier, account ID of the group owner, name of group granting permission, type of rule, protocol to allow, start of port range, end of port range, source (for ingress rules) or destination (for egress rules), and any tags assigned to the security group.
- : Returns information about your instances, including output type identifier, reservation ID, name of each security group the instance is in, output type identifier, instance ID for each running instance, EMI ID of the image on which the instance is based, public DNS name associated with the instance (for instances in the running state), private DNS name associated with the instance (for instances in running state), instance state, key name, launch index, instance type, launch time, availability zone, kernel ID, ramdisk ID, monitoring state, public IP address, private IP address, type of root device (ebs or instance-store), placement group the cluster instance is in, virtualization type (paravirtual or hvm), any tags assigned to the instance, hypervisor type, block device identifier for each EBS volume the instance is using, along with the device name, the volume ID, and the timestamp.
- : Returns information about key pairs available to you, including keypair identifier, keypair name, and private key fingerprint.
- : Returns information about EBS snapshots available to you, including snapshot identifier, ID of the snapshot, ID of the volume, snapshot state (pending, completed, error), timestamp when snapshot initiated, percentage of completion, ID of the owner, volume sized, description, and any tags assigned to the snapshot.
- : Describes your EBS volumes, including volume identifier, volume ID, size of the volume in GiBs, snapshot from which the volume was created, availability zone, volume state (creating, available, in-use, deleting, deleted, error), timestamp of the volume creation, and any tags assigned to the volume.
2.2.3.3 - Change Network Configuration
Change Network Configuration
You might want to change the original network configuration of your cloud. To change your network configuration, perform the tasks listed in this topic.Log in to the CLC and open the /etc/eucalyptus/eucalyptus.conf file. Navigate to the Networking Configuration section and make your edits. Save the file. Restart the Cluster Controller.
systemctl restart eucalyptus-cluster.service
2.2.3.3.1 - Networking Configuration Options
All network-related options specified in /etc/eucalyptus/eucalyptus.conf use the prefix VNET_. The most commonly used VNET options are described in the following table.
Note
If you change the value of in the file, you must restart the Cluster Controller.| Option | Description | Component |
|---|
| VNET_BRIDGE | This is the name of the bridge interface to which instances’ network interfaces should attach. A physical interface that can reach the CC must be attached to this bridge. Common setting for KVM is br0. | Node Controller |
| VNET_DHCPDAEMON | The ISC DHCP executable to use. This is set to a distro-dependent value by packaging. The internal default is /usr/sbin/dhcpd3. | Node Controller |
| VNET_MODE | The networking mode in which to run. The same mode must be specified on all CCs and NCs in your cloud. Valid values: EDGE | All CCs and NCs |
| VNET_PRIVINTERFACE | The name of the network interface that is on the same network as the NCs. Default: eth0 | Node Controller |
| VNET_PUBINTERFACE | This is the name of the network interface that is connected to the same network as the CC. Depending on the hypervisor’s configuration this may be a bridge or a physical interface that is attached to the bridge. Default: eth0 | Node Controller |
2.2.3.4 - Add a Node Controller
If you want to increase your system’s capacity, you’ll want to add more Node Controllers (NCs).To add an NC, perform the following tasks:
Log in to the CLC and enter the following command:
clusteradmin-register-nodes node0_IP_address ... [nodeN_IP_address]
When prompted, enter the password to log into each node. Eucalyptus requires this password to propagate the cryptographic keys.
2.2.3.5 - Migrate Instances Between Node Controllers
In order to ensure optimal system performance, or to perform system maintenance, it is sometimes necessary to move running instances between Node Controllers (NCs). You can migrate instances individually, or migrate all instances from a given NC.
Note
For migrations to succeed, you must have set to the same value in the file on each NC.To migrate a single instance to another NC, enter the following command:
euserv-migrate-instances -i INSTANCE_ID
You can also optionally specify --include-dest HOST_NC_IP or --exclude-dest HOST_NC_IP , to ensure that the instance is migrated to one of the specified NCs, or to avoid migrating the instance to any of the specified NCs. These flags may be used more than once to specify multiple NCs.
To migrate all instances away from an NC, enter the following command:
euserv-migrate-instances --source HOST_NC_IP
You can also optionally specify euserv-modify-service -s stop HOST_NC_IP , to stop the specified NC and ensure that no new instances are started on that NC while the migration occurs. This allows you to safely remove the NC without interrupting running instances. The NC will remain in the DISABLED state until it is explicitly enabled using euserv-modify-service -s start HOST_NC_IP .
In some cases, timeouts may cause a migration to initially fail. Run the command again to complete the migration.
If the migration fails, check the nc.log file on the source and destination NCs. If you see an error similar to:
libvirt: Cannot get interface MTU on 'br0': No such device (code=38)
… then ensure the NCs have the same interface and bridge device names, as described in .
2.2.3.6 - Remove a Node Controller
Describes how to delete NCs in your system.If you want to decrease your system’s capacity, you’ll need to decrease NC servers. To delete an NC, perform the following tasks.
Log in to the CC and enter the following command:
clusteradmin-deregister-nodes node0_IP_address ... [nodeN_IP_address]
2.2.3.7 - Restart Eucalyptus
Restart Eucalyptus
Describes the recommended processes to restart Eucalyptus, including terminating instances and restarting Eucalyptus components.You must restart Eucalyptus whenever you make a physical change (e.g., switch out routers), or edit the eucalyptus.conf file. To restart Eucalyptus, perform the following tasks in the order presented.
Note
Before you restart Eucalyptus, we recommend that you notify all users that you are terminating all instances.2.2.3.7.1 - Shut Down All Instances
To terminate all instances on all NCs perform the steps listed in this topic. To terminate all instances on all NCs:
Enter the following command:
euca-terminate-instances <instance_id>
2.2.3.7.2 - Restart the CLC
Log in to the CLC and enter the following command:
systemctl restart eucalyptus-cloud.service
All Eucalyptus components on this server will restart.
2.2.3.7.3 - Restart Walrus
Log in to Walrus and enter the following command:
systemctl restart eucalyptus-cloud.service
2.2.3.7.4 - Restart the CC
Log in to the CC and enter the following command:
systemctl restart eucalyptus-cluster.service
2.2.3.7.5 - Restart the SC
Log in to the SC and enter the following command:
systemctl restart eucalyptus-cloud.service
2.2.3.7.6 - Restart an NC
To restart an NC perform the steps listed in this topic.Log in to the NC and enter the following command:
systemctl restart eucalyptus-node.service
Repeat for each NC. Verify that the following is even needed. If so, replicate for other NC-tasks. You can automate the restart command for all of your NCs. Store a list of your NCs in a file called nc-hosts that looks like:
nc-host-00
nc-host-01
...
nc-host-nn
To restart all of your NCs, run the following command:
cat nc-hosts | xargs -i ssh root@{} systemctl restart eucalyptus-node.service
2.2.3.8 - Shut Down Eucalyptus
Shut Down Eucalyptus
Describes the recommended processes to shut down Eucalyptus.There may be times when you need to shut down Eucalyptus. This might be because of a physical failure, topological change, backing up, or making an upgrade. We recommend that you shut down Eucalyptus components in the reverse order of how you started them. To stop the system, shut down the components in the order listed.
Note
Before you shut Eucalyptus down, we recommend that you notify all users that you are terminating all instances.2.2.3.8.1 - Shut Down All Instances
To terminate all instances on all NCs perform the steps listed in this topic.To terminate all instances on all NCs:
Enter the following command:
euca-terminate-instances <instance_id>
2.2.3.8.2 - Shut Down the NCs
To shut down the NCs perform the steps listed in this topic.To shut down the NCs:
Log in as root to a machine hosting an NC. Enter the following command:
systemctl stop eucalyptus-node.service
Repeat for each machine hosting an NC.
2.2.3.8.3 - Shut Down the CCs
To shut down the CCs:
Log in as root to a machine hosting a CC. Enter the following command:
systemctl stop eucalyptus-cluster.service
Repeat for each machine hosting a CC.
2.2.3.8.4 - Shut Down the SCs
To shut down the SC:
Log in as root to the physical machine that hosts the SC. Enter the following command:
systemctl stop eucalyptus-cloud.service
Repeat for any other machine hosting an SC.
2.2.3.8.5 - Shut Down Walrus
To shut down Walrus:
Log in as root to the physical machine that hosts Walrus. Enter the following command:
systemctl stop eucalyptus-cloud.service
2.2.3.8.6 - Shut Down the CLC
To shut down the CLC:
Log in as root to the physical machine that hosts the CLC. Enter the following command:
systemctl stop eucalyptus-cloud.service
2.2.3.9 - Disable CloudWatch
To disable CloudWatch, run the following command.
euctl cloudwatch.enable_cloudwatch_service=true
2.3 - Operations
Operations
This section contains concepts and tasks associated with operating your Eucalyptus cloud.
2.3.1 - Operations Overview
This section is for architects and cloud administrators who plan to deploy Eucalyptus in a production environment. It is not intended for end users or proof-of-concept installations.To run Eucalyptus in a production environment, you must be aware of your hardware and network resources. This guide is to help you make decisions about deploying Eucalyptus. It is also meant to help you keep Eucalyptus running smoothly.
2.3.2 - Planning Your Deployment
To decide on your deployment’s scope, determine the use case for your cloud. For example, will this be a small dev-test environment, or a large and scalable web services environment?To help with scoping your deployment, see Plan Your Installation in the Installation Guide . There you will find solution examples and physical resource information.
2.3.3 - Testing Your Deployment
This topic details what you should test when you want to make sure your deployment is working. The following suggested test plan contains tasks that ensure DNS, imaging, and storage are working.
DNS
- Verify that instances can ping their:
- Verify that instances are pingable on their public DNS names from:
Imaging
- Verify that an EBS-backed image boots successfully
- Verify that you can create an image from a running EBS-backed instance
- Verify that you can install a new Ubuntu image
- Verify that you can deregister an image
- Verify that you can import an instance
- Verify that you can import a volume
Walrus
- Verify that you can make a basic s3cmd request
- Verify that you can successfully perform a multi-part upload (use a 1G+ file)
2.3.4 - Customizing Your Deployment
This section describes the most commonly applied post-install customizations and the issues they pose:
- Over-subscription
- Networking changes (EDGE mode)
- CloudWatch tweaks/customizations
- Capacity changes
Over-subscription
Over-subscription refers to the practice of expanding your computer beyond its limits. Over-subscription applies only to node controllers. You may modify disks and cores to allow enough usage buffer for your instance. Navigate to /etc/eucalyptus/ and locate the eucalyptus.conf file. Edit the following values to define the appropriate size buffers for your instances: NC_WORK_SIZE Defines the amount of disk space available for instances to be run. Defaults to 1/3 of the currently available disk space on the NC, and NC_CACHE_SIZE defaults to the other 2/3.
NC_CACHE_SIZE Defines how much disk space is needed for images to be cached. MAX_CORES Defines the maximum number of cores that can be provided to VMs on each NC. If it is 0 or not present, then the only limit on the number of instances is the number of cores available on the NC. If it is present, any value greater than 256 is treated as 256. In order for these changes to take effect, you must restart the NC.
Networking Changes (EDGE modes)
You can modify the default by adding network IPs to your cloud. Adding public IPs does not require shutting down the whole system.
To add network IPs:In EDGE mode, adding or changing the IP involves creating a JSON file and uploading it the Cloud Controller (CLC). See Configure for Edge Mode for more details. No restart needed, changes apply automatically.
Change CloudWatch Properties
You can change the following CloudWatch properties:
| Property | Description |
|---|
| cloud.monitor.default_poll_interval_mins | This is how often the CLC sends a request to the CC for sensor data. Default value is 5 minutes. If you set it to 0 = no reporting. The more often you poll, the more hit on system performance. |
| cloud.monitor.history_size | This is how many data value samples are sent in each sensor data request. The default value is 5. How many samples per poll interval. |
| cloudwatch.enable_cloudwatch_service | Disables CloudWatch when set to false. |
Change Capacity
Capacity changes refer to adding another zone or more nodes. To add another zone, install , start , and register . To add more nodes, see Add a Node Controller .
2.3.5 - Managing Policies
This topic details best practices for managing your cloud policies.
- Establish a workflow for account creation, including the initial request for a cloud account and the email containing credentials.
- Limit your use of individual policies. Focus your policies on groups and add individuals to the group.
- Use groups to assign permissions to individual users. Limit the use of policies for individual users.
For more information about policy best practices, see IAM Best Practices .
2.3.6 - Networking
This topic addresses networking in the Eucalyptus cloud.
Networking Modes
Eucalyptus offers different modes to provide you with a cloud that will fit in your current network. For information what each networking mode has to offer, see Plan Networking Modes .
EC2-Classic Networking
Eucalyptus EDGE networking mode supports EC2-Classic networking. Your instances run in a single, flat network that you share with others. For more information about EC2-Classic networking, see EC2 Supported Platforms .
EC2-VPC Networking
Eucalyptus VPCMIDO networking mode resembles the Amazon Virtual Private Cloud (VPC) product wherein the network is fully configurable by users. For more information about EC2-VPC networking, see Differences Between Instances in EC2-Classic and EC2-VPC .
2.3.7 - Monitoring
This topic includes details about which resources you should monitor.
| Component | Running Processes |
|---|
| Cloud Controller (CLC) | eucalyptus-cloud, postgres, eucanetd (VPCMIDO mode) |
| User-facing services (UFS) | eucalyptus-cloud |
| Walrus | eucalyptus-cloud |
| Cluster Controller (CC) | eucalyptus-cluster |
| Storage Controller (SC) | eucalyptus-sc, tgtd (for DAS and Overlay) |
| Node Controller (NC) | eucalyptus-node, httpd, dhcpd, eucanetd (EDGE mode), qemu-kvm / 1 per instance |
| Management Console | eucaconsole |
2.3.8 - Backup and Recovery
Backup and Recovery
This section provides details on important files to back up and recover.
2.3.8.1 - Back Up Eucalyptus Cloud Data
Back Up Cloud Data
This section explains what you need to back up and protect your cloud data.We recommend that you back up the following data:
- The cloud database: see
- Object storage. For objects in Walrus, the frequency depends on current load. Use your own discretion to determine the backup plan and strategy. You must have Walrus running.
- EBS volumes in each cluster (DAS and Overlay)
- The configuration file for the cloud is stored on the CLC: .
- Any configuration file for the cloud stored on any other host (UFS, CC, etc.): .
- The cloud security credentials on all hosts (you already backed up the CLC keys as part of the database backup). Use the tar command: .
- The CC and NC configuration files, stored on every CC and NC: .
- Any Euca2ools (.ini) configuration files, which reside on any Euca2ools host machine. Files can be found in:
- Management Console config files in should be backed up. Typical files:
- Ensure you have your instances’ so you can access the instances later.
- and LVM snapshots
Users are responsible for volume backups using EBS snapshots on their defined schedules.
2.3.8.1.1 - Back Up the Database
To back up the cloud database follow the steps listed in this topic.Bucket and object metadata are stored in the Eucalyptus cloud database. To back up the database
Log in to the CLC. The cloud database is on the CLC. Extract the Eucalyptus PostgreSQL database cluster into a script file.
pg_dumpall --oids -c -h/var/lib/eucalyptus/db/data -p8777 -U root -f/root/eucalyptus_pg_dumpall-backup.sql
Back up the cloud security credentials in the keys directory.
tar -czvf ~/eucalyptus-keydir.tgz /var/lib/eucalyptus/keys
2.3.8.2 - Recover Eucalyptus Cloud Data
Recover Cloud Data
This topic explains what to include when you recover your cloud.Recovering Your Cloud Data
Note
When you recover your cloud data, you need to stop all services, recover the files, then start all services again.We recommend that you recover the following data:
- The cloud database: see
- Object storage. For objects in Walrus, the frequency depends on current load. Use your own discretion to determine the restore plan and strategy.
- EBS volumes in each cluster (DAS and Overlay)
- The configuration file for the cloud is stored on the CLC: .
- Any configuration file for the cloud stored on any other host (UFS, CC, etc.): .
- The cloud security credentials on all hosts (you already restored the CLC keys as part of the database restore). Use the tar command: .
- The CC and NC configuration files, stored on every CC and NC: .
- Any Euca2ools (.ini) configuration files, which reside on any Euca2ools host machine. Files in these directories:
- Management Console config files you backed up from should be restored. Typical files:
- Ensure you have your instances’ so you can access the instances.
- and LVM snapshots
Users are responsible for volume restore using EBS snapshots.
2.3.8.2.1 - Restore the Database
To restore the cloud database follow the steps listed in this topic.
Note
Sometimes you’ll get this message on both startup and shutdown of the database: … where is actually your current directory, meaning if you run the command from , then the path in the output will be instead of . The message is completely benign and can be ignored.To restore the databaseStop the CLC service.
systemctl stop eucalyptus-cloud.service
Remove traces of the old database.
rm -rf /var/lib/eucalyptus/db
Restore the cloud security credentials in the keys directory.
tar -xvf ~/eucalyptus-keydir.tgz -C /
Re-initialize the database structure.
clcadmin-initialize-cloud
Start the database manually.
su eucalyptus -s /bin/bash -c "/usr/bin/pg_ctl start -w \
-s -D/var/lib/eucalyptus/db/data -o '-h0.0.0.0/0 -p8777 -i'"
Restore the backup.
psql -U root -d postgres -p 8777 -h /var/lib/eucalyptus/db/data -f/root/eucalyptus_pg_dumpall-backup.sql
Stop the database manually.
su eucalyptus -s /bin/bash -c "/usr/bin/pg_ctl stop -D/var/lib/eucalyptus/db/data"
Start CLC service
Note
If you are upgrading, skip this step (you don’t want to start the CLC service now because you haven’t restored the rest of the cloud data yet; starting the CLC appears in the installation steps, later).systemctl start eucalyptus-cloud.service
2.3.9 - Troubleshooting
Troubleshooting
This topic details how to find information you need to troubleshoot most problems in your cloud. To troubleshoot Eucalyptus, you must have the following:
- a knowledge about which machines each Eucalyptus component is installed on
- root access to each machine hosting Eucalyptus components
- an understanding of the network mode (EDGE, VPCMIDO)
- an understanding of eucanetd and the configuration connecting the Eucalyptus components
For most problems, the procedure for tracing problems is the same: start at the bottom to verify the bottom-most component, and then work your way up. If you do this, you can be assured that the base is solid. This applies to virtually all Eucalyptus components and also works for proactive, targeted monitoring.
2.3.9.1 - Eucalyptus Log Files
Usually when an issue arises in Eucalyptus, you can find information that points to the nature of the problem either in the Eucalyptus log files or in the system log files. This topic details log file message meanings, location, configuration, and fault log information.
2.3.9.2 - Network Information
When you have to troubleshoot, it’s important to understand the elements of the network on your system.Here are some ideas for finding out information about your network:
- It is also important to understand the elements of the network on your system. For example, you might want to list bridges to see which devices are enslaved by the bridge. To do this, use the command.
- You might also want to list network devices and evaluate existing configurations. To do this, use these commands: , , and .
- You can use to check status, or to force eucanetd to run in the foreground, sending log messages to the terminal.
- You can get further information if you use the commands with the options. For example, returns all instances running by all users on the system. Other describe commands are:
2.3.9.3 - Common Problems
Common Problems
This section describes common problems and workarounds.
2.3.9.3.1 - Problem: can't communicate with instance
Use ping from a client (not the CLC). Can you ping it?
Yes: Check the open ports on security groups and retry connection using SSH or HTTP. Can you connect now? Yes. Okay, then. You’re work is done. No: Try the same procedure as if you can’t ping it up front. No: Is your cloud running in Edge networking mode?
2.3.9.3.2 - Problem: install-time checks
Eucalyptus offers installation checks for any Eucalyptus component or service (CLC, Walrus, SC, NC, SC, services, and more). When Eucalyptus encounters an error, it presents the problem to the operator. These checks are used for install-time problems. They provide resolutions to some of the fault conditions.
Each problematic condition contains the following information:
| Heading | Description |
|---|
| Condition | The fault found by Eucalyptus |
| Cause | The cause of the condition |
| Initiator | What is at fault |
| Location | Where to go to fix the fault |
| Resolution | The steps to take to resolve the fault |
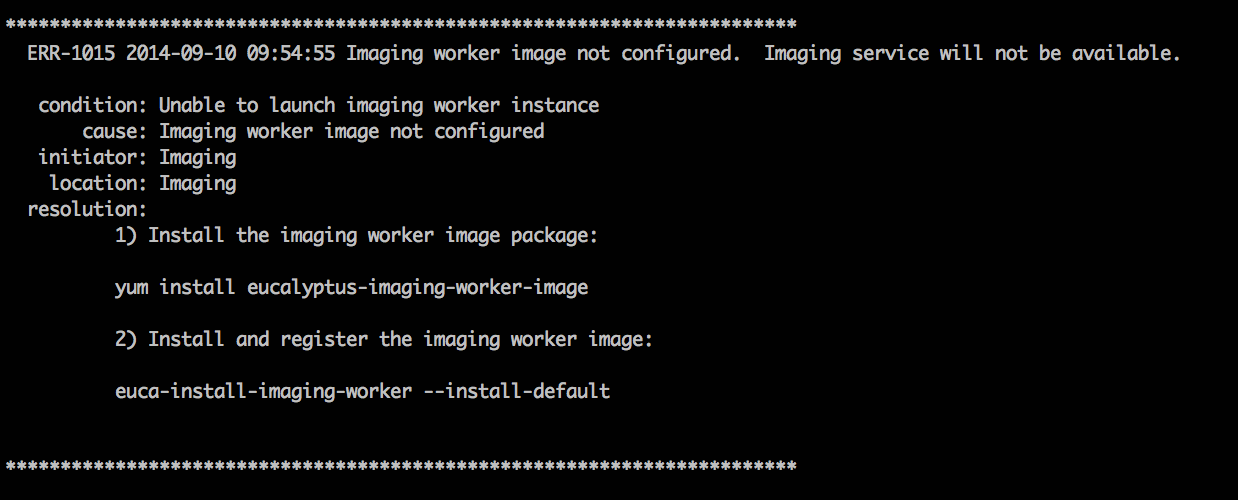
For more information about all the faults we support, go to https://github.com/eucalyptus/eucalyptus/tree/master/util/faults/en_US .
2.3.9.3.3 - Problem: instance runs but fails
Run euca-describe-nodes to verify if instance is there. Is the instance there?
Yes: Go to the NC log for that NC and grep your instance ID. Did you find the instance?
- Yes: Is there an error message?
No: Go to the CC log and grep the instance ID. Is it there error message?
No: Log in as admin and run euca-describe-instance . Is the instance there?
- Yes:
- No: Start over and run a new instance, recreate failure, and start these steps over.
2.3.9.3.4 - Problem: snapshot creation failed
On the SC, depending on the backend used for storage:
- For Overlay, use the command to check the disk space in .
- For DAS, use the command to check the disk space in the DAS volumes.
- For any other backend, use its specific commands to check the free space for storage allocated for volumes.
Is there enough space?
Yes: On the OSG host, depending on the backend used for object storage:
For Walrus, use the command to check the disk space in .
For RiakCS or Ceph-RGW, use its specific commands to check the free space for storage allocated for buckets and objects.
Is there enough space? Yes.
Use and note the IP addresses for the OSG and SC.
SSH to SC and ping the OSG. Are there error messages?
No: Delete volumes or add disk space. No: Delete volumes or add disk space.
2.3.9.3.5 - Problem: volume creation failed
Symptom: Went from available to fail. This is typically caused by the CLC and the SC.On the SC, use df or lvdisplay to check the disk space. Is there enough space?
Yes: Check the SC log and grep the volume ID. Is there error message? Yes. This provides clues to helpful information. No: Check cloud-output.log for a volume ID error. No: Delete volumes or add disk space.
2.3.9.4 - Component Workarounds
Component Workarounds
This section contains troubleshooting information for Eucalyptus components and services.
2.3.9.4.1 - Access and Identities
This topic contains information about access-related problems and solutions.
Need to verify an existing LIC file.
- Enter the following command: The output from the example above shows the name of the LIC file and status of the synchronization (set to false).
2.3.9.4.2 - Elastic Load Balancing
This topic explains suggestions for problems you might have with Elastic Load Balancing (ELB).
Can’t synchronize with time server
Eucalyptus sets up NTP automatically for any instance that has an internet connection to a public network. If an instance doesn’t have such a connection, set the cloud property loadbalancing.loadbalancer_vm_ntp_server to a valid NTP server IP address. For example:
euctl loadbalancing.loadbalancer_vm_ntp_server=169.254.169.254
PROPERTY	loadbalancing.loadbalancer_vm_ntp_server	169.254.169.254 was {}
Need to debug an ELB instance
To debug an ELB instance, set the loadbalancing.loadbalancer_vm_keyname cloud property to the keypair of the instance you want to debug. For example:
# euctl loadbalancing.loadbalancer_vm_keyname=sshlogin
PROPERTY	loadbalancing.loadbalancer_vm_keyname	sshlogin was {}
2.3.9.4.3 - Imaging Worker
This topic contains troubleshooting tips for the Imaging Worker.Some requests that require the Imaging Worker might remain in pending for a long time. For example: an import task or a paravirtual instance run. If request remains in pending, the Imaging Worker instance might not able to run because of a lack of resources (for example, instance slots or IP addresses).
You can check for this scenario by listing latest AutoScaling activities:
euscale-describe-scaling-activities -g asg-euca-internal-imaging-worker-01
Check for failures that indicate inadequate resources such as:
ACTIVITY 1950c4e5-0db9-4b80-ad3b-5c7c59d9c82e 2014-08-12T21:05:32.699Z asg-euca-internal-imaging-worker-01 Failed Not enough resources available: addresses; please stop or terminate unwanted instances or release unassociated elastic IPs and try again, or run with private addressing only
2.3.9.4.4 - Instances
This topic contains information to help you troubleshoot your instances.
Inaccurate IP addresses display in the output of euca-describe-addresses.
This can occur if you add IPs from the wrong subnet into your public IP pool, do a restart on the CC, swap out the wrong ones for the right ones, and do another restart on the CC. To resolve this issue, run the following commands.
Note
A restart should only be performed when no instances are running, or when instance service interruption can be tolerated. A restart causes the CC to reset its networking configuration, regardless of whether or not it is in use.systemctl stop eucalyptus-cloud.service
systemctl stop eucalyptus-cluster.service
iptables -F
systemctl restart eucalyptus-cluster.service
systemctl start eucalyptus-cloud.service
NC does not recalculate disk size correctly
This can occur when trying to add extra disk space for instance ephemeral storage. To resolve this, you need to delete the instance cache and restart the NC.
For example:
rm -rf /var/lib/eucalyptus/instances/*
systemctl restart eucalyptus-node.service
2.3.9.4.5 - Walrus and Storage
This topic contains information about Walrus-related problems and solutions.
Walrus decryption failed.
On Ubuntu 10.04 LTS, kernel version 2.6.32-31 includes a bug that prevents Walrus from decrypting images. This can be determined from the following line in cloud-output.log
javax.crypto.
BadPaddingException: pad block corrupted
If you are running this kernel:
- Update to kernel version 2.6.32-33 or higher.
- De-register the failed image ( ).
- Re-register the bundle that you uploaded ( ).
Walrus physical disk is not large enough.
- Stop the CLC.
- Add a disk.
- Migrate your data.
Make sure you use LVM with your new disk drive(s).
2.4 - Manage Resources
Manage Resources
This section includes tasks to help you manage your users’ cloud resources.
2.4.1 - Manage Auto Scaling Resources
You can list, delete, update, and suspend your Eucalyptus cloud’s Autoscaling resources by passing the option with the keyword with the appropriate command.The followings are some examples you can use to act on your Auto Scaling resources.
To show all launch configurations in your cloud, run the following command:
euscale-describe-launch-configs --show-long verbose
To show all Auto Scaling instances in your cloud, run the following command:
euscale-describe-auto-scaling-groups --show-long verbose
To show all Auto Scaling instances in your cloud, run the following command:
euscale-describe-auto-scaling-groups --show-long verbose
To delete an Auto Scaling resource in your cloud, first get the ARN of the resource, as in this example:
$ euscale-describe-launch-configs --show-long verbose
LAUNCH-CONFIG  TestLaunchConfig  emi-06663A57  m1.medium  2013-10-30T22:52:39.392Z  true
arn:aws:autoscaling::961915002812:launchConfiguration:5ac29caf-9aad-4bdb-b228-5f
ce841dc062:launchConfigurationName/TestLaunchConfig
Then run the following command with the ARN:
euscale-delete-launch-config
arn:aws:autoscaling::961915002812:launchConfiguration:5ac29caf-9aad-4bdb-b228-5f
ce841dc062:launchConfigurationName/TestLaunchConfig
2.4.2 - Manage CloudWatch Resources
To manage CloudWatch resources on a Eucalyptus cloud, use the option in any command that lists, deletes, modifies, or sets a CloudWatch resource.The following are examples of what you can do with your CloudWatch resources.
To list all alarms for the cloud, run the following command:
euwatch-describe-alarms verbose
2.4.3 - Manage Compute Resources
To manage compute resources on a Eucalyptus cloud, use the option in any command.The following are some examples you can use to view various compute resources.
To see all instances running on your cloud, enter the following command:
euca-describe-instances verbose
To see all volumes in your cloud, enter the following command:
euca-describe-volumes verbose
To see all keypairs in your cloud, enter the following command:
euca-describe-keypairs verbose
2.4.4 - Manage ELB Resources
To list and delete ELB resources on a Eucalyptus cloud, use the option with any command.The following are some examples.
To list all detailed configuration information for the load balancers in your cloud, run the following command:
eulb-describe-lbs verbose
To list the details of policies for all load balancers in your cloud, run the following command:
eulb-describe-lb-policies verbose
To list meta information for all load balancer policies in your cloud, run the following command:
eulb-describe-lb-policy-types verbose
To delete any load balancer or any load balancer resource on the cloud, instead of using the ELB name, use the DNS name. For example:
$ eulb-describe-lbs verbose
LOAD_BALANCER	MyLoadBalancer	MyLoadBalancer-961915002812.lb.foobar.eucalyptus-systems.com	2013-10-30T03:02:53.39Z

$ eulb-delete-lb MyLoadBalancer-961915002812.lb.foobar.eucalyptus-systems.com
$ eulb-describe-lbs verbose
2.4.5 - Manage IAM Resources
To manage Euare (IAM) resources on your Eucalyptus cloud, use the option with any command that describes, adds, deletes, or modifies resources. This option allows you to assume the role of the admin user for a given account. You can also use a policy to control and limit instances to specific availability zones. The following are some examples.
To list all groups in an account, enter the following command:
euare-grouplistbypath --as-account <account-name>
Note
The as-account option is for the Euare service only. To run commands for an account with any service use the clcadmin-impersonate-user command.To list all users in an account, enter the following command:
euare-userslistbypath --as-account <account-name>
To delete the login profile of a user in an account, enter the following command:
euare-userdelloginprofile --as-account <account-name> -u <user_name>
To modify the login profile of a user in an account, enter the following command:
euare-usermod --as-account <account-name> -u <user_name> -n
<new_user_name>
To restrict an image to a specific availability zone, edit and attach this sample policy to a user:
{
    "Statement":[
      {
        "Effect":"Allow",
        "Action":"ec2:*",
         "Resource":"*"
      },
      {
        "Effect": "Deny",
        "Action": [ "ec2:*" ],
        "Resource": "arn:aws:ec2:::availabilityzone/PARTI00",
        "Condition": {
          "ArnLike": {
            "ec2:TargetImage": "arn:aws:ec2:*:*:image/emi-239D37F2"
          }
        }
      }
    ]
  }
To restrict a user to actions only within a specific availability zone, edit and attach this sample policy to a user:
{
    "Version": "2012-10-17",
    "Statement": [{
      "Effect": "Allow",
      "Action": [ "ec2:TerminateInstances" ],
      "Resource": "*",
      "Condition": {
        "StringEquals": {
          "ec2:AvailabilityZone": "PARTI00"
        }
      }
    }]
  }
To deny actions at the account level, edit and attach this example policy to an account:
{
    "Statement": [ {
      "Effect": "Deny",
      "Action": [ "ec2:RunInstances" ],
      "Resource": "arn:aws:ec2:::availabilityzone/PARTI00",
      "Condition": {
          "ArnLike": {
              "ec2:TargetImage": "arn:aws:ec2:*:*:image/emi-239D37F2"
          }
      }
    } ]
  }
2.4.6 - Manage Walrus Resources
This topic explains Walrus resources.
- Access Control Lists (ACLs) allow an account to explicitly grant access to a bucket or object to another account. ACLs only work between accounts, not IAM users. You specify accounts with the CanonicalID or the email address associated with the account (for Eucalyptus this is the email of the account admin).
- These are set by the admin of an account to control the access of users within that specific account. This is how an admin controls what users in that specific account are allowed to do. Policies can specify allow/deny on specific S3 operations (e.g. s3:GetObject, or s3:PutObject). IAM policies are set by sending the policy to the IAM (Euare) endpoint, not S3 (Walrus).
- These are IAM-like policies set by the bucket owner are not supported in Eucalyptus.
For more information about bucket ACLs, go to Access Control List (ACL) Overview and Managing ACLs Using the REST API .
For more information about IAM policies, go to Using IAM Policies .
2.5 - Manage Regions
Manage Regions
This section provides information about regions and identity federation.
2.5.1 - Regions Overview
Eucalytpus provides support for the notion of federation of identity.Federation of identity information means that a Cloud Administrator can create a federation of (otherwise independent) Eucalyptus “clouds” where a Cloud User, using the same credentials as always, can use any of these federated Eucalyptus cloud regions. For the parts of Identify Access Management (IAM) and Security Token Service (STS) that Eucalyptus implements, the experience exposed to the Cloud User is the same as that seen by an AWS user working across AWS regions.
A user can interact with any region using the same credentials, subjected to the same policies, and having uniformly accessible and structured principals (Accounts, Users, Groups, Roles, etc.). The globality also includes the STS service functionality, the temporary credentials produced by the STS service also work globally.
Notably, this feature is restricted to IAM/STS and does not include other services which have pseudo-global characteristics, such as global bucket name space for S3. The following are general principles associated with regions:
- A region needs to be Registered as a federated region
- Registered regions should be discoverable via the EC2 DescribeRegions response
- A cloud user’s credentials should be accepted by any federated cloud
- There is a global IAM service (identities and policies are global for all registered regions)
2.5.2 - Region Configuration File Format
This section describes the necessary configuration properties that need to be addressed.For federation to be successfully configured, each cloud (i.e. region) that will be part of the federated cloud needs to have the following properties set (at a minimum):
| Property Name | Description |
|---|
| region.region_name | This cloud property identifies the local region. This is required and should be valid for use in a DNS name. |
| region.region_configuration | This property is a JSON document that will be the same for all federated regions. |
2.5.3 - Examples
In this example, there will be two clouds used (10.111.5.32 and 10.111.1.1). Before setting up federation, the clouds must meet the following requirements:
- Eucalyptus installed
- Eucalyptus DNS enabled
2.5.4 - Federation Differences Between AWS and Eucalyptus
This section outlines the differences between AWS and Eucalyptus with respect to federation in the following platforms:
- Euca2ools vs. AWS EC2 API Tools
- Eucalyptus OSG vs. AWS S3
- Eucalyptus Resource-Level vs. AWS Resource-Level Permissions
- Global Cloud Administration (Local vs. Federated)
2.5.5 - Troubleshooting
This section is presented in a Q&A format to provide a quick reference to the most frequently asked questions.
Can Cloud Administrators federate existing clouds (i.e. clouds that already have non-system Eucalyptus accounts)? A. No, this is currently not supported. If a cloud administrator wants to federate an Eucalyptus clouds, this must be done prior to any non-system Eucalyptus account/user/group creation.
Is Eucalyptus DNS required for federating Eucalyptus clouds? A. No, however its highly recommended to enable it.
Are supported for more granular IAM access policies per region? A. As of 4.2, no. IAM policies apply globally (for all regions). In order to get more granular IAM access, use availability zone restrictions under each region. For more information, see Restrict Image to Availability Zone .
What services/resources span globally? Which span regionally? A. Currently, only Eucalyptus IAM and STS are global services/resources. All other services/resources are region-based (i.e. Eucalyptus cloud-specific). The only resource that can be either global or regional are keypairs. This is because users can import the same keypair to each region, therefore, the keypair is globally accessible. For additional information, please refer to the AWS EC2 Documentation regarding Resource Locations .
Are Eucalyptus system accounts global in a federated setup? A. No. Any Eucalyptus system account is limited to that region. Examples of Eucalyptus system accounts are as follows:
- eucalyptus
- (eucalyptus)blockstorage
- (eucalyptus)aws-exec-read
- (eucalyptus)cloudformation
Is and supported? A. No. There have been no improvements associated with Object Storage Gateway (OSG) regarding cross-regional behavior similar to AWS.
If a user uploads an object to an Object Storage Gateway in one region, will copies show up in other regions (similar to the behavior on AWS)? A. No, this is currently unsupported.
Do federated Eucalyptus clouds follow the same globally? A. No, Eucalyptus IAM limitations are regionally scoped.
2.6 - Manage Security
Manage Security
This section details concepts and tasks required to secure your cloud.
2.6.1 - Security Overview
This topic is intended for people who are currently using Eucalyptus and who want to harden the cloud and underlying configuration.
This topic covers available controls and best practices for securing your Eucalyptus cloud. Cloud security depends on security across many layers of infrastructure and technology:
- Security of the physical infrastructure and hosts
- Security of the virtual infrastructure
- Security of instances
- Security of storage and data
- Security of users and accounts
Note
For information about securing applications in AWS cloud, we recommend the Amazon Web Services whitepaper. The practices in this in this paper also apply to your Eucalyptus cloud.2.6.2 - Best Practices
Best Practices
This topic contains recommendations for hardening your Eucalyptus cloud.
2.6.2.1 - Authentication and Access Control Best Practices
This topic describes best practices for Identity and Access Management and the account.
Identity and Access Management
Eucalyptus manages access control through an authentication, authorization, and accounting system. This system manages user identities, enforces access controls over resources, and provides reporting on resource usage as a basis for auditing and managing cloud activities. The user identity organizational model and the scheme of authorizations used to access resources are based on and compatible with the AWS Identity and Access Management (IAM) system, with some Eucalyptus extensions provided that support ease-of-use in a private cloud environment.
For a general introduction to IAM in Eucalyptus, see Access Concepts in the IAM Guide. For information about using IAM quotas to enforce limits on resource usage by users and accounts in Eucalyptus, see the Quotas section in the IAM Guide.
The Amazon Web Services IAM Best Practices are also generally applicable to Eucalyptus.
Credential Management
Protection and careful management of user credentials (passwords, access keys, X.509 certificates, and key pairs) is critical to cloud security. When dealing with credentials, we recommend:
- Limit the number of active credentials and do not create more credentials than needed.
- Only create users and credentials for the interfaces that you will actually use. For example, if a user is only going to use the Management Console, do not create credentials access keys for that user.
- Use and or to get a specific set of credentials if needed.
- Regularly check for active credentials using commands and remove unused credentials. Ideally, only one pair of active credentials should be available at any time.
- Rotate credentials regularly and delete old credentials as soon as possible. Credentials can be created and deleted using commands, such as and .
- When rotating credentials, there is an option to deactivate, instead of removing, existing access/secret keys and X.509 certificates. Requests made using deactivated credentials will not be accepted, but the credentials remain in the Eucalyptus database and can be restored if needed. You can deactivate credentials using and .
Privileged Roles
The eucalyptus account is a super-privileged account in Eucalyptus. It has access to all cloud resources, cloud setup, and management. The users within this account do not obey IAM policies and compromised credentials can result in a complete cloud compromisation that is not easy to contain. We recommend limiting the use of this account and associated users’ credentials as much as possible.
For all unprivileged operations, use regular accounts. If you require super-privileged access (for example, management of resources across accounts and cloud setup administration), we recommend that you use one of the predefined privileged roles.
The Account, Infrastructure, and Resource Administrator roles provide a more secure way to gain super privileges in the cloud. Credentials returned by an assume-role operation are short-lived (unlike regular user credentials). Privileges available to each role are limited in scope and can be revoked easily by modifying the trust or access policy for the role.
2.6.2.2 - Hosts
This topic describes best practices for machines that host a Eucalyptus component.Eucalyptus recommends restricting physical and network access to all hosts comprising the Eucalyptus cloud, and disabling unused applications and ports on all machines used in your cloud.
After installation, no local access to Eucalyptus component hosts is required for normal cloud operations and all normal cloud operations can be done over remote web service APIs.
The user-facing services (UFS) and object storage gateway (OSG) are the only two components that generally expect remote connections from end users. Each Eucalyptus component can be put behind a firewall following the list of open ports and connectivity requirements described in the Configure the Firewall section.
For more information on securing Red Hat hosts, see the Red Hat Enterprise Linux Security Guide .
2.6.2.3 - Images and Instances
Because all instances are based on images, creating a secure image helps to create secure instances. This topic lists best practices that will add additional security during image creation. As a general rule, harden your images similar to how you would harden your physical servers.
- Turn off password-based authentication by specifying the following option in :
- Encourage non-root access by providing an unprivileged user account. If necessary, use sudo to allow access to privileged commands
- Always delete the shell history and any other potentially sensitive information before bundling. If you attempt more than one bundle upload in the same image, the shell history contains your secret access key.
- Bundling a running instance requires your private key and X.509 certificate. Put these and other credentials in a location that is not bundled (e.g. when using , pass the folder location where the certificates are stored as part of the values for the option). AWS provides more in-depth information on .
- Consider installing in the image to help control root and non-root access. If cloud-init isn’t available, a custom script can be used.
- Consider using a tool such as zerofree to zero-out any unused space on the image.
- Consider editing to clear out the swap every time the instance is booted. This can be done using the following command:
- Consider enabling or for your images
- Disable all unused services and ports on the image.
- By default, all images registered have private launch permissions. Consider using to limit the accounts that can access the image.
After locking down the image using the steps above, additional steps can be done to further secure instances started from that image. For example, restrict access to the instance by allowing only trusted hosts or networks to access ports on your instances. You can control access to instances using
euca-authorize and euca-revoke .
Consider creating one security group that allows external logins and keep the remainder of your instances in a group that does not allow external logins. Review the rules in your security groups regularly, and ensure that you apply the principle of least privilege: only open up permissions as they are required. Use different security groups to deal with instances that have different security requirements.
2.6.2.4 - Management Console
This topic describes things you can do to secure the Eucalyptus Management Console.
- Enable HTTPS for communications with the console and configure the console to use a CA-signed certificate.
- We do not recommend the “Remember my keys” option for “Login to AWS” because it stores AWS credentials in your browser’s local storage and increases the security risk of AWS credentials being compromised.
- Change the default session timeouts if needed. For more information, see .
- If you don’t use the Management Console, we recommend that you disable (using ). For more information, see .
- Turn off password autocomplete for the console by setting the configuration option to false in the console’s configuration file.
- If memcached is configured to be used by the console, make sure it’s not exposed publicly because there is no authentication mechanism enabled out of the box. If the default Eucalyptus-provided configuration is used, it accepts connections only from localhost.
2.6.2.5 - Message Security
This topic describes which networking mode is the most secure, and describes how to enforce message security.
Replay Detection
Eucalyptus components receive and exchange messages using either Query or SOAP interfaces (or both). Messages received over these interfaces are required to have a time stamp (as defined by AWS specification) to prevent message replay attacks. Because Eucalyptus enforces strict policies when checking timestamps in the received messages, for the correct functioning of the cloud infrastructure, it is crucial to have clocks constantly synchronized (for example, with ntpd) on all machines hosting Eucalyptus components. To prevent user commands failures, it is also important to have clocks synchronized on the client machines.
Following the AWS specification, all Query interface requests containing the Timestamp element are rejected as expired after 15 minutes of the timestamp. Requests containing the Expires element expire at the time specified by the element. SOAP interface requests using WS-Security expire as specified by the WS-Security Timestamp element.
Replay detection parameters can be tuned as described in Configure Replay Protection .
Endpoints
Eucalyptus requires that all user requests (SOAP with WS-Security and Query) are signed, and that their content is properly hashed, to ensure integrity and non-repudiation of messages. For stronger security, and to ensure message confidentiality and server authenticity, client tools and applications should always use SSL/TLS protocols with server certification verification enabled for communications with Eucalyptus components.
By default, Eucalyptus components are installed with self-signed certificates. For public Eucalyptus endpoints, certificates signed by a trusted CA provider should be installed.
2.6.2.6 - Networking Modes
This topic describes the recommendations for networking modes.A Eucalyptus deployment can be configured in EDGE (AWS EC2 Classic compatible) or VPCMIDO (AWS VPC compatible) networking modes. In both modes, by default, instances are not allowed to send traffic with spoofed IP and/or MAC addresses and receive traffic that are not destined to their own IP and/or MAC addresses. Security groups should be used to control the ingress traffic to instances (EDGE and VPCMIDO modes) and to control the egress traffic from instances (VPCMIDO mode).
VPCMIDO mode offers many security features not present in EDGE mode. Instances of different accounts are deployed in user-defined isolated networks within a Eucalyptus cloud. A combination of security features including VPC, VPC subnets, security groups, source/destination check configuration, route tables, internet gateways, and NAT gateways can be used to selectively enable and configure network access to/from instances or group of instances.
For more information about choosing a networking modes, see Plan Networking Modes .
2.6.3 - Security Tasks
Tasks
This section details the tasks needed to make your cloud secure.
2.6.3.1 - Configure SSL
In order to connect to Eucalyptus using SSL, you must have a valid certificate for the User-Facing Services (UFS).
2.6.3.1.1 - Configure and Enable SSL for the Management Console
You can use secure HTTP for your console.To run your console over Secure HTTP:
Install nginx on your console server with the following command: yum install nginx Overwrite the default nginx.conf file with the template provided in /usr/share/doc/eucaconsole-/nginx.conf. cp /usr/share/doc/eucaconsole-/nginx.conf /etc/nginx/nginx.conf Uncomment the ’listen’ directive and uncomment/modify the SSL certificate paths in /etc/nginx/nginx.conf (search for “SSL configuration”). For example:
# SSL configuration
listen 443 ssl;
# ssl_certificate /path/to/ssl/pem_file;
# EXAMPLE:
ssl_certificate /etc/eucaconsole/console.crt;
# ssl_certificate_key /path/to/ssl/certificate_key;
# EXAMPLE:
ssl_certificate_key /etc/eucaconsole/console.key;
# end of SSL configuration
Note
For more information on generating self-signed SSL certificates, go to .Restart nginx using the following command:
systemctl restart nginx.service Edit the
/etc/eucaconsole/console.ini file, locate the
session.secure = false parameter, change
false to
true , then add the
sslcert and
sslkey lines immediately following, per this example:
session.secure = true
sslcert=/etc/eucaconsole/eucalyptus.com.chained.crt
sslkey=/etc/eucaconsole/eucalyptus.com.key
2.6.3.1.2 - Configure and Enable SSL for the UFS
This topic details tasks to configure SSL/TLS for the User-Facing Services (UFS)
If you have more than one host (other than node controllers), note the following:
- The keystore must be updated on each host running the eucalyptus-cloud service
- The [key_alias] must be the same on each host
- Use a wildcard certificate (i.e. *.<system.dns.dnsdomain>), since UFS is responsible for all service API endpoints
Create a Keystore
Eucalyptus uses a PKCS12-format keystore. If you are using a certificate signed by a trusted root CA, perform the following steps.
Enter the following command to convert your trusted certificate and key into an appropriate format:
openssl pkcs12 -export -in [YOURCERT.crt] -inkey [YOURKEY.key] \
  -out tmp.p12 -name [key_alias]
Note
The above command will request an export password, which is used in the following steps.Save a backup of the Eucalyptus keystore, at /var/lib/eucalyptus/keys/euca.p12 . Import your keystore into the Eucalyptus keystore on the UFS:
keytool -importkeystore -srckeystore tmp.p12 -srcstoretype pkcs12 \
  -srcstorepass [export_password] -destkeystore /var/lib/eucalyptus/keys/euca.p12 \
  -deststoretype pkcs12 -deststorepass eucalyptus -alias [key_alias] -destkeypass eucalyptus
Enable the UFS to Use the Keystore
To enable the UFS to use the keystore, perform the following steps in the CLC because the UFS gets all its configuration information from the CLC. Run the following commands on the CLC:
euctl bootstrap.webservices.ssl.server_alias=[key_alias]
Optional: Redirect Requests to use Port 443
To allow user facing services requests on port 443 instead of the default 8773, run the following commands on the CLC:
euctl bootstrap.webservices.port=443
2.6.3.2 - Change Multicast Address
This topic describes how to change your multicast address for group membership.By default, Eucalyptus uses the multicast address 239.193.7.3 for group membership. Most data centers limit multicast address communication for security measures. We recommend that you use addresses in the administratively-scoped multicast address range.
Note
As of Eucalyptus 4.3, the default multicast address changed from 228.7.7.3 to 239.193.7.3.To change the multicast address for group membership Stop all services, starting from the CC, SC, Walrus, then CLC. For example:
systemctl stop eucalyptus-cluster.service
systemctl stop eucalyptus-cloud.service
Change the eucalyptus.conf on the CC, modifying the CLOUD_OPTS parameter to the new IP address:
CLOUD_OPTS="--mcast-addr=228.7.7.3"
Note
The above shows how to set the multicast address to a value compatible with releases prior to Eucalyptus 4.3.Restart all services, starting from the CLC, Walrus, SC, CC. For example:
systemctl start eucalyptus-cloud.service
systemctl start eucalyptus-cluster.service
Verify that the configured multicast address is being used via netstat:
netstat -nulp
Postrequisites
- Check the firewall after changing the multicast address. See for more information.
2.6.3.3 - Configure Replay Protection
You can configure replay detection in Java components (which includes the CLC, UFS, OSG, Walrus, and SC) to allow replays of the same message for a set time period.
Note
To protect against replay attacks, the Java components cache messages only for 15 minutes. So it’s important that any client tools used to interact with the components have the Expires element set to a value less than 15 minutes from the current time. This is usually not an issue with standard tools, such as euca2ools and Amazon EC2 API Tools.The Java components’ replay detection algorithm rejects messages with the same signatures received within 15 minutes. The time within which messages with the same signatures are accepted is controlled by the
bootstrap.webservices.replay_skew_window_sec property. The default value of this property is 3 seconds. To change this value, enter the following command:
euctl bootstrap.webservices.replay_skew_window_sec=[new_value_in_seconds]
If you set this property to 0 , Eucalyptus will not allow any message replays. This setting provides the best protection against message replay attacks.
If you set this property to any value greater than 15 minutes plus the values of ws.clock_skew_sec (that is, to a value >= 920 sec in the default installation), Eucalyptus disables replay detection completely.
When checking message timestamps for expiration, Eucalyptus allows up to 20 seconds of clock drift between the machines. This is a default setting. You can change this value for the Java components at runtime by setting the bootstrap.webservices.clock_skew_sec property as follows:
euctl bootstrap.webservices.clock_skew_sec=[new_value_in_seconds]
2.6.3.4 - Configure Session Timeouts
To set the session timeouts in the Management Console:
Modify the session.timeout and session.cookie_expires entries in the [app:main] section of the configuration file. The session.timeout value defines the number of seconds before an idle session is timed out. The session.cookie_expires is the maximum length that any session can be active before being timed out. All values are in seconds:
session.timeout=1800


session.cookie_expires=43200
2.6.3.5 - Configure STS Actions
The Security Token Service (STS) allows you to enable or disable specific token actions.By default, the enabled actions list is empty. However, this means that all actions are enabled. To disable actions, list each action in the disabledactions property. To enable specific actions, list them in the enabledactions property.
# euctl tokens
PROPERTY	tokens.disabledactions	{}
PROPERTY	tokens.enabledactions	{}
The values for each property are case-insensitive, space or comma-separated lists of token service actions. If an action is in the disable list it will not be permitted. Eucalyptus returns an HTTP status 503 and the code ServiceUnavailable .
If the enable list is not empty, Eucalyptus only permits the actions specifically listed.
| Action | Description |
|---|
| AssumeRole | Roles as per AWS/STS and Eucalyptus-specific personas admin functionality |
| GetAccessToken | Eucalyptus extension for password logins (for example, the Management Console) |
| GetImpersonationToken | Eucalyptus extension that allows cloud administrators to act as specific users |
| GetSessionToken | Session tokens in the sameas per AWS/STS |
For more information about STS, go to STS section of the AWS CLI Reference .
2.6.3.6 - Configure the Firewall
Restricting Network Access
This section provides basic guidance on setting up a firewall around your Eucalyptus components. It is not intended to be exhaustive.
On the Cloud Controller (CLC), Walrus, and Storage Controller (SC), allow for the following jGroups traffic:
TCP connections between CLC, user-facing services (UFS), object storage gateway (OSG), Walrus, and SC on port 8779 (or the first available port in range 8779-8849)
UDP connections between CLC, UFS, OSG, Walrus, and SC on port 7500
Multicast connections between CLC and UFS, OSG, Walrus, and SC to IP 239.193.7.3 on UDP port 8773
On the UFS, allow the following connections:
TCP connections from end-users and instances on ports 8773
End-user and instance connections to DNS ports
On the CLC, allow the following connections:
TCP connections from UFS, CC and Eucalyptus instances (public IPs) on port 8773 (for metadata service)
TCP connections from UFS, OSG, Walrus, and SC on port 8777
On the CC, make sure that all firewall rules are compatible with the dynamic changes performed by Eucalyptus, described in the section below. Also allow the following connections:
TCP connections from CLC on port 8774
On OSG, allow the following connections:
TCP connections from end-users and instances on port 8773
TCP connections from SC and NC on port 8773
On Walrus, allow the following connections:
TCP connections from OSG on port 8773
On the SC, allow the following connections:
TCP connections from CLC and NC on TCP port 8773
TCP connections from NC on TCP port 3260, if tgt (iSCSI open source target) is used for EBS in DAS or Overlay modes
On the NC, allow the following connections:
TCP connections from CC on port 8775
TCP connections from other NCs on port 16514
DHCP traffic forwarding to VMs
Traffic forwarding to and from instances’ private IP addresses
2.6.3.7 - Reserve Ports
| Port | Description |
|---|
| TCP 5005 | DEBUG ONLY: This port is used for debugging (using the –debug flag). |
| TCP 8772 | DEBUG ONLY: JMX port. This is disabled by default, and can be enabled with the –debug or –jmx options for CLOUD_OPTS. |
| TCP 8773 | Web services port for the CLC, user-facing services (UFS), object storage gateway (OSG), Walrus SC; also used for external and internal communications by the CLC and Walrus. Configurable with euctl. |
| TCP 8774 | Web services port on the CC. Configured in the eucalyptus.conf configuration file |
| TCP 8775 | Web services port on the NC. Configured in the eucalyptus.conf configuration file. |
| TCP 8777 | Database port on the CLC |
| TCP 8779 (or next available port, up to TCP 8849) | jGroups failure detection port on CLC, UFS, OSG, Walrus SC. If port 8779 is available, it will be used, otherwise, the next port in the range will be attempted until an unused port is found. |
| TCP 8888 | The default port for the Management Console. Configured in the /etc/eucalyptus-console/console.ini file. |
| TCP 16514 | TLS port on Node Controller, required for instance migrations |
| UDP 7500 | Port for diagnostic probing on CLC, UFS, OSG, Walrus SC |
| UDP 8773 | Membership port for any UFS, OSG, Walrus, and SC |
| UDP 8778 | The bind port used to establish multicast communication |
| TCP/UDP 53 | DNS port on UFS |
| UDP 63822 | eucanetd binds to localhost port 63822 and uses it to detect and avoid running multiple instances (of eucanetd) |
Note
For information about ports used by MidoNet, see the (Category OpenStack can be ignored).2.6.3.8 - Synchronize Components
To synchronize your Eucalyptus component machines with an NTP server, perform the following tasks.
Enter the following command on a machine hosting a Eucalyptus component:
# ntpdate pool.ntp.org
# systemctl start ntpd.service
# systemctl enable ntpd.service
# ps ax | grep ntp
# hwclock --systohc
Repeat for each machine hosting a Eucalyptus component.
2.7 - Eucalyptus Commands
Eucalyptus Commands
This section contains reference information for Eucalyptus administration commands.
2.7.1 - Eucalyptus Administration Commands
Eucalyptus Administration Commands
Eucalyptus offers commands for common administration tasks and inquiries. This section provides a reference for these commands.
2.7.1.1 - euctl
Syntax
euctl [-Anr] [-d | -s] NAME ...
euctl [-nq] NAME=VALUE ...
euctl [-nq] NAME=@FILE ...
euctl --dump [--format {raw,json,yaml}] NAME
euctl --edit [--format {raw,json,yaml}] NAME
Positional Arguments
| Argument | Description |
|---|
| NAME | Output a variable’s value. |
| NAME=VALUE | Set a variable to the specified value and then output it. |
| NAME=@FILE | Set a variable to that of the specified file’s contents, then output it. |
Options
| Option | Description | Required |
|---|
| -A, –all-types | List all the known variable names, including structures. Those with string or integer values will be output as usual; for the structured values, the methods of retrieving them are given. | No |
| -d | Output variables’ default values rather than their current values. Note that not all variables have default values. | No |
| -s | Show variables’ descriptions instead of their current values. | No |
| -n | Suppress output of the variable name. This is useful for setting shell variables. | No |
| -q | Suppress all output when setting a variable. This option overrides the behavior of the -n parameter. | No |
| -r, –reset | Reset the given variables to their default values. | No |
| –dump | Output the value of a structured variable in its entirety. The value will be formatted in the manner specified by the –format option. | No |
| –edit | Edit the value of a structure variable interactively. The value will be formatted in the manner specified by the –format option. Only one variable may be edited per invocation. When looking for an editor, the program will first try the environment variable VISUAL, then the environment variable EDITOR, and finally the default editor, vi. | No |
| –format {raw,json,yaml} | Use the specified format when displaying a structured variable.Valid values: raw | json |
Examples
When retrieving a variable, a subset of the MIB name may be specified to retrieve a list of variables in that subset. For example, to list all the dns variables:
euctl dns
This replaces euca-describe-properties .
When setting a variable, the MIB name should be followed by an equal sign and the new value:
euctl dns.enabled=true
This replaces euca-modify-property -p .
To write variables using the contents of the files as their new values rather than typing them into the command line, follow them with =@ and those file names:
euctl cloud.network.network_configuration=@/etc/eucalyptus/network.yaml
This replaces euca-modify-property -f .
Specify a filename to read the values from a file:
myproperty=@myvaluefile
It is possible to read or write more than one variable in a single invocation of euctl . Just separate them with spaces:
euctl one=1 two=2 three four=@4.txt five
In all of these cases, euctl will generally output each variable named on its command line, along with its current (and potentially just-changed) value. For example, the output of the command above could be:
one = 1
two = 2
three = 3
four = 4
five = 5
To reset a variable to its default value, specify the -r option:
euctl -r dns.enabled
The information available from euctl consists of integers, strings, and structures. The structured information can only be retrieved by specialized programs and, in some cases, this program’s --edit and --dump options.
Note
Refer to this command’s manpage for a complete list of environment variables, options, and outputs.2.7.1.2 - euserv-deregister-service
Syntax
euserv-deregister-service [-U URL] [--region USER@REGION] [-I KEY_ID]

       [-S KEY] [--security-token TOKEN] [--debug]
              [--debugger] [--version] [-h] SVCINSTANCE
Positional Arguments
| Argument | Description |
|---|
| SVCINSTANCE | Name of the service instance to de-register. |
Output
Eucalyptus returns a message stating that service instance was successfully de-registered.
Example
To de-register the dns service named “API_10.111.1.44.dns”:
euserv-deregister-service API_10.111.1.44.dns
2.7.1.3 - euserv-describe-events
Syntax
euserv-describe-events [-s] [-f FORMAT]
Description
Events come in the form of a list, where each event contains one or more of the following tags:
| Tag | Description |
|---|
| id | A unique ID for the event. |
| message | A free-form text description of the event. |
| severity | The message’s severity (FATAL, URGENT, ERROR, WARNING, INFO, DEBUG, TRACE). |
| stack-trace | The stack trace, if any, corresponding to the event. The -s option is required to make this appear. |
| subject-arn | The Eucalyptus ARN of the service affected by the event. |
| subject-name | The name of the service affected by the event. |
| subject-type | The type of service affected by the event. |
| timestamp | The date and time of the event’s creation. |
Environment
Note
The command requires access keys and knowledge of where to locate the web services it needs to contact. It can obtain these from several locations.| Environment | Description |
|---|
| AWS_ACCESS_KEY_ID | The access key ID to use when authenticating web service requests. This takes precedence over and euca2ools.ini, but not -I. |
| AWS_SECRET_ACCESS_KEY | The secret key to use when authenticating web service requests. This takes precedence over –region and euca2ools.ini(5), but not -S. |
| EUCA_BOOTSTRAP_URL | The URL of the service to contact. This takes precedence over –region and euca2ools.ini, but not -U. |
Options
| Option | Description | Required |
|---|
| -f, –format format | Print events in a given format, where format can be: yaml or oneline, and format:string. See for details about each format. When omitted, the format defaults to yaml. | No |
| -s, –show-stack-traces | Include the stack-trace tag in events’ data. This is omitted by default due to its length. | No |
Output
There are several built-in formats, and you can define additional formats using a format: string , as described below. Here are the details of the built-in formats:
yaml
This outputs block-style YAML designed to be easily readable. Tags that are empty or not defined do not appear in this output at all.
events:
            - timestamp: {timestamp}
            severity: {severity}
            id: {id}
            subject-type: {subject-type}
            subject-name: {subject-name}
            subject-host: {subject-host}
            subject-arn: {subject-arn}
            message: |-
            {message}
            stack-trace: |-
            {stack-trace}
oneline
This output is designed to be as compact as possible.
{timestamp} {severity} {subject-type} {subject-name} {message}
format:string
The format: string format allows you to specify which information you want to show using placeholders enclosed in curly braces to indicate where to show the tags for each event. For example:
euserv-describe-events -f "format:{timestamp} {subject-name} {message}"
Example
To output a list of service-affecting events in the oneline format:
euserv-describe-events --format oneline
2016-06-20 16:16:08 INFO node 10.111.1.15 the node is operating normally\nFound service status for 10.111.1.15: ENABLED
2016-06-27 17:37:57 ERROR node 10.111.5.50 Error occurred in transport
2016-06-28 07:00:17 ERROR node 10.111.5.50
2.7.1.4 - euserv-describe-node-controllers
Syntax
euserv-describe-node-controllers [--ec2-url URL] [--show-headers]

   [--show-empty-fields] [-U URL]
          [--region USER@REGION] [-I KEY_ID]  [-S  KEY]  [--security-token
          TOKEN] [--debug] [--debugger] [--version] [-h]
Options
| Option | Description | Required |
|---|
| –ec2-url url | The compute service’s endpoint URL. | No |
| –show-headers | Show column headers. | No |
Output
Eucalyptus returns information about the node controller and its instances, for example:
NODE  one  10.111.1.53  enabled
INSTANCE  i-162a8f09
INSTANCE  i-2b6cdd10
NODE  one  10.111.5.132  enabled
INSTANCE  i-ba9307d7
Example
euserv-describe-node-controllers --region localhost
2.7.1.5 - euserv-describe-service-types
Syntax
euserv-describe-service-types [-a] [--show-headers]

[--show-empty-fields] [-U URL]
   [--region  USER@REGION]  [-I  KEY_ID]  [-S  KEY] [--security-token TOKEN]
   [--debug] [--debugger] [--version] [-h]
Options
| Option | Description | Required |
|---|
| -a, –all | Show all service types regardless of their properties. | No |
| –show-headers | Show column headers. | No |
Output
Eucalyptus returns a list of service types.
Example
euserv-describe-service-types
SVCTYPE  arbitrator                The Arbitrator service
SVCTYPE  autoscaling     user-api  Auto Scaling API service
SVCTYPE  cloudformation  user-api  Cloudformation API service
SVCTYPE  cloudwatch      user-api  CloudWatch API service
SVCTYPE  cluster                   The Cluster Controller service
SVCTYPE  compute         user-api  the Eucalyptus EC2 API service
SVCTYPE  dns             user-api  Eucalyptus DNS server
SVCTYPE  euare           user-api  IAM API service
SVCTYPE  eucalyptus                eucalyptus service implementation
SVCTYPE  identity        user-api  Eucalyptus identity service
SVCTYPE  imaging         user-api  Eucalyptus imaging service
SVCTYPE  loadbalancing   user-api  ELB API service
SVCTYPE  objectstorage   user-api  S3 API service
SVCTYPE  simpleworkflow  user-api  Simple Workflow API service
SVCTYPE  storage                   The Storage Controller service
SVCTYPE  tokens          user-api  STS API service
SVCTYPE  user-api                  The service group of all user-facing API endpoint services
SVCTYPE  walrusbackend             The legacy Walrus Backend service
2.7.1.6 - euserv-describe-services
Syntax
euserv-describe-services [-a]

       [--group-by-type | --group-by-zone | --group-by-host | --expert]
         [--show-headers]   [--show-empty-fields]   [-U   URL]  [--region
         USER@REGION]  [-I  KEY_ID]  [-S  KEY]  [--security-token  TOKEN]
         [--filter  NAME=VALUE]  [--debug]  [--debugger] [--version] [-h]
         [SVCINSTANCE [SVCINSTANCE ...]]
Positional Arguments
| Argument | Description |
|---|
| SVCINSTANCE | Limit results to specific instances of services. |
Options
| Option | Description | Required |
|---|
| -a, –all | Show all services regardless of type. | No |
| –group-by-type | Collate services by service type (default). | No |
| –group-by-zone | Collate services by availability zone. | No |
| –group-by-host | Collate services by host. | No |
| –expert | Show advanced information, including service accounts. | No |
| –show-headers | Show column headers. | No |
| –filter name=value | Restrict results to those that meet criteria. Allowed filter names: availability-zone. The service’s availability zone.host. The machine running the service.internal. Whether the service is used only internally (true or false).public. Whether the service is public (true or false).service-group. Whether the service is a member of a specific service group.service-group-member. Whether the service is a member of any service group (true or false).service-type. The type of service.state. The service’s state. | No |
Output
Eucalyptus returns information about the services you specified.
Example
Verify that you are looking at the cloud controllers view of the service state by explicitly running against that host:
euserv-describe-services --filter service-type=storage -U http://localhost:8773/services/Empyrean
SERVICE  storage  one  one-sc-1  enabled
2.7.1.7 - euserv-migrate-instances
Syntax
euserv-migrate-instances (-s HOST | -i INSTANCE)

  [--include-dest HOST | --exclude-dest HOST]
  [-U URL] [--region USER@REGION] [-I KEY_ID]  [-S  KEY]  [--security-token
  TOKEN] [--debug] [--debugger] [--version] [-h]
Options
| Option | Description | Required |
|---|
| -s, –source host | Remove all instances from a specific host. | No |
| -i, –instance instance | Remove one instance from its current host. | No |
| –include-dest host | Allow migration to only a specific host (may be used more than once). | No |
| –exclude-dest host | Allow migration to any host except a specific one (may be used more than once). | No |
Output
Unless requested, no output is given. You can run the euserv-describe-* command to verify that the migration activity completed successfully, as shown in the example following.
Example
To migrate an instance from its current host:
euserv-migrate-instances -i i-8eacd211
euserv-describe-node-controllers
NODE  zone-555  10.104.1.200  enabled

NODE  zone-555  10.104.1.201  enabled
INSTANCE  i-8eacd211
2.7.1.8 - euserv-modify-service
Syntax
euserv-modify-service -s STATE [-U URL] [--region USER@REGION]

   [-I KEY_ID] [-S KEY] [--security-token TOKEN]
   [--debug] [--debugger] [--version] [-h] SVCINSTANCE
Positional Arguments
| Argument | Description |
|---|
| SVCINSTANCE | The name of the service instance to modify. |
Options
| Option | Description | Required |
|---|
| -s, –state state | The state to change to. | Yes |
Output
No output is given. You can run the euserv-describe-services command to verify that the modification completed successfully, as shown in the example following.
Example
To modify the state of a storage controller service named “two-sc-1” to stopped:
euserv-modify-service -s stopped two-sc-1
euserv-describe-services two-sc-1
SERVICE  storage  two  two-sc-1  stopped
2.7.1.9 - euserv-register-service
Syntax
euserv-register-service -t TYPE -h IP [--port PORT] [-z ZONE] [-U URL]

       [--region USER@REGION] [-I KEY_ID] [-S KEY]
           [--security-token   TOKEN]  [--debug]  [--debugger]  [--version]
           [--help] SVCINSTANCE
Positional Arguments
| Argument | Description |
|---|
| SVCINSTANCE | The name of the new service instance to register. |
Options
| Option | Description | Required |
|---|
| -t, –type type | The new service instance’s type. | Yes |
| -h, –host IP | The host on which the new instance of the service runs. | Yes |
| –port port | The port on which the new instance of the service runs (default for cluster: 8774, otherwise: 8773). | No |
| -z, –availability-zone zone | The availability zone in which to register the new service instance. This is required only for services of certain types. | Conditional |
Output
No output is given when it succeeds.
Example
To register the ufs service named “user-api-5”:
euserv-register-service -t user-api -h 10.0.0.15 user-api-5
Note
A prerequisite for this command is to have the credentials in the shell you are running the register command. For example:2.7.2 - Eucalyptus Configuration Variables
Eucalyptus exposes a number of variables that can be configured using the command. This topic explains what types of variables Eucalyptus uses, and lists the most common configurable variables.
Eucalyptus Variable Types
Eucalyptus uses two types of variables: ones that can be changed (as configuration options), and ones that cannot be changed (they are displayed as variables, but configured by modifying the eucalyptus.conf file on the CC).
Note
Once a cloud is in use and has started operating based on these variables, it is not safe to change them at runtime.Eucalyptus Variables
The following table contains a list of common Eucalyptus cloud variables.
| Variable | Description |
|---|
| authentication.access_keys_limit | Limit for access keys per user |
| authentication.authorization_cache | Authorization cache configuration, for credentials and authorization metadata |
| authentication.authorization_expiry | Default expiry for cached authorization metadata |
| authentication.authorization_reuse_expiry | Default expiry for re-use of cached authorization metadata on failure |
| authentication.credential_download_generate_certificate | Strategy for generation of certificates on credential download (Never |
| authentication.credential_download_host_match | CIDR to match against for host address selection |
| authentication.credential_download_port | Port to use in service URLs when ‘bootstrap.webservices.port’ is not appropriate. |
| authentication.default_password_expiry | Default password expiry time |
| authentication.max_policy_attachments | Maximum number of attached managed policies |
| authentication.max_policy_size | Maximum size for an IAM policy (bytes) |
| authentication.signing_certificates_limit | Limit for signing certificates per user |
| authentication.system_account_quota_enabled | Process quotas for system accounts |
| autoscaling.activityexpiry | Expiry age for scaling activities. Older activities are deleted. |
| autoscaling.activityinitialbackoff | Initial back-off period for failing activities. |
| autoscaling.activitymaxbackoff | Maximum back-off period for failing activities. |
| autoscaling.activitytimeout | Timeout for a scaling activity. |
| autoscaling.maxlaunchincrement | Maximum instances to launch at one time. |
| autoscaling.maxregistrationretries | Number of times to attempt load balancer registration for each instance. |
| autoscaling.maxtags | Maximum number of user defined tags for a group |
| autoscaling.pendinginstancetimeout | Timeout for a pending instance. |
| autoscaling.suspendedprocesses | Globally suspend scaling processes; a comma-delimited list of processes (Launch,Terminate,HealthCheck, ReplaceUnhealthy,AZRebalance, AlarmNotification,ScheduledActions, AddToLoadBalancer). Default is empty, meaning the processes are not suspended. |
| autoscaling.suspendedtasks | Suspended scaling tasks. |
| autoscaling.suspensionlaunchattemptsthreshold | Minimum launch attempts for administrative suspension of scaling activities for a group. |
| autoscaling.suspensiontimeout | Timeout for administrative suspension of scaling activities for a group. |
| autoscaling.untrackedinstancetimeout | Timeout for termination of untracked auto scaling instances. |
| autoscaling.zonefailurethreshold | Time after which an unavailable zone should be treated as failed |
| bootstrap.async.future_listener_debug_limit_secs | Number of seconds a future listener can execute before a debug message is logged. |
| bootstrap.async.future_listener_error_limit_secs | Number of seconds a future listener can execute before an error message is logged. |
| bootstrap.async.future_listener_get_retries | Total number of seconds a future listener’s executor waits to get(). |
| bootstrap.async.future_listener_get_timeout | Number of seconds a future listener’s executor waits to get() per call. |
| bootstrap.async.future_listener_info_limit_secs | Number of seconds a future listener can execute before an info message is logged. |
| bootstrap.hosts.state_initialize_timeout | Timeout for state initialization (in msec). |
| bootstrap.hosts.state_transfer_timeout | Timeout for state transfers (in msec). |
| bootstrap.notifications.batch_delay_seconds | Interval (in seconds) during which a notification will be delayed to allow for batching events for delivery. |
| bootstrap.notifications.digest | Send a system state digest periodically. |
| bootstrap.notifications.digest_frequency_hours | Period (in hours) with which a system state digest will be delivered. |
| bootstrap.notifications.digest_only_on_errors | If sending system state digests is set to true, then only send the digest when the system has failures to report. |
| bootstrap.notifications.digest_frequency_hours | Period (in hours) with which a system state digest will be delivered. |
| bootstrap.notifications.digest_only_on_errors | If sending system state digests is set to true, then only send the digest when the system has failures to report. |
| bootstrap.notifications.email_from | From email address used for notification delivery. |
| bootstrap.notifications.email_from_name | From email name used for notification delivery. |
| bootstrap.notifications.email_from_name | From email name used for notification delivery. |
| bootstrap.notifications.email_subject_prefix | Email subject used for notification delivery. |
| bootstrap.notifications.email_to | Email address where notifications are to be delivered. |
| bootstrap.notifications.include_fault_stack | Period (in hours) with which a system state digest will be delivered. |
| bootstrap.notifications.email.email_smtp_host | SMTP host to use when sending email. If unset, the following values are tried: 1) the value of the ‘mail.smtp.host’ system variable, 2) localhost, 3) mailhost. |
| bootstrap.notifications.email.email_smtp_port | SMTP port to use when sending email. Defaults to 25 |
| bootstrap.servicebus.common_thread_pool_size | Default thread pool for component message processing. When the size of the common thread pool is zero or less, Eucalyptus uses separate thread pools for each component and a pool for dispatching. Default size = 256 threads. |
| bootstrap.servicebus.component_thread_pool_size | Used when the size of the common thread pool is zero or less. Default size = 64 threads. |
| bootstrap.servicebus.context_message_log_whitelist | Message patterns to match for logging. Allows selective message logging at INFO level. A list of wildcards that allows selective logging for development or troubleshooting (e.g., on request/response, on a package, on a component). Logging can impact security; do not use as a general purpose logging feature. |
| bootstrap.servicebus.context_timeout | Message context timeout in seconds. Default = 60 seconds. |
| bootstrap.servicebus.dispatch_thread_pool_size | Used when the size of the common thread pool is zero or less. Default size = 256 threads. |
| bootstrap.servicebus.hup | Do a soft reset. Default = 0 (false). |
| bootstrap.timer.rate | Amount of time (in milliseconds) before a previously running instance which is not reported will be marked as terminated. |
| bootstrap.topology.coordinator_check_backoff_secs | Backoff between service state checks (in seconds). |
| bootstrap.topology.local_check_backoff_secs | Backoff between service state checks (in seconds). |
| bootstrap.tx.concurrent_update_retries | Maximum number of times a transaction may be retried before giving up. |
| bootstrap.webservices.async_internal_operations | Execute internal service operations from a separate thread pool (with respect to I/O). |
| bootstrap.webservices.async_operations | Execute service operations from a separate thread pool (with respect to I/O). |
| bootstrap.webservices.async_pipeline | Execute service specific pipeline handlers from a separate thread pool (with respect to I/O). |
| bootstrap.webservices.channel_connect_timeout | Channel connect timeout (ms). |
| bootstrap.webservices.channel_keep_alive | Socket keep alive. |
| bootstrap.webservices.channel_nodelay | Server socket TCP_NODELAY. |
| bootstrap.webservices.channel_reuse_address | Socket reuse address. |
| bootstrap.webservices.client_http_chunk_buffer_max | Server http chunk max. |
| bootstrap.webservices.client_http_pool_acquire_timeout | Client http pool acquire timeout |
| bootstrap.webservices.client_internal_connect_timeout_millis | Client connection timeout (ms) |
| bootstrap.webservices.client_internal_hmac_signature_enabled | Client HMAC signature version 4 enabled |
| bootstrap.webservices.client_internal_timeout_secs | Client idle timeout (secs). |
| bootstrap.webservices.client_message_log_whitelist | Client message patterns to match for logging |
| bootstrap.webservices.client_pool_max_threads | Server worker thread pool max. |
| bootstrap.webservices.clock_skew_sec | A max clock skew value (in seconds) between client and server accepted when validating timestamps in Query/REST protocol. |
| bootstrap.webservices.cluster_connect_timeout_millis | Cluster connect timeout (ms). |
| bootstrap.webservices.default_aws_sns_uri_scheme | Default scheme for AWS_SNS_URL. |
| bootstrap.webservices.default_ec2_uri_scheme | Default scheme for EC2_URL. |
| bootstrap.webservices.default_euare_uri_scheme | Default scheme for EUARE_URL. |
| bootstrap.webservices.default_https_enabled | Default scheme prefix. |
| bootstrap.webservices.default_s3_uri_scheme | Default scheme for S3_URL. |
| bootstrap.webservices.disabled_soap_api_components | List of services with disabled SOAP APIs. |
| bootstrap.webservices.http_max_chunk_bytes | Maximum HTTP chunk size (bytes). |
| bootstrap.webservices.http_max_header_bytes | Maximum HTTP headers size (bytes). |
| bootstrap.webservices.http_max_initial_line_bytes | Maximum HTTP initial line size (bytes). |
| bootstrap.webservices.http_max_requests_per_connection | Maximum HTTP requests per persistent connection |
| bootstrap.webservices.http_server_header | HTTP server header returned for responses. If set to “default”, the standard version header is returned, e.g. Eucalyptus/4.3.1. If set to another value, that value is returned in the header, except for an empty value, which results in no server header being returned.Default: default |
| bootstrap.webservices.listener_address_match | CIDRs matching addresses to bind on Default interface is always bound regardless. |
| bootstrap.webservices.log_requests | Enable request logging. |
| bootstrap.webservices.oob_internal_operations | Execute internal service operations out of band from the normal service bus. |
| bootstrap.webservices.pipeline_enable_query_decompress | Enable Query Pipeline http request decompression |
| bootstrap.webservices.pipeline_idle_timeout_seconds | Server socket idle time-out. |
| bootstrap.webservices.pipeline_max_query_request_size | Maximum Query Pipeline http chunk size (bytes). |
| bootstrap.webservices.port | Port to bind Port 8773 is always bound regardless. |
| bootstrap.webservices.replay_skew_window_sec | Time interval duration (in seconds) during which duplicate signatures will be accepted to accommodate collisions. |
| bootstrap.webservices.server_boss_pool_max_mem_per_conn | Server max selector memory per connection. |
| bootstrap.webservices.server_boss_pool_max_threads | Server selector thread pool max. |
| bootstrap.webservices.server_boss_pool_timeout_millis | Service socket select timeout (ms). |
| bootstrap.webservices.server_boss_pool_total_mem | Server worker thread pool max. |
| bootstrap.webservices.server_channel_nodelay | Server socket TCP_NODELAY. |
| bootstrap.webservices.server_channel_reuse_address | Server socket reuse address. |
| bootstrap.webservices.server_pool_max_mem_per_conn | Server max worker memory per connection. |
| bootstrap.webservices.server_pool_max_threads | Server worker thread pool max. |
| bootstrap.webservices.server_pool_timeout_millis | Service socket select timeout (ms). |
| bootstrap.webservices.server_pool_total_mem | Server max worker memory total. |
| bootstrap.webservices.statistics | Record and report service times. |
| bootstrap.webservices.unknown_parameter_handling | Request unknown parameter handling (default |
| bootstrap.webservices.use_dns_delegation | Use DNS delegation. |
| bootstrap.webservices.use_instance_dns | Use DNS names for instances. |
| bootstrap.webservices.ssl.client_https_enabled | Client HTTPS enabled |
| bootstrap.webservices.ssl.client_https_server_cert_verify | Client HTTPS verify server certificate enabled |
| bootstrap.webservices.ssl.client_ssl_ciphers | Client HTTPS ciphers for internal use |
| bootstrap.webservices.ssl.client_ssl_protocols | Client HTTPS protocols for internal use |
| bootstrap.webservices.ssl.server_alias | Alias of the certificate entry in euca.p12 to use for SSL for webservices. |
| bootstrap.webservices.ssl.server_password | Password of the private key corresponding to the specified certificate for SSL for web services. |
| bootstrap.webservices.ssl.server_ssl_ciphers | SSL ciphers for web services. |
| bootstrap.webservices.ssl.server_ssl_protocols | SSL protocols for web services. |
| bootstrap.webservices.ssl.user_ssl_ciphers | SSL ciphers for external use. |
| bootstrap.webservices.ssl.user_ssl_default_cas | Use default CAs with SSL for external use. |
| bootstrap.webservices.ssl.user_ssl_enable_hostname_verification | SSL hostname validation for external use. |
| bootstrap.webservices.ssl.user_ssl_protocols | SSL protocols for external use. |
| cloud.db_check_poll_time | Poll time (ms) for db connection check |
| cloud.db_check_threshold | Threshold (number of connections or %) for db connection check |
| cloud.euca_log_level | Log level for dynamic override. |
| cloud.identifier_canonicalizer | Name of the canonicalizer for resource identifiers. |
| cloud.log_file_disk_check_poll_time | Poll time (ms) for log file disk check |
| cloud.log_file_disk_check_threshold | Threshold (bytes or %) for log file disk check |
| cloud.memory_check_poll_time | Poll time (ms) for memory check |
| cloud.memory_check_ratio | Ratio (of post-garbage collected old-gen memory) for memory check |
| cloud.trigger_fault | Fault id last used to trigger test |
| cloud.cluster.disabledinterval | The time period between service state checks for a Cluster Controller which is DISABLED. |
| cloud.cluster.enabledinterval | The time period between service state checks for a Cluster Controller which is ENABLED. |
| cloud.cluster.notreadyinterval | The time period between service state checks for a Cluster Controller which is NOTREADY. |
| cloud.cluster.pendinginterval | The time period between service state checks for a Cluster Controller which is PENDING. |
| cloud.cluster.requestworkers | The number of concurrent requests which will be sent to a single Cluster Controller. |
| cloud.cluster.startupsyncretries | The number of times a request will be retried while bootstrapping a Cluster Controller. |
| cloud.images.cleanupperiod | The period between runs for clean up of deregistered images. |
| cloud.images.defaultvisibility | The default value used to determine whether or not images are marked ‘public’ when first registered. |
| cloud.images.maximagesizegb | The maximum registerable image size in GB |
| cloud.images.maxmanifestsizebytes | The maximum allowed image manifest size in bytes |
| cloud.long_identifier_prefixes | List of resource identifier prefixes for long identifiers or * for all |
| cloud.monitor.default_poll_interval_mins | How often the CLC requests data from the CC. Default value is 5 minutes. |
| cloud.monitor.history_size | How many data value samples are sent from the CC to the CLC. The default value is 5. |
| cloud.network.address_pending_timeout | Minutes before a pending system public address allocation times out and is released. Default: 35 minutes. |
| cloud.network.ec2_classic_additional_protocols_allowed | Comma delimited list of protocol numbers supported in EDGE mode for security group rules beyond the EC2-Classic defaults (TCP,UDP,ICMP). Only valid IANA protocol numbers are accepted. Default: None |
| cloud.network.max_broadcast_apply | Maximum time to apply network information. Default: 120 seconds. |
| cloud.network.min_broadcast_interval | Minimum interval between broadcasts of network information. Default: 5 seconds. |
| cloud.network.network_index_pending_timeout | Minutes before a pending index allocation times out and is released. Default: 35 minutes. |
| cloud.short_identifier_prefixes | List of resource identifier prefixes for short identifiers or * for all |
| cloud.vmstate.buried_time | Amount of time (in minutes) to retain unreported terminated instance data. |
| cloud.vmstate.ebs_root_device_name | Name for root block device mapping |
| cloud.vmstate.ebs_volume_creation_timeout | Amount of time (in minutes) before a EBS volume backing the instance is created |
| cloud.vmstate.instance_private_prefix | Private name prefix for instance DNS |
| cloud.vmstate.instance_public_prefix | Public name prefix for instance DNS |
| cloud.vmstate.instance_reachability_timeout | Amount of time (in minutes) before a VM which is not reported by a cluster will fail a reachability test. |
| cloud.vmstate.instance_subdomain | Subdomain to use for instance DNS. |
| cloud.vmstate.instance_timeout | Amount of time (default unit minutes) before a previously running instance which is not reported will be marked as terminated. |
| cloud.vmstate.instance_touch_interval | Amount of time (in minutes) between updates for a running instance. |
| cloud.vmstate.mac_prefix | Default prefix to use for instance / network interface MAC addresses. |
| cloud.vmstate.max_state_threads | Maximum number of threads the system will use to service blocking state changes. |
| cloud.vmstate.migration_refresh_time | Maximum amount of time (in seconds) that migration state will take to propagate state changes (e.g., to tags). |
| cloud.vmstate.pending_time | Amount of time (in minutes) before a pending instance will be terminated. |
| cloud.vmstate.shut_down_time | Amount of time (in minutes) before a VM which is not reported by a cluster will be marked as terminated. |
| cloud.vmstate.stopping_time | Amount of time (in minutes) before a stopping VM which is not reported by a cluster will be marked as terminated. |
| cloud.vmstate.terminated_time | Amount of time (in minutes) that a terminated VM will continue to be reported. |
| cloud.vmstate.tx_retries | Number of times to retry transactions in the face of potential concurrent update conflicts. |
| cloud.vmstate.unknown_instance_handlers | Comma separated list of handlers to use for unknown instances (‘restore’, ‘restore-failed’, ’terminate’, ’terminate-done’) |
| cloud.vmstate.user_data_max_size_kb | Max length (in KB) that the user data file can be for an instance (after base 64 decoding) |
| cloud.vmstate.vm_initial_report_timeout | Amount of time (in seconds) since completion of the creating run instance operation that the new instance is treated as unreported if not… reported. |
| cloud.vmstate.vm_metadata_generated_cache | Instance metadata generated data cache configuration. The cache is used for IAM metadata (../latest/meta-data/iam/) and instance identity (../latest/dynamic/instance-identity/).Default: maximumSize=1000, expireAfterWrite=5m |
| cloud.vmstate.vm_metadata_instance_cache | Instance metadata cache configuration. |
| cloud.vmstate.vm_metadata_request_cache | Instance metadata instance resolution cache configuration. |
| cloud.vmstate.vm_metadata_user_data_cache | Instance metadata user data cache configuration. |
| cloud.vmstate.vm_state_settle_time | Amount of time (in seconds) to let instance state settle after a transition to either stopping or shutting-down. |
| cloud.vmstate.volatile_state_interval_sec | Period (in seconds) between state updates for actively changing state. |
| cloud.vmstate.volatile_state_timeout_sec | Timeout (in seconds) before a requested instance terminate will be repeated. |
| cloud.vmtypes.default_type_name | Default type used when no instance type is specified for run instances. |
| cloud.vmtypes.format_ephemeral_storage | Format first ephemeral disk by defaut with ext3 |
| cloud.vmtypes.merge_ephemeral_storage | Merge non-root ephemeral disks |
| cloud.volumes.deleted_time | Amount of time (in minutes) that a deleted volume will continue to be reported |
| cloud.vpc.defaultvpc | Enable default VPC. |
| cloud.vpc.defaultvpccidr | CIDR to use when creating default VPCs |
| cloud.vpc.networkaclspervpc | Maximum number of network ACLs for each VPC. |
| cloud.vpc.reservedcidrs | Comma separated list of reserved CIDRs |
| cloud.vpc.routespertable | Maximum number of routes for each route table. |
| cloud.vpc.routetablespervpc | Maximum number of route tables for each VPC. |
| cloud.vpc.rulespernetworkacl | Maximum number of rules per direction for each network ACL. |
| cloud.vpc.rulespersecuritygroup | Maximum number of associated security groups for each network interface . |
| cloud.vpc.securitygroupspernetworkinterface | Maximum number of associated security groups for each network interface . |
| cloud.vpc.securitygroupspervpc | Maximum number of security groups for each VPC. |
| cloud.vpc.subnetspervpc | Maximum number of subnets for each VPC. |
| cloudformation.autoscaling_group_deleted_max_delete_retry_secs | The amount of time (in seconds) to wait for an autoscaling group to be deleted after deletion) |
| cloudformation.autoscaling_group_zero_instances_max_delete_retry_secs | The amount of time (in seconds) to wait for an autoscaling group to have zero instances during delete |
| cloudformation.cfn_instance_auth_cache | CloudFormation instance credential authentication cache |
| cloudformation.instance_attach_volume_max_create_retry_secs | The amount of time (in seconds) to wait for an instance to have volumes attached after creation) |
| cloudformation.instance_running_max_create_retry_secs | The amount of time (in seconds) to wait for an instance to be running after creation) |
| cloudformation.instance_terminated_max_delete_retry_secs | The amount of time (in seconds) to wait for an instance to be terminated after deletion) |
| cloudformation.max_attributes_per_mapping | The maximum number of attributes allowed in a mapping in a template |
| cloudformation.max_mappings_per_template | The maximum number of mappings allowed in a template |
| cloudformation.max_outputs_per_template | The maximum number of outputs allowed in a template |
| cloudformation.max_parameters_per_template | The maximum number of outputs allowed in a template |
| cloudformation.max_resources_per_template | The maximum number of resources allowed in a template |
| cloudformation.nat_gateway_available_max_create_retry_secs | The amount of time (in seconds) to wait for a nat gateway to be available after create) |
| cloudformation.network_interface_attachment_max_create_or_update_retry_secs | The amount of time (in seconds) to wait for a network interface to be attached during create or update) |
| cloudformation.network_interface_available_max_create_retry_secs | The amount of time (in seconds) to wait for a network interface to be available after create) |
| cloudformation.network_interface_deleted_max_delete_retry_secs | The amount of time (in seconds) to wait for a network interface to be deleted) |
| cloudformation.network_interface_detachment_max_delete_or_update_retry_secs | The amount of time (in seconds) to wait for a network interface to detach during delete or update) |
| cloudformation.pseudo_param_partition | CloudFormation AWS::Partition (default: eucalyptus) |
| cloudformation.pseudo_param_urlsuffix | CloudFormation AWS::URLSuffix (default: dns domain) |
| cloudformation.region | The value of AWS::Region and value in CloudFormation ARNs for Region |
| cloudformation.request_template_body_max_length_bytes | The maximum number of bytes in a request-embedded template |
| cloudformation.request_template_url_max_content_length_bytes | The maximum number of bytes in a template referenced via a URL |
| cloudformation.security_group_max_delete_retry_secs | The amount of time (in seconds) to retry security group deletes (may fail if instances from autoscaling group) |
| cloudformation.subnet_max_delete_retry_secs | The amount of time (in seconds) to retry subnet deletes |
| cloudformation.swf_activity_worker_config | JSON configuration for the cloudformation simple workflow activity worker |
| cloudformation.swf_domain | The simple workflow service domain for cloudformation |
| cloudformation.swf_tasklist | The simple workflow service task list for cloudformation |
| cloudformation.url_domain_whitelist | A comma separated white list of domains (other than Eucalyptus S3 URLs) allowed by CloudFormation URL parameters |
| cloudformation.volume_attachment_max_create_retry_secs | The amount of time (in seconds) to wait for a volume to be attached during create) |
| cloudformation.volume_available_max_create_retry_secs | The amount of time (in seconds) to wait for a volume to be available after create) |
| cloudformation.volume_deleted_max_delete_retry_secs | The amount of time (in seconds) to wait for a volume to be deleted) |
| cloudformation.volume_detachment_max_delete_retry_secs | The amount of time (in seconds) to wait for a volume to detach during delete) |
| cloudformation.volume_snapshot_complete_max_delete_retry_secs | The amount of time (in seconds) to wait for a snapshot to be complete (if specified as the deletion policy) before a volume is deleted) |
| cloudformation.wait_condition_bucket_prefix | The prefix of the bucket used for wait condition handles |
| cloudwatch.disable_cloudwatch_service | Set this to true to stop cloud watch alarm evaluation and new alarm/metric data entry |
| dns.dns_listener_address_match | Additional address patterns to listen on for DNS requests. |
| dns.enabled | Enable pluggable DNS resolvers. This must be ’true’ for any pluggable resolver to work. Also, each resolver may need to be separately enabled. |
| dns.search | Comma separated list of domains to search, OS settings used if none specified (a change requires restart). |
| dns.server | Comma separated list of name servers; OS settings used if none specified (change requires restart) |
| dns.server_pool_max_threads | Server worker thread pool max. |
| dns.server_pool_max_threads | Server worker thread pool max. |
| dns.instancedata.enabled | Enable the instance-data resolver. dns.enabled must also be ’true’. |
| dns.negative_ttl | Time-to-live for negative caching on authoritative records. Since version 5.1. |
| dns.ns.enabled | Enable the NS resolver. dns.enabled must also be ’true’. |
| dns.recursive.enabled | Enable the recursive DNS resolver. dns.enabled must also be ’true’. |
| dns.services.enabled | Enable the service topology resolver. dns.enabled must also be ’true’. |
| dns.split_horizon.enabled | Enable the split-horizon DNS resolution for internal instance public DNS name queries. dns.enabled must also be ’true'. |
| dns.spoof_regions.enabled | Enable the spoofing resolver which allows for AWS DNS name emulation for instances. |
| dns.spoof_regions.region_name | Internal region name. If set, the region name to expect as the second label in the DNS name. For example, to treat your Eucalyptus install like a region named ’eucalyptus’, set this value to eucalyptus. Then, e.g., autoscaling.eucalyptus.amazonaws.com will resolve to the service address when using this DNS server. The specified name creates a pseudo-region with DNS names like ec2.pseudo-region.amazonaws.com will resolve to Eucalyptus endpoints from inside of instances. Here ec2 is any service name supported by Eucalyptus. Those that are not supported will continue to resolve through AWS’s DNS. |
| dns.spoof_regions.spoof_aws_default_regions | Enable spoofing of the default AWS DNS names, e.g., ec2.amazonaws.com would resolve to the ENABLED Cloud Controller. Here ec2 is any service name supported by Eucalyptus. Those that are not supported will continue to resolve through AWS’s DNS. |
| dns.spoof_regions.spoof_aws_regions | Enable spoofing for the normal AWS regions, e.g., ec2.us-east-1.amazonaws.com would resolve to the ENABLED Cloud Controller. Here ec2 is any service name supported by Eucalyptus. Those that are not supported will continue to resolve through AWS’s DNS. |
| dns.tcp.timeout_seconds | Variable controlling tcp handler timeout in seconds. |
| dns.ttl | Default time-to-live for authoritative records. Since version 5.1. |
| dns.dns_listener_port | Port number to listen on for DNS requests |
| objectstorage.bucket_creation_wait_interval_seconds | Interval, in seconds, during which buckets in creating-state are valid. After this interval, the operation is assumed failed. |
| objectstorage.bucket_naming_restrictions | The S3 bucket naming restrictions to enforce. Values are ‘dns-compliant’ or ’extended’. Default is ’extended’. dns_compliant is non-US region S3 names, extended is for US-Standard Region naming. See http://docs.aws.amazon.com/AmazonS3/latest/dev/BucketRestrictions.html.[]() |
| objectstorage.bucket_reserved_cnames | List of host names that may not be used as bucket cnames |
| objectstorage.cleanup_task_interval_seconds | Interval, in seconds, at which cleanup tasks are initiated for removing old/stale objects. |
| objectstorage.dogetputoncopyfail | Should provider client attempt a GET / PUT when backend does not support Copy operation |
| objectstorage.failed_put_timeout_hrs | Number of hours to wait for object PUT operations to be allowed to complete before cleanup. |
| objectstorage.max_buckets_per_account | Maximum number of buckets per account |
| objectstorage.max_tags | Maximum number of user defined tags for a bucket |
| objectstorage.max_total_reporting_capacity_gb | Total ObjectStorage storage capacity for Objects solely for reporting usage percentage. Not a size restriction. No enforcement of this value |
| objectstorage.providerclient | Object Storage Provider client to use for backend |
| objectstorage.queue_size | Channel buffer queue size for uploads |
| objectstorage.queue_timeout | Channel buffer queue timeout (in seconds) |
| objectstorage.s3client.buffer_size | Internal S3 client buffer size |
| objectstorage.s3client.connection_timeout_ms | Internal S3 client connection timeout in ms |
| objectstorage.s3client.max_connections | Internal S3 client maximum connections |
| objectstorage.s3client.max_error_retries | Internal S3 client maximum retries on error |
| objectstorage.s3client.socket_read_timeout_ms | Internal S3 client socket read timeout in ms |
| objectstorage.s3provider.s3accesskey | Local Store S3 Access Key. |
| objectstorage.s3provider.s3endpoint | External S3 endpoint. |
| objectstorage.s3provider.s3secretkey | Local Store S3 Secret Key. |
| objectstorage.s3provider.s3usebackenddns | Use DNS virtual-hosted-style bucket names for communication to service backend. |
| objectstorage.s3provider.s3usehttps | Use HTTPS for communication to service backend. |
| region.region_enable_ssl | Enable SSL (HTTPS) for regions. |
| region.region_name | Region name. |
| region.region_ssl_ciphers | Ciphers to use for region SSL |
| region.region_ssl_default_cas | Use default CAs for region SSL connections. |
| region.region_ssl_protocols | Protocols to use for region SSL |
| region.region_ssl_verify_hostnames | Verify hostnames for region SSL connections. |
| services.imaging.import_task_expiration_hours | expiration hours of import volume/instance tasks |
| services.imaging.import_task_timeout_minutes | expiration time in minutes of import tasks |
| services.imaging.worker.availability_zones | availability zones for imaging worker |
| services.imaging.worker.configured | Prepare imaging service so a worker can be launched. If something goes south with the service there is a big chance that setting it to false and back to true would solve issues. |
| services.imaging.worker.expiration_days | the days after which imaging work VMs expire |
| services.imaging.worker.healthcheck | enabling imaging worker health check |
| services.imaging.worker.image | EMI containing imaging worker |
| services.imaging.worker.init_script | bash script that will be executed before service configuration and start up |
| services.imaging.worker.instance_type | instance type for imaging worker |
| services.imaging.worker.keyname | keyname to use when debugging imaging worker |
| services.imaging.worker.log_server | address/ip of the server that collects logs from imaging wokrers |
| services.imaging.worker.log_server_port | UDP port that log server is listening to |
| services.imaging.worker.log_server_port | UDP port that log server is listening to |
| services.imaging.worker.ntp_server | address of the NTP server used by imaging worker |
| services.loadbalancing.dns_resolver_enabled | Enable the load balancing DNS resolver. dns.enabled must also be ’true’. |
| services.loadbalancing.dns_subdomain | loadbalancer dns subdomain |
| services.loadbalancing.dns_ttl | loadbalancer dns ttl value |
| services.loadbalancing.max_tags | Maximum number of user defined tags for a load balancer |
| services.loadbalancing.restricted_ports | The ports restricted for use as a loadbalancer port. Format should be port(, port) or port-port |
| services.loadbalancing.vm_per_zone | number of VMs per loadbalancer zone |
| services.loadbalancing.vpc_cidrs | Comma separated list of CIDRs for use with ELB VPCs |
| services.loadbalancing.worker.app_cookie_duration | duration of app-controlled cookie to be kept in-memory (hours) |
| services.loadbalancing.worker.expiration_days | the days after which the loadbalancer VMs expire |
| services.loadbalancing.worker.image | EMI containing haproxy and the controller |
| services.loadbalancing.worker.init_script | bash script that will be executed before service configuration and start up |
| services.loadbalancing.worker.instance_type | instance type for loadbalancer instances |
| services.loadbalancing.worker.keyname | keyname to use when debugging loadbalancer VMs |
| services.loadbalancing.worker.ntp_server | the address of the NTP server used by loadbalancer VMs |
| services.simpleworkflow.activitytypesperdomain | Maximum number of activity types for each domain. |
| services.simpleworkflow.deprecatedactivitytyperetentionduration | Deprecated activity type retention time. |
| services.simpleworkflow.deprecateddomainretentionduration | Deprecated domain minimum retention time. |
| services.simpleworkflow.deprecatedworkflowtyperetentionduration | Deprecated workflow type minimum retention time. |
| services.simpleworkflow.openactivitytasksperworkflowexecution | Maximum number of open activity tasks for each workflow execution. |
| services.simpleworkflow.opentimersperworkflowexecution | Maximum number of open timers for each workflow execution. |
| services.simpleworkflow.openworkflowexecutionsperdomain | Maximum number of open workflow executions for each domain. |
| services.simpleworkflow.systemonly | Service available for internal/administrator use only. |
| services.simpleworkflow.workflowexecutionduration | Maximum workflow execution time. |
| services.simpleworkflow.workflowexecutionhistorysize | Maximum number of events per workflow execution. |
| services.simpleworkflow.workflowexecutionretentionduration | Maximum workflow execution history retention time. |
| services.simpleworkflow.workflowtypesperdomain | Maximum number of workflow types for each domain. |
| stats.config_update_check_interval_seconds | Interval, in seconds, at which the sensor configuration is checked for changes |
| stats.enable_stats | Enable Eucalyptus internal monitoring stats |
| stats.event_emitter | Internal stats emitter FQ classname used to send metrics to monitoring system |
| stats.file_system_emitter.stats_data_permissions | group permissions to place on stats data files in string form. eg. rwxr-x–x |
| stats.file_system_emitter.stats_group_name | group name that owns stats data files |
| storage.global_total_snapshot_size_limit_gb | Maximum total snapshot capacity (GB) |
| system.dns.dnsdomain | Domain name to use for DNS. |
| system.dns.nameserver | Nameserver hostname. |
| system.dns.nameserveraddress | Nameserver IP address. |
| system.dns.nameserveraddress | Nameserver IP address. |
| system.dns.registrationid | Unique ID of this cloud installation. |
| system.exec.io_chunk_size | Size of IO chunks for streaming IO |
| system.exec.max_restricted_concurrent_ops | Maximum number of concurrent processes which match any of the patterns in system.exec.restricted_concurrent_ops. |
| system.exec.restricted_concurrent_ops | Comma-separated list of commands which are restricted by system.exec.max_restricted_concurrent_ops. |
| tagging.max_tags_per_resource | The maximum number of tags per resource for each account |
| tokens.disabledactions | Actions to disable |
| tokens.enabledactions | Actions to enable (ignored if empty) |
| tokens.rolearnaliaswhitelist | Permitted account aliases for role Amazon Resource Names (ARNs). Value is a list, for example: eucalyptus,aws,dev*,prod* in the case where multiple aliases are permitted. Default: eucalyptus |
| tokens.webidentityoidcdiscoverycache | Cache settings for discovered OpenID Connect metadata: provider configuration and keys. Works with tokens.webidentityoidcdiscoveryrefresh. Default: maximumSize=20, expireAfterWrite=15m |
| tokens.webidentityoidcdiscoveryrefresh | OpenID Connect discovery cache refresh expiry. Controls the time in seconds between checks for updated OIDC metadata. Works with tokens.webidentityoidcdiscoverycache. Default: 60 |
| tokens.webidentitysignaturealgorithmwhitelist | List of JSON Web Signature algorithms to allow in web identity tokens. The algorithm whitelist can be used to permit use of these signature algorithms: RS256, RS384, RS512, PS256, PS384, PS512. Default: RS512 |
| tokens.webidentitytokenskew | A clock skew value in seconds. The Web identity token expiry / not before validation is allowed within the configured skew. Default: 60 |
| walrusbackend.storagedir | Path to buckets storage |
| ZONE.storage.blockstoragemanager | EBS Block Storage Manager to use for backend |
| ZONE.storage.cephconfigfile | Absolute path to Ceph configuration (ceph.conf) file. Default value is ‘/etc/ceph/ceph.conf’ |
| ZONE.storage.cephkeyringfile | Absolute path to Ceph keyring (ceph.client.eucalyptus.keyring) file. Default value is ‘/etc/ceph/ceph.client.eucalyptus.keyring’ |
| ZONE.storage.cephsnapshotpools | Ceph storage pool(s) made available to Eucalyptus for EBS snapshots. Use a comma separated list for configuring multiple pools. Default value is ‘rbd’ |
| ZONE.storage.cephuser | Ceph username employed by Eucalyptus operations. Default value is ’eucalyptus' |
| ZONE.storage.cephvolumepools | Ceph storage pool(s) made available to Eucalyptus for EBS volumes. Use a comma separated list for configuring multiple pools. Default value is ‘rbd’ |
| ZONE.storage.chapuser | User ID for CHAP authentication |
| ZONE.storage.dasdevice | Direct attached storage device location |
| ZONE.storage.maxconcurrentsnapshots | Maximum number of snapshots processed on the block storage backend at a given time |
| ZONE.storage.maxconcurrentsnapshottransfers | Maximum number of snapshots that can be uploaded to or downloaded from objectstorage gateway at a given time |
| ZONE.storage.maxconcurrentvolumes | Maximum number of volumes processed on the block storage backend at a given time |
| ZONE.storage.maxsnapshotdeltas | A non-zero integer value enables upload of incremental snapshots when possible. The configured value indicates the SC to create/upload that many snapshot deltas for a given EBS volume before triggering a full upload of the snapshot contents. Between any two consecutive full snapshot uploads for a given EBS volume, there will be at most maxsnapshotdeltas number of incremental snapshot uploads. A value of 0 indicates that a newly created snapshot will always be uploaded in its entirety (that is, no deltas). Snapshot deltas are only used when your backend is Ceph-RBD. ZONE.storage.shouldtransfersnapshots must be set to true to enable snapshot deltas.Default: 0 |
| ZONE.storage.maxsnapshotpartsqueuesize | Maximum number of snapshot parts per snapshot that can be spooled on the disk |
| ZONE.storage.maxtotalvolumesizeingb | Total disk space reserved for volumes |
| ZONE.storage.maxvolumesizeingb | Max volume size |
| ZONE.storage.ncpaths | iSCSI Paths for NC. Default value is ’nopath' |
| ZONE.storage.readbuffersizeinmb | Buffer size in MB for reading data from snapshot when uploading snapshot to objectstorage gateway |
| ZONE.storage.resourceprefix | Prefix for resource name on SAN |
| ZONE.storage.resourcesuffix | Suffix for resource name on SAN |
| ZONE.storage.sanhost | Hostname for SAN device. |
| ZONE.storage.sanpassword | Password for SAN device. |
| ZONE.storage.sanuser | Username for SAN device. |
| ZONE.storage.scpaths | iSCSI Paths for SC. Default value is ’nopath' |
| ZONE.storage.shouldtransfersnapshots | Enable snapshot transfer to the OSG. Setting it to false will disable storing snapshots (full or delta) in object storage. While a false setting will reduce object storage requirements, it also prevents the ability to use a snapshot from one availability zone to create a volume in another zone. You can still take/use snapshots even when the setting is false, but you can only use a snapshot to create a volume in the same zone. Must be set to true to use snapshot deltas, which are managed by the ZONE.storage.maxsnapshotdeltas property.Default: true |
| ZONE.storage.snapexpiration | Time interval in minutes after which Storage Controller metadata for snapshots that have been physically removed from the block storage backend will be deleted |
| ZONE.storage.snapshotpartsizeinmb | Snapshot part size in MB for snapshot transfers using multipart upload. Minimum part size is 5MB |
| ZONE.storage.snapshottransfertimeoutinhours | Snapshot upload wait time in hours after which the upload will be cancelled |
| ZONE.storage.storeprefix | Prefix for ISCSI device |
| ZONE.storage.tid | Next Target ID for ISCSI device |
| ZONE.storage.timeoutinmillis | Timeout value in milli seconds for storage operations |
| ZONE.storage.volexpiration | Time interval in minutes after which Storage Controller metadata for volumes that have been physically removed from the block storage backend will be deleted |
| ZONE.storage.volumesdir | Storage volumes directory. |
| ZONE.storage.writebuffersizeinmb | Buffer size in MB for writing data to snapshot when downloading snapshot from object storage gateway |
| ZONE.storage.zerofillvolumes | Should volumes be zero filled. |
2.8 - Advanced Storage Configuration
Advanced Storage Configuration
This section covers advanced storage provider configuration options.
2.8.1 - OSG Advanced Configuration
The following properties are for tuning the behavior of the Object Storage service and Gateways; the defaults are reasonable and changing is not necessary, but they are available for unexpected situations.
| Property | Description |
|---|
| objectstorage.bucket_creation_wait_interval_seconds | The interval, in seconds, during which buckets in a ‘creating’ state are valid. After this interval, the operation is assumed failed. Valid values: integer > 0Default: 60 |
| objectstorage.bucket_naming_restrictions | The S3 bucket naming restrictions to enforce. Use dns_compliant for non-US region S3 names. Use extended for US-Standard Region naming. For more information, see Bucket Restrictions and Limitations in the Amazon S3 documentation. Valid values: dns-compliant |
| objectstorage.cleanuptaskintervalseconds | The interval, in seconds, at which background cleanup tasks are run. The background cleanup tasks purge the backend of overwritten objects and clean object history. Valid values: integer > 0Default: 60 |
| objectstorage.dogetcopyputonfail | When this property is enabled (true), the OSG attempts to perform a manual copy (performing a GET operation on the source, followed by a PUT operation on the destination) whenever the copy operation fails against the upstream provider. Because manual copies can be slow and memory-intensive, this capability is disabled (false) by default. Valid values: true |
| objectstorage.failedputtimeouthours | The time, in hours, after which an uncommitted object upload is considered to be failed. This allows cleansing of metadata for objects that were pending upload when an OSG fails or is stopped in the middle of a user operation. This should be kept at least as long as the longest reasonable time to upload a single large object in order to prevent unintentional cleanup of uploads in-progress. The S3 maximum single upload size is 5GB. Valid values: integer > 0Default: 168 |
| objectstorage.max_buckets_per_account | Maximum number of buckets per account. For more information, see Bucket Restrictions and Limitations in the Amazon S3 documentation. Valid values: integer > 0Default: 100 (the AWS limit) |
| objectstorage.max_total_reporting_capacity_gb | Total object storage capacity for objects, used solely for reporting usage percentage. Not a size restriction. No enforcement of this value. Valid values: integer > 0Default: 2147483647 (maximum value of an integer) |
| objectstorage.queue_size | The size, in chunks, of the internal buffers that queue data for transfer to the backend on a per-request basis. A larger value will allow more buffering in the OSG when the client is uploading quickly, but the backend bandwidth is lower and cannot consume data fast enough. Too large a value may result in out-of-memory (OOM) errors if the JVM does not have sufficient heap space to handle the concurrent requests * queue_size.Valid values: integer > 0Default: 100 |
| objectstorage.s3provider.s3usebackenddns | Use DNS virtual-hosted-style bucket names for communication to service backend. Valid values: true |
| objectstorage.s3provider.s3usehttps | Whether or not to use HTTPS for the connections to the backend provider. If you configure this, be sure you can use the backend properly with HTTPS (certs, etc.) or the OSG will fail to connect. For RiakCS, you must configure certificates and identities to support HTTPS; it is not enabled in a default RiakCS installation.Valid values: true |
3 - User Guide
User Guide
This User Guide instructs you how to use a Eucalyptus private cloud. As a cloud user, you will set up your account, work with images, launch instances, and so on. To install or administer and operate a Eucalyptus cloud, refer to the Eucalyptus Installation Guide and the Administration Guide, respectively.Enjoy using your Eucalyptus private cloud!
3.1 - Eucalyptus Overview
Eucalyptus is open source software for building AWS-compatible private and hybrid clouds. As an Infrastructure as a Service product, Eucalyptus allows you to flexibly provision your own collections of resources (both compute and storage), on an as-needed basis.
Who Should Read this Guide?
This guide is for Eucalyptus users who wish to run application workloads on a Eucalyptus cloud.
What’s in this Guide?
This guide contains instructions for users of the Eucalyptus cloud platform. While these instructions apply generally to all tools capable of interacting with Eucalyptus, such as the Eucalyptus Management Console or the AWS S3 toolset, but the primary focus is on the use of Euca2ools (Eucalyptus command line tools). The following is an overview of the contents of this guide.
Eucalyptus Features
Eucalyptus offers ways to implement, manage, and maintain your own collection of virtual resources (machines, network, and storage). The following is an overview of these features.
AWS API compatibility
Eucalyptus provides API compatibility with Amazon Web Services, to allow you to use familiar tools and commands to provision your cloud.
Block- and bucket-based storage abstractions
Eucalyptus provides storage options compatible with Amazon’s EBS (block-based) and S3 (bucket-based) storage products.
Self-service capabilities
Eucalyptus offers a Management Console, allowing your users to request the resources they need, and automatically provisioning those resources where available.
Web-based Interface
The Eucalyptus Management Console is accessible from any device via a browser. The Console initial page provides a Dashboard view of components available to you to manage, configure, provision, and generate various reports.
Resource Management
Eucalyptus offers tools to seamlessly manage a variety of virtual resources. The following is an overview of the types of resources your cloud platform.
SSH Key Management
Eucalyptus employs public and private keypairs to validate your identity when you log into VMs using SSH. You can add, describe, and delete keypairs.
Image Management
Before running instances, someone must prepare VM images for use in the cloud. This can be an administrator or a user. Eucalyptus allows you to bundle, upload, register, describe, download, unbundle, and deregister VM images.
Linux Guest OS Support
Eucalyptus lets you run your own VMs in the cloud. You can run, describe, terminate, and reboot a wide variety of Linux-based VMs that were prepared using image management commands.
IP Address Management
Eucalyptus can allocate, associate, disassociate, describe, and release IP addresses. Depending on the networking mode, you might have access to public IP addresses that are not statically associated with a VM ( Elastic IPs ). Eucalyptus provides tools to allow users to reserve and dynamically associate these elastic IPs with virtual machines.
Security Group Management
Security groups are sets of firewall rules applied to VMs associated with the group. Eucalyptus lets you create, describe, delete, authorize, and revoke security groups. How much of these things can a typical user actually do?
Volume and Snapshot Management
Eucalyptus allows you to create dynamic block volumes. A dynamic block volume is similar to a raw block storage device that can be used with virtual machines. You can create, attach, detach, describe, bundle, and delete volumes. You can also create and delete snapshots of volumes and create new volumes from snapshots.
3.2 - Getting Started
Getting Started
This section helps you get started using your Eucalyptus cloud, and covers setting up your user credentials, installing and configuring command line tools, and working with images and instances. As a cloud user, you can access the Eucalyptus cloud using a command line interface such as the AWS CLI, or by using a web-based interface such as the Eucalyptus Management Console.
To access Eucalyptus via the command line, you can use the AWS CLI or Euca2ools with access key credentials. To access Eucalyptus with the Management Console, you’ll need a password. Talk to your cloud administrator to get your keys and passwords.
3.2.1 - Getting Started with the Eucalyptus Management Console
Getting Started with the Eucalyptus Management Console
This section helps you get started using your Eucalyptus cloud with the Eucalyptus Management Console.To access Eucalyptus with the Management Console, you’ll need a password for the Management Console. Talk to your cloud administrator to get your keys and passwords.
3.2.1.1 - Console Login
This screen allows you to log in to the Eucalyptus Management Console with either your Eucalyptus or your Amazon Web Services account. If you’ve forgotten your password, don’t have login credentials, or do not know the URL for the Eucalyptus Management Console for your Eucalyptus account, please contact your system administrator.Navigate to the Eucalyptus Management Console by typing the URL of the Management Console into your browser’s navigation bar. The URL of the Eucalyptus Management Console depends on how the console was installed in your cloud; see your system administrator for the specific URL for your installation. Follow the appropriate instructions below for logging into either your Eucalyptus or your Amazon Web Services cloud.
Log in to your Eucalyptus cloud
This area of the login dialog allows you to log in to your Eucalyptus cloud.Click the Log in to Eucalyptus tab. Type your account name into the Account name text box. Type your user name into the User name text box. Type your password into the Password text box. Click the Log in to Eucalyptus button.
Log in to your Amazon Web Services cloud
This area of the login dialog allows you to log in to your Amazon Web Services cloud.Click the Log in to AWS tab.
Note
To obtain your AWS security credentials, go to Amazon’s page.Enter your AWS access key ID into the Access key ID text box. Enter your AWS secret access key into the Secret access key text box. Click the Log in to AWS button.
3.2.1.2 - Launch and Connect to an Instance with the Management Console
To launch an instance:
Click on the Launch Instance button on the main console page:
 Select an image from the list (for this example, we’ll select a CentOS image), then click the Next button:
 Select an instance type and availability zone from the Details tab. For this example, select the defaults, and then click the Next button:
 On the Security tab, we’ll create a key pair and a security group to use with our new instance. A key pair will allow you to access your instance, and a security group allows you to define what kinds of incoming traffic your instance will allow.
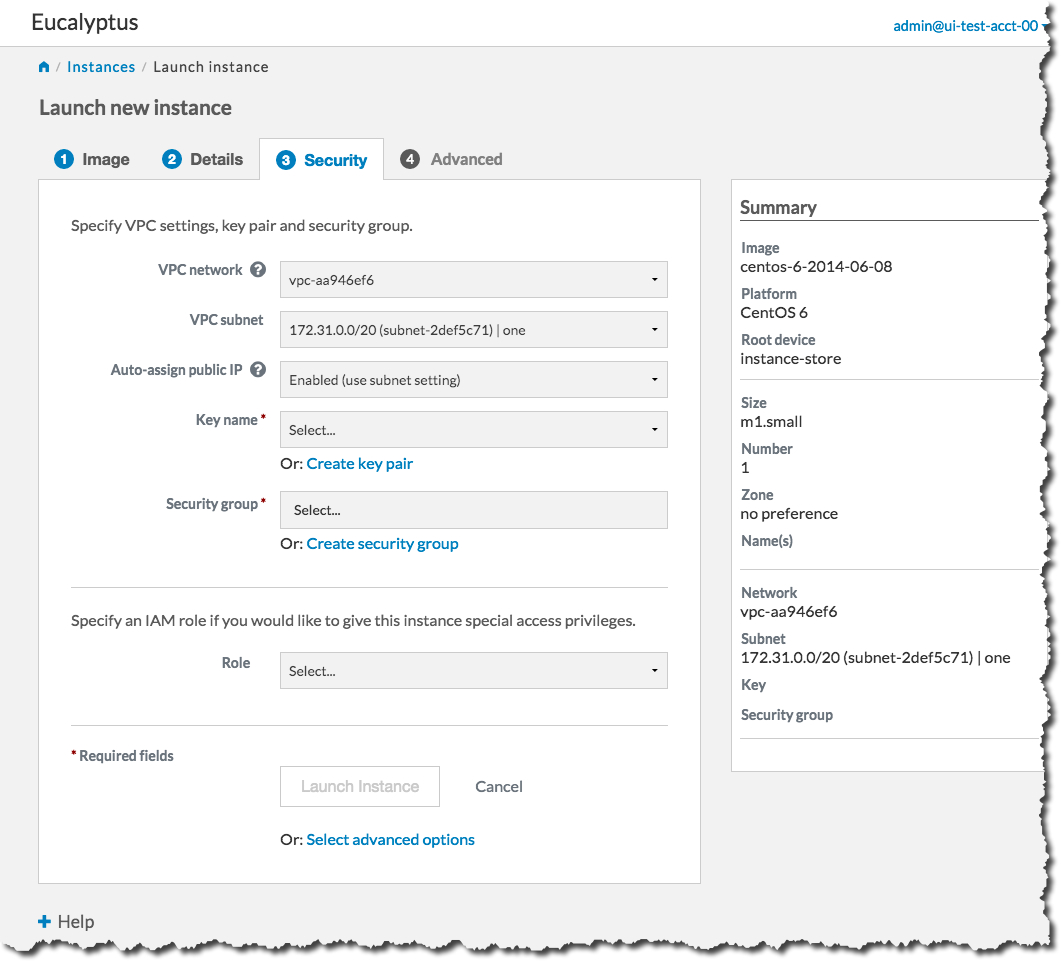 First, we will create a key pair. Click the Create key pair link to bring up the Create key pair dialog:
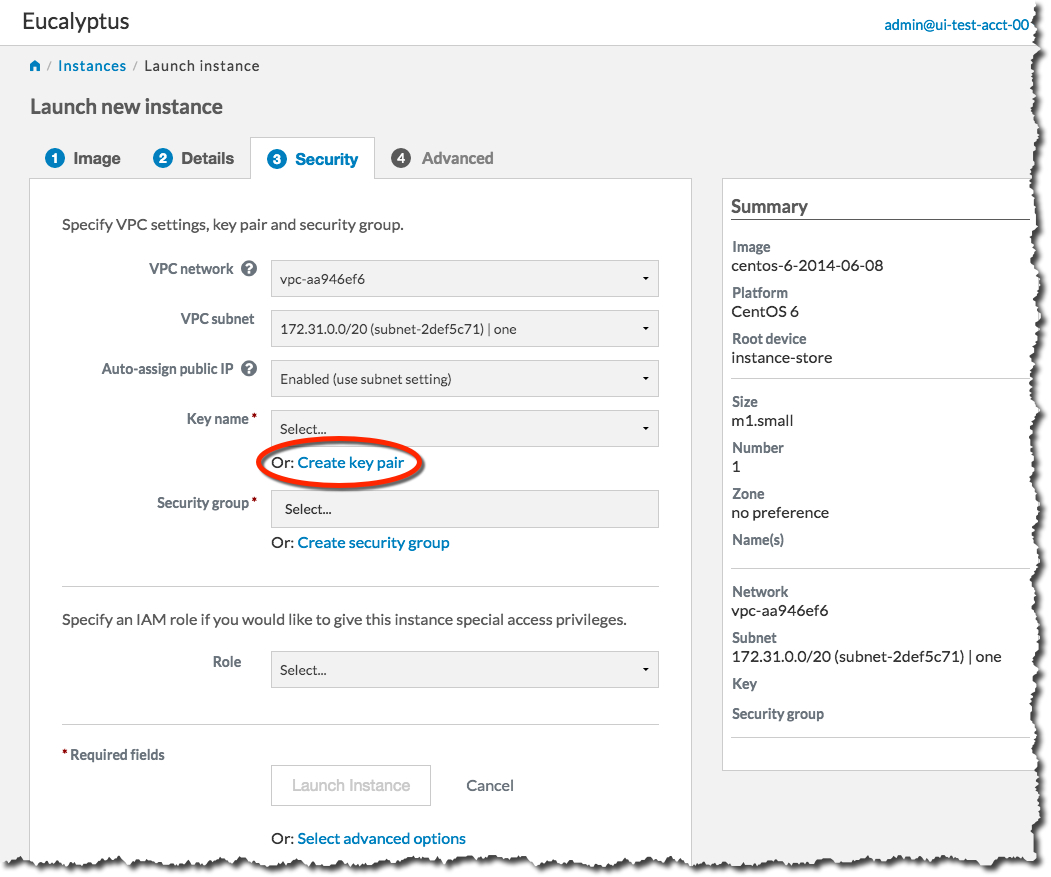 Type the name of your new key pair into the Name text box, and then click the Create and Download button:
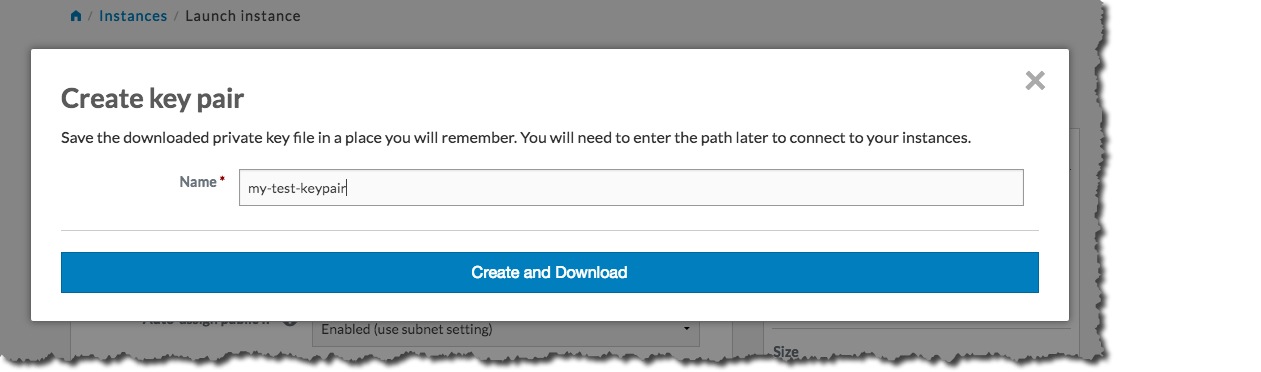 The key pair automatically downloads to a location on your computer, typically in the Downloads folder. The Create key pair dialog will close, and the Key name text box will be populated with the name of the key pair you just created:
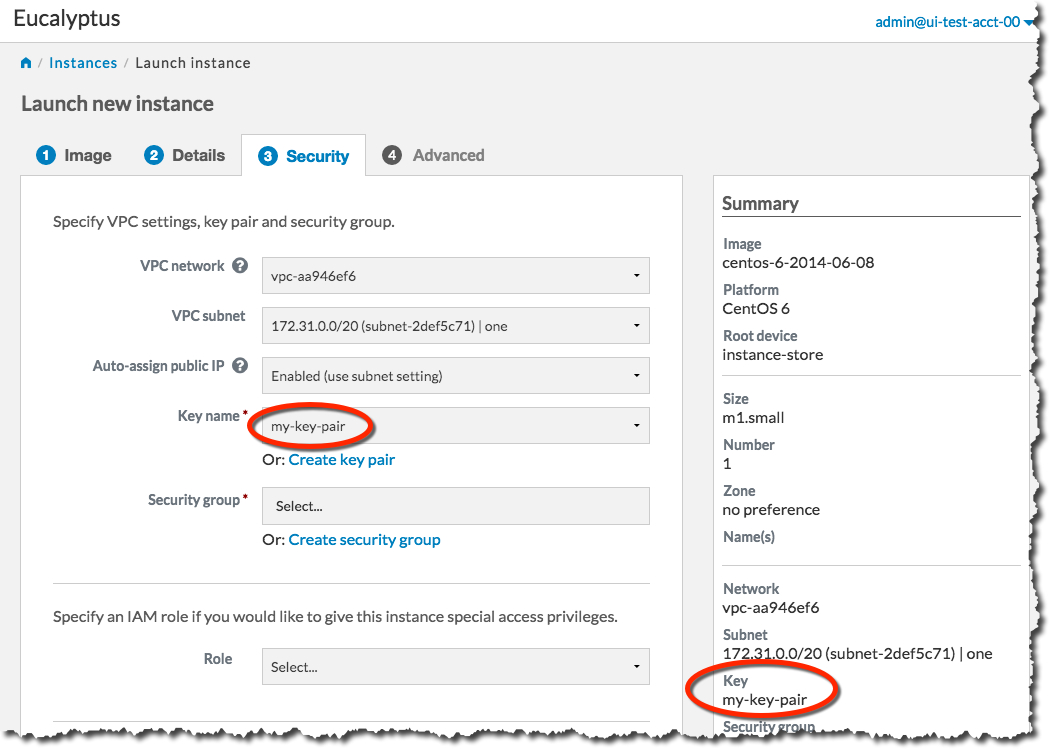 Next, we will create a security group. Click the Create security group link to bring up the Create security group dialog:
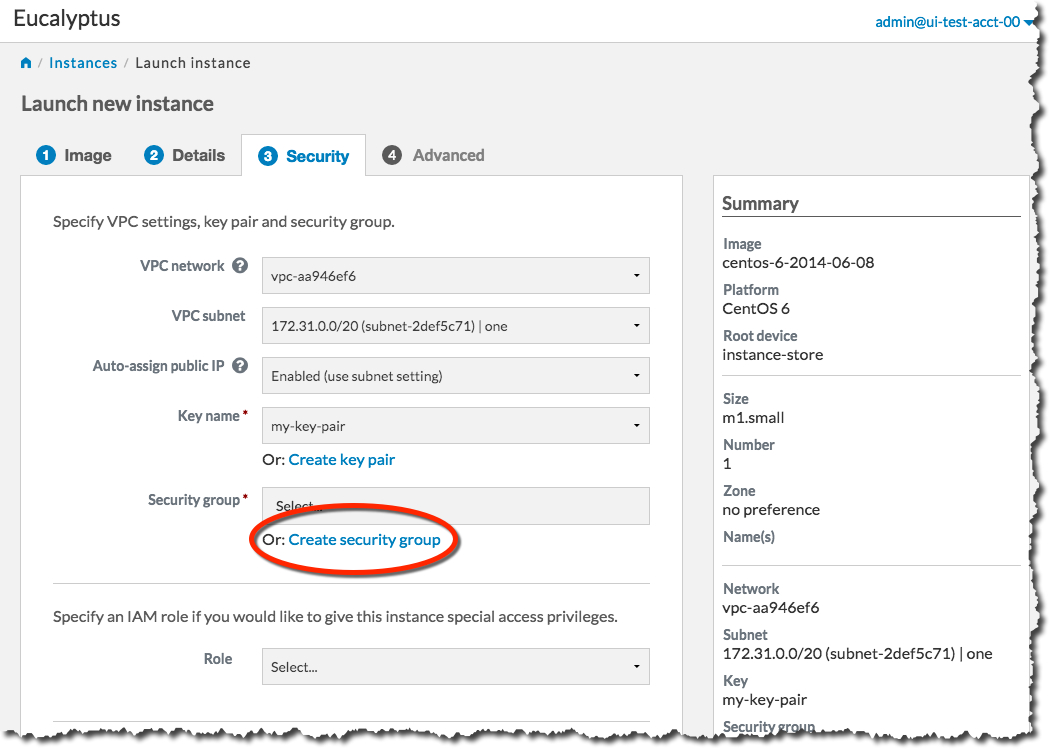 On the Create security group dialog, type the name of your security group into the Name text box. Type a brief description of your security group into the Description text box. We’ll need to SSH into our instance later, so in the Rules section of the dialog, select the SSH protocol from the Protocol drop-down list box.
Note
In this example, we allow any IP address to access our new instance. For production use, please use appropriate caution when specifying an IP range. For more information on CIDR notation, go to .You need to specify an IP address or a range of IP addresses that can use SSH to access your instance. For this example, click the Open to all addresses link. This will populate the IP Address text box with 0.0.0.0/0, which allows any IP address to access your instance via SSH.
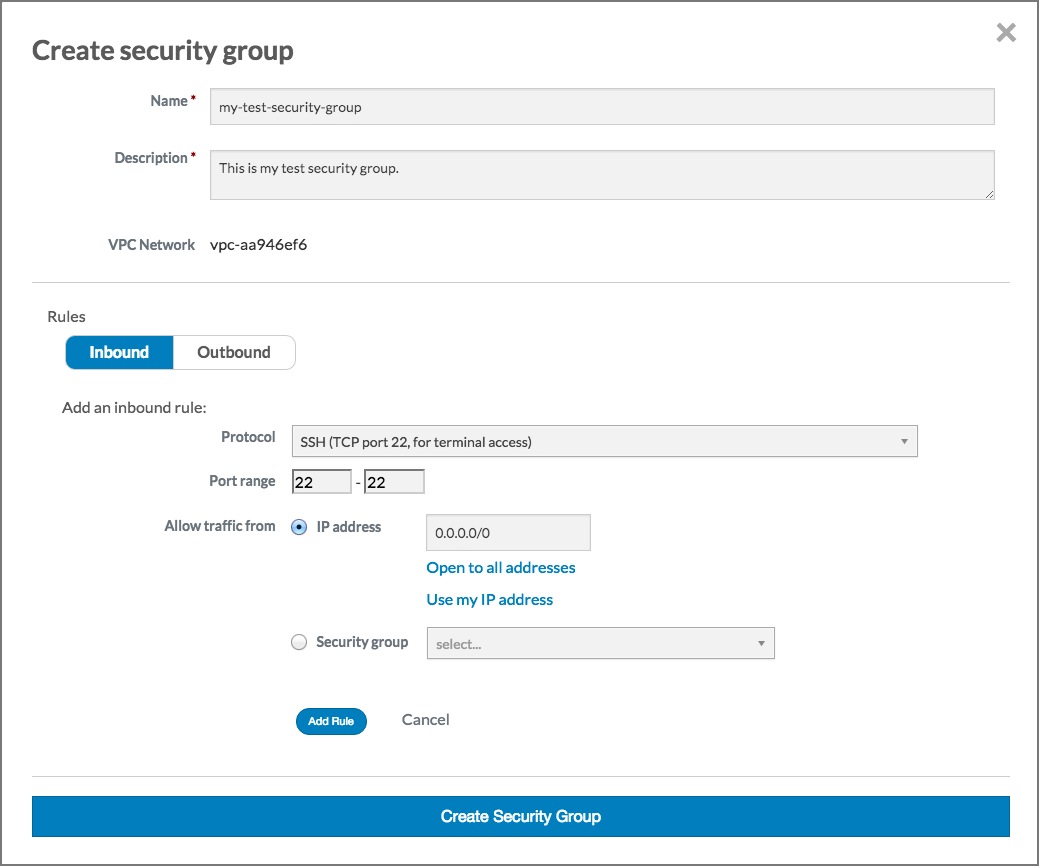
Click the Add rule button. The Create security group dialog should now look something like this:
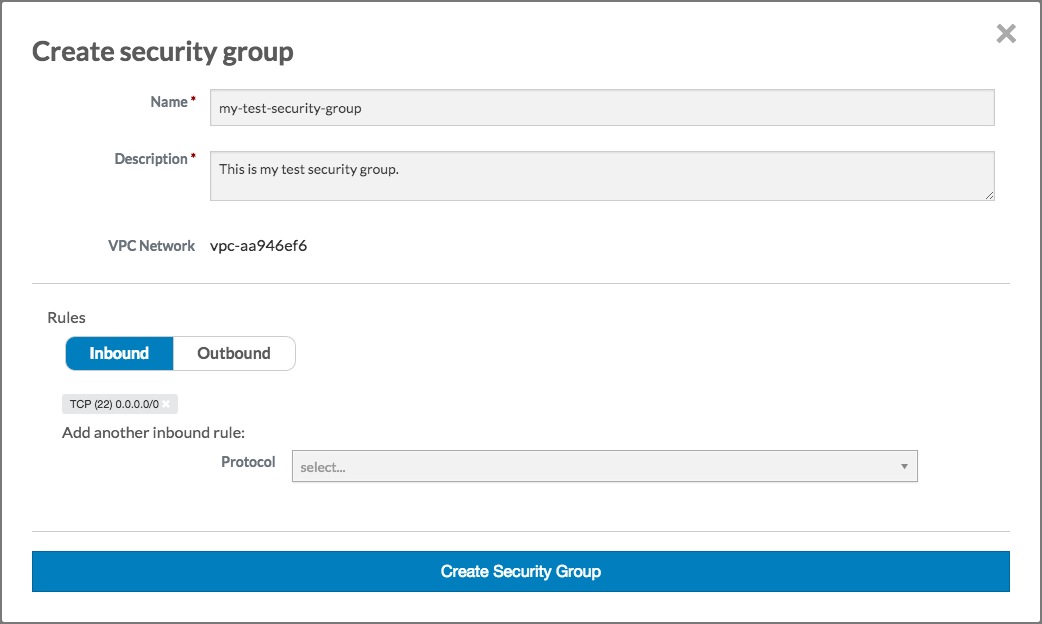
Click the Create security group button. The Create security group dialog will close, and the Security group text box will be populated with the name of the security group you just created:
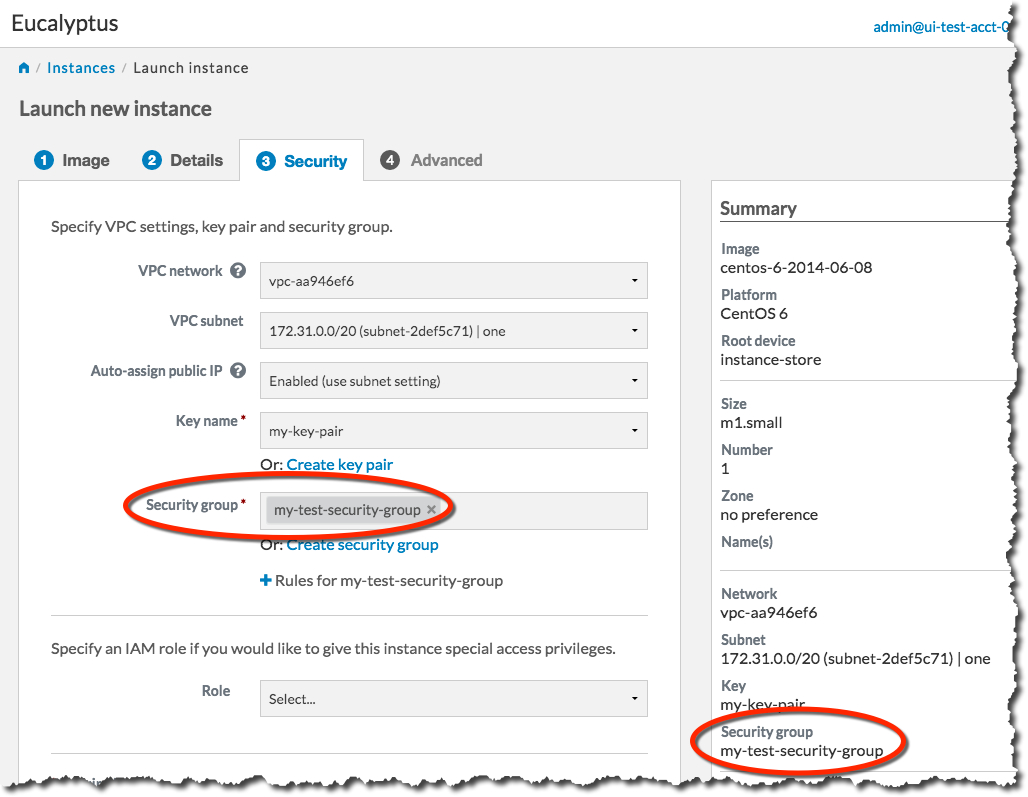
You’re now ready to launch your new instance. Click the Launch Instance button. The Launch Instance dialog will close, and the Instances screen will display. The instance you just created will display at the top of the list with a status of Pending:

When the status of your new instance changes to Running, click the instance in the list to bring up a page showing details of your instance. For example:
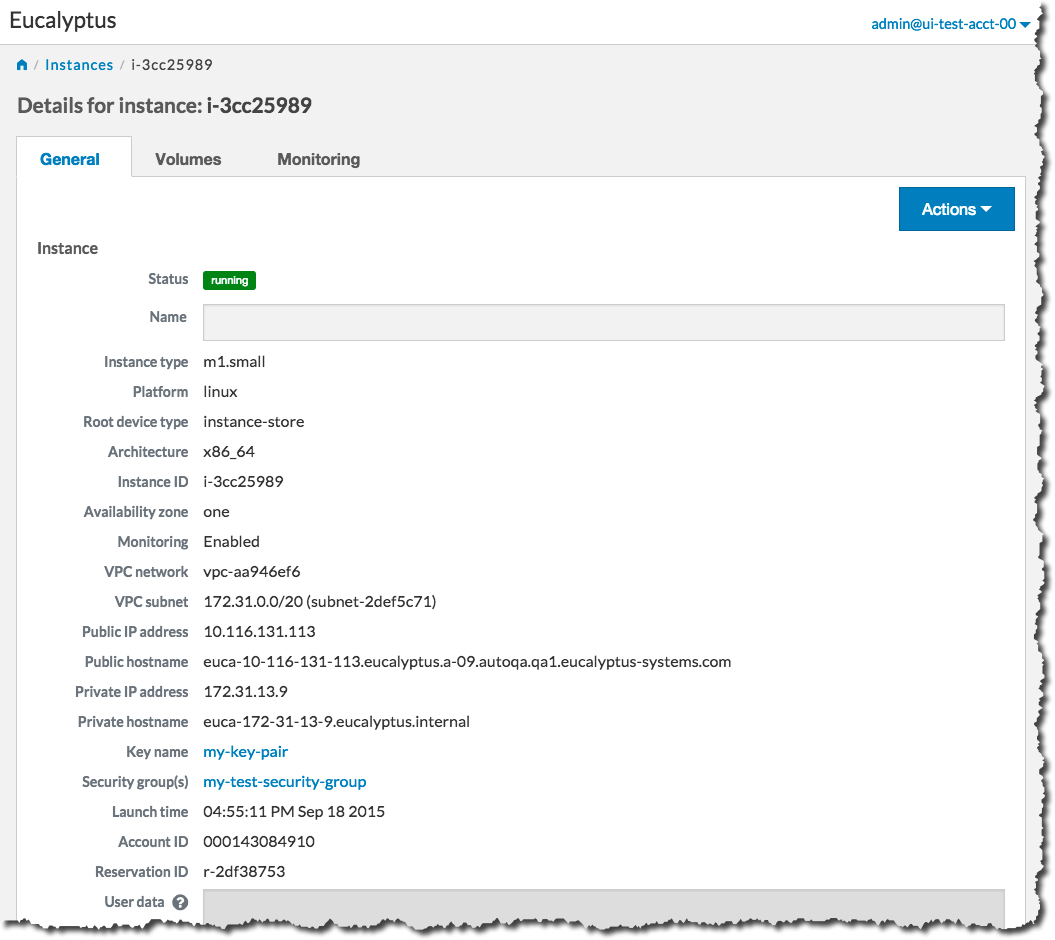
Note the Public IP address and/or the Public hostname fields. You will need this information to connect to your new instance. For example:
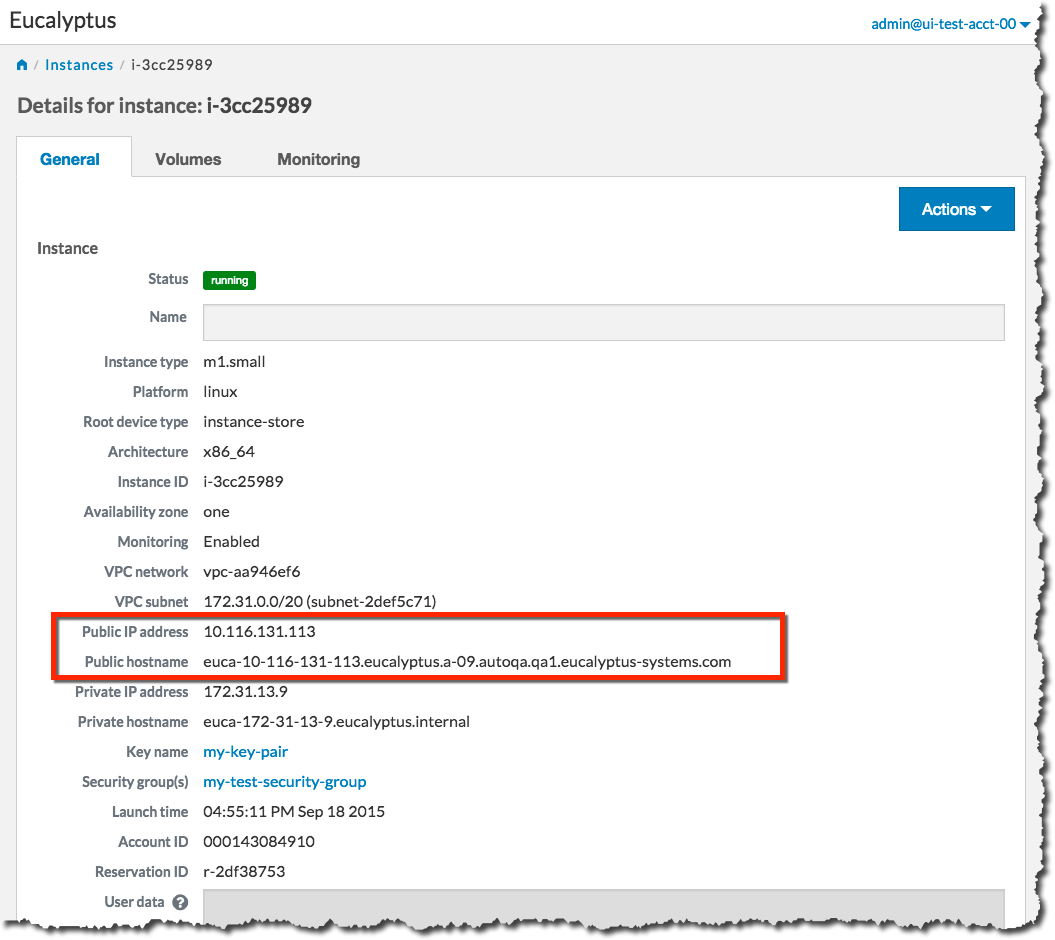
Using the public IP address or hostname of your new instance, you can now use SSH to log into the instance using the private key file you saved when you created a key pair. For example:
ssh -i my-test-keypair.private root@10.111.57.109
3.2.1.3 - Set Up A Web Server on an Instance
Once you’ve launched an instance and connected to it, you can test it by setting up a web server.
ssh into your instance.
ssh 192.168.1.1 -l root
Install Apache:
yum install -y httpd
You should see output similar to the following:
Loaded plugins: fastestmirror, security, versionlock
Loading mirror speeds from cached hostfile
 * extras: centos.sonn.com
centos-7-x86_64-os                                       | 3.7 kB     00:00
centos-7-x86_64-updates                                  | 3.4 kB     00:00
centos-7-x86_64-updates/primary_db                       | 5.4 MB     00:00
epel-7-x86_64                                            | 4.4 kB     00:00
epel-7-x86_64/primary_db                                 | 6.3 MB     00:00
extras                                                   | 3.3 kB     00:00
Setting up Install Process
Package httpd-2.2.15-31.el7.centos.x86_64 already installed and latest version
Nothing to do
Start the web server:
systemctl start httpd.service
You should see output similar to the following:
Starting httpd: [ OK ]
Test connectivity to your instance by using a web browser and connecting to the web service on your instance. For example:
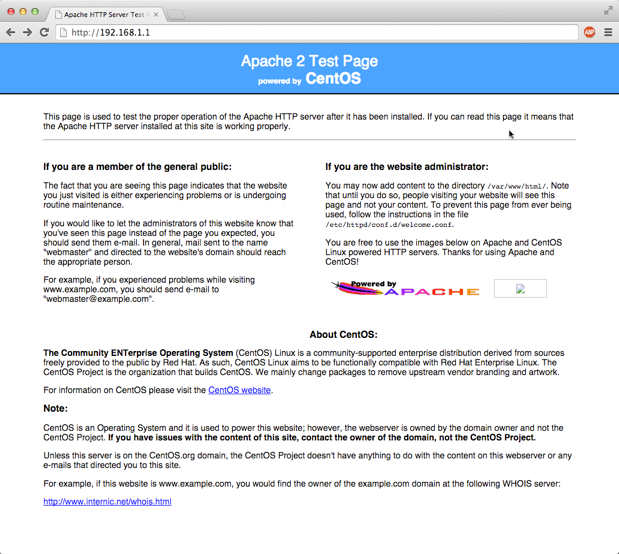
3.2.1.4 - Reboot an Instance with the Management Console
Rebooting preserves the root filesystem of an instance across restarts. To reboot an instance:
On the Instances page, select Reboot from the Actions menu next to the instance you want to reboot.
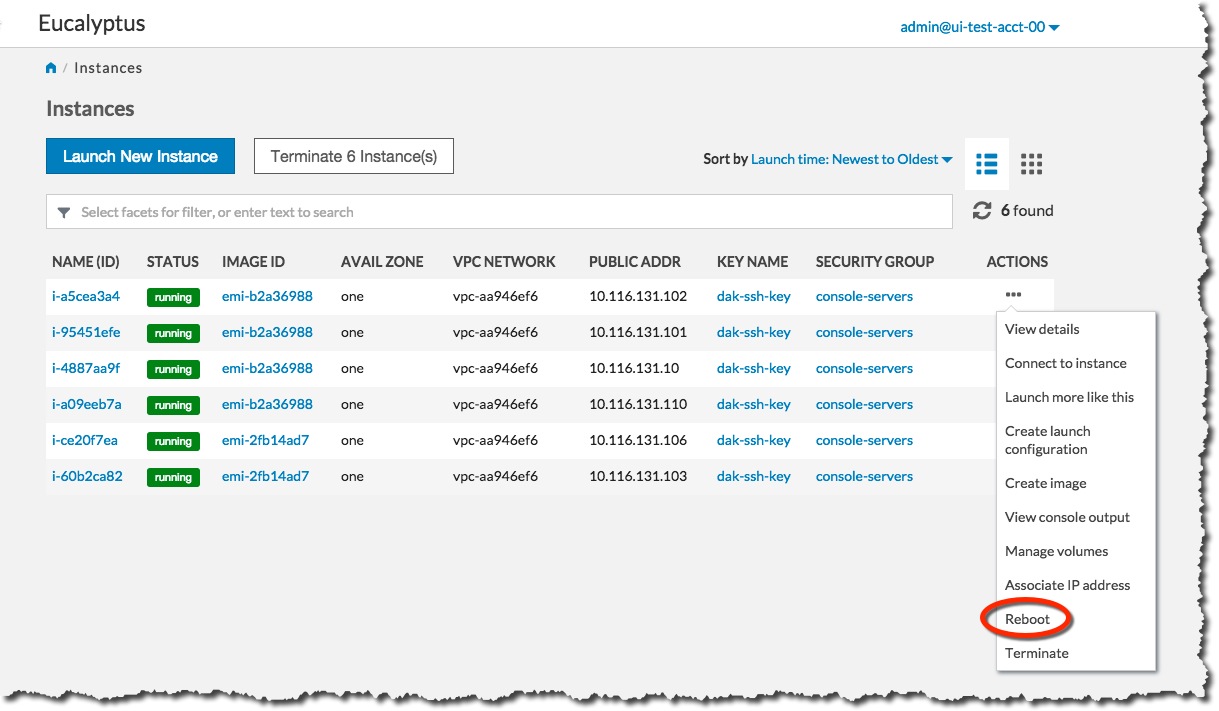 Click the Yes, Reboot button.
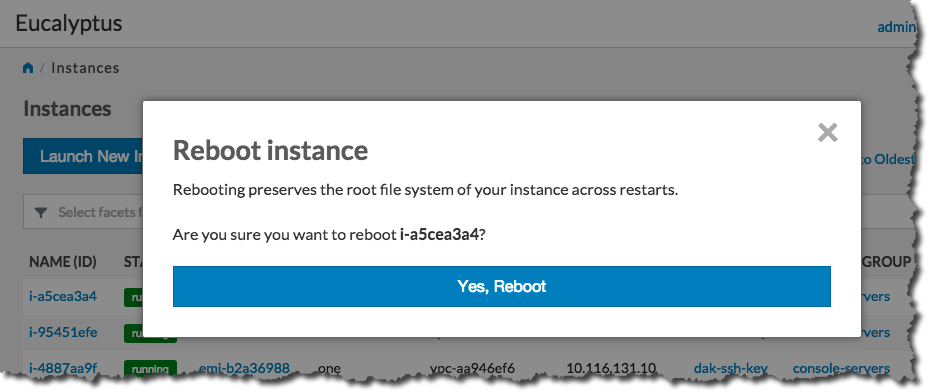
3.2.1.5 - Terminate an Instance with the Management Console
Warning
Terminating an instance can cause the instance and all items associated with the instance (data, packages installed, etc.) to be lost. Be sure to save any important work or data before terminating an instance.To terminate instances:
On the Instances page, Select Terminate from the Actions menu next to the instance you want to terminate.
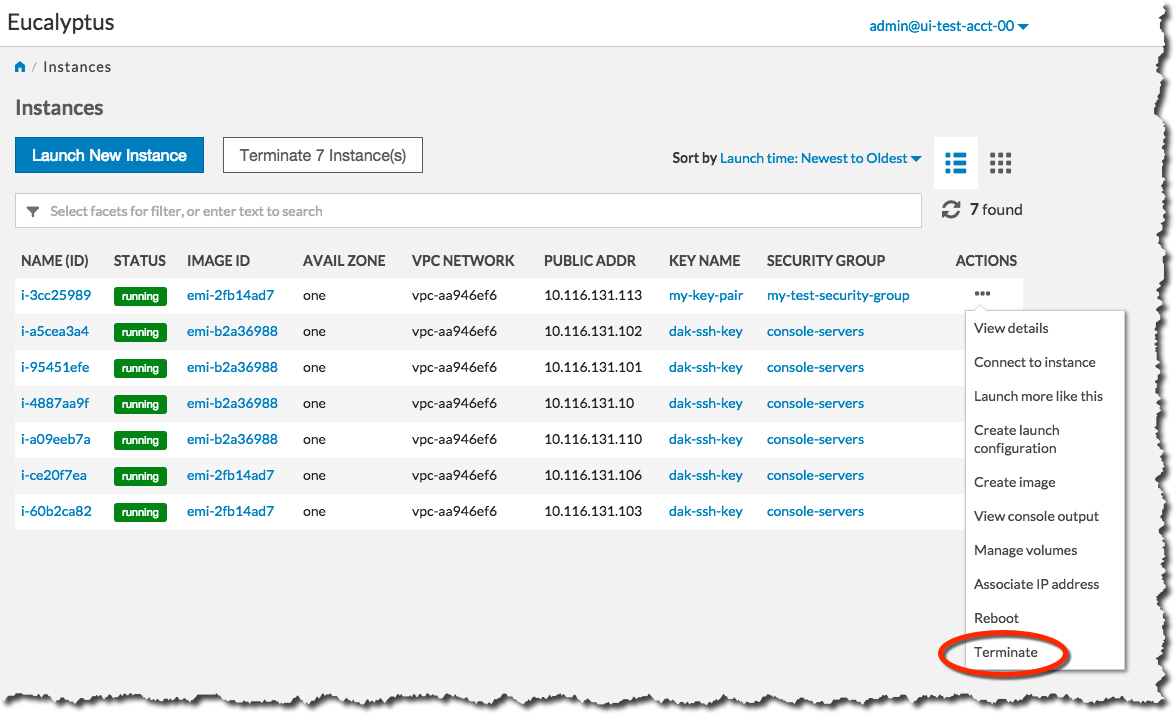 Click the Yes, Terminate button.
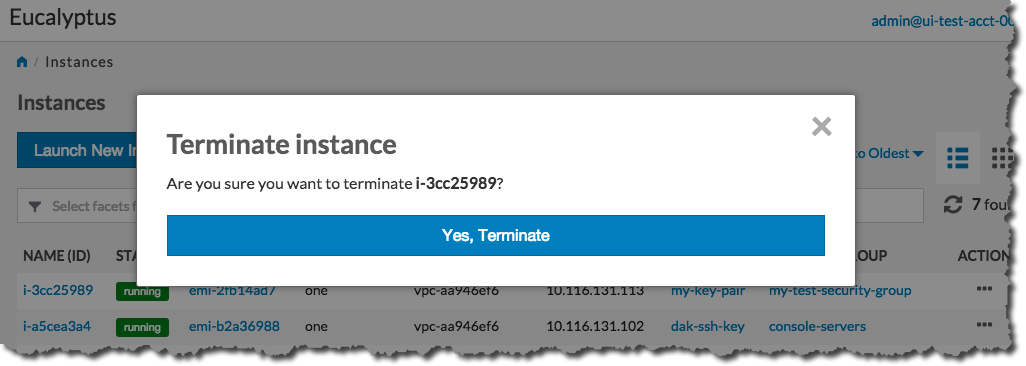 The Status field of the instance will first change to Shutting-down :
 …and then change to Terminated :

3.2.2 - Getting Started with the AWS CLI
This section helps you get started using your Eucalyptus cloud, and covers setting up your user credentials, installing and configuring the AWS CLI, and working with images and instances. As a cloud user, you can access the Eucalyptus cloud using a command line interface such as the AWS CLI, or using a web-based interface such as the Eucalyptus Management Console.
Note
This section primarily deals with using the AWS CLI. For complete documentation on using web-based the Eucalyptus Console, see
Console Login.
The install guide covers “AWS CLI Installation”
Find Image
Enter the following command:
# aws ec2 describe-images
IMAGES	x86_64	2020-10-17T05:29:09.161Z	emi-0ba907069cb1845bc	ubuntu-focal/focal-server-cloudimg-amd64.raw.manifest.xml	machine	ubuntu-focal	000575948401		True	/dev/sda	instance-store	available	hvm
IMAGES	x86_64	2020-10-17T05:24:08.857Z	emi-371ada125a928669e	centos-7/CentOS-7-x86_64-GenericCloud-2003.raw.manifest.xml	machine	centos-7	000575948401		True	/dev/sda	instance-store	available	hvm
Look for the image ID and write it down. The image ID starts with emi- . Once you find a suitable image to use, make sure you have a keypair to use.
Note
Examples use the AWS CLI text output format. You can request this output for a command by adding an “–output text” argument to any command.Create KeyPairs
Enter the following command:
aws ec2 create-key-pair --key-name <keypair_name> > <keypair_name>.private
where <keypair_name> is a unique name for your keypair. For example:
aws ec2 create-key-pair --key-name "alice-keypair" > "alice-keypair.private"
The private key is saved to a file in your local directory. Query the system to view the public key:
# aws ec2 describe-key-pairs
KEYPAIRS	92:40:28:cb:08:54:80:95:8d:69:d9:ab:9a:ff:28:30:40:12:6a:66	alice-keypair
Authorize Security Groups
Before you can log in to an instance, you must authorize access to that instance. This done by configuring a security group for that instance.
A security group is a set of networking rules applied to instances associated with that group. When you first create an instance, it is assigned to a default security group that denies incoming network traffic from all sources. To allow login and usage of a new instance, you must authorize network access to the default security group with the authorize-security-group-ingress command.
To authorize a security group, use authorize-security-group-ingress with the name of the security group, and the options of the network rule permissions you want to apply.
aws ec2 authorize-security-group-ingress [--group-id <value>] [--group-name <value>] [--ip-permissions <value>]
Use the following command to grant unlimited network access using SSH (TCP, port 22) and VNC (TCP, ports 5900 to 5910) to the security group default :
# aws ec2 authorize-security-group-ingress --ip-permissions "IpProtocol=tcp,FromPort=22,ToPort=22,IpRanges={CidrIp=0.0.0.0/0}" --group-name default
# aws ec2 authorize-security-group-ingress --ip-permissions "IpProtocol=tcp,FromPort=5900,ToPort=5910,IpRanges={CidrIp=0.0.0.0/0}" --group-name default
Launch an Instance
Use the run-instances command and provide an image ID. For example:
aws ec2 run-instances --image-id emi-371ada125a928669e
For additional details and options that can be used with the run-instances command. Enter the following command to get the launch status of the instance:
aws ec2 describe-instances --instance-ids <instance_id>
Log in to an Instance
When you create an instance, Eucalyptus assigns the instance two IP addresses: a public IP address and a private IP address. The public IP address provides access to the instance from external network sources; the private IP address provides access to the instance from within the Eucalyptus cloud environment. For more information on Eucalyptus networking modes, see the Eucalyptus Administrator’s Guide.
To use an instance you must log into it via ssh using one of the IP addresses assigned to it. You can obtain the instance’s IP addresses using the describe-instances query as shown in the following example.
To log into a VM instance:
Enter the following command to view the IP addresses of your instance:
# aws ec2 describe-instances
RESERVATIONS	000332850814	r-825a2c9c04e97ee62
GROUPS	sg-84741faf0bd87ea73	default
INSTANCES	0	x86_64	emi-371ada125a928669e	i-131e5853a71c87f16	t2.micro	2020-10-19T16:35:36.120Z	euca-172-31-15-2.eucalyptus.internal	172.31.15.2	euca-192-168-134-74.eucalyptus.mycloud.example.com	192.168.134.74	/dev/sda1	instance-store	True	NORMAL:  -- []	subnet-1343e38b5566c8e90	hvm	vpc-bded94e5dd0a07bc3
MONITORING	disabled
NETWORKINTERFACES	Primary network interface	d0:0d:c1:ba:7d:64	eni-c1ba7d641cb70a7ee	000332850814	euca-172-31-15-2.eucalyptus.internal	172.31.15.2	True	in-usesubnet-1343e38b5566c8e90	vpc-bded94e5dd0a07bc3
ASSOCIATION	euca-192-168-134-74.eucalyptus.mycloud.example.com	192.168.134.74
ATTACHMENT	2020-10-19T16:35:36.125Z	eni-attach-d597b44874e84bbb2	True	0	attached
GROUPS	sg-84741faf0bd87ea73	default
PRIVATEIPADDRESSES	True	euca-172-31-15-2.eucalyptus.internal	172.31.15.2
ASSOCIATION	euca-192-168-134-74.eucalyptus.mycloud.example.com	192.168.134.74
PLACEMENT	cloud-1a
SECURITYGROUPS	sg-84741faf0bd87ea73	default
STATE	16	running
Note that the public IP address is on the INSTANCES line after “mycloud.example.com”, the private address is after “eucalyptus.internal”.
Look for the instance ID on the INSTANCE line and write it down. Use this ID to manipulate and terminate this instance.
Note
Be sure that the security group for the instance allows SSH access.Use SSH to log into the instance, using your private key and the public IP address. For example:
ssh -i alice-keypair.private root@192.168.134.74
You are now logged in to your Linux instance.
Terminate an Instance
The terminate-instances command lets you cancel running VM instances. When you terminate instances, you must specify the ID string of the instance(s) you wish to terminate. You can obtain the ID strings of your instances using the describe-instances or describe-instance-status commands.
Warning
Terminating an instance can cause the instance and all items associated with the instance (data, packages installed, etc.) to be lost. Be sure to save any important work or data to Object Storage or EBS before terminating an instance.To terminate VM instances:
Enter describe-instance-status to obtain the ID of the instances you wish to terminate. Note that an instance ID strings begin with the prefix i- followed by an 8-character string:
# aws ec2 describe-instance-status
INSTANCESTATUSES	cloud-1a	i-131e5853a71c87f16
INSTANCESTATE	16	running
INSTANCESTATUS	ok
DETAILS	reachability	passed
SYSTEMSTATUS	ok
DETAILS	reachability	passed
Enter terminate-instances and the ID string(s) of the instance(s) you wish to terminate:
# aws ec2 terminate-instances --instance-ids i-131e5853a71c87f16
TERMINATINGINSTANCES	i-131e5853a71c87f16
CURRENTSTATE	32	shutting-down
PREVIOUSSTATE	16	running
3.2.3 - Getting Started with Euca2ools
This section helps you get started using your Eucalyptus cloud, and covers setting up your user credentials, installing and configuring the command line tools, and working with images and instances.As a cloud user, you can access the Eucalyptus cloud using a command line interface such as Euca2ools, or using a web-based interface such as the Eucalyptus Management Console.
Note
This section primarily deals with using the Eucalyptus command line. For complete documentation on using web-based the Eucalyptus Console, see
Console Login.
To access Eucalyptus via the command line tools, you need keys for Euca2ools. To access Eucalyptus with the Management Console, you’ll need a password for the Management Console. Talk to your cloud administrator to get your keys and passwords.
Find Image
Enter the following command:
# euca-describe-images -a
IMAGE	emi-0ba907069cb1845bc	ubuntu-focal/focal-server-cloudimg-amd64.raw.manifest.xml	000575948401	available	public	x86_64	machine				instance-storehvm
IMAGE	emi-371ada125a928669e	centos-7/CentOS-7-x86_64-GenericCloud-2003.raw.manifest.xml	000575948401	available	public	x86_64	machine				instance-storehvm
Look for the image ID in the second column and write it down. The image ID starts with emi- . Once you find a suitable image to use, make sure you have a keypair to use.
Create KeyPairs
Enter the following command:
euca-create-keypair -f <keypair_name>.private <keypair_name>
where <keypair_name> is a unique name for your keypair. For example:
euca-create-keypair -f "alice-keypair.private" "alice-keypair"
The private key is saved to a file in your local directory. Query the system to view the public key:
# euca-describe-keypairs
KEYPAIR	alice-keypair	92:40:28:cb:08:54:80:95:8d:69:d9:ab:9a:ff:28:30:40:12:6a:66
Authorize Security Groups
Before you can log in to an instance, you must authorize access to that instance. This done by configuring a security group for that instance.
A security group is a set of networking rules applied to instances associated with that group. When you first create an instance, it is assigned to a default security group that denies incoming network traffic from all sources. To allow login and usage of a new instance, you must authorize network access to the default security group with the euca-authorize command.
To authorize a security group, use euca-authorize with the name of the security group, and the options of the network rules you want to apply.
euca-authorize <security_group>
Use the following command to grant unlimited network access using SSH (TCP, port 22) and VNC (TCP, ports 5900 to 5910) to the security group default :
# euca-authorize -P tcp -p 22 -s 0.0.0.0/0 default
# euca-authorize -P tcp -p 5900-5910 -s 0.0.0.0/0 default
Launch an Instance
Use the euca-run-instances command and provide an image ID and the user data file, in the format euca-run-instances <image_id> . For example:
euca-run-instances emi-371ada125a928669e
For additional details and options that can be used with the euca-run-instances command. Enter the following command to get the launch status of the instance:
euca-describe-instances <instance_id>
Log in to an Instance
When you create an instance, Eucalyptus assigns the instance two IP addresses: a public IP address and a private IP address. The public IP address provides access to the instance from external network sources; the private IP address provides access to the instance from within the Eucalyptus cloud environment. For more information on Eucalyptus networking modes, see the Eucalyptus Administrator’s Guide.
To use an instance you must log into it via ssh using one of the IP addresses assigned to it. You can obtain the instance’s IP addresses using the euca-describe-instances query as shown in the following example.
To log into a VM instance:
Enter the following command to view the IP addresses of your instance:
# euca-describe-instances
RESERVATION	r-825a2c9c04e97ee62	000332850814	default
INSTANCE	i-131e5853a71c87f16	emi-371ada125a928669e	euca-192-168-134-74.eucalyptus.mycloud.example.com	euca-172-31-15-2.eucalyptus.internal	running		0		t2.micro	2020-10-19T16:35:36.120Z	cloud-1a				monitoring-disabled	192.168.134.74	172.31.15.2	vpc-bded94e5dd0a07bc3	subnet-1343e38b5566c8e90	instance-store					hvm			sg-84741faf0bd87ea73				x86_64
NETWORKINTERFACE	eni-c1ba7d641cb70a7ee	subnet-1343e38b5566c8e90	vpc-bded94e5dd0a07bc3	000332850814	in-use	172.31.15.2	euca-172-31-15-2.eucalyptus.internal	true
ATTACHMENT		eni-attach-d597b44874e84bbb2	0	attached	2020-10-19T16:35:36.125Z	true
ASSOCIATION	192.168.134.74		172.31.15.2
GROUP	sg-84741faf0bd87ea73	default
PRIVATEIPADDRESS	172.31.15.2	euca-172-31-15-2.eucalyptus.internal	primary
Note that the public IP address appears after the monitoring-disabled text, with the private address immediately following.
Look for the instance ID in the second field of the INSTANCE line and write it down. Use this ID to manipulate and terminate this instance.
Note
Be sure that the security group for the instance allows SSH access.Use SSH to log into the instance, using your private key and the public IP address. For example:
ssh -i alice-keypair.private root@192.168.134.74
You are now logged in to your Linux instance.
Terminate an Instance
The euca-terminate-instances command lets you cancel running VM instances. When you terminate instances, you must specify the ID string of the instance(s) you wish to terminate. You can obtain the ID strings of your instances using the euca-describe-instances or euca-describe-instance-status commands.
Warning
Terminating an instance can cause the instance and all items associated with the instance (data, packages installed, etc.) to be lost. Be sure to save any important work or data to Object Storage or EBS before terminating an instance.To terminate VM instances:
Enter euca-describe-instance-status to obtain the ID of the instances you wish to terminate. Note that an instance ID strings begin with the prefix i-:
# euca-describe-instance-status
INSTANCE	i-131e5853a71c87f16	cloud-1a	running	16	ok	ok	active
SYSTEMSTATUS	reachability	passed
INSTANCESTATUS	reachability	passed
Enter euca-terminate-instances and the ID string(s) of the instance(s) you wish to terminate:
# euca-terminate-instances i-131e5853a71c87f16
INSTANCE	i-131e5853a71c87f16	running	shutting-down
3.3 - Using Instances
Using Instances
Any application that runs on a cloud, whether public or private or hybrid, runs inside at least one . To start using the cloud, you must launch one or more instances. Every instance is created from stored . An image contains the basic operating system and often other software that will be needed when the instance is running. When you launch an instance, you tell the cloud what image to base the instance on. Your cloud administrator should have set up a catalog of standard or customized images for you to use.To find out more about what instances are, see Instance Overview .
To find out how to use CloudWatch, see Instance Tasks .
3.3.1 - Instance Overview
Instance Overview
An instance is a virtual machine (VM). Eucalyptus allows you to run instances from registered images.
The following sections describe instances in more detail.
3.3.1.1 - Instance Concepts
This section describes conceptual information to help you understand instances.
Eucalyptus Machine Image (EMI)
A Eucalyptus machine image (EMI) is a copy of a virtual machine bootable file system stored in the Walrus storage. An EMI is a template from you can use to deploy multiple identical instances—or copies of the virtual machine.
EMIs are analogous to Amazon Machine Images (AMIs) in AWS. In fact, you can download and deploy any of the 10,000+ AMIs as EMIs in a Eucalyptus cloud without significant modification. While it is possible to build your own EMI, it is might be just as simple to find a thoroughly vetted, freely available image in AWS, download it to your Eucalyptus cloud, and use that instead.
When registered in a Eucalyptus cloud, each distinct EMI is given a unique ID for identification. The ID is in the format emi-.
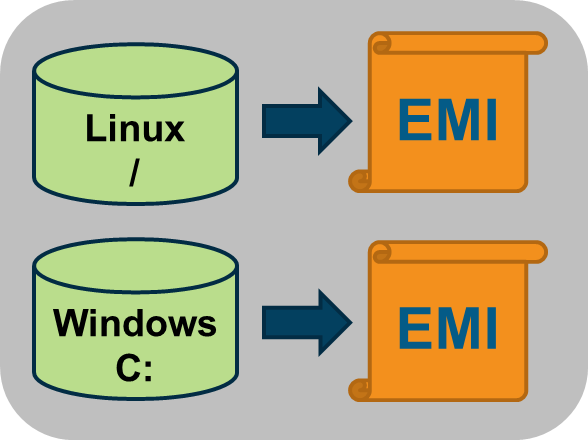
Instance
A instance is a virtual machine deployed from an EMI. An instance then, is simply a running copy of an EMI, which means it always starts from a known baseline. There are two types of instances; instance store-backed and EBS-backed. This section describes store-backed instances. For information about EBS-backed instances, see Using EBS .

Every instance receives a unique ID in the format i-.
You can deploy multiple instances using a single command. In this case all the instances will have unique instance IDs but will share a common reservation ID. This reservation ID can be seen, for example, from the euca2ools euca-describe-instances command that lists running instances. Reservations IDs appear in the format r-.
Note
A reservation is an EC2 term used to describe the resources reserved for one or more instances launched in the cloud.Persistence
Applications running in ephemeral instances that generate data that must be saved should write that data to some place other than the instance itself. There are two Eucalyptus options available. First, the data can be written to a volume that is attached to the instance. Volumes provided by the Storage Controller and attached to instances are persistent. Second, the data could be written to the Walrus using HTTP put/get operations. Walrus storage is also persistent.
If the application cannot be rewritten to send data to a volume or the Walrus, then the application should be deployed inside an EBS-backed instance. EBS-backed instances are persistent and operate in a manner more similar to a physical machine.
3.3.1.2 - Instance Basics
Instance Basics
This section describes information to help you decide which type of instance you need.
3.3.1.2.1 - Virtual Machine Types
A virtual machine type, known as a VM type, defines the number of CPUs, the size of memory, and the size of storage that is given to an instance when it boots. There are five pre-defined VM types in Eucalyptus. You can change the quantity of resources associated with each of the five VM types, but you cannot change the name of the VM types or the number of VM types available. If you customize the sizes they must be well-ordered. That means that the CPU, memory, and storage sizes of the next VM type must be equal to, or larger than, the size of the preceding VM type.
The VM type used to instantiate an EMI must have a defined disk size larger than the EMI file. If a 6GB EMI is loaded into an instance with a VM type defined with a 5GB disk, it will fail to boot. The status of the instance will show as pending . The pending status is the result of the fact that the Walrus cannot finish downloading the image to the Node Controller because the Node Controller has not allotted sufficient disk space for the download. Starting with Eucalyptus 3.2, if the user attempts to launch an instance with a VM type that is too small, they will receive an on-screen warning and the operation will terminate.
Available VM Types
Eucalyptus, like AWS, offers families of VM types. These families are composed of varying combinations of CPU, disk size, and memory. Eucalyptus offers enough VM types to give you the flexibility to choose the appropriate mix of resources for your applications. For the best experience, we recommend that you launch instance types that are appropriate for your applications.
This family includes the M1 and M3 VM types. These types provide a balance of CPU, memory, and network resources, which makes them a good choice for many applications. The VM types in this family range in size from one virtual CPU with two GB of RAM to eight virtual CPUs with 30 GB of RAM. The balance of resources makes them ideal for running small and mid-size databases, more memory-hungry data processing tasks, caching fleets, and backend servers. M1 types offer smaller instance sizes with moderate CPU performance. M3 types offer larger number of virtual CPUs that provide higher performance. We recommend you use M3 instances if you need general-purpose instances with demanding CPU requirements.
This family includes the C1 and CC2 instance types, and is geared towards applications that benefit from high compute power. Compute-optimized VM types have a higher ratio of virtual CPUs to memory than other families but share the NCs with non optimized ones. We recommend this type if you are running any CPU-bound scale-out applications. CC2 instances provide high core count (32 virtual CPUs) and support for cluster networking. C1 instances are available in smaller sizes and are ideal for scaled-out applications at massive scale.
This family includes the CR1 and M2 VM types and is designed for memory-intensive applications. We recommend these VM types for performance-sensitive database, where your application is memory-bound. CR1 VM types provide more memory and faster CPU than do M2 types. CR1 instances also support cluster networking for bandwidth intensive applications. M2 types are available in smaller sizes, and are an excellent option for many memory-bound applications.
This Micro family contains the T1 VM type. The t1.micro provides a small amount of consistent CPU resources and allows you to increase CPU capacity in short bursts when additional cycles are available. We recommend this type for lower throughput applications like a proxy server or administrative applications, or for low-traffic websites that occasionally require additional compute cycles. We do not recommend this VM type for applications that require sustained CPU performance.
The following tables list each VM type Eucalyptus offers. Each type is listed in its associate VM family.
| Instance Type | Virtual CPU | Disk Size | Memory |
|---|
| m1.small | 1 | 5 | 256 |
| m1.medium | 1 | 10 | 512 |
| m1.large | 2 | 10 | 512 |
| m1.xlarge | 2 | 10 | 1024 |
| m3.xlarge | 4 | 15 | 2048 |
| m3.2xlarge | 4 | 30 | 4096 |
| Instance Type | Virtual Cores | Disk Size | Memory |
|---|
| c1.medium | 2 | 10 | 512 |
| c1.xlarge | 2 | 10 | 2048 |
| cc1.4xlarge | 8 | 60 | 3072 |
| cc2.8xlarge | 16 | 120 | 6144 |
| Instance Type | Virtual Cores | Disk Size | Memory |
|---|
| m2.xlarge | 2 | 10 | 2048 |
| m2.2xlarge | 2 | 30 | 4096 |
| m2.4xlarge | 8 | 60 | 4096 |
| cr1.8xlarge | 16 | 240 | 16384 |
| Instance Type | Virtual Cores | Disk Size | Memory |
|---|
| t1.micro | 1 | 5 | 256 |
3.3.1.2.2 - Ephemeral Linux Instances
Instance store-backed instances are ephemeral instances. This means that any changes made to a running instance are lost if the instance is either purposely or accidentally terminated. Applications running in ephemeral instances should write their data to persistent storage for safe keeping. Persistent storage available to instances includes Storage Controller volumes and the Walrus.
As an instance store-backed instance is launched, several files are brought together using loop devices on the Node Controller. As these files are brought together they form what looks like a disk to the instance’s operating system. The illustration below lists a some of the files that make up a running instance. Notice that the EKI, EMI, and ERI images are presented to the instance’s operating system as the partition /dev/sda1 and are mounted as the / file system.
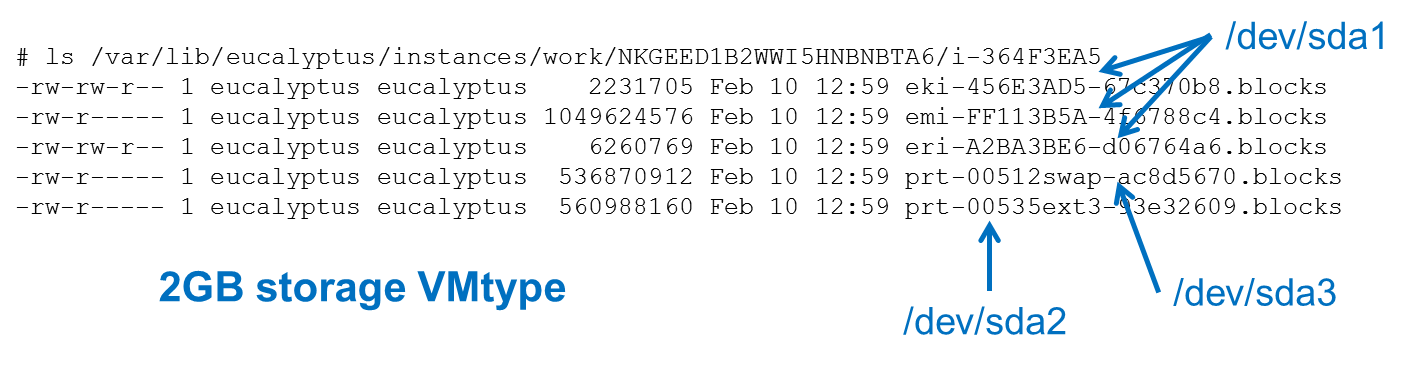
Assume that the illustration above shows some of the files that make up an instance that was launched in a vmtype with 2GB of storage. Notice that the eki-* , emi-* , and eri-* files have been downloaded from the Walrus and cached on the Node Controller. These three files consume around 1.06GB of storage space. Notice also that a swap file was automatically created for the instance. The swap file has the string swap in its name and the file is approximately 500MB in size. It is presented to the instance’s operating system as the partition /dev/sda3 .
This means the EKI, ERI, EMI, and swap files have consumed approximately 1.5GB of the available 2GB of storage space. The remaining 500GB is allocated to the file with the string ext3 in its name. In our example, this space is formatted as an ext3 file system and is made available to the instance as the disk partition /dev/sda2 , and is actually mounted to the /mnt directory in the instance. An example of this configuration is shown below.
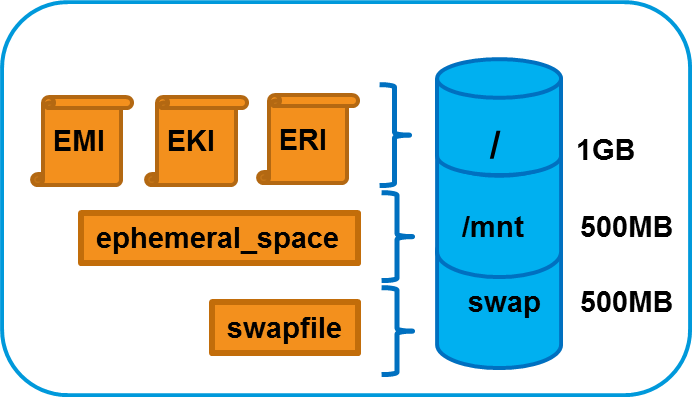
3.3.1.2.3 - EBS-Backed Instances
EBS-Backed Instances
Eucalyptus supports two different types of instances; instance store-backed instances and EBS-backed instances. This section describes EBS-backed instances.
With EBS-backed instances you are booting an instance from a volume rather than a bundled EMI image. The boot volume is created from a snapshot of a root device volume. The boot volume is persistent so changes to the instance are persistent.
Note
Linux boot-from-EBS instances do not require EKI and ERI images like paravirtual instance store-backed instances.
3.3.1.2.3.1 - Comparing Instance Types
The graphic below illustrates the differences between an instance store-backed instance and an EBS-backed instance. Both types of instances still boot from an EMI; the difference is what is behind the EMI. For an instance store-backed instance the EMI is backed by a bundled image. For an EBS-backed instance the EMI is backed by a snapshot of a volume that contains bootable software, similar to a physical host’s boot disk.
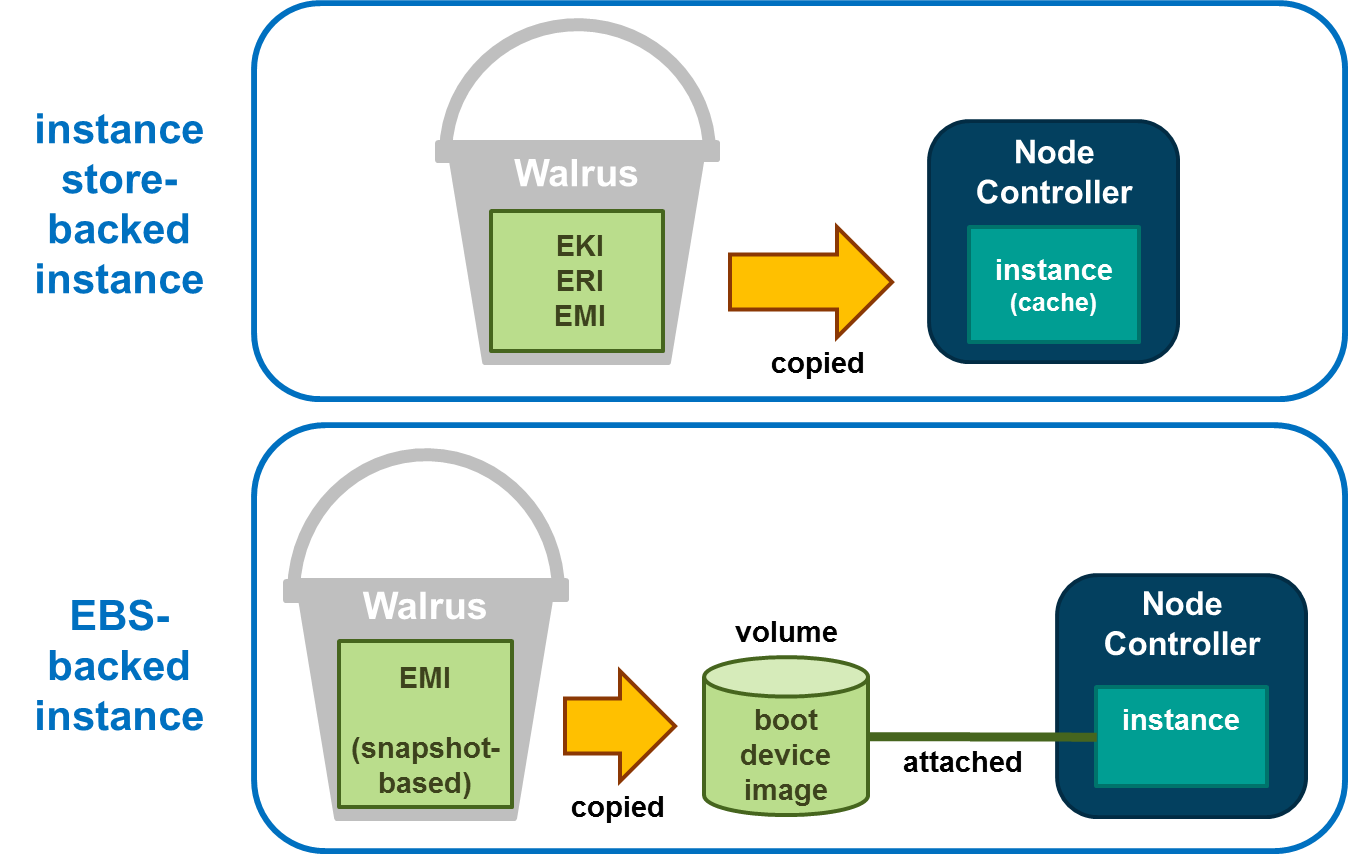
Note that for the instance store-backed instance, the EMI, EKI, and ERI (assuming Linux) are copied from the Walrus directly to Node Controller. Both disk and memory on the Node Controller are used as cache so an instance store-backed instance can be considered a cache-based instance and is not persistent. Once the instance is terminated both the RAM and the disk cache are cleared and any modifications to the instance are lost.
When an EBS-backed instance is launched, the snapshot on which the EMI is based is automatically copied to a new volume which is then attached to the instance. The instance then boots from the attached volume. Changes to the EBS-backed instance are persistent because the volume used to boot the EBS-backed instance is persistent. As a result, EBS-backed instances can be suspended and resumed and not just terminated like an instance store-backed instance.
3.3.1.2.3.2 - Using EBS-Backed Instances
An EBS-backed instance is very much like a physical machine in the way it boots and persists data. Because an EBS-backed instance functions in a manner similar to physical machine, it makes it a good choice to run legacy applications that cannot be re-architected for the cloud.

An EBS-backed boot volume can still be protected by taking a snapshot of it. In fact, other non-boot volumes can be attached to the EBS-backed instance and they can be protected using snapshots too.
3.3.1.2.3.3 - Suspending and Resuming EBS-Backed Instances
An EBS-backed instance can be suspended and resumed, similar to the operating system and applications on a laptop. The current state of the EBS-backed instance is saved in a suspend operation and restored in a resume operation. Like instance store-backed instances, an EBS-backed instance can also be rebooted and terminated.
To suspend a running EBS-backed instance:
euca-stop-instances i-<nnnnnnnn>
To resume a suspended EBS-backed instance:
euca-start-instances i-<nnnnnnnn>
To reboot an EBS-backed instance:
euca-reboot-instances i-<nnnnnnnn>
To terminate an EBS-backed instance:
euca-terminate-instances i-<nnnnnnnn>
3.3.1.2.3.4 - EBS EMI Creation Overview
EBS EMI Creation Overview
You can create an EBS EMI from an existing .img file or create your own .img file. One way to create your own EBS .img file is to use virt-install as described below.
Use virt-install on a system with the same operating system version and hypervisor as your Node Controller. When using virt-install , select scsi as the disk type for KVM if the VIRTIO paravirtualized devices are not enabled. If you have KVM with VIRTIO enabled (the default), select virtio as the disk type of the virtual machine. If you create, successfully boot, and connect the virtual machine to the network in this environment, it should boot as an EBS-backed instance in the Eucalyptus cloud.
Note
For CentOS or RHEL images, you will typically need to edit the file and remove the line. This is because an instance’s network interface will always be assigned a different hardware address at instantiation.Note
: If you use an image created by under a different distribution or hypervisor combination, it is likely that it will not install the correct drivers into the ramdisk and the image will not boot on your Node Controller.To create an EMI for EBS-backed instances will require initial assistance from a helper instance. The helper instance can be either an instance store-backed or EBS-backed instance and can be deleted when finished. It only exists to help create the initial volume that will be the source of the snapshot behind the EMI used to boot other EBS-backed instances.
First you will need to create a volume large enough to contain the boot image file that was created by virt-install . Once this volume has been created attach it to the helper instance. Then transfer the boot image file to the helper instance. The helper instance must have enough free disk space to temporarily hold the boot image file. Once there, transfer the boot image file, using the dd command, to the attached volume.
At this point the volume can be detached from the helper instance, a snapshot taken, and the snapshot registered as a new EMI.
The process to create a new EMI is summarized as follows:
- Create the file using (the file is the virtual machine’s disk file).
- Create the helper instance.
- Create and attach the volume to the helper instance.
- Copy the file to the helper instance and from there to the attached volume.
- Detach the volume and take a snapshot of it.
- Register the snapshot as a new EMI.
This process is illustrated below.
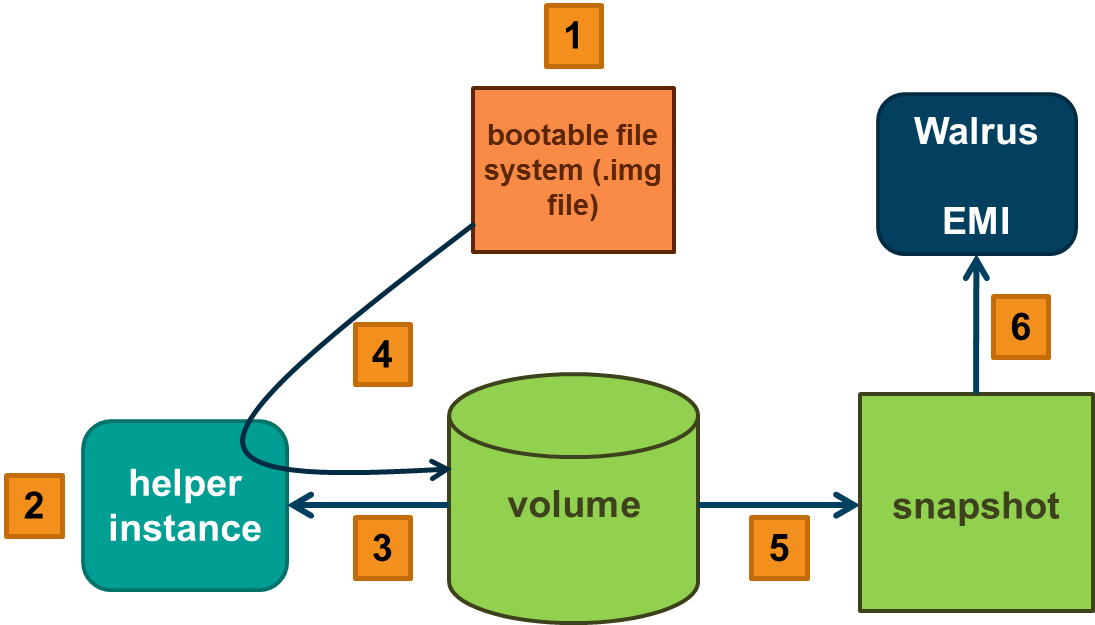
3.3.1.2.3.4.1 - Create an EBS EMI
To create a new EMI that is used to boot EBS-backed instances:
Create a new volume whose size matches the size of the bootable file:
Attach the volume to a helper instance:
Log in to the instance and copy the bootable image from its source to the helper instance.
While logged in to the helper instance, copy a bootable image to the attached volume:
While logged in to the helper instance, flush the file system buffers after running the command:
Detach the volume from the instance:
Create a snapshot of the bootable volume:
Register the bootable volume as a new EMI:
Run a new EBS-backed instance:
Note
The snapshot cannot be deleted unless the EMI is first deregistered.3.3.2 - Instance Tasks
Instance Tasks
This section describes the tasks you can perform with instances in Eucalyptus.
3.3.2.1 - Authorize Security Groups
Before you can log in to an instance, you must authorize access to that instance. This done by configuring a security group for that instance.
A security group is a set of networking rules applied to instances associated with a group. When you first create an instance, it is assigned to a default security group that denies incoming network traffic from all sources. To allow login and usage of a new instance, you must authorize network access to the default security group with the euca-authorize command.
To authorize a security group, use euca-authorize with the name of the security group, and the options of the network rules you want to apply.
euca-authorize <security_group>
Use the following command to grant unlimited network access using SSH (TCP, port 22) and VNC (TCP, ports 5900 to 5910) to the security group default :
euca-authorize -P tcp -p 22 -s 0.0.0.0/0 default
euca-authorize -P tcp -p 5900-5910 -s 0.0.0.0/0 default
3.3.2.2 - Create Key Pairs
Eucalyptus uses cryptographic key pairs to verify access to instances. Key pairs are used if you want to connect to your instance using SSH. Creating a key pair generates two keys: a public key (saved within Eucalyptus) and a corresponding private key (output to the user as a character string). To enable this private key you must save it to a file and set appropriate access permissions (using the chmod command), as shown in the example below.
Create Key Pairs with the Console
From the main dashboard screen, click the Key Pairs icon. The Key Pairs page opens. Click the Create Key Pair button. The Create new key pair window opens. Type a name for the new key pair into the Name text box. The name may contain up to 255 alphanumeric and special characters. Click the Create and Download button. The private half of the key pair (.pem file) is saved to the default download location for your browser.
Note
Keep your private key file in a safe place. If you lose it, you will be unable to access instances created with the key pair.Change file permissions to enable access to the private key file in the local directory. For example, on a Linux or Mac OS X system:
chmod 0600 <keypair_name>.private
Create Key Pairs with the Command Line
Enter the following command:
euca-create-keypair <keypair_name> -f <keypair_name>.private
where <keypair_name> is a unique name for your keypair. For example:
euca-create-keypair alice-keypair -f alice-keypair.private
The private key is saved to a file in your local directory. Query the system to view the public key:
euca-describe-keypairs
The command returns output similar to the following:
KEYPAIR alice-keypair ad:0d:fc:6a:00:a7:e7:b2:bc:67:8e:31:12:22:c1:8a:77:8c:f9:c4
3.3.2.3 - Find an Image
To find an image:
Enter the following command:
euca-describe-images
The output displays all available images.
IMAGE	emi-EC1410C1	centos-32/centos.5-3.x86.img.manifest.xml ↵
admin	available	public 	x86_64	machine
IMAGE	eki-822C1344	kernel-i386/vmlinuz-2.6.28-11-server.manifest.xml ↵
admin	available	public 	x86_64	kernel
IMAGE	eri-A98C13E4  initrd-64/initrd.img-2.6.28-11-generic.manifest.xml ↵
admin	available	public 	x86_64	ramdisk
Look for the image ID in the second column and write it down. The image ID starts with emi- . Once you find a suitable image to use, make sure you have a keypair to use.
3.3.2.4 - Launch an Instance
To launch an instance:
Use the euca-run-instances command and provide an image ID and the user data file, in the format euca-run-instances <image_id> . For example:
euca-run-instances emi-EC1410C1
For additional details and options that can be used with the euca-run-instances command. Enter the following command to get the launch status of the instance:
euca-describe-instances <instance_id>
Need response from Eucalyptus then uncomment the para below.
3.3.2.5 - Log in to an Instance
For a Linux Instance
When you create an instance, Eucalyptus assigns the instance two IP addresses: a public IP address and a private IP address. The public IP address provides access to the instance from external network sources; the private IP address provides access to the instance from within the Eucalyptus cloud environment. Note that the two IP addresses may be the same depending on the current networking mode set by the administrator. For more information on Eucalyptus networking modes, see the Eucalyptus Administrator’s Guide.
To use an instance you must log into it via ssh using one of the IP addresses assigned to it. You can obtain the instance’s IP addresses using the euca-describe-instances query as shown in the following example.
To log into a VM instance:
Enter the following command to view the IP addresses of your instance:
euca-describe-instances
Eucalyptus returns output similar to the following:
RESERVATION	r-338206B5	alice	default
INSTANCE	i-4DCF092C  emi-EC1410C1  192.168.7.24	  10.17.0.130 ↵ running 	alice-keypair 	0 	m1.small  2010-03-15T21:57:45.134Z
Note that the public IP address appears after the image name, with the private address immediately following.
Look for the instance ID in the second field and write it down. Use this ID to manipulate and terminate this instance.
Note
Be sure that the security group for the instance allows SSH access. For more information, seeUse SSH to log into the instance, using your private key and the external IP address. For example:
ssh -i alice-keypair.private root@192.168.7.24
You are now logged in to your Linux instance.
Using SSH to Connect via PuTTY
If you are a Windows user and want to securely connect to instances via PuTTY, you must first have a key pair.If you don’t have a key pair, you can create one through the Management Console or the command line. For the key pair to be used with PuTTY, convert your .pem file to a .ppk file by performing the last step in the Creating SSH Credentials for the Master Node: Modify Your PEM File procedure.
3.3.2.6 - Reboot an Instance
Rebooting preserves the root filesystem of an instance across restarts. To reboot an instance:
Enter the following command:
euca-reboot-instances <instance_id>
To reboot the instance i-34523332 , enter:
euca-reboot-instances i-34523332
3.3.2.7 - Terminate an Instance
The euca-terminate-instances command lets you cancel running VM instances. When you terminate instances, you must specify the ID string of the instance(s) you wish to terminate. You can obtain the ID strings of your instances using the euca-describe-instances command.
Warning
Terminating an instance can cause the instance and all items associated with the instance (data, packages installed, etc.) to be lost. Be sure to save any important work or data to Walrus or EBS before terminating an instance.To terminate VM instances:
Enter euca-describe instances to obtain the ID of the instances you wish to terminate. Note that an instance ID strings begin with the prefix i- followed by an 8-character string:
euca-describe-instances
RESERVATION	r-338206B5	alice	default
INSTANCE	i-4DCF092C  emi-EC1410C1	192.168.7.24	10.17.0.130 ↵
running 	mykey 	0 	m1.small 	2010-03-15T21:57:45.134Z ↵
wind 	eki-822C1344 	eri-BFA91429
Enter euca-terminate-instances and the ID string(s) of the instance(s) you wish to terminate:
euca-terminate-instances i-4DCF092C
 INSTANCE	i-3ED007C8
3.4 - Using EBS
Using EBS
This section details what you need to know about Eucalyptus Elastic Block Storage (EBS).
3.4.1 - EBS Overview
Eucalyptus Elastic Block Storage (EBS) provides block-level storage volumes that you can attach to instances running in your Eucalyptus cloud. An EBS volume looks like any other block-level storage device when attached to a running Eucalyptus instance, and may be formatted with an appropriate file system and used as you would a regular storage device. Any changes that you make to an attached EBS volume will persist after the instance is terminated.
You can create an EBS volume by using the Eucalyptus command line tools or by using the Eucalyptus management console and specifying the desired size (up to 10GB) and availability zone. Once you’ve created an EBS volume, you can attach it to any instance running in the same availability zone. An EBS volume can only be attached to one running instance at a time, but you can attach multiple EBS volumes to a running instance.
You can create a backup — called a snapshot — of any Eucalyptus EBS volume. You can create a snapshot by using the command-line tools or the Eucalyptus management console and simply specifying the volume from which you want to create the snapshot, along with a description of the snapshot. Snapshots can be used to create new volumes.
3.4.2 - EBS Tasks
EBS Tasks
This section contains examples of the most common Eucalyptus EBS tasks.
3.4.2.1 - Create and Attach an EBS Volume
The following example shows how to create a 10 gigabyte EBS volume and attach it to a running instance called i-00000000 running in availability zone zone1 .
Create a new EBS volume in the same availability zone as the running instance.
euca-create-volume --availability-zone zone1 --size 10
The command displays the ID of the newly-created volume. Attach the newly-created volume to the instance, specifying the local device name /dev/sdf .
euca-attach-volume vol-00000000 -i i-00000000 -d /dev/sdf
You’ve created a new EBS volume and attached it to a running instance. You can now access the EBS volume from your running instance.
3.4.2.2 - List Available EBS Volumes
You can use the Eucalyptus command line tools to list all available volumes and retrieve information about a specific volume.
To get a list of all available volumes in your Eucalyptus cloud, enter the following command:
euca-describe-volumes
To get information about one specific volume, use the euca-describe-volumes command and specify the volume ID.
euca-describe-volumes vol-00000000
3.4.2.3 - Detach an EBS Volume
To detach a block volume from an instance:
Enter the following command:
euca-detach-volume <volume_id>


euca-detach-volume vol-00000000
3.4.2.4 - Create a Snapshot
The following example shows how to create a snapshot.
Enter the following command:
euca-create-snapshot <volume_id>


euca-create-snapshot vol-00000000
3.4.2.5 - List Available Snapshots
You can use the Eucalyptus command line tools to list available snapshots and retrieve information about a specific snapshot.
To get a list of all available snapshots in your Eucalyptus cloud, enter the following command:
euca-describe-snapshots
To get information about one specific snapshot, use the euca-describe-snapshots command and specify the snapshot ID.
euca-describe-snapshots snap-00000000
3.4.2.6 - Delete a Snapshot
The following example shows how to delete a snapshot.
Enter the following command:
euca-delete-snapshot <snapshot_id>


euca-delete-snapshot mytestsnaphot
3.5 - Using Tags and Filters
This section describes features and tasks that enable you to manage your cloud resources, such as EMIs, instances, EBS volumes, and snapshots.
3.5.1 - Tagging and Filtering Overview
Tagging and Filtering Overview
This section describes what tagging is, its restrictions, and how tagging relates to filtering.
3.5.1.1 - Tagging Resources
To help you manage your cloud’s instances, images, and other Eucalyptus resources, you can assign your own metadata to each resource in the form of tags. You can use tags to create user-friendly names, make resource searching easier, and improve coordination between multiple users. This section describes tags and how to create them.
Tagging Overview
A tag consists of a key and an optional value for that key. You define both the key and the value for each tag. For example, you can define a tag for your instances that helps you track each instance’s owner and stack level.
Tags let you categorize your cloud resources in various ways. For example, you can tag resources based on their purpose, their owner, or their environment. We recommend that you devise a set of tag keys that meets your needs for each resource type. Using a consistent set of tag keys makes it easier for you to manage your resources. You can search and filter the resources based on the tags you add. For more information about filtering, see Filtering Resources .
Eucalyptus doesn’t apply any semantic meaning to your tags. Instead, Eucalyptus interprets your tags simply as strings of characters. Eucalyptus doesn’t automatically assign any tags on resources.
You can only assign tags to resources that already exist. However, if you use the Management Console, you can add tags when you launch an instance. If you add a tag that has the same key as an existing tag on that resource, the new value overwrites the old value. You can edit tag keys and values, and you can remove tags from a resource at any time. You can set a tag’s value to the empty string, but you can’t set a tag’s value to null.
Tagging Restrictions
The following restrictions apply to tags:
| Restriction | Description |
|---|
| Maximum number of tags per resource | 10 |
| Maximum key length | 128 Unicode characters |
| Maximum value length | 256 Unicode characters |
| Unavailable prefixes | You can’t use either euca: or aws: as a prefix to either a tag name or value. These are reserved by Eucalyptus. |
| Case sensitivity | Tag keys and values are case sensitive. |
You can’t terminate, stop, or delete a resource based solely on its tags. You must specify the resource identifier. For example, to delete snapshots that you tagged with a tag key called temporary , you must first get a list of those snapshots using euca-describe-snapshots with a filter that specifies the tag. Then you use euca-delete-snapshots with the IDs of the snapshots (for example, snap-1A2B3C4D). You can’t call euca-delete-snapshots with a filter that specified the tag. For more information about using filters when listing your resources, see Filtering Resources .
Available Resources
You can tag the following cloud resources:
Images (EMIs, kernels, RAM disks)
Instances
Volumes
Snapshots
Security Groups
You can’t tag the following cloud resources:
Elastic IP addresses
Key pairs
Placement groups
You can tag public or shared resources, but the tags you assign are available only to your account and not to the other accounts sharing the resource.
3.5.1.2 - Filtering Resources
You can search and filter resources based on the tags you use. For example, you can list a Eucalyptus Machine Image (EMI) using euca-describe-images, and you can list instances using euca-describe-instances .
Filtering Overview
Results from describe commands can be long. Use a filter to include only the resources that match certain criteria. For example, you can filter so that a returned list shows only the EMIs that use an EBS volume as the root device volumes.
Filtering also allows you to:
- Specify multiple filter values: For example, you can list all the instances whose type is either m1.small or m1.large.
- Specify multiple filters: for example, you can list all the instances whose type is either m1.small or m1.large, and that have an attached EBS volume that is set to delete when the instance terminates.
- Use wildcards with values: For example, you can use production as a filter value to get all EBS snapshots that include production in the description.
In each case, the instance must match all your filters to be included in the results. Filter values are case sensitive.
3.5.2 - Tagging and Filtering Tasks
Tagging and Filtering Tasks
This section details the tasks that you can with tagging and filtering. You can use the Management Console or the command line interface.
Eucalyptus supports three commands for tagging:
- euca-create-tags
- euca-describe-tags
- euca-delete-tags
Eucalyptus supports the following commands for filtering:
- euca-describe-addresses
- euca-describe-availability-zones
- euca-describe-bundle-tasks
- euca-describe-groups
- euca-describe-images
- euca-describe-instances
- euca-describe-keypairs
- euca-describe-regions
- euca-describe-snapshots
- euca-describe-tags
- euca-describe-volumes
3.5.2.1 - Add a Tag
Use the euca-create-tags command to add a tag to a resource.
Enter the following command and parameters:
euca-create-tags [resource_id] --tag [tag_key]=[tag_value]
Eucalyptus returns a the resource identifier and its tag key and value. The following example shows how to add a tag to an EMI. This tag key is dataserver and has no value.
euca-create-tags emi-1A2B3C4D --tag dataserver
TAG  emi-1a2b3c4d  image  dataserver
The following example shows how to add the same two tags to both an EMI and an instance. One tag key is dataserver, which has no value, an empty string. The other tag key is stack, which has a value of Production .
euca-create-tags emi-1A2B3C4D i-6F5D4E3A --tag dataserver --tag stack=Production
TAG  emi-1A2B3C4D  image  dataserver
TAG  emi-1A2B3C4D  image  stack  Production
TAG  i-6F5D4E3A  image  dataserver
TAG  i-6F5D4E3A  image  stack  Production
3.5.2.2 - List Tags
Use the euca-describe-tags command to list your tags and filter the results different ways.
Enter the following command and parameters:
euca-describe-tags --filter resource-type=[resource_type]" --filter
"key=[key_name]" --filter "value=[key_value]"
The following example describes all the tags belonging to your account.
euca-describe-tags
TAG  emi-1A2B3C4D  image  database_server
TAG  emi-1A2B3C4D  image  stack  Production
TAG  i-5F4E3D2A  instance  database_server
TAG  i-5F4E3D2A  instance  stack  Production
TAG  i-12345678  instance  webserver
TAG  i-12345678  instance  stack  Test
The following example describes the tags for the resource with ID emi-1A2B3C4D.
ec2-describe-tags --filter "resource-id=emi-1A2B3C4D"
TAG  emi-1A2B3C4D  image  database_server
TAG  emi-1A2B3C4D  image  stack  Production
The following example describes the tags for all your instances.
ec2-describe-tags --filter "resource-type=instance"
TAG  i-5F4E3D2A  instance  database_server
TAG  i-5F4E3D2A  instance  stack  Production
TAG  i-12345678  instance  webserver
TAG  i-12345678  instance  stack  Test
The following example describes the tags for all your instances that have a tag with the key webserver.
ec2-describe-tags --filter "resource-type=instance" --filter "key=database_server"
TAG  i-5F4E3D2A  instance  database_server
The following example describes the tags for all your instances that have a tag with the key stack that has a value of either Test or Production.
ec2-describe-tags --filter "resource-type=instance" --filter "key=stack"
--filter "value=Test" --filter "value=Production"
TAG  i-5F4E3D2A  instance  stack  Production
TAG  i-12345678  instance  stack  Test
The following example describes the tags for all your instances that have a tag with the key Purpose that has no value.
ec2-describe-tags --filter "resource-type=instance" --filter "key=Purpose" --filter "value="
3.5.2.3 - Change a Tag's Value
To change a tag’s value:
Enter the following command and parameters:
euca-create-tags [resource] --tag [key=value]
Eucalyptus returns a the resource identifier and its tag key and value. The following example changes the value of the stack tag for one of your EMIs from prod to test:
euca-create-tags emi-1a2b3c4d  --tag stack=dev
TAG  emi-1a2b3c4d  image  stack  dev
3.5.2.4 - Delete a Tag
To delete a tag:
Enter the following command and parameters:
euca-delete-tags resource_id [resource_id]" --tag
"key=[key_value]" --tag "value=[key_value]"
Note
If you specify a value, the tag is deleted only if its value matches the one you specified. If you specify an empty string as the value, the tag is deleted only if the tag’s value is an empty string.Eucalyptus does not return a message. The following example deletes two tags assigned to an EMI and an instance:
euca-delete-tags emi-1A2B3C4D i-6F5D4E3A --tag appserver --tag stack
The following example deletes a tag only if the value is an empty string:
euca-delete-tags snap-1A2B3C4D --tag Owner=
3.5.2.5 - Filter by Tag
You can describe your resources and filter the results based on the tags. To filter by tag:
Enter the following command and parameter:
euca-describe-tags --filter resource-type=[resource_type]
The following example describes all your tags.
euca-describe-tags
TAG  emi-1A2B3C4D  image  appserver
TAG  emi-1A2B3C4D  image  stack  dev
TAG  i-5F4E3D2A  instance  appserver
TAG  i-5F4E3D2A  instance  stack  dev
TAG  i-12345678  instance  database_server
TAG  i-12345678  instance  stack  test
The following example describes the tags for a resource with ID emi-1A2B3C4D.
euca-describe-tags --filter "resource-id=emi-1A2B3C4D"
TAG  emi-1A2B3C4D  image  appserver
TAG  emi-1A2B3C4D  image  stack  dev
The following example describes the tags for all your instances.
euca-describe-tags --filter "resource-type=instance"
TAG  i-5F4E3D2A  instance  appserver
TAG  i-5F4E3D2A  instance  stack  dev
TAG  i-12345678  instance  database_server
TAG  i-12345678  instance  stack  test
3.6 - Managing Access
Managing Access
Eucalyptus manages access to the cloud by policies attached to accounts, groups, and users. This section details access-related tasks you can perform once your administrator allows you access to Eucalyptus. These tasks are split into the following areas: tasks for groups, and tasks for users, and tasks for credential management.
3.6.1 - Groups
Groups
Groups are used to share resource access authorizations among a set of users within an account. Users can belong to multiple groups.
Note
A group in the context of access is not the same as a security group.This section details tasks that can be performed on groups.
3.6.1.1 - Create a Group
To create a group perform the steps listed in this topic.Enter the following command:
euare-groupcreate -g <group_name>
Eucalyptus does not return anything.
3.6.1.2 - Add a Group Policy
To add a group policy perform the steps listed in this topic.Enter the following command:
euare-groupaddpolicy -g <group_name> -p <policy_name> -e <effect> -a
							<actions> -o
The optional -o parameter tells Eucalyptus to return the JSON policy, as in this example:
{"Version":"2008-10-17","Statement":[{"Effect":"Allow", "Action":["ec2:RunInstances"], "Resource":["*"]}]}
3.6.1.3 - Modify a Group
To modify a group perform the steps listed in this topic.Modifying a group is similar to a “move” operation. Whoever wants to modify the group must have permission to do it on both sides of the move. That is, you need permission to remove the group from its current path or name, and put that group in the new path or name.
For example, if a group changes from one area in a company to another, you can change the group’s path from /area_abc/ to /area_efg/ . You need permission to remove the group from /area_abc/ . You also need permission to put the group into /area_efg/ . This means you need permission to call UpdateGroup on both arn:aws:iam::123456789012:group/area_abc/* and arn:aws:iam::123456789012:group/area_efg/* .
Enter the following command to modify the group’s name:
euare-groupmod -g <group_name> --new-group-name <new_name>
Eucalyptus does not return a message. Enter the following command to modify a group’s path:
euare-groupmod -g <group_name> -p <new_path>
Eucalyptus does not return a message.
3.6.1.4 - Add a User to a Group
To add a user to a group perform the steps listed in this topic.Enter the following command:
euare-groupadduser -g <group_name> -u <user-name>
3.6.1.5 - Remove a User from a Group
To remove a user from a group perform the steps listed in this topic.Enter the following command:
euare-groupremoveuser -g <group_name> -u <user-name>
3.6.1.6 - List Groups
To list groups perform the steps listed in this topic.Enter the following command:
euare-grouplistbypath
Eucalyptus returns a list of paths followed by the ARNs for the groups in each path. For example:
arn:aws:iam::eucalyptus:group/groupa
3.6.1.7 - Delete a Group
To delete a group perform the steps listed in this topic.When you delete a group, you have to remove users from the group and delete any policies from the group. You can do this with one command, using the euare-groupdel command with the -r option. Or you can follow the following steps to specify who and what you want to delete.
Individually remove all users from the group.
euare-groupremoveuser -g <group_name> -u <user_name>
Delete the policies attached to the group.
euare-groupdelpolicy -g <group_name> -p <policy_name>
Delete the group.
euare-groupdel -g <group_name>
The group is now deleted.
3.6.2 - Users
Users
Users are subsets of accounts and are added to accounts by an appropriately credentialed administrator. While the term user typically refers to a specific person, in Eucalyptus, a user is defined by a specific set of credentials generated to enable access to a given account. Each set of user credentials is valid for accessing only the account for which they were created. Thus a user only has access to one account within a Eucalyptus system. If an individual person wishes to have access to more than one account within a Eucalyptus system, a separate set of credentials must be generated (in effect a new ‘user’) for each account (though the same username and password can be used for different accounts).
When you need to add a new user to your Eucalyptus cloud, you’ll go through the following process:
- Create a user
- Add user to a group
- Give user a login profile
3.6.2.1 - Add a User
To add a user, perform the steps in this topic.Enter the following command
euare-usercreate -u <user_name> -g <group_name> -k
Eucalyptus does not return a response.
Note
If you include the parameter, Eucalyptus returns a response that includes the user’s ARN and GUID.3.6.2.2 - Create a Login Profile
To create a login profile, perform the tasks in this topic.Enter the following command:
euare-useraddloginprofile -u <user_name> -p <password>
Eucalyptus does not return a response.
3.6.2.3 - Modify a User
Modifying a user is similar to a “move” operation. To modify a user, you need permission to remove the user from the current path or name, and put that user in the new path or name.For example, if a user changes from one team in a company to another, you can change the user’s path from /team_abc/ to /team_efg/ . You need permission to remove the user from /team_abc/ . You also need permission to put the user into /team_efg/ . This means you need permission to call UpdateUser on both arn:aws:iam::123456789012:user/team_abc/* and arn:aws:iam::123456789012:user/team_efg/* .
To rename a user:
Enter the following command to rename a user:
euare-usermod -u <user_name> --new-user-name <new_name>
Eucalyptus does not return a message. Enter the following command:
euare-groupmod -u <user_name> -p <new_path>
Eucalyptus does not return a message.
3.6.2.4 - Change User Path
Enter the following command:
euare-usermod -u <user_name> -p <new_path>
Eucalyptus does not return a message.
3.6.2.5 - Change User Password
To change a user’s password using the CLI:
Enter the following command:
euare-usermodloginprofile -u [username] -p [password]
Eucalyptus does not return a message.
3.6.2.6 - List Users
To list users within a path, perform the steps in this topic.Use the euare-userlistbypath command to list all the users in an account or to list all the users with a particular path prefix. The output lists the ARN for each resulting user.
euare-userlistbypath -p <path>
3.6.2.7 - Delete a User
To delete a user, perform the tasks in this topic.Enter the following command
euare-userdel -u <user_name>
Eucalyptus does not return a response.
3.6.3 - Credentials
Credentials
Eucalyptus uses different types of credentials for different purposes. This section details tasks needed to allow access to Eucalyptus services.
3.6.3.1 - Create Credentials
The first time you get credentials using the Eucalyptus Administrator Console, a new secret access key is generated. On each subsequent request to get credentials, an existing active secret Key is returned. You can also generate new keys using the command.
Note
Each request to get a user’s credentials generates a new pair of a private key and X.509 certificate.To generate a new key for a user by an account administrator, enter the following
euare-useraddkey USERNAME
To generate a private key and an X.509 certificate pair, enter the following:
euare-usercreatecert USERNAME
3.6.3.2 - Upload a Certificate
To upload a certificate provided by a user:
Enter the following command:
euare-useraddcert -u <user_name> -f <cert_file>
3.7 - Using VM Networking and Security
Using VM Networking and Security
The Eucalyptus networking mode used, and it’s configuration, determine the features available to users; such as elastic IPs, which are public (external) IP addresses that users can reserve and dynamically associate with VM instance; and security groups, which are sets of firewall rules applied to VM instances associated with the group.
Euca2ools or the AWS CLI provide means for users to interact with these features with commands for allocating and associating IP addresses, as well as creating, deleting, and modifying security groups.
3.7.1 - Associate an IP Address with an Instance
To associate an IP address with an instance:
Allocate an IP address:
euca-allocate-address ADDRESS <IP_address>
Associate the allocated IP address with an instance ID:
euca-associate-address -i <instance_ID> <IP_address>


euca-associate-address -i i-56785678 192.168.17.103
3.7.2 - Release an IP Address
Use euca-disassociate-address and euca-release-address to disassociate an IP address from an instance and to release the IP address to the global pool, respectively.
To release an IP address:
Enter the following command to disassociate an IP address from an instance:
euca-disassociate-address <IP_address>
Enter the following command to release an IP address:
euca-disassociate-address <IP_address>
The following example releases the IP address, 192.168.17.103
euca-release-address 192.168.17.103
3.7.3 - Create a Security Group
Security groups let you control network access to instances by applying network rules to instances associated with a group.
To create a security group:
Enter the following command:
euca-add-group -d <description> <group_name>
Note
You can also create a security group you run an instance. Use the command with the option. Security group rules only apply to incoming traffic thus all outbound traffic is permitted.The following example creates a new security group named mygroup and described as newgroup .
euca-add-group -d "newgroup" mygroup
3.7.4 - Delete a Security Group
The euca-delete-group command lets you delete security groups. To delete a security group:
Enter the following command:
euca-delete-group <group_name>
The following example deletes the security group, mygroup .
euca-delete-group mygroup
3.7.5 - Authorize Security Group Rules
By default, a security group prevents incoming network traffic from all sources. You can modify network rules and allow incoming traffic to security groups from specified sources using the euca-authorize command.
To authorize security group rules:
Use euca-authorize to authorize port 22 access to your default group. Enter the following command:
euca-authorize -P <protocol> -p <port_number> \
-s <CIDR_source_network> <group_name>
The following example allows all incoming SSH traffic on port 22 to access to the security group mygroup . The CIDR source network, 0.0.0.0/0 , refers to any source.
euca-authorize -P tcp -p 22 -s 0.0.0.0/0 mygroup
 GROUP	mygroup ↵
 PERMISSION	mygroup	ALLOWS	tcp	22	22	FROM	CIDR
Instead of specifying a CIDR source, you can specify another security group. The following example allows access to the security group mygroup from the someothergroup security group using SSH on port 22.
euca-authorize --source-group someothergroup \
--source-group-user someotheruser -P tcp -p 22 mygroup
3.7.6 - Revoke Security Group Rules
To revoke security group rules:
Enter the following command:
euca-revoke -P <protocol> -p <port_number> -s <CIDR_source_network> <group_name>
The following example revokes the network rules authorized for the security group mygroup .
euca-revoke -P tcp -p 22 -s 0.0.0.0/0 mygroup
3.8 - Using Auto Scaling
Using Auto Scaling
Eucalyptus Auto Scaling automatically adds and removes instances based on demand. Auto Scaling scales dynamically based on metrics (for example, CPU utilization). The Auto Scaling service works in conjunction with the ElasticLoad Balancing and CloudWatch services.
3.8.1 - How Auto Scaling Works
Eucalyptus Auto Scaling is designed to address a common web application scenario: that you are running multiple copies of an application across several identical instances to adequately handle a certain volume of user requests. Eucalyptus Auto Scaling can help you make more efficient use of the computing resources in your cloud by automatically launching and terminating these instances, based on metrics and/or a schedule that you can define. There are three main Auto Scaling components that work together to provide this functionality: the Auto Scaling group , the launch configuration , and the scaling plan .
The Auto Scaling group contains the information about the instances that will be actually be used for scaling operations. The Auto Scaling group defines the minimum, desired, and maximum number of instances that you will use to scale your application.
The launch configuration contains all of the information necessary for Auto Scaling to launch instances, including instance type, image ID, key pairs, security groups, and block device mappings.
The scaling policy defines how to perform scaling actions. Scaling policies can execute automatically in response to CloudWatch alarms, or they you can execute them manually.
In addition to performing scaling operations based on the criteria defined in the scaling plan, Auto Scaling will periodically perform health checks to ensure that the instances in your Auto Scaling group are up and running. If an instance is determined to be unhealthy, Auto Scaling will terminate that instance and launch a new instance in order to maintain the minimum or desired number of instances in the scaling group.
3.8.2 - Auto Scaling Concepts
Auto Scaling Concepts
This section discusses Auto Scaling concepts and terminology.
3.8.2.1 - Understanding Launch Configurations
The launch configuration defines the settings used by the Eucalyptus instances launched within an Auto Scaling group. This includes the image name, the instance type, key pairs, security groups, and block device mappings. You associate the launch configuration with an Auto Scaling group. Each Auto Scaling group can have one (and only one) associated launch configuration.
Once you’ve created a launch configuration, you can’t change it; you must create a new launch configuration and then associate it with an Auto Scaling group. After you’ve created and attached a new launch configuration to an Auto Scaling group, any new instances will be launched using parameters defined in the new launch configuration; existing instances in the Auto Scaling group are not affected.
For more information, see Creating a Basic Auto Scaling Configuration .
3.8.2.2 - Understanding Auto Scaling Groups
An Auto Scaling group is the central component of Auto Scaling. An Auto Scaling group defines the parameters for the Eucalyptus instances are used for scaling, as well as the minimum, maximum, and (optionally) the desired number of instances to use for Auto Scaling your application. If you don’t specify the desired number of instances in your Auto Scaling group, the default value will be the same as the minimum number of instances defined.
In addition to instance and capacity definitions, each Auto Scaling group must specify one (and only one) launch configuration.
For more information, see Creating a Basic Auto Scaling Configuration .
3.8.2.3 - Understanding Auto Scaling Policies
An Auto Scaling policy defines how to perform scaling actions in response to CloudWatch alarms. Auto scaling policies can either scale-in , which terminates instances in your Auto Scaling group, or scale-out , which will launch new instances in your Auto Scaling group. You can define an Auto Scaling policy based on demand, or based on a fixed schedule.
Demand-Based Auto Scaling Policies
Demand-based Auto Scaling policies scale your application dynamically based on CloudWatch metrics (such as average CPU utilization) gathered from the instances running in your scaling group. For example, you can configure a CloudWatch alarm to monitor the CPU usages of the instances in your Auto Scaling group. A CloudWatch alarm definition includes thresholds - minimum and maximum values for the defined metric - that will cause the alarm to fire.
Note
For more information on CloudWatch, go to .For example, you can define the lower and upper thresholds of the CloudWatch alarm at 40% and 80% CPU usage. Once you’ve created the CloudWatch alarm, you can create a scale-out policy that launches 10 new instances when the CloudWatch alarm breaches the upper threshold (the average CPU usage is at or above 80%), and a scale-in policy that terminates 10 instances when the CloudWatch alarm breaches the lower threshold (the average CPU usage of the instances in the Auto Scaling group falls below 40%). Your Auto Scaling group will execute the appropriate Auto Scaling policy when it receives the message from the CloudWatch alarm.
Cooldown Period
A cooldown period is the amount of time after an Auto Scaling activity takes place where further Auto Scaling activity is suspended. This is to allow time for the Auto Scaling activities (such as new instance launches or terminations) to fully complete so that resources are not unnecessarily launched or terminated. You can specify this amount of time; if you don’t specify a cooldown period, Auto Scaling uses a default cooldown period of 300 seconds (5 minutes).
For more information, go to Configuring a Demand-Based Scaling Policy .
3.8.2.4 - Understanding Health Checks
Auto scaling periodically performs health checks on the instances in your Auto Scaling group. By default, Auto Scaling group determines the health state of each instance by periodically checking the results of Eucalyptus instance status checks. When Auto Scaling determines that an instance is unhealthy, it terminates that instance and launches a new one.
If your Auto Scaling group is using elastic load balancing, Auto Scaling can determine the health status of the instances by checking the results of both Eucalyptus instance status checks and elastic load balancing instance health.
Auto scaling determines an instance is unhealthy if the calls to either Eucalyptus instance status checks or elastic load balancing instance health status checks return any state other than OK (or InService ).
If there are multiple elastic load balancers associated with your Auto Scaling group, Auto Scaling will make health check calls to each load balancer. If any of the health check calls return any state other than InService , that instance will be marked as unhealthy. After Auto Scaling marks an instance as unhealthy, it will remain marked in that state, even if subsequent calls from other load balancers return an InService state for the same instance.
For more information, go to Configuring Health Checks .
3.8.2.5 - Understanding Instance Termination Policies
Before Auto Scaling selects an instance to terminate, it first identifies the availability zone used by the group that contains the most instances. If all availability zones have the same number of instances, Auto Scaling selects a random availability zone, and then uses the termination policy to select the instance within that randomly selected availability zone for termination.
By default, Auto Scaling chooses the instance that was launched with the oldest launch configuration. If more than one instance was launched using the oldest launch configuration, Auto Scaling the instance that was created first using the oldest launch configuration.
You can override the default instance termination policy for your Auto Scaling group with one of the following options:
| Option | Description |
|---|
| OldestInstance | The oldest instance in the Auto Scaling group should be terminated. |
| NewestInstance | The newest instance in the Auto Scaling group should be terminated. |
| OldestLaunchConfiguration | The first instance created using the oldest launch configuration should be terminated. |
| Default | Use the default instance termination policy. |
You can have more than one termination policy per Auto Scaling group. The termination policies are executed in the order they were created.
For more information, go to Configuring an Instance Termination Policy .
3.8.3 - Auto Scaling Usage Examples
Auto Scaling Usage Examples
This section contains examples of many common usage scenarios for Auto Scaling.
3.8.3.1 - Creating a Basic Auto Scaling Configuration
Auto scaling requires two basic elements to function properly: a launch configuration and an Auto Scaling group. The following examples show how to set up the basic elements of an Auto Scaling configuration.
Create a Launch Configuration
The launch configuration specifies the parameters that Auto Scaling will use when launching new instances for your Auto Scaling group. In this example, we will create a launch configuration with the minimum required parameters - in this case, we set up a launch configuration that specifies that all instances launched in the Auto Scaling group will be of instance type and use the image.To create a launch configuration:
Enter the following command: euscale-create-launch-config MyLaunchConfig --image-id emi-00123456 --instance-type m1.small To verify the launch configuration, enter the following command: euscale-describe-launch-configs MyLaunchConfig You should see output similar to the following:
LAUNCH-CONFIG MyLaunchConfig emi-00123456 m1.small
You’ve now created a launch configuration..
Create an Auto Scaling Group
The Auto Scaling group contains settings like the minimum, maximum, and desired number of Eucalyptus instances. At minimum, you must specify the name of the Auto Scaling group, the name of an existing launch configuration, the availability zone, and the minimum and maximum number of instances that should be running. In the following example, we will create an Auto Scaling group called MyScalingGroup in availability zone PARTI00, with a minimum size of 2 and a maximum size of 5.To create an Auto Scaling group: Enter the following command:
euscale-create-auto-scaling-group MyScalingGroup --launch-configuration
                    		MyLaunchConfig --availability-zones PARTI00 --min-size 2 --max-size 5
                    		--desired-capacity 2
Enter the following command to verify the Auto Scaling group you just created:
euscale-describe-auto-scaling-groups MyScalingGroup
This command will return output similar to the following:
AUTO-SCALING-GROUP	MyScalingGroup	MyLaunchConfig	PARTI00		2	5	2	Default
INSTANCE	i-1B853EC3	PARTI00	InService	Healthy	MyLaunchConfig
INSTANCE	i-ABC53ED7	PARTI00	InService	Healthy	MyLaunchConfig
Once you’ve created the Auto Scaling group, Auto Scaling will launch the appropriate number of instances.
3.8.3.2 - Configuring a Demand-Based Scaling Policy
An Auto Scaling group needs a scaling policy to determine when to perform scaling activities. Auto scaling policies work with CloudWatch to identify metrics and set alarms, which are triggered when the metrics fall outside of a specified value range. To configure a scale-based policy, you need to create the policy, and then create CloudWatch alarms to associate with the policy.In the following example, we will create a demand-based scaling policy.
Note
For more information on CloudWatch, go to .Create Auto Scaling Policies
To create the scaling policies:
Create a scale-out policy using the following command:
euscale-put-scaling-policy MyScaleoutPolicy --auto-scaling-group MyScalingGroup --adjustment=30 --type PercentChangeInCapacity
This command will return a unique Amazon Resource Name (ARN) for the new policy.
Note
You will need this ARN to create the Cloudwatch alarms in subsequent steps.Note
The following example has been split into two lines for legibility.arn:aws:autoscaling::706221218191:scalingPolicy:5d02981b-f440-4c8f-98f2-8a620dc2b787:
autoScalingGroupName/MyScalingGroup:policyName/MyScaleoutPolicy
Create a scale-in policy using the following command:
euscale-put-scaling-policy MyScaleinPolicy -g MyScalingGroup --adjustment=-2 --type ChangeInCapacity
This command will return output containing a unique Amazon Resource Name (ARN) for the new policy, similar to the following:
Note
You will need this ARN to create the Cloudwatch alarms in subsequent steps.Note
The following example has been split into two lines for legibility.arn:aws:autoscaling::706221218191:scalingPolicy:d28c6ffc-e9f1-4a48-a79c-8b431794c367:
autoScalingGroupName/MyScalingGroup:policyName/MyScaleinPolicy
Create CloudWatch Alarms
To create CloudWatch alarms:
Create a Cloudwatch alarm for scaling out when the average CPU usage exceeds 80 percent:
Note
The following example has been split into multiple lines for legibility.euwatch-put-metric-alarm AddCapacity --metric-name CPUUtilization --unit Percent
--namespace "AWS/EC2" --statistic Average --period 120 --threshold 80 --comparison-operator
GreaterThanOrEqualToThreshold --dimensions "AutoScalingGroupName=MyScalingGroup"
--evaluation-periods 2 --alarm-actions
arn:aws:autoscaling::706221218191:scalingPolicy:5d02981b-f440-4c8f-98f2-8a620dc2b787:
    autoScalingGroupName/MyScalingGroup:policyName/MyScaleoutPolicy
Create a Cloudwatch alarm for scaling in when the average CPU usage falls below 40 percent:
Note
The following example has been split into multiple lines for legibility.euwatch-put-metric-alarm RemoveCapacity --metric-name CPUUtilization --unit Percent
--namespace "AWS/EC2" --statistic Average --period 120 --threshold 40 --comparison-operator
LessThanOrEqualToThreshold --dimensions "AutoScalingGroupName=MyScalingGroup" --evaluation-periods 2
--alarm-actions
arn:aws:autoscaling::706221218191:scalingPolicy:d28c6ffc-e9f1-4a48-a79c-8b431794c367:
    autoScalingGroupName/MyScalingGroup:policyName/MyScaleinPolicy
Verify Your Alarms and Policies
Once you’ve created your Auto Scaling policies and CloudWatch alarms, you should verify them.To verify your alarms and policies:
Use the CloudWatch command euwatch-describe-alarms to see a list of the alarms you’ve created:
euwatch-describe-alarms
This will return output similar to the following:
AddCapacity	INSUFFICIENT_DATA	arn:aws:autoscaling::706221218191:scalingPolicy:5d02981b-f440-4c8f-98f2-8a620dc2b787:
   autoScalingGroupName/MyScalingGroup:policyName/MyScaleoutPolicy
   AWS/EC2	CPUUtilization	120	Average	2	GreaterThanOrEqualToThreshold	80.0
RemoveCapacity	INSUFFICIENT_DATA	arn:aws:autoscaling::706221218191:scalingPolicy:d28c6ffc-e9f1-4a48-a79c-8b431794c367:
autoScalingGroupName/MyScalingGroup:policyName/MyScaleinPolicy
   AWS/EC2	CPUUtilization	120	Average	2	LessThanOrEqualToThreshold	40.0
Use the euscale-describe-policies command to see the scaling policies you’ve created:
euscale-describe-policies --auto-scaling-group MyScalingGroup
This will return output similar to the following (note that this output has been split into multiple lines for legibility):
SCALING-POLICY	MyScalingGroup	MyScaleinPolicy	-2	ChangeInCapacity	arn:aws:autoscaling::706221218191:
  scalingPolicy:d28c6ffc-e9f1-4a48-a79c-8b431794c367:
  autoScalingGroupName/MyScalingGroup:policyName/MyScaleinPolicy
SCALING-POLICY	MyScalingGroup	MyScaleoutPolicy	30	PercentChangeInCapacity	arn:aws:autoscaling::706221218191:
  scalingPolicy:5d02981b-f440-4c8f-98f2-8a620dc2b787:
  autoScalingGroupName/MyScalingGroup:policyName/MyScaleoutPolicy
3.8.3.3 - Configuring Health Checks
By default, Auto Scaling group determines the health state of each instance by periodically checking the results of instance status checks. You can specify using the ELB health check method in addition to using the instance health check method.To use load balancing health checks for an Auto Scaling group:
Use the following command to specify ELB health checks for an Auto Scaling group:
euscale-update-auto-scaling-group MyScalingGroup –-health-check-type ELB –-grace-period 300
3.8.3.4 - Configuring an Instance Termination Policy
You can control how Auto Scaling determines which instances to terminate. You can specify a termination policy when you create an Auto Scaling group, and you can change the termination policy at any time using the command.You can override the default instance termination policy for your Auto Scaling group with one of the following options:
| Option | Description |
|---|
| OldestInstance | The oldest instance in the Auto Scaling group should be terminated. |
| NewestInstance | The newest instance in the Auto Scaling group should be terminated. |
| OldestLaunchConfiguration | The first instance created using the oldest launch configuration should be terminated. |
| Default | Use the default instance termination policy. |
To configure an instance termination policy:
Specify the –termination-policies parameter when creating or updating the Auto Scaling group. For example:
euscale-update-auto-scaling-group MyScalingGroup --termination-policies "NewestInstance"
Verify that your Auto Scaling group has updated the termination policy by running the following command: euscale-describe-auto-scaling-groups MyScalingGroup This command should return output similar to the following:
AUTO-SCALING-GROUP	MyScalingGroup	MyLaunchConfig	PARTI00		2	5	2	NewestInstance
INSTANCE	i-1B853EC3	PARTI00	InService	Healthy	MyLaunchConfig
INSTANCE	i-ABC53ED7	PARTI00	InService	Healthy	MyLaunchConfig
3.8.3.5 - Configuring Auto Scaling with Elastic Load Balancing
This example shows how to set up Auto Scaling with Elastic Load Balancing.To set up a load-balanced auto scaling configuration:
If you don’t already have a launch configuration, create one: euscale-create-launch-config MyLaunchConfig --image-id emi-50783D25 --instance-type m1.medium --group mysecuritygroup Create a new auto scaling group associated with a load balancer: euscale-create-auto-scaling-group MyScalingGroup --launch-configuration MyLaunchConfig --load-balancers MyLoadBalancer --availability-zones AcmeAvailabilityZone --min-size 2 --max-size 4 Authorize the security group used by the load balancer for back-end port communication. For example:
$ eulb-describe-lbs --show-long
LOAD_BALANCER	MyLoadBalancer	MyLoadBalancer-408396244283.elb.acme.eucalyptus-systems.com
{interval=200,target=HTTP:80/,timeout=3,healthy-threshold=2,unhealthy-threshold=4}		AcmeAvailabilityZone
{protocol=HTTP,lb-port=80,instance-protocol=HTTP,instance-port=80}
{owner-alias=944786667073,group-name=euca-internal-408396244283-MyLoadBalancer}
2014-05-28T18:13:17.902Z
euca-authorize mysecuritygroup -u 944786667073 -o euca-internal-408396244283-MyLoadBalancer -p -1 Verify that your Auto Scaling group has been created with a load balancer:
$ euscale-describe-auto-scaling-groups
AUTO-SCALING-GROUP	MyScalingGroup	MyLaunchConfig	AcmeAvailabilityZone	MyLoadBalancer	2	4	2	Default
INSTANCE	i-DFCD0CBC	AcmeAvailabilityZone	InService	Healthy	MyLaunchConfig
INSTANCE	i-B3431043	AcmeAvailabilityZone	InService	Healthy	MyLaunchConfig
3.9 - Using Elastic Load Balancing
Using Elastic Load Balancing
Elastic Load Balancing automatically distributes incoming traffic across your Eucalyptus cloud. It enables you to achieve even greater fault tolerance by automatically detecting instances that are overloaded, and rerouting traffic to other instances as needed.Elastic Load Balancing works in conjunction with Eucalyptus’s Auto Scaling and Cloud Watch services, to make your cloud more robust and efficient.
The following section describes how load balancing works, provides an overview of load balancing concepts, and includes a series of usage scenarios that will show you how to perform common load balancing tasks.
3.9.1 - Elastic Load Balancing Overview
Elastic Load Balancing Overview
Elastic Load Balancing is designed to provide an easy-to-use fault tolerant cloud platform. Using Elastic Load Balancing, you can automatically balance incoming traffic, ensuring that requests are sent to an instance that has the capacity to serve them. It allows you to add and remove instances as needed, without interrupting the operation of your cloud. If an instance fails or is removed, the load balancer stops routing traffic to that instance. If that instance is restored, or an instance is added, the load balancer automatically resumes or starts routing traffic to that instance.
If your cloud is serving traffic over HTTP, the Elastic Load Balancing service can provide session stickiness, allowing you to bind specific virtual instances to your load balancers.
Elastic Load Balancing can balance requests within a cluster, or across multiple clusters. If there are no more healthy instances in a cluster, the load balancer will route traffic to other clusters, until healthy instances are restored to that cluster.
3.9.1.1 - Elastic Load Balancing Concepts
This section describes the terminology and concepts you need for understanding and using the Elastic Load Balancing service.
DNS
When a new load balancer is created, Eucalyptus will assign a unique DNS A record to the load balancer. After the load balancer has been launched and configured, the IP address of its interface will be added to the DNS name. If more than one cluster is specified, there can be more than one IP addresses mapped to the DNS name.
The load balancers in one cluster will distribute traffic to the instances only in the same cluster. Application users can query the application service using the DNS name and the Eucalyptus DNS service will respond to the query with the list of IP addresses on a round-robin basis.
Eucalyptus generates a DNS name automatically (e.g., lb001.euca-cloud.example.com). Typically there will also be a CNAME record that maps from the meaningful domain name (e.g., service.example.com) to the automatically-generated DNS name. The CNAME records can be serviced anywhere on Internet.
Health Check
In order to route traffic to healthy instances, and prevent traffic from being routed to unhealthy instances, the Elastic Load Balancing service routinely checks the health of your service instances. The health check uses metrics such as latency, RequestCount and HTTP response code counts to ensure that service instances are responding appropriately to user traffic.
Load Balancer
Load balancers are the core of the Elastic Load Balancing service. Load balancers are special instances created from a Eucalyptus-provided VM image, and are managed by Eucalyptus. Instances off the image forward packets to your service instances using load-balancing software to ensure no instances are overloaded.
There may be a brief delay between the time that the first service instance is registered to a load balancer and the time the load balancer becomes operational. This is due to the virtual machine instantiation, and will not adversely affect the operation of your load balancer.
Each balancer VM will service only one load balancer. Launching unnecessary load balancers may be detrimental to your cloud’s performance.
Service Instance
A service instance is an instance created from an image in your cloud. These are the instances that serve your application and users. The Elastic Load Balancing service monitors the health of these instances and routes traffic only to healthy instances.
Sticky Sessions
By default, a load balancer routes each request independently to the application instance with the smallest load. However, you can use the sticky session feature (also known as session affinity), which enables the load balancer to bind a user’s session to a specific application instance. This ensures that all requests coming from the user during the session will be sent to the same application instance.
The key to managing the sticky session is determining how long your load balancer should consistently route the user’s request to the same application instance. If your application has its own session cookie, then you can set Elastic Load Balancing to create the session cookie to follow the duration specified by the application’s session cookie. If your application does not have its own session cookie, then you can set Elastic Load Balancing to create a session cookie by specifying your own stickiness duration. You can associate stickiness duration for only HTTP/HTTPS load balancer listeners.
An application instance must always receive and send two cookies: A cookie that defines the stickiness duration and a special Elastic Load Balancing cookie named AWSELB, that has the mapping to the application instance.
HTTPS/SSL Support
HTTPS Support is a feature that allows you to use the SSL/TLS protocol for encrypted connections (also known as SSL offload). This feature enables traffic encryption between the clients that initiate HTTPS sessions with your load balancer and also for connections between the load balancer and your back-end instances.
There are several advantages to using HTTPS/SSL connections with your load balancer:
The SSL server certificate used to terminate client connections can be managed centrally on the load balancer, rather than on every individual application instance.
The work of encrypting and decrypting SSL traffic is moved from the application instance to the load balancer.
The load balancer can ensure session affinity or “sticky sessions” by terminating the incoming HTTPS request and then re-encrypting the content to send to the back-end application instance.
All of the features available for HTTP can be used with HTTPS connections.
Using HTTPS/SSL protocols for both front-end and back-end connections ensures end-to-end traffic encryption. If you are using SSL and do not want Elastic Load Balancing to terminate, you can use a TCP listener and install certificates on all the back-end instances handling requests.
To enable HTTPS support for your load balancer, you’ll have to install an SSL server certificate on your load balancer by using Identity and Access Management (IAM) to upload your SSL certificate and key. After you upload your certificate, specify its Amazon Resource Name (ARN) when you create a new load balancer or update an existing load balancer. The load balancer uses the certificate to terminate and then decrypt requests before sending them to the back-end instances.
3.9.2 - Eucalyptus Load Balancing Usage Examples
Eucalyptus Load Balancing Usage Examples
This section contains examples of common usage scenarios for Eucalyptus Load Balancing.
3.9.2.1 - Eucalyptus ELB Listener Configurations
This section provides a reference to various possible ways to configure your listener, depending on how secure you want your load balancer. Currently, Eucalyptus supports the following HTTP/HTTPS Load Balancer use cases:
- Basic HTTP load balancer
- Secure website or application using ELB to offload SSL decryption.
- Secure website or application using end-to-end encryption
| Use Case | Front-end Protocol | Front-end Options | Back-end Protocol | Back-end Options | Notes |
|---|
| Basic HTTP load balancer | HTTP | NA | HTTP | NA | Supports X-forward for header. Go to AWS X-forwarding for more information. |
| Secure website or application using Elastic Load Balancing to offload SSL decryption | HTTPS | SSL Negotiation. | HTTP | NA | Supports X-forward for header. Go to AWS X-forwarding for more information. Requires an SSL certificate installed on the load balancer. |
| Secure website or application using end-to-end encryption | HTTPS | SSL Negotiation. | HTTPS | Back-end authentication | Supports X-forward for header. Go to AWS X-forwarding for more information. Requires an SSL certificate installed on the load balancer and registered instances. |
3.9.2.2 - Creating a Basic Elastic Load Balancing Configuration
Elastic load balancing requires two basic elements to function properly: a load balancer and instances registered with that load balancer. The following examples show how to set up the basic elements of an elastic load balancer configuration.
Create a Load Balancer
The load balancer manages incoming traffic, and monitors the health of your instances. The load balancer ensures that traffic is only sent to healthy instances.To create a load balancer:
Enter the following command, specifying availability zones:
eulb-create-lb -z one -l "lb-port=80, protocol=HTTP, instance-port=80,
instance-protocol=HTTP" MyLoadBalancer
To verify the elastic load balancer has been created, enter the following command: eulb-describe-lbs MyLoadBalancer You should see output similar to the following:
LOAD_BALANCER MyLoadBalancer MyLoadBalancer-587773761872.lb.localhost 2013-01-01T01:23:45.678Z
Optionally, you can create listeners for the load balancer as follows:
eulb-create-lb-listeners --listener "lb-port=80, protocol=HTTP,
    instance-port=80, instance-protocol=HTTP"
You’ve now created an elastic load balancer.
Register instances with the Load Balancer
The load balancer monitors the health of registered instances, and balances incoming traffic across the healthy instances.To register an instance with the load balancer: Enter the following command:
eulb-register-instances-with-lb --instances i-e0636aca,i-0c9c3967 MyLoadBalancer
Enter the following command to verify that the instances are registered with the load balancer: eulb-describe-instance-health MyLoadBalancer This command will return output similar to the following:
INSTANCE	i-6FAD3F7B	InService
INSTANCE	i-70FE4541	InService
Once you’ve created the load balancer and registered your instances with it, the load balancer will automatically route traffic from its endpoint URL to healthy instances.
3.9.2.3 - Configuring the Health Check
To determine which instances are healthy, the load balancer periodically polls the registered instances. You can use the command as described in this topic.Perform the following step to configure how the instances should be polled, how long to wait for a response, and how many consecutive successes or failures are required to mark an instance as healthy or unhealthy.
Note
After you initially set up your load balancer, Eucalyptus automatically performs a health check to protect against potential side-effects caused by instances being terminated without being deregistered. This health check uses the instance port defined in the load balancer configurationThe following shows an example health check configuration command:
eulb-configure-healthcheck --healthy-threshold 5 --unhealthy-threshold 5 --interval 30 --timeout 120 --target HTTP:80/ MyLoadBalancer
Use --healthy-threshold and --unhealthy-threshold to specify the number of consecutive health checks required to mark an instance as Healthy or Unhealthy respectively. Use --target to specify the connection target on your instances for these health checks. Use --interval and --timeout to specify the approximate frequency and maximum duration of these health checks.
3.9.2.4 - Modifying an Elastic Load Balancing Configuration
Elastic load balancing requires two basic elements to function properly: a load balancer and instances registered with that load balancer. The following examples show how to modify the basic elements of an elastic load balancer configuration.
De-register instances from the Load Balancer
The load balancer monitors the health of registered instances, and balances incoming traffic across the healthy instances.To deregister an instance from the load balancer: Enter the following command:
eulb-deregister-instances-from-lb --instances INSTANCE1,INSTANCE2,... MyLoadBalancer
Enter the following command to verify that the instances are deregistered from the load balancer: eulb-describe-instance-health MyLoadBalancer This command will return output similar to the following:
INSTANCE i-6FAD3F7B InService
Delete Load Balancer Listeners
To delete a load balancer listener:
Enter the following command:
eulb-delete-lb-listeners --lb-ports PORT1,PORT2,... MyLoadBalancer
Delete Load Balancer
To delete a load balancer:
Enter the following command:
eulb-delete-lb MyLoadBalancer
You’ve now deleted the elastic load balancer.
3.9.2.5 - Creating Elastic Load Balancing Sticky Sessions
By default, a load balancer routes each request independently to the application instance with the smallest load. However, you can use the sticky session feature (also known as session affinity) which enables the load balancer to bind a user’s session to a specific application instance. This ensures that all requests coming from the user during the session will be sent to the same application instance.
Enable Duration-Based Session Stickiness
To enable duration-based sticky sessions for a load balancer:
Use the eulb-create-lb-cookie-stickiness-policy command to create a load-balancer-generated cookie stickiness policy with a cookie expiration period of 60 seconds. eulb-create-lb-cookie-stickiness-policy MyLoadBalancer --policy-name MyLoadBalancerPolicy --expiration-period 60 Use the eulb-set-lb-policies-of-listener command to enable session stickiness for a load balancer using the MyLoadBalancerPolicy. eulb-set-lb-policies-of-listener MyLoadBalancer --lb-port 80 --policy-names MyLoadBalancerPolicy You can use the eulb-describe-lb-policies command to list the policies created for the load balancer. eulb-describe-lb-policies MyLoadBalancer --show-long
Enable Application-Controlled Session Stickiness
To enable application-controlled session stickiness: Use the eulb-create-app-cookie-stickiness-policy command to create a load application-generated cookie stickiness policy: eulb-create-app-cookie-stickiness-policy my-load-balancer -p my-app-cookie-lb-policy -c my-cookie Use the eulb-set-lb-policies-of-listener command to enable session stickiness for a load balancer using the my-load-balancer policy. eulb-set-lb-policies-of-listener example-lb --lb-port 80 --policy-names my-app-cookie-lb-policy You can use the eulb-describe-lb-policies command to list the policies created for the load balancer. eulb-describe-lb-policies example-lb --show-long
3.9.2.6 - Uploading SSL Certificates for Elastic Load Balancing
You must install an X.509 certificate on your load balancer in order to use HTTPS or SSL termination. The X.509 certificate is issued by a central Certificate Authority (CA) and contains identifying information, including a digital signature. X.509 certificates have a validity period. Once an X.509 certificate expires, you must create and install a new certificate.
Upload a Certificate
Once you’ve created a certificate, you must upload it to your cloud using the command.
Note
You must create the certificate and get it signed by a certificate authority (CA) before you can upload the certificate using the AWS Identity and Access Management (IAM) service. For instructions, go to .To upload a certificate :
Enter the euare-servercertupload command, specifying the name of your certificate, the contents of the PEM-encoded public- and private-keys:
euare-servercertupload -s cert-name --certificate-file ssl_server_cert.crt --private-key-file ssl_server_cert.pem
You’ve now created an elastic load balancer.
Verify Server Certificate
You can verify that an uploaded certificate is stored in IAM. Each certificate object has a unique Amazon Resource Name (ARN) and ID.To verify an uploaded certificate: Use the euare-servercertlistbypath command to verify the certificate is stored in IAM:
euare-servercertgetattributes -s elb-ssl-cert
The command will return the ARN, followed by the GUID. For example:
arn:aws:iam::495375389014:server-certificate/elb-ssl-cert
ASCWDKTJBXPSZTHWFERVP
3.9.2.7 - Adding SSL Support
This topic describes how to add SSL support to a new or existing load balancer.
Creating a new listener with SSL support
This task shows how to create a new listener with SSL support.
Note
In order to use HTTPS support, you’ll need to install an SSL server certificate on your load balancer. If you haven’t already done this, see .To add a new listener to your load balancer: Using the ARN for the certificate you installed, use the
eulb-create-listener command to create a new listener. For example:
eulb-create-lb-listeners MyLoadBalancer --listener "protocol=HTTPS,lb-port=443,instance-port=80,instance-protocol=HTTP, cert-id=arn:aws:iam::12345678901:my-server-certificate/testing/myNewCert" Use the
eulb-describe-lbs command to see the details of your load balancer. For example:
eulb-describe-lbs MyLoadBalancerUpdating a listener with a new SSL certificate
This task shows how to replace an SSL server certificate configured with listeners"
Note
In order to use HTTPS support, you’ll need to install an SSL server certificate on your load balancer. If you haven’t already done this, see .To update an existing listener with SSL support: Use the
eulb-set-lb-listener-ssl-certcommand with the ARN of your new server certificate to replace the certificate configured with listeners For example:
eulb-set-lb-listener-ssl-cert MyLoadBalancer --lb-port 443 --cert-id arn:aws:iam::12345678901:my-server-certificate/testing/myNewCert Use the
eulb-describe-lbs command to see the details of your load balancer. For example:
eulb-describe-lbs MyLoadBalancer3.9.2.8 - Updating the SSL Negotiation Configuration
Eucalyptus Elastic Load Balancing (ELB) uses SSL negotiation configurations to determine how SSL connections to your load balancer behave. This topic shows how to update an existing load balancer with an SSL negotiation configuration.
Get a list of predefined security policies using the eulb-describe-lb-policies command: eulb-describe-lb-policies This produces output similar to the following:
POLICY	ELBSample-AppCookieStickinessPolicy	AppCookieStickinessPolicyType
POLICY	ELBSample-LBCookieStickinessPolicy	LBCookieStickinessPolicyType
POLICY	ELBSecurityPolicy-2014-10	SSLNegotiationPolicyType
POLICY	ELBSecurityPolicy-2015-02	SSLNegotiationPolicyType
POLICY	ELBSecurityPolicy-2011-08	SSLNegotiationPolicyType
POLICY	ELBSecurityPolicy-2015-05	SSLNegotiationPolicyType
POLICY	ELBSecurityPolicy-2014-01	SSLNegotiationPolicyType
Use the eulb-create-lb-policy command to update the SSL negotiation configuration to use one of the predefined security policies. For example: eulb-create-lb-policy --policy-name mypredefinedsslpolicy --policy-type SSLNegotiationPolicyType --attributes "Reference-Security-Policy=ELBSecurityPolicy-2011-08" myloadbalancer Use the eulb-describe-lbs command to verify the update. For example: eulb-describe-lbs myloadbalancer
3.9.2.9 - Adding and Editing Predefined Security Policies
This topic describes how to add and edit ELB security policies.Default ELB policies are stored as JSON files in the /etc/eucalyptus/cloud.d/elb-security-policy directory. You can add or edit policy files here, and the changes will take effect when the CLC is restarted.
Copy one of the ELB policy files to a new file and edit the file. You must change the PolicyName attribute to a new name, with the name ending in a date. For example: ELBSecurityPolicy-2015-09 The policy file with the most recent date appended to the name will be used as the default policy when users create HTTPS/SSL listeners. The following is an example of an ELB policy file. You can modify this file and save it with a new filename in the /etc/eucalyptus/cloud.d/elb-security-policy directory.
{
    "PolicyAttributeDescriptions": [
        {
            "AttributeName": "Protocol-SSLv2",
            "AttributeValue": "false"
        },
        {
            "AttributeName": "Protocol-TLSv1",
            "AttributeValue": "true"
        },
        {
            "AttributeName": "Protocol-SSLv3",
            "AttributeValue": "false"
        },
        {
            "AttributeName": "Protocol-TLSv1.1",
            "AttributeValue": "true"
        },
        {
            "AttributeName": "Protocol-TLSv1.2",
            "AttributeValue": "true"
        },
        {
            "AttributeName": "Server-Defined-Cipher-Order",
            "AttributeValue": "true"
        },
        {
            "AttributeName": "ECDHE-ECDSA-AES128-GCM-SHA256",
            "AttributeValue": "true"
        },
        {
            "AttributeName": "ECDHE-RSA-AES128-GCM-SHA256",
            "AttributeValue": "true"
        },
        {
            "AttributeName": "ECDHE-ECDSA-AES128-SHA256",
            "AttributeValue": "true"
        },
        {
            "AttributeName": "ECDHE-RSA-AES128-SHA256",
            "AttributeValue": "true"
        },
        {
            "AttributeName": "ECDHE-ECDSA-AES128-SHA",
            "AttributeValue": "true"
        },
        {
            "AttributeName": "ECDHE-RSA-AES128-SHA",
            "AttributeValue": "true"
        },
        {
            "AttributeName": "DHE-RSA-AES128-SHA",
            "AttributeValue": "false"
        },
        {
            "AttributeName": "ECDHE-ECDSA-AES256-GCM-SHA384",
            "AttributeValue": "true"
        },
        {
            "AttributeName": "ECDHE-RSA-AES256-GCM-SHA384",
            "AttributeValue": "true"
        },
        {
            "AttributeName": "ECDHE-ECDSA-AES256-SHA384",
            "AttributeValue": "true"
        },
        {
            "AttributeName": "ECDHE-RSA-AES256-SHA384",
            "AttributeValue": "true"
        },
        {
            "AttributeName": "ECDHE-RSA-AES256-SHA",
            "AttributeValue": "true"
        },
        {
            "AttributeName": "ECDHE-ECDSA-AES256-SHA",
            "AttributeValue": "true"
        },
        {
            "AttributeName": "AES128-GCM-SHA256",
            "AttributeValue": "true"
        },
        {
            "AttributeName": "AES128-SHA256",
            "AttributeValue": "true"
        },
        {
            "AttributeName": "AES128-SHA",
            "AttributeValue": "true"
        },
        {
            "AttributeName": "AES256-GCM-SHA384",
            "AttributeValue": "true"
        },
        {
            "AttributeName": "AES256-SHA256",
            "AttributeValue": "true"
        },
        {
            "AttributeName": "AES256-SHA",
            "AttributeValue": "true"
        },
        {
            "AttributeName": "DHE-DSS-AES128-SHA",
            "AttributeValue": "false"
        },
        {
            "AttributeName": "CAMELLIA128-SHA",
            "AttributeValue": "false"
        },
        {
            "AttributeName": "EDH-RSA-DES-CBC3-SHA",
            "AttributeValue": "false"
        },
        {
            "AttributeName": "DES-CBC3-SHA",
            "AttributeValue": "true"
        },
        {
            "AttributeName": "ECDHE-RSA-RC4-SHA",
            "AttributeValue": "false"
        },
        {
            "AttributeName": "RC4-SHA",
            "AttributeValue": "false"
        },
        {
            "AttributeName": "ECDHE-ECDSA-RC4-SHA",
            "AttributeValue": "false"
        },
        {
            "AttributeName": "DHE-DSS-AES256-GCM-SHA384",
            "AttributeValue": "false"
        },
        {
            "AttributeName": "DHE-RSA-AES256-GCM-SHA384",
            "AttributeValue": "false"
        },
        {
            "AttributeName": "DHE-RSA-AES256-SHA256",
            "AttributeValue": "false"
        },
        {
            "AttributeName": "DHE-DSS-AES256-SHA256",
            "AttributeValue": "false"
        },
        {
            "AttributeName": "DHE-RSA-AES256-SHA",
            "AttributeValue": "false"
        },
        {
            "AttributeName": "DHE-DSS-AES256-SHA",
            "AttributeValue": "false"
        },
        {
            "AttributeName": "DHE-RSA-CAMELLIA256-SHA",
            "AttributeValue": "false"
        },
        {
            "AttributeName": "DHE-DSS-CAMELLIA256-SHA",
            "AttributeValue": "false"
        },
        {
            "AttributeName": "CAMELLIA256-SHA",
            "AttributeValue": "false"
        },
        {
            "AttributeName": "EDH-DSS-DES-CBC3-SHA",
            "AttributeValue": "false"
        },
        {
            "AttributeName": "DHE-DSS-AES128-GCM-SHA256",
            "AttributeValue": "false"
        },
        {
            "AttributeName": "DHE-RSA-AES128-GCM-SHA256",
            "AttributeValue": "false"
        },
        {
            "AttributeName": "DHE-RSA-AES128-SHA256",
            "AttributeValue": "false"
        },
        {
            "AttributeName": "DHE-DSS-AES128-SHA256",
            "AttributeValue": "false"
        },
        {
            "AttributeName": "DHE-RSA-CAMELLIA128-SHA",
            "AttributeValue": "false"
        },
        {
            "AttributeName": "DHE-DSS-CAMELLIA128-SHA",
            "AttributeValue": "false"
        },
        {
            "AttributeName": "ADH-AES128-GCM-SHA256",
            "AttributeValue": "false"
        },
        {
            "AttributeName": "ADH-AES128-SHA",
            "AttributeValue": "false"
        },
        {
            "AttributeName": "ADH-AES128-SHA256",
            "AttributeValue": "false"
        },
        {
            "AttributeName": "ADH-AES256-GCM-SHA384",
            "AttributeValue": "false"
        },
        {
            "AttributeName": "ADH-AES256-SHA",
            "AttributeValue": "false"
        },
        {
            "AttributeName": "ADH-AES256-SHA256",
            "AttributeValue": "false"
        },
        {
            "AttributeName": "ADH-CAMELLIA128-SHA",
            "AttributeValue": "false"
        },
        {
            "AttributeName": "ADH-CAMELLIA256-SHA",
            "AttributeValue": "false"
        },
        {
            "AttributeName": "ADH-DES-CBC3-SHA",
            "AttributeValue": "false"
        },
        {
            "AttributeName": "ADH-DES-CBC-SHA",
            "AttributeValue": "false"
        },
        {
            "AttributeName": "ADH-RC4-MD5",
            "AttributeValue": "false"
        },
        {
            "AttributeName": "ADH-SEED-SHA",
            "AttributeValue": "false"
        },
        {
            "AttributeName": "DES-CBC-SHA",
            "AttributeValue": "false"
        },
        {
            "AttributeName": "DHE-DSS-SEED-SHA",
            "AttributeValue": "false"
        },
        {
            "AttributeName": "DHE-RSA-SEED-SHA",
            "AttributeValue": "false"
        },
        {
            "AttributeName": "EDH-DSS-DES-CBC-SHA",
            "AttributeValue": "false"
        },
        {
            "AttributeName": "EDH-RSA-DES-CBC-SHA",
            "AttributeValue": "false"
        },
        {
            "AttributeName": "IDEA-CBC-SHA",
            "AttributeValue": "false"
        },
        {
            "AttributeName": "RC4-MD5",
            "AttributeValue": "false"
        },
        {
            "AttributeName": "SEED-SHA",
            "AttributeValue": "false"
        },
        {
            "AttributeName": "DES-CBC3-MD5",
            "AttributeValue": "false"
        },
        {
            "AttributeName": "DES-CBC-MD5",
            "AttributeValue": "false"
        },
        {
            "AttributeName": "RC2-CBC-MD5",
            "AttributeValue": "false"
        },
        {
            "AttributeName": "PSK-AES256-CBC-SHA",
            "AttributeValue": "false"
        },
        {
            "AttributeName": "PSK-3DES-EDE-CBC-SHA",
            "AttributeValue": "false"
        },
        {
            "AttributeName": "KRB5-DES-CBC3-SHA",
            "AttributeValue": "false"
        },
        {
            "AttributeName": "KRB5-DES-CBC3-MD5",
            "AttributeValue": "false"
        },
        {
            "AttributeName": "PSK-AES128-CBC-SHA",
            "AttributeValue": "false"
        },
        {
            "AttributeName": "PSK-RC4-SHA",
            "AttributeValue": "false"
        },
        {
            "AttributeName": "KRB5-RC4-SHA",
            "AttributeValue": "false"
        },
        {
            "AttributeName": "KRB5-RC4-MD5",
            "AttributeValue": "false"
        },
        {
            "AttributeName": "KRB5-DES-CBC-SHA",
            "AttributeValue": "false"
        },
        {
            "AttributeName": "KRB5-DES-CBC-MD5",
            "AttributeValue": "false"
        },
        {
            "AttributeName": "EXP-EDH-RSA-DES-CBC-SHA",
            "AttributeValue": "false"
        },
        {
            "AttributeName": "EXP-EDH-DSS-DES-CBC-SHA",
            "AttributeValue": "false"
        },
        {
            "AttributeName": "EXP-ADH-DES-CBC-SHA",
            "AttributeValue": "false"
        },
        {
            "AttributeName": "EXP-DES-CBC-SHA",
            "AttributeValue": "false"
        },
        {
            "AttributeName": "EXP-RC2-CBC-MD5",
            "AttributeValue": "false"
        },
        {
            "AttributeName": "EXP-KRB5-RC2-CBC-SHA",
            "AttributeValue": "false"
        },
        {
            "AttributeName": "EXP-KRB5-DES-CBC-SHA",
            "AttributeValue": "false"
        },
        {
            "AttributeName": "EXP-KRB5-RC2-CBC-MD5",
            "AttributeValue": "false"
        },
        {
            "AttributeName": "EXP-KRB5-DES-CBC-MD5",
            "AttributeValue": "false"
        },
        {
            "AttributeName": "EXP-ADH-RC4-MD5",
            "AttributeValue": "false"
        },
        {
            "AttributeName": "EXP-RC4-MD5",
            "AttributeValue": "false"
        },
        {
            "AttributeName": "EXP-KRB5-RC4-SHA",
            "AttributeValue": "false"
        },
        {
            "AttributeName": "EXP-KRB5-RC4-MD5",
            "AttributeValue": "false"
        }
    ],
    "PolicyName": "ELBSecurityPolicy-2015-05",
    "PolicyTypeName": "SSLNegotiationPolicyType"
}
Using a text editor, change the PolicyName attribute. For example: "PolicyName": "ELBSecurityPolicy-2015-05" Once you’ve edited and saved the JSON file, restart the CLC. Once the CLC has restarted, use the eulb-describe-lb-policies command to verify that your new policy is listed. For example:
POLICY	ELBSample-AppCookieStickinessPolicy	AppCookieStickinessPolicyType
POLICY	ELBSample-LBCookieStickinessPolicy	LBCookieStickinessPolicyType
POLICY	ELBSecurityPolicy-2014-10	SSLNegotiationPolicyType
POLICY	ELBSecurityPolicy-2015-02	SSLNegotiationPolicyType
POLICY	ELBSecurityPolicy-2011-08	SSLNegotiationPolicyType
POLICY	ELBSecurityPolicy-2015-05	SSLNegotiationPolicyType
POLICY	ELBSecurityPolicy-2014-01	SSLNegotiationPolicyType
POLICY	MyNewELBSecurityPolicy-2015-09	SSLNegotiationPolicyType
You can now use your new security policy using the eulb-create-lb-policy command. For more information, see Updating the SSL Negotiation Configuration .
3.9.2.10 - Configuring Back-end Server Authentication
When running a web application with HTTPS or SSL as the backend server’s protocol, you might want to authenticate the back-end servers using the public key of the back-end server’s certificate. This authentication can be used to ensure that back-end servers accept only encrypted communication and to ensure that the back-end servers have the correct certificate.To configure back-end server authentication:
Create a new loadbalancer with HTTPS as backend instance’s protocol:
eulb-create-lb -l "protocol=HTTPS,lb-port=443,instance-protocol=HTTPS,instance-port=8443,cert-id=arn:aws:iam::000550595745:server-certificate/mycert01"\
                        -z one myloadbalancer
Create a new PublicKeyPolicyType policy for the load balancer. In the example below, ‘server.crt’ is the file containing the public key of the backend server’s certificate.
eulb-create-lb-policy -n webservercert -t PublicKeyPolicyType -a "name=PublicKey, value=$(<./server.crt)" myloadbalancer
Use the eulb-describe-lb-policies to ensure that the policy was created. For example:
eulb-describe-lb-policies -p webservercert myloadbalancer
Create a new BackendServerAuthenticationPolicyType policy that refers to the public key policy created above.
eulb-create-lb-policy -n webserverauthentication -t BackendServerAuthenticationPolicyType -a "name=PublicKeyPolicyName, value=webservercert" myloadbalancer
Make sure the policy is created. For example:
eulb-describe-lb-policies -p webserverauthentication myloadbalancer
Set the created policy to the listener by specifying the instance’s port number. For example:
eulb-set-lb-policies-for-backend-server -i 443 -p webserverauthentication myloadbalancer
Make sure the policy is attached to the intended listener. For example:
eulb-describe-lbs --show-long myloadbalancer
LOAD_BALANCER myloadbalancer
myloadbalancer-000550595745.lb.c-04.autoqa.qa1.eucalyptus-systems.com
{interval=30,target=TCP:8443,timeout=5,healthy-threshold=3,unhealthy-threshold=3} one \
{protocol=HTTPS,lb-port=443,instance-protocol=HTTPS,instance-port=8443,cert-id=arn:aws:iam::000550595745:server-certificate/mycert01,\
{ELBSecurityPolicy-2015-05}}
{instance-port=8443,policies={webserverauthentication}}
{ELBSecurityPolicy-2015-05,webservercert,webserverauthentication}
{owner-alias=000936883517,group-name=euca-internal-000550595745-myloadbalancer}
2015-10-12T20:55:52.08Z
internet-facing
3.9.2.11 - Enabling Cross-Zone Load Balancing
When an ELB has instances in multiple available zones, enabling cross-zone load balancing will distribute traffics to instances across availability zones. If disabled, the load balancer in a zone will distribute traffics to instances within the zone. For example, if a Zone A has 10 instances, and a Zone B has 1 instance, and the client happens to use the load balancer of Zone B (via round-robin DNS), cross-zone load balancing will ensure that the clients will use all 11 instances, not just the one instance in Zone B.To enable cross-zone load balancing:
By default, cross-zone load balancing is not enabled for a new load balancer. To enable, modify the load balancer attribute using the eulb-modify-lb-attributes command. For example: eulb-modify-lb-attributes myloadbalancer CrossZoneLoadBalancing.Enabled=true Make sure the attribute is enabled. For example:
eulb-describe-lb-attributes myloadbalancer
AccessLog.Enabled false
ConnectionDraining.Enabled  false
ConnectionSettings.IdleTimeout 60
CrossZoneLoadBalancing.Enabled true
3.9.2.12 - Accessing Load Balancer Logs
To help analyze an application’s performances or troubleshoot problems, you can capture detailed information for all requests coming through your load balancers. When enabled, such access logs will be captured and stored in the S3 bucket.To access ELB logs:
Before enabling the access logs, update the access control of your S3 (Eucalyptus object-storage-gateway) bucket so that Eucalyptus’ load balancer has write permissions. The access control list requires the canonical ID of the grantee. To obtain the canonical ID of the load balancing service:
Note
If your cloud is using VPCMIDO networking mode, use the command in the next step.eulb-describe-lbs --show-long --region devops-admin@region-1
LOAD_BALANCER myloadbalancer
myloadbalancer-000476918024.lb.a-18.autoqa.qa1.eucalyptus-systems.com
{interval=30,target=TCP:80,timeout=5,healthy-threshold=3,unhealthy-threshold=3
cash,money i-6f2a1874,i-be660343
{protocol=HTTP,lb-port=80,instance-protocol=HTTP,instance-port=80}
{owner-alias=000865102303,group-name=euca-internal-000476918024-myloadbalancer}
2015-09-29T18:11:33.761Z
internet-facing
Note
Save the number at the end of the output to update the bucket’s ACL in .To obtain the canonical ID of the load balancing service in VPCMIDO networking mode:
Note
If your cloud is not using VPCMIDO networking mode, use the command in the previous step.euserv-describe-services --filter service-type=loadbalancing --expert
SERVICE arn:euca:bootstrap:API_10.111.1.19:loadbalancing:API_10.111.1.19.loadbalancing/ enabled 25
http://10.111.1.19:8773/services/LoadBalancing
(eucalyptus)loadbalancing=000036660381:28323c32338354b20255a633830524c1224434cb1a5254c1d614614841586042
Note
Save the number at the end of the output to update the bucket’s ACL in .Use any S3 client tools to update the bucket’s ACL. For example:
# aws --endpoint-url http://objectstorage.a-18.autoqa.qa1.eucalyptus-systems.com:8773/ s3 s3://webserverlog
# aws --endpoint-url http://objectstorage.a-18.autoqa.qa1.eucalyptus-systems.com:8773/ s3api put-bucket-acl --grant-write "id=000865102303" --bucket s3://webserverlog
Modify your load balancer’s attributes to enable the access logs. For example:
eulb-modify-lb-attributes myloadbalancer AccessLog.Enabled=true AccessLog.S3BucketName=webserverlog AccessLog.EmitInterval=5 AccessLog.S3BucketPrefix=myprefix
Check that the attribute has been updated correctly by using the eulb-describe-lb-attributes command:
eulb-describe-lb-attributes myloadbalancer
AccessLog.EmitInterval  5
AccessLog.Enabled true
AccessLog.S3BucketName  webserverlog
AccessLog.S3BucketPrefix  myprefix
ConnectionDraining.Enabled  false
ConnectionSettings.IdleTimeout 60
CrossZoneLoadBalancing.Enabled true
3.10 - Using CloudWatch
Using CloudWatch
CloudWatch is a Eucalyptus service that enables you to monitor, manage, and publish various metrics, as well as configure alarm actions based on data from metrics. You can use the default metrics that come with Eucalyptus, or you can use your own metrics.CloudWatch collects raw data from your cloud’s resources and generates the information into readable, near real-time metrics. These metrics are recorded for a period of two weeks. This allows you to access historical information and provides you with information about how your resource is performing.
To find out more about what CloudWatch is, see CloudWatch Overview .
To find out how to use CloudWatch, see CloudWatch Tasks .
3.10.1 - CloudWatch Overview
CloudWatch Overview
This section describes the concepts and details you need to understand the CloudWatch service. This section also includes procedures to complete the most common tasks for CloudWatch.CloudWatch is a Eucalyptus service that collects, aggregates, and dispenses data from your cloud’s resources. This data allows you to make operational and business decisions based on actual performance metrics. You can use CloudWatch to collect metrics about your cloud resources, such as the performance of your instances. You can also publish your own metrics directly to CloudWatch.
CloudWatch monitors the following cloud resources:
- instances
- Elastic Block Store (EBS) volumes
- Auto Scaling instances
- Eucalyptus Load Balancers (ELB)
Alarms
CloudWatch alarms help you make decisions more easily by automatically making changes to the resources you are monitoring, based on rules that you define. For example, you can create alarms that initiate Auto Scaling actions on your behalf. For more information about alarm tasks, see Configuring Alarms .
Common Use Cases
A common use for CloudWatch is to keep your applications and services healthy and running efficiently. For example, CloudWatch can determine that your application runs best when network traffic remains below a certain threshold level on your instances. You can then create an automated procedure to ensure that you always have the right number of instances to match the amount of traffic you have.
Another use for CloudWatch is to diagnose problems by looking at system performance before and after a problem occurs. CloudWatch helps you identify the cause and verify your fix by tracking performance in real time.
3.10.1.1 - CloudWatch Concepts
This section describes the terminology and concepts you need in order to understand and use CloudWatch.
Metric
A metric is a time-ordered set of data points. You can get metric data from Eucalyptus cloud resources (like instances or volumes), or you can publish your own set of custom metric data points to CloudWatch. You then retrieve statistics about those data points as an ordered set of time-series data.
Data points represent values of a variable over time. For example you can get metrics for the CPU usage of a particular instance, or for the latency of an elastic load balancer (ELB).
Each metric is uniquely defined by a name, a namespace, and zero or more dimensions. Each data point has a time stamp, and (optionally) a unit of measure. When you request statistics, the returned data stream is identified by namespace, metric name, dimension, and (optionally) the unit. For more information about Eucalyptus-supported metrics, see Namespaces, Metrics, and Dimensions .
CloudWatch stores your metric data for two weeks. You can publish metric data from multiple sources, such as incoming network traffic from dozens of different instances, or requested page views from several different web applications. You can request statistics on metric data points that occur within a specified time window.
Namespace
A namespace is a conceptual container for a collection of metrics. Eucalyptus treats metrics in different namespaces as unique. This means that metrics from different services cannot mistakenly be aggregated into the same statistical set.
Namespace names are strings you define when you create a metric. The names must be valid XML characters, typically containing the alphanumeric characters “0-9A-Za-z” plus “."(period), “-” (hyphen), “_” (underscore), “/” (slash), “#” (hash), and “:” (colon). All Eucalyptus services that provide CloudWatch data follow the convention AWS/, such as AWS/EC2 and AWS/ELB. For more information, see Namespaces .
Note
A namespace name must be less than 256 characters. There is no default namespace. You must specify a namespace for each data element you put into CloudWatch.Dimension
A dimension is a name-value pair that uniquely identifies a metric. A dimension helps you design a conceptual structure for your statistics plan. Because dimensions are part of the unique identifier for a metric, metric name, namespace, and dimension key-value pairs define unique metrics.
You specify dimensions when you create a metric with the euwatch-put-data command. Eucalyptus services that report data to CloudWatch also attach dimensions to each metric. You can use dimensions to filter result sets that CloudWatch queries return. For example, you can get statistics for a specific instance by calling euwatch-get-stats with the InstanceID dimension set to a specific instance ID.
For Eucalyptus metrics, CloudWatch can aggregate data across select dimensions. For example, if you request a metric in the AWS/EC2 namespace and do not specify any dimensions, CloudWatch aggregates all data for the specified metric to create the statistic that you requested. However, CloudWatch does not aggregate across dimensions for custom metrics
Note
You can assign up to ten dimensions to a metric.Time Stamp
Each metric data point must be marked with a time stamp. The time stamp can be up to two weeks in the past and up to two hours into the future. If you do not provide a time stamp, CloudWatch creates a time stamp for you based on the time the data element was received.
The time stamp you use in the request must be a dateTime object, with the complete date plus hours, minutes, and seconds. For example: 2007-01-31T23:59:59Z. For more information, go to http://www.w3.org/TR/xmlschema-2/#dateTime . Although it is not required, we recommend you provide the time stamp in the Coordinated Universal Time (UTC or Greenwich Mean Time) time zone. When you retrieve your statistics from CloudWatch, all times reflect the UTC time zone.
Unit
A unit represents a statistic’s measurement in time or amount. For example, the units for the instance NetworkIn metric is Bytes because NetworkIn tracks the number of bytes that an instance receives on all network interfaces.
You can also specify a unit when you create a custom metric. Units help provide conceptual meaning to your data. Metric data points you create that specify a unit of measure, such as Percent, will be aggregated separately. The following list provides some of the more common units that CloudWatch supports:
- Seconds
- Bytes
- Bits
- Percent
- Count
- Bytes/Second (bytes per second)
- Bits/Second (bits per second)
- Count/Second (counts per second)
- None (default when no unit is specified)
Though CloudWatch attaches no significance to a unit, other applications can derive semantic information based on the unit you choose. When you publish data without specifying a unit, CloudWatch associates it with the None unit. When you get statistics without specifying a unit, CloudWatch aggregates all data points of the same unit together. If you have two otherwise identical metrics with different units, two separate data streams will be returned, one for each unit.
Statistic
A statistic is computed aggregation of metric data over a specified period of time. CloudWatch provides statistics based on the metric data points you or Eucalyptus provide. Aggregations are made using the namespace, metric name, dimensions, and the data point unit of measure, within the time period you specify. The following table describes the available statistics.
| Statistic | Description |
|---|
| Minimum | The lowest value observed during the specified period. You can use this value to determine low volumes of activity for your application. |
| Maximum | The highest value observed during the specified period. You can use this value to determine high volumes of activity for your application. |
| Sum | All values submitted for the matching metric added together. You can use this statistic for determining the total volume of a metric. |
| Average | The value of Sum / SampleCount during the specified period. By comparing this statistic with the Minimum and Maximum, you can determine the full scope of a metric and how close the average use is to the Minimum and Maximum. This comparison helps you to know when to increase or decrease your resources as needed. |
| SampleCount | The count (number) of data points used for the statistical calculation. |
Period
A period is the length of time, in seconds, associated with a specific CloudWatch statistic. Each statistic represents an aggregation of the metrics data collected for a specified period of time. You can adjust how the data is aggregated by varying the length of the period. A period can be as short as one minute (60 seconds) or as long as two weeks (1,209,600 seconds).
The values you select for the StartTime and EndTime options determine how many periods CloudWatch returns. For example, if you set values for the Period, EndTime, and StartTime options for 60 seconds, CloudWatch returns an aggregated set of statistics for each minute of the previous hour. If you want statistics aggregated into ten-minute blocks, set Period to 600. For statistics aggregated over the entire hour, use a Period value of 3600.
Periods are also an important part of the CloudWatch alarms feature. When you create an alarm to monitor a specific metric, you are asking CloudWatch to compare that metric to the threshold value that you supplied. You have control over how CloudWatch makes that comparison. You can specify the period over which the comparison is made, as well as how many consecutive periods the threshold must be breached before you are notified.
Aggregation
CloudWatch aggregates statistics according a length of time that you set. You can publish as many data points as you want with the same or similar time stamps. CloudWatch aggregates these data points by period length. You can publish data points for a metric that share not only the same time stamp, but also the same namespace and dimensions.
Subsequent calls to euwatch-get-stats return aggregated statistics about those data points. You can even do this in one euwatch-put-data request. CloudWatch accepts multiple data points in the same euwatch-put-data call with the same time stamp. You can also publish multiple data points for the same or different metrics, with any time stamp. The size of a euwatch-put-data request, however, is limited to 8KB for HTTP GET requests and 40KB for HTTP POST requests. You can include a maximum of 20 data points in one PutMetricData request.
For large data sets that would make the use of euwatch-put-data impractical, CloudWatch allows you to insert a pre-aggregated data set called a StatisticSet. With StatisticSets you give CloudWatch the Min, Max, Sum, and SampleCount of a number of data points. A common use case for StatisticSets is when you are collecting data many times in a minute. For example, if you have a metric for the request latency of a server, it doesn’t make sense to do a euwatch-put-data request with every request. We suggest you collect the latency of all hits to that server, aggregate them together once a minute and send that StatisticSet to CloudWatch.
CloudWatch doesn’t differentiate the source of a metric. If you publish a metric with the same namespace and dimensions from different sources, CloudWatch treats this as a single metric. This can be useful for service metrics in a distributed, scaled system. For example, all the hosts in a web server application could publish identical metrics representing the latency of requests they are processing. CloudWatch treats these as a single metric, allowing you to get the statistics for minimum, maximum, average, and sum of all requests across your application.
Alarm
An alarm watches a single metric over a time period you set, and performs one or more actions based on the value of the metric relative to a given threshold over a number of time periods. CloudWatch alarms will not invoke actions just because they are in a particular state. The state must have changed and been maintained for a specified number of periods.
For example, Auto Scaling works with CloudWatch alarms to perform scaling activities. When an Auto Scaling activity reacts to a CloudWatch alarm, the cooldown period is the amount of time after the activity takes place where further Auto Scaling activity is suspended. This is to allow time for the Auto Scaling activities (such as new instance launches or terminations) to fully complete so that resources are not unnecessarily launched or terminated. You can specify this amount of time; if you don’t specify a cooldown period, Auto Scaling uses a default cooldown period of 300 seconds (5 minutes).
After an alarm invokes an action due to a change in state, the alarm continues to invoke the action for every period that the alarm remains in the new state.
An alarm has three possible states:
: The metric is within the defined threshold.
: The metric is outside of the defined threshold.
: The alarm has just started, the metric is not available, or not enough data is available for the metric to determine the alarm state.
The following lists some common features of alarms:
You can create up to 5000 alarms per Eucalyptus account. To create or update an alarm, use the command.
You can list any or all of the currently configured alarms, and list any alarms in a particular state using the command.
You can disable and enable alarms by using the and commands
You can test an alarm by setting it to any state using the command. This temporary state change lasts only until the next alarm comparison occurs.
Finally, you can view an alarm’s history using the command. CloudWatch preserves alarm history for two weeks. Each state transition is marked with a unique time stamp. In rare cases, your history might show more than one notification for a state change. The time stamp enables you to confirm unique state changes.
3.10.1.2 - Namespaces, Metrics, and Dimensions
Namespaces, Metrics, and Dimensions
This section discusses the namespaces, metrics, and dimensions that CloudWatch supports for Eucalyptus services.
3.10.1.2.1 - Namespaces
All Eucalyptus services that provide CloudWatch data use a namespace string, beginning with “AWS/”. This section describes the service namespaces.The following table lists the namespaces for services that push metric data points to CloudWatch.
| Service | Namespace |
|---|
| Elastic Block Store | AWS/EBS |
| Elastic Compute Cloud | AWS/EC2 |
| Auto Scaling | AWS/Autoscaling |
| Elastic Load Balancing | AWS/ELB |
3.10.1.2.2 - Instance Metrics and Dimensions
This section describes the instance metrics and dimensions available to CloudWatch.
Available Metrics for Instances
| Metric | Description | Unit |
|---|
| CPUUtilization | The percentage of allocated EC2 compute units that are currently in use on the instance. This metric identifies the processing power required to run an application upon a selected instance. | Percent |
| DiskReadOps | Completed read operations from all ephemeral disks available to the instance (if your instance uses EBS, see EBS Metrics.) This metric identifies the rate at which an application reads a disk. This can be used to determine the speed in which an application reads data from a hard disk. | Count |
| DiskWriteOps | Completed write operations to all ephemeral disks available to the instance (if your instance uses Amazon EBS, see Amazon EBS Metrics.) This metric identifies the rate at which an application writes to a hard disk. This can be used to determine the speed in which an application saves data to a hard disk. | Count |
| DiskReadBytes | Bytes read from all ephemeral disks available to the instance (if your instance uses Amazon EBS, see Amazon EBS Metrics.) This metric is used to determine the volume of the data the application reads from the hard disk of the instance. This can be used to determine the speed of the application. | Bytes |
| DiskWriteBytes | Bytes written to all ephemeral disks available to the instance (if your instance uses Amazon EBS, see Amazon EBS Metrics.) This metric is used to determine the volume of the data the application writes onto the hard disk of the instance. This can be used to determine the speed of the application. | Bytes |
| NetworkIn | The number of bytes received on all network interfaces by the instance. This metric identifies the volume of incoming network traffic to an application on a single instance. | Bytes |
| NetworkOut | The number of bytes sent out on all network interfaces by the instance. This metric identifies the volume of outgoing network traffic to an application on a single instance. | Bytes |
| StatusCheckFailed | A combination of StatusCheckFailed_Instance and StatusCheckFailed_System that reports if either of the status checks has failed. Values for this metric are either 0 (zero) or 1 (one.) A zero indicates that the status check passed. A one indicates a status check failure. | Count |
| StatusCheckFailed_Instance | Reports whether the instance has passed the EC2 instance status check in the last 5 minutes. Values for this metric are either 0 (zero) or 1 (one.) A zero indicates that the status check passed. A one indicates a status check failure. | Count |
| StatusCheckFailed_System | Reports whether the instance has passed the EC2 system status check in the last 5 minutes. Values for this metric are either 0 (zero) or 1 (one.) A zero indicates that the status check passed. A one indicates a status check failure. | Count |
Available Dimensions for Instances
You can filter the instance data using any of the dimensions in the following table.
| Dimension | Description |
|---|
| AutoScalingGroupName | This dimension filters the data you request for all instances in a specified capacity group. An AutoScalingGroup is a collection of instances you define if you’re using the Auto Scaling service. This dimension is available only for instance metrics when the instances are in such an Auto Scaling group. |
| ImageId | This dimension filters the data you request for all instances running this Eucalyptus Machine Image (EMI). |
| InstanceId | This dimension filters the data you request for the identified instance only. This helps you pinpoint an exact instance from which to monitor data. |
| InstanceType | This dimension filters the data you request for all instances running with this specified instance type. This helps you categorize your data by the type of instance running. For example, you might compare data from an m1.small instance and an m1.large instance to determine which has the better business value for your application. |
3.10.1.2.3 - EBS Metrics and Dimensions
This section describes the Elastic Block Store (EBS) metrics and dimensions available to CloudWatch.
Available Metrics for EBS
| Metric | Description | Unit |
|---|
| VolumeReadBytes | The total number of bytes transferred in the period. | Bytes |
| VolumeWriteBytes | The total number of bytes transferred in the period. | Bytes |
| VolumeReadOps | The total number of operations in the period. | Count |
| VolumeWriteOps | The total number of operations in the period. | Count |
| VolumeTotalReadTime | The total number of seconds spent by all operations that completed in the period. If multiple requests are submitted at the same time, this total could be greater than the length of the period. For example, say the period is 5 minutes (300 seconds); if 700 operations completed during that period, and each operation took 1 second, the value would be 700 seconds. | Seconds |
| VolumeTotalWriteTime | The total number of seconds spent by all operations that completed in the period. If multiple requests are submitted at the same time, this total could be greater than the length of the period. For example, say the period is 5 minutes (300 seconds); if 700 operations completed during that period, and each operation took 1 second, the value would be 700 seconds. | Seconds |
| VolumeIdleTime | The total number of seconds in the period when no read or write operations were submitted. | Seconds |
| VolumeQueueLength | The number of read and write operation requests waiting to be completed in the period. | Count |
Available Dimensions for EBS
The only dimension that EBS sends to CloudWatch is the Volume ID. This means that all available statistics are filtered by Volume ID.
3.10.1.2.4 - Auto Scaling Metrics and Dimensions
This section discusses the Auto Scaling metrics and dimensions available to CloudWatch.
Available Metrics for Auto Scaling
| Metric | Description | Unit |
|---|
| GroupMinSize | The minimum size of the Auto Scaling group. | Count |
| GroupMaxSize | The maximum size of the Auto Scaling group. | Count |
| GroupDesiredCapacity | The number of instances that the Auto Scaling group attempts to maintain. | Count |
| GroupInServiceInstances | The number of instances that are running as part of the Auto Scaling group. This metric does not include instances that are pending or terminating. | Count |
| GroupPendingInstances | The number of instances that are pending. A pending instance is not yet in service. This metric does not include instances that are in service or terminating. | Count |
| GroupTerminatingInstances | The number of instances that are in the process of terminating. This metric does not include instances that are in service or pending. | Count |
| GroupTotalInstances | The total number of instances in the Auto Scaling group. This metric identifies the number of instances that are in service, pending, and terminating. | Count |
Available Dimensions for Auto Scaling
The only dimension that Auto Scaling sends to CloudWatch is the name of the Auto Scaling group. This means that all available statistics are filtered by Auto Scaling group name.
3.10.1.2.5 - ELB Metrics and Dimensions
This section discusses the Elastic Load Balancing (ELB) metrics and dimensions available to CloudWatch.
Available Metrics for ELB
| Metric | Description | Unit |
|---|
| Latency | Time elapsed after the request leaves the load balancer until it receives the corresponding response. Valid Statistics: Minimum | Maximum |
| RequestCount | The number of requests handled by the load balancer. | Count |
| HealthyHostCount | The number of healthy instances registered with the load balancer in a specified availability zone. Healthy instances are those that have not failed more health checks than the value of the unhealthy threshold. Constraints: You must provide both LoadBalancerName and AvailabilityZone dimensions for this metric.Valid Statistics: Minimum | Maximum |
| UnHealthyHostCount | The number of unhealthy instances registered with the load balancer. These are instances that have failed more health checks than the value of the unhealthy threshold. Constraints: You must provide both LoadBalancerName and AvailabilityZone dimensions for this metric.Valid Statistics: Minimum | Maximum |
| HTTPCode_ELB_4XX | Count of HTTP response codes generated by ELB that are in the 4xx (client error) series. Valid Statistics: Sum | Count |
| HTTPCode_ELB_5XX | Count of HTTP response codes generated by ELB that are in the 5xx (server error) series. ELB can generate 5xx errors if no back-end instances are registered, no healthy back-end instances, or the request rate exceeds ELB’s current available capacity. This response count does not include any responses that were generated by back-end instances. Valid Statistics: Sum | Count |
| HTTPCode_Backend_2XX | Count of HTTP response codes generated by back-end instances that are in the 2xx (success) series. Valid Statistics: Sum | Count |
| HTTPCode_Backend_3XX | Count of HTTP response codes generated by back-end instances that are in the 3xx (user action required) series. Valid Statistics: Sum | Count |
| HTTPCode_Backend_4XX | Count of HTTP response codes generated by back-end instances that are in the 4xx (client error) series. This response count does not include any responses that were generated by ELB. Valid Statistics: Sum | Count |
| HTTPCode_Backend_5XX | Count of HTTP response codes generated by back-end instances that are in the 5xx (server error) series. This response count does not include any responses that were generated by ELB. Valid Statistics: Sum | Count |
Available Dimensions for ELB
You can use the currently available dimensions for ELB to refine the metrics returned by a query. For example, you could use HealthyHostCount and dimensions LoadBalancerName and AvailabilityZone to get the average number of healthy instances behind the specified load balancer within the specified Availability Zone for a given period of time.
You can aggregate ELB data along any of the following dimensions shown in the following table.
| Metric | Description |
|---|
| LoadBalancerName | Limits the metric data to instances that are connected to the specified load balancer. |
| AvailabilityZone | Limits the metric data to load balancers in the specified availability zone. |
3.10.2 - CloudWatch Tasks
CloudWatch Tasks
This section details the tasks you can perform using CloudWatch.This section expands on the basic concepts presented in the preceding section (see CloudWatch Overview and includes procedures for using CloudWatch. This section also shows you how to view metrics that Eucalyptus services provide to CloudWatch and how to publish custom metrics with CloudWatch.
3.10.2.1 - Configuring Monitoring
Configuring Monitoring
This section describes how to enable and disable monitoring for your cloud resources.
3.10.2.1.1 - Enable Monitoring
This section describes steps for enabling monitoring on your cloud resources.To enable monitoring on your resources, following the steps for your resource.
Enable monitoring for an instance
To enable monitoring for a running instance, enter the following command:
euca-monitor-instances [instance_id]
To enable monitoring when you launch an instance, enter the following command:
euca-run-instances [image_id] -k gsg-keypair --monitor
Enable monitoring for a scaling group
To enable monitoring for an existing Auto Scaling group: Create a launch configuration with --monitoring-enabled option. Make a euscale-update-auto-scaling-group request to update your Auto Scaling group with the launch configuration you created in the previous step. Auto Scaling will enable monitoring for new instances that it creates. Choose one of the following actions to deal with all existing instances in the Auto Scaling group:
| To . . . | Do this . . . |
|---|
| Preserve existing instances | Make a euca-monitor-instances request for all existing instances to enable monitoring. |
| Terminate existing instances | Make a euscale-terminate-instance-in-auto-scaling-group request for all existing instances. Auto Scaling will use the updated launch configuration to create replacement instances with monitoring enabled. |
To enable monitoring when you create a new Auto Scaling group: Create a launch configuration with --monitoring-enabled option.
Enable monitoring for a load balancer
Elastic Load Balancing (ELB) sends metrics and dimensions for all load balancers to CloudWatch. By default, you do not need to specifically enable monitoring.
Note
ELB only sends CloudWatch metrics when requests are sent through the load balancer. If there are no requests or data for a given metric, ELB does not report to CloudWatch. If there are requests sent through the load balancer, ELB measures and sends metrics for that load balancer in 60-second intervals.3.10.2.1.2 - Disable Monitoring
This section describes steps for disabling monitoring on your cloud resources.To disable monitoring on your resources, following the steps for your resource.
Disable monitoring for an instance
To disable monitoring for a running instance, enter the following command:
euca-unmonitor-instances [instance_id]
Disable monitoring for a scaling group
To enable monitoring for an existing Auto Scaling group: Create a launch configuration with --monitoring-disabled option. Make a euscale-update-auto-scaling-group request to update your Auto Scaling group with the launch configuration you created in the previous step. Auto Scaling will disable monitoring for new instances that it creates. Choose one of the following actions to deal with all existing instances in the Auto Scaling group:
| To . . . | Do this . . . |
|---|
| Preserve existing instances | Make a euca-unmonitor-instances request for all existing instances to disable monitoring. |
| Terminate existing instances | Make a euscale-terminate-instance-in-auto-scaling-group request for all existing instances. Auto Scaling will use the updated launch configuration to create replacement instances with monitoring disabled. |
To enable monitoring when you create a new Auto Scaling group: Create a launch configuration with --monitoring-disabled option.
Disable monitoring for a load balancer
There is no way to disable monitoring for a load balancer.
3.10.2.2 - Viewing and Publishing Metrics
Viewing and Publishing Metrics
This section describes how to view Eucalyptus metrics as well as how to publish your own metrics.
3.10.2.2.1 - List Available Metrics
You can list available metrics via Euca2ools.To list available metrics:
Enter the following command.
euwatch-list-metrics
Eucalyptus returns a listing of all metrics, as shown in the following partial example output:
Metric Name         Namespace  Dimensions
CPUUtilization      AWS/EC2    {InstanceId=i-5431413d}
CPUUtilization      AWS/EC2    {InstanceType=m1.medium}
DiskReadBytes       AWS/EC2    {InstanceId=i-1d3d4d74}
DiskReadBytes       AWS/EC2    {InstanceType=m1.medium}
DiskReadOps         AWS/EC2    {InstanceId=i-d3c8baba}
DiskReadOps         AWS/EC2    {InstanceType=m1.medium}
DiskWriteBytes      AWS/EC2    {InstanceId=i-6732420e}
DiskWriteBytes      AWS/EC2    {InstanceType=m1.medium}
DiskWriteOps        AWS/EC2    {InstanceId=i-e03d4d89}
DiskWriteOps        AWS/EC2    {InstanceType=m1.medium}
NetworkIn           AWS/EC2    {InstanceId=i-e0304089}
NetworkIn           AWS/EC2    {InstanceType=m1.medium}
NetworkOut          AWS/EC2    {InstanceId=i-69334300}
NetworkOut          AWS/EC2    {InstanceType=m1.medium}
StatusCheckFailed		 AWS/EC2 {InstanceId=i-6f8418e6}
StatusCheckFailed      	  AWS/EC2 {InstanceType=m1.medium}
StatusCheckFailed_Instance      AWS/EC2 {InstanceId=i-6f8418e6}
StatusCheckFailed_Instance      AWS/EC2 {InstanceType=m1.medium}
StatusCheckFailed_System        AWS/EC2 {InstanceId=i-6f8418e6}
StatusCheckFailed_System        AWS/EC2 {InstanceType=m1.medium}
3.10.2.2.2 - Get Statistics for a Metric
You can get statistics for metrics via Euca2ools.To get statistics for a metric:
Enter the following command.
 euwatch-get-stats -n NAMESPACE -s STAT1,STAT2,...
            			[--dimensions KEY1=VALUE1,KEY2=VALUE2,...]
            			[--start-time YYYY-MM-DDThh:mm:ssZ]
            			[--end-time YYYY-MM-DDThh:mm:ssZ] [--period SECONDS]
            			[--unit UNIT] [--show-empty-fields] [-U URL]
            			[--region USER@REGION] [-I KEY_ID] [-S KEY]
            			[--security-token TOKEN] [--debug] [--debugger]
            			[--version] [-h]
            			METRIC
The following example returns the average CPU utilization for the i-c08804a9 instance at one hour resolution.
euwatch-get-stats --namespace "AWS/EC2" --statistics "Average" \
--dimensions "InstanceId=i-c08804a9" --start-time 2016-12-14T23:00:00.000Z \
--end-time 2016-12-15T23:00:00.000Z --period 3600  CPUUtilization
The following example returns CPU utilization for all of your cloud’s instances.
euwatch-get-stats --namespace "AWS/EC2" --statistics "Average,Minimum,Maximum" \
--start-time 2016-02-14T23:00:00.000Z --end-time 2016-03-14T23:00:00.000Z \
--period 3600 CPUUtilization
3.10.2.2.3 - Publish Custom Metrics
CloudWatch allows you to publish your own metrics, such as application performance, system health, or customer usage.
Publish a single data point
To publish a single data point for a new or existing metric, call euwatch-put-data with one value and time stamp. For example, the following actions each publish one data point:
euwatch-put-data --metric-name PageViewCount --namespace "TestService" --value 2 --timestamp 2011-03-14T12:00:00.000Z
euwatch-put-data --metric-name PageViewCount --namespace "TestService" --value 4 --timestamp 2011-03-14T12:00:01.000Z
euwatch-put-data --metric-name PageViewCount --namespace "TestService" --value 5 --timestamp 2011-03-14T12:00:02.000Z
You can publish data points with time stamps as granular as one-thousandth of a second. However, CloudWatch aggregates the data to a minimum granularity of 60 seconds. For example, the PageViewCount metric from the previous examples contains three data points with time stamps just seconds apart. CloudWatch aggregates the three data points because they all have time stamps within a 60-second period.
CloudWatch uses 60-second boundaries when aggregating data points. For example, CloudWatch aggregates the data points from the previous example because all three data points fall within the 60-second period that begins at 2011-03-14T12:00:00.000Z and ends at 2011-03-14T12:00:59.999Z.
Publish statistic sets
You can also aggregate your data before you publish to CloudWatch. When you have multiple data points per minute, aggregating data minimizes the number of calls to euwatch-put-data . For example, instead of calling euwatch-put-data multiple times for three data points that are within three seconds of each other, you can aggregate the data into a statistic set that you publish with one call:
euwatch-put-data --metric-name PageViewCount --namespace "TestService" -s "Sum=11,Minimum=2,Maximum=5,SampleCount=3" --timestamp 2011-03-14T12:00:00.000
Publish the value zero
When your data is more sporadic and you have periods that have no associated data, you can choose to publish the value zero (0) for that period or no value at all. You might want to publish zero instead of no value if you use periodic calls to PutMetricData to monitor the health of your application. For example, you can set an Amazon CloudWatch alarm to notify you if your application fails to publish metrics every five minutes. You want such an application to publish zeros for periods with no associated data.
You might also publish zeros if you want to track the total number of data points or if you want statistics such as minimum and average to include data points with the value 0.
3.10.2.2.4 - Modify Metric Polling Timing
You can modify metrics timing and reporting defaults.When using the default CloudWatch properties, metrics reporting can take around 15 minutes:
- 5 minutes to receive a sensor data point for an instance.
- 5 more minutes to receive a second sensor data point for an instance.
- 1 more minute to calculate the difference between these two and send a single data point to CloudWatch.
- 1 more minute for CloudWatch to put the data in the database, making it available for a call.
- 5 more minutes for info to be available in the database.
Note
The above workflow is sequential and cumulative.The sensor data point timing values can be shortened by changing variables in the CLC.
Note
These changes will increase network traffic as polling will be done more frequently.To modify metrics defaults:Modify the default polling interval CLC variable to a number less than 5.
cloud.monitor.default_poll_interval_mins
This is how often the CLC sends a request to the CC for sensor data. Default value is 5 minutes. Modify the history size CLC variable to a number less than 5.
cloud.monitor.history_size
This is how many data value samples are sent in each sensor data request. The default value is 5. The frequency requests is either 1 minute (if the cloud.monitor.default_poll_interval_mins is 1 minute) or half the value of cloud.monitor.default_poll_interval_mins if that value is greater). So by default, with a cloud.monitor.default_poll_interval_mins of 5 minutes and cloud.monitor.history_size size of 5, every 5 minutes the CLC asks for the last 5 data points from the CC, which should be timed for every 2.5 minutes (e.g., 2.5 minutes ago, 5 minutes ago, 7.5 minutes ago, and 10 minutes ago).
Note
These values may be skewed a bit based on the time the CC uses.3.10.2.3 - Configuring Alarms
Configuring Alarms
This section describes how to create, test, and delete and alarm.
3.10.2.3.1 - Create an Alarm
You can create a CloudWatch alarm using a resource’s metric, and then add an action using the action’s dedicated Amazon Resource Name (ARN). You can add the action to any alarm state.
Note
Eucalyptus currently only supports actions for executing Auto Scaling policies.To create an alarm, perform the following step.
Enter the following command:
euwatch-put-metric-alarm [alarm_name] --unit Percent --namespace "AWS/EC2"
-- dimensions "InstanceId=[instance_id]" --statistic [statistic] --metric-name
[metric] --comparison-operator [operator] --threshold [value] --period
[seconds] --evaluation-periods [value] -- alarm-actions [action]
For example, the following triggers an Auto Scaling policy if the average CPUUtilization is less than 10 percent over a 24 hour period.
euwatch-put-metric-alarm test-Alarm --unit Percent --namespace "AWS/EC2"
-- dimensions "InstanceId=i-abc123" --statistic Average --metric-name CPUUtilization
--comparison-operator LessThanThreshold --threshold 10 --period 86400
--evaluation-periods 4 -- alarm-actions arn:aws:autoscaling::429942273585:scalingPolicy:
12ad560b-58b2-4051-a6d3-80e53b674de4:autoScalingGroupName/testgroup01:
policyName/testgroup01-pol01
3.10.2.3.2 - Test an Alarm
You can test the CloudWatch alarms by temporarily changing the state of your alarm to “ALARM” using the command: euwatch-set-alarm-state .
euwatch-set-alarm-state --alarm-name TestAlarm --state ALARM
3.10.2.3.3 - Delete an Alarm
To delete an alarm, perform the following step.
Enter the following command:
euwatch-delete-alarms [alarm_name]
For example, to delete an alarm named TestAlarm enter:
euwatch-delete-alarms TestAlarm
3.11 - Using Object Storage
Using Object Storage
Scalable object storage is composed of two parts: the object storage gateway and the object storage backend. This section explains storage and how to access it.The object storage gateway (OSG) receives user requests and authorizes these requests using the Eucalyptus identity services. For more information about identity services, see Managing Access .
3.11.1 - Access Object Storage
You can use your favorite S3 client (for example, ) to interact with Eucalyptus.To access object storage:
Replace your S3_URL with the IP address of the OSG you wish to interact with and the service path with /services/objectstorage instead of /services/Walrus . For example:
S3_URL = http://<OSG IP>:8773/services/objectstorage
Note
If you have DNS enabled, you may use the “objectstorage” prefix to access your object storage. Eucalyptus will return a list of IPs that correspond to OSGs that are in the state.3.12 - Using Route53
Using Route53
Eucalyptus Route53 is an integrated Domain Name System (DNS) web service. Route53 allows end users to access your cloud resources using names that you control.
Route53 seamlessly connects user requests to Eucalyptus controlled infrastructure – including EC2 instances, Elastic Load Balancers, and S3 buckets – it can also be used to route users to external infrastructure.
Note
Route53 is a tech preview service so should be used accordingly.3.12.1 - Route53 Concepts
This section describes the important concepts for the Route53 service and for Domain Name System (DNS)
Public and Private Hosted Zones
A public hosted zone describes how to route traffic for a public domain, such as example.com, and its subdomains. Information in a public hosted zone is available to anyone that can connect to your Eucalyptus deployment.
A private hosted zone describes how to route traffic for a domain and its subdomains within a VPC managed using Eucalyptus EC2 VPC service. Private zones are useful for repeatable deployments using well-known names.
Resource Record Sets
After you create a hosted zone for your domain, such as example.com, you create resource record sets to tell the Domain Name System (DNS) how to route traffic for that domain.
For example you would create an A record to map the name resource.example.com to the public IP address of an EC2 instance.
DNS Concepts
Important concepts related to underlying DNS functionality are:
- Alias : An alias connects a name to a cloud resource such as an Elastic Load Balancer
- CName : A CNAME resource record redirects to another name. CNAMES are often used with S3 buckets.
- IP Address : An A resource record maps a name to an IP address used to access a resource such as an EC2 instance.
- TTL : The Time To Live (TTL) of a resource record is important for controlling how long clients can cache DNS information.
3.12.2 - Route53 Usage
This section describes some options for access to the Route53 service and shows some example usage.
Using the AWS CLI
The AWS CLI can be used to access Route53. Use of the Eucalyptus AWS CLI plug-in is assumed in these examples.
To list hosted zones:
# aws route53 list-hosted-zones
HOSTEDZONES	e001e659-32ac-4fd5-b45a-f7e6d6420f9b	/hostedzone/ZAAW4ODX2K7WOL	subdomain.example.com.	3
CONFIG	Private zone for subdomain.example.com in vpc-837bc081de161f8c0	True
To list resource records for a hosted zone:
# aws route53 list-resource-record-sets --hosted-zone-id ZAAW4ODX2K7WOL
RESOURCERECORDSETS	alias.subdomain.example.com.	0	A
RESOURCERECORDSETS	cname.subdomain.example.com.	300	CNAME
RESOURCERECORDS	name.subdomain.example.com
RESOURCERECORDSETS	name.subdomain.example.com.	300	A
RESOURCERECORDS	10.20.30.43
The AWS CLI can be used to create and delete hosted zones and to change resource record sets.
A CloudFormation template can be used to manage Route53 resources. The following template is an example showing the:
- AWS::Route53::HostedZone
- AWS::Route53::RecordSet
- AWS::Route53::RecordSetGroup
CloudFormation resources:
AWSTemplateFormatVersion: 2010-09-09
Description: >-
    Route53 private HostedZone

Parameters:

  Vpc:
    Description: The VPC to create the Zone for
    Type: String

  Zone:
    Description: The zone to create
    Type: String
    Default: example.com

Resources:

  MyHostedZone:
    Type: AWS::Route53::HostedZone
    Properties:
      Name: !Ref Zone
      HostedZoneConfig:
        Comment: !Sub "Private zone for ${Zone} in ${Vpc}"
      VPCs:
        - VPCId: !Ref Vpc
          VPCRegion: !Ref AWS::Region
      HostedZoneTags:
        - Key: example-tag
          Value: !Ref Zone

  MyRecordSet:
    Type: AWS::Route53::RecordSet
    DependsOn: MyHostedZone
    Properties:
      HostedZoneName: !Ref Zone
      Name: !Sub "name.${Zone}"
      ResourceRecords:
        - "10.20.30.43"
      TTL: 300
      Type: A

  MyRecordSetGroup:
    Type: AWS::Route53::RecordSetGroup
    DependsOn: MyHostedZone
    Properties:
      HostedZoneName: !Ref Zone
      RecordSets:
        - Name: !Sub "cname.${Zone}"
          ResourceRecords:
          - !Sub "name.${Zone}"
          TTL: 300
          Type: CNAME
        - Name: !Sub "alias.${Zone}"
          Type: A
          AliasTarget:
            DNSName: !Sub "name.${Zone}"
            EvaluateTargetHealth: no
            HostedZoneId: !Ref MyHostedZone

Outputs:

  HostedZoneId:
    Description: The identifier for the private hosted zone
    Value: !Ref MyHostedZone
The output for the stack will show the identifier for the hosted zone.
3.12.3 - Route53 Delegated Subdomain
When using Route53 the Hosted Zone is often a subdomain for a domain managed using external DNS. In this case the external DNS must be updated to delegate management of the subdomain to your
hosted zones name servers.
Hosted Zone Name Servers
When you create a public Hosted Zone in Eucalyptus it will be allocated some nameservers. You can use the AWS CLI to determine the Name Servers for your zone:
# aws route53 list-hosted-zones
HOSTEDZONES	87a20e2b-f835-4775-a6ad-16f14033668a	/hostedzone/ZAAKJGJPMUHV32	subdomain.example.com.	2
CONFIG	False
#
# aws route53 list-resource-record-sets --hosted-zone-id ZAAKJGJPMUHV32 --query "ResourceRecordSets[?Type == 'NS']"
subdomain.example.com.	900	NS
RESOURCERECORDS	ns1.mycloud.example.com.
To discover the nameservers, first list the hosted zone to find the identifer and then pass the identifer to list-resource-record-sets. The example above uses a query to output only the NS information.
External Name Server records
The external DNS should be updated to add a Name Server NS record and a corresponding A record to map that name to an IP address:
subdomain.example.com	    NS	ns1.mycloud.example.com.
ns1.mycloud.example.com	A	1.X.Y.123
Note
The external DNS must not have an SOA record for the delegated subdomain as your Hosted Zone in Eucalyptus Route53 is authoritative.3.13 - Using Simple Queue Service
Using Simple Queue Service
Eucalyptus Simple Queue Service (SQS) is a message queuing service that enables you to decouple your services and distributed systems.
SQS reduces the overhead of managing and operating message oriented middleware and facilitates robust cloud architectures when used with other services such as Auto Scaling.
Note
Simple Queue Service (SQS) is a tech preview service so should be used accordingly.3.13.1 - Simple Queue Service Concepts
This section describes the important concepts for the Simple Queue Service (SQS)
Queues and Queue URLs
A queue is a named destination for messages in an account. A queue has a URL that uniquely identifies it on the cloud.
Delivery and Visiblity
When a message is delivered to a client it is hidden from other clients for a period to prevent duplicate handling. If the message is not handled by the first client it will later become visible for handling by other clients.
Dead-letter Queues
A dead-letter queue can be used for undeliverable messages. Using a dead-letter queue allows for handling of messages that would otherwise not be processed.
Delay Queue
A delay queue allows messages to be available from a queue after a delay period rather than as soon as messages are sent to the queue.
Polling Style
Short or long polling can be used when receiving messages. For short polling there is an immediate response whether a message is available or not. For long polling a delay of up to 20 seconds is used and the response will occur when a message is available or when the given timeout is reached even if there is no message.
3.13.2 - Simple Queue Service Overview
Using the AWS CLI
The AWS CLI can be used to access the Simple Queue Service (SQS). Use of the Eucalyptus AWS CLI plug-in is assumed in these examples.
To list queues:
# aws sqs list-queues
QUEUEURLS	http://sqs.mycloud.example.com:8773/000575948401/queue1
QUEUEURLS	http://sqs.mycloud.example.com:8773/000575948401/sqs-1-DeadLetterQueue-N7AHZIWZEW3H5
Send a message:
# aws sqs send-message --queue-url http://sqs.mycloud.example.com:8773/000575948401/queue1 --message-body "TEST MESSAGE"
d41d8cd98f00b204e9800998ecf8427e	2b3ce69548da118bf617bfdd33a06108	daedefab-669b-47a4-a801-8b84e747c11c
Receive a messge:
# aws sqs receive-message --queue-url http://sqs.mycloud.example.com:8773/000575948401/queue1
MESSAGES	TEST MESSAGE	2b3ce69548da118bf617bfdd33a06108	d41d8cd98f00b204e9800998ecf8427e	9cc9bc8c-c201-4a27-9f7f-94924a79968a	000575948401:queue1:9cc9bc8c-c201-4a27-9f7f-94924a79968a:3
A CloudFormation template can be used to manage SQS resources. The following template is an example showing the:
- AWS::SQS::Queue
- AWS::SQS::QueuePolicy
CloudFormation resources:
AWSTemplateFormatVersion: 2010-09-09
Description: >-
  SQS queue and queue policy template

Resources:

  Queue:
    Type: AWS::SQS::Queue
    Properties:
      RedrivePolicy:
        deadLetterTargetArn: !GetAtt 'DeadLetterQueue.Arn'
        maxReceiveCount: 5
      DelaySeconds: '10'
      MaximumMessageSize: '65536'
      MessageRetentionPeriod: '1209600'
      VisibilityTimeout: '20'
      ReceiveMessageWaitTimeSeconds: '5'
      QueueName: queue1

  DeadLetterQueue:
    Type: AWS::SQS::Queue

  QueuePolicy:
    Type: AWS::SQS::QueuePolicy
    Properties:
      PolicyDocument:
        Statement:
          Action: sqs:*
          Principal:
            AWS: !Ref 'AWS::AccountId'
          Effect: Allow
      Queues:
        - !Ref Queue
        - !Ref DeadLetterQueue

Outputs:

  QueueURL:
    Description: URL of the queue
    Value: !Ref 'Queue'

  QueueARN:
    Description: ARN of the queue
    Value: !GetAtt 'Queue.Arn'

  DeadLetterQueueURL:
    Description: URL of the dead letter queue
    Value: !Ref 'DeadLetterQueue'

  DeadLetterQueueARN:
    Description: ARN of the dead letter queue
    Value: !GetAtt 'DeadLetterQueue.Arn'
The output for the stack will show the URLs and ARNs for the created queue resources.
3.14 - Using CloudFormation
This topic describes the Eucalyptus implementation of the AWS CloudFormation web service, how CloudFormation works, and some details and examples of how to add CloudFormation to your Eucalyptus deployment.
Cloud computing allows for application repeatability and redundancy. This means that you can spin up as many virtual machines as you need, but the application configuration only needs to happen when the images are created. CloudFormation takes this concept to the next level: it allows you to configure an entire set of resources (instances, security groups, user roles and policies, and more) in a single template. Then you can create a stack of all those resources from the template using a single command. So, you don’t just get machine repeatability, you get environment repeatability. CloudFormation allows you to clone environments in different cloud setups, as well as giving applications the ability to be set up and torn down in a repeatable manner.
CloudFormation manages a set of resources, called a stack, in batch operations (create, update, or delete). Stacks are described in templates, which can be simple, as the following example:
Resources:
  MyInstance:
    Type: AWS::EC2::Instance
    Properties:
      ImageId: emi-371ada125a928669e
This stack creates a single instance, based on the image with ID emi-371ada125a928669e. However, this stack is not portable because different clouds might have different image IDs.
CloudFormation allows stack customization through user parameters that are passed in at stack creation time. The following is an example of the template above with a user parameter called MyImageId.
Parameters:
  MyImageId:
    Description: Image id
    Type: String
Resources:
  MyInstance:
    Type: AWS::EC2::Instance
    Properties:
      ImageId: !Ref MyImageId
This stack creates a single instance, but the image ID will be required to be passed in using the command line. For example, the following example uses the euform-create-stack command in Euca2ools:
euform-create-stack --template-file template.yaml -p MyImageId=emi-371ada125a928669e MyStack
or using the AWS CLI:
aws cloudformation create-stack --template-body file://template.yaml --parameters ParameterKey=MyImageId,ParameterValue=emi-371ada125a928669e --stack-name MyStack
These example commands pass the parameter MyImageId with value emi-371ada125a928669e into the stack creation process.
You can also use templates to create multiple resources and associate them with each other. For example, the following template creates an instance with its own security group and ingress rule.
Parameters:
  MyImageId:
    Description: Image id
    Type: String
Resources:
  MySecurityGroup:
    Type: AWS::EC2::SecurityGroup
    Properties:
      GroupDescription: Security Group with Ingress Rule for MyInstance
      SecurityGroupIngress:
        - IpProtocol: tcp
          FromPort: '22'
          ToPort: '22'
          CidrIp: '0.0.0.0/0'
  MyInstance:
    Type: AWS::EC2::Instance
    Properties:
      ImageId: !Ref 'MyImageId'
      SecurityGroups:
        - !Ref 'MySecurityGroup'
Templates can be more complicated than the ones shown above, but CloudFormation allows many resources to be deployed in one operation. Resources from most Eucalyptus services are supported.
To run CloudFormation on Eucalyptus, you need the following:
- A running Eucalyptus cloud, version 4.0 or later, with at least one Cloud Controller, Node Controller, and Cluster Controller up, running and registered
- At least one active running service of each of the following: CloudWatch, AutoScaling, Load Balancing, Compute, and IAM
- A registered active CloudFormation service
Note
Eucalyptus versions earlier than 5 support JSON CloudFormation templates but not the newer YAML formatSupported Resources
The following resources are supported by CloudFormation in Eucalyptus.
| Resource | Description |
|---|
| AWS::AutoScaling::AutoScalingGroup | All properties in the Template Reference section of the AWS CloudFormation User Guide are supported except: HealthCheckType. |
| AWS::AutoScaling::LaunchConfiguration | All properties in the Template Reference section of the AWS CloudFormation User Guide are supported except AssociatePublicIpAddress. |
| AWS::AutoScaling::ScalingPolicy | All properties in the Template Reference section of the AWS CloudFormation User Guide are supported. |
| AWS::CloudFormation::Stack | All properties in the Template Reference section of the AWS CloudFormation User Guide are supported. |
| AWS::CloudFormation::WaitCondition | All properties in the Template Reference section of the AWS CloudFormation User Guide are supported. |
| AWS::CloudFormation::WaitConditionHandle. | All properties in the Template Reference section of the AWS CloudFormation User Guide are supported. |
| AWS::CloudWatch::Alarm | All properties in the Template Reference section of the AWS CloudFormation User Guide are supported. |
| AWS::EC2::CustomerGateway | All properties in the Template Reference section of the AWS CloudFormation User Guide are supported. |
| AWS::EC2::DHCPOptions | All properties in the Template Reference section of the AWS CloudFormation User Guide are supported. |
| AWS::EC2::EIP | All properties in the Template Reference section of the AWS CloudFormation User Guide are supported. |
| AWS::EC2::EIPAssociation | All properties in the Template Reference section of the AWS CloudFormation User Guide are supported except: PrivateIpAddress. |
| AWS::EC2::Instance | All properties in the Template Reference section of the AWS CloudFormation User Guide are supported except: SourceDestCheck, Tags, and Tenancy. |
| AWS::EC2::InternetGateway | All properties in the Template Reference section of the AWS CloudFormation User Guide are supported. |
| AWS::EC2::LaunchTemplate | All properties in the Template Reference section of the AWS CloudFormation User Guide are supported. |
| AWS::EC2::NatGateway | All properties in the Template Reference section of the AWS CloudFormation User Guide are supported. |
| AWS::EC2::NetworkAcl | All properties in the Template Reference section of the AWS CloudFormation User Guide are supported. |
| AWS::EC2::NetworkAclEntry | All properties in the Template Reference section of the AWS CloudFormation User Guide are supported. |
| AWS::EC2::NetworkInterface | All properties in the Template Reference section of the AWS CloudFormation User Guide are supported. |
| AWS::EC2::NetworkInterfaceAttachment | All properties in the Template Reference section of the AWS CloudFormation User Guide are supported. |
| AWS::EC2::Route | All properties in the Template Reference section of the AWS CloudFormation User Guide are supported. |
| AWS::EC2::RouteTable | All properties in the Template Reference section of the AWS CloudFormation User Guide are supported. |
| AWS::EC2::SecurityGroup | All properties in the Template Reference section of the AWS CloudFormation User Guide are supported. |
| AWS::EC2::SecurityGroupEgress | All properties in the Template Reference section of the AWS CloudFormation User Guide are supported. |
| AWS::EC2::SecurityGroupIngress | All properties in the Template Reference section of the AWS CloudFormation User Guide are supported except SourceSecurityGroupId. |
| AWS::EC2::Subnet | All properties in the Template Reference section of the AWS CloudFormation User Guide are supported. |
| AWS::EC2::SubnetNetworkAclAssociation | All properties in the Template Reference section of the AWS CloudFormation User Guide are supported. |
| AWS::EC2::SubnetRouteTableAssociation | All properties in the Template Reference section of the AWS CloudFormation User Guide are supported. |
| AWS::EC2::Volume | All properties in the Template Reference section of the AWS CloudFormation User Guide are supported except: HealthCheckType and Tags. |
| AWS::EC2::VolumeAttachment | All properties in the Template Reference section of the AWS CloudFormation User Guide are supported. |
| AWS::EC2::VPC | All properties in the Template Reference section of the AWS CloudFormation User Guide are supported. |
| AWS::EC2::VPCDHCPOptionsAssociation | All properties in the Template Reference section of the AWS CloudFormation User Guide are supported. |
| AWS::EC2::VPCGatewayAttachment | All properties in the Template Reference section of the AWS CloudFormation User Guide are supported. |
| AWS::ElasticLoadBalancing::LoadBalancer | All properties in the Template Reference section of the AWS CloudFormation User Guide are supported except: AccessLoggingPolicy, ConnectionDrainingPolicy, CrossZone, Policies.InstancePorts, and Policies.LoadBalanerPorts. All other properties are passed through to the LoadBalancing service internally but some features are not implemented so properties may be ignored there. |
| AWS::IAM::AccessKey | All properties in the Template Reference section of the AWS CloudFormation User Guide are supported except Serial. |
| AWS::IAM::Group | All properties in the Template Reference section of the AWS CloudFormation User Guide are supported. |
| AWS::IAM::InstanceProfile | All properties in the Template Reference section of the AWS CloudFormation User Guide are supported. |
| AWS::IAM::ManagedPolicy | All properties in the Template Reference section of the AWS CloudFormation User Guide are supported. |
| AWS::IAM::Policy | All properties in the Template Reference section of the AWS CloudFormation User Guide are supported. |
| AWS::IAM::Role | All properties in the Template Reference section of the AWS CloudFormation User Guide are supported. |
| AWS::IAM::User | All properties in the Template Reference section of the AWS CloudFormation User Guide are supported. |
| AWS::IAM::UserToGroupAddition | All properties in the Template Reference section of the AWS CloudFormation User Guide are supported. |
| AWS::Route53::HostedZone | All properties in the Template Reference section of the AWS CloudFormation User Guide are supported. |
| AWS::Route53::RecordSet | All properties in the Template Reference section of the AWS CloudFormation User Guide are supported. |
| AWS::Route53::RecordSetGroup | All properties in the Template Reference section of the AWS CloudFormation User Guide are supported. |
| AWS::S3::Bucket | All properties in the Template Reference section of the AWS CloudFormation User Guide are supported. |
| AWS::S3::BucketPolicy | All properties in the Template Reference section of the AWS CloudFormation User Guide are supported. |
| AWS::SQS::Queue | All properties in the Template Reference section of the AWS CloudFormation User Guide are supported. |
| AWS::SQS::QueuePolicy | All properties in the Template Reference section of the AWS CloudFormation User Guide are supported. |
The service endpoint for CloudFormation is of the form:
http://cloudformation.mycloud.example.com:8773/
If DNS is not availble for your cloud, then an endpoint with a service path can be used:
http://<host-ip>:8773/services/CloudFormation
CloudFormation follows the same convention as the other user facing services.
3.14.1 - CloudFormation Use Case
This topic describes a use case for creating a stack, checking the stack progress, and deleting the stack. For this use case, we will use the following template:
Parameters:
  MyImageId:
    Description: Image id
    Type: String
  MyKeyPair:
    Description: Key Pair
    Type: String
Resources:
  MySecurityGroup:
    Type: AWS::EC2::SecurityGroup
    Properties:
      GroupDescription: Security Group with Ingress Rule for MyInstance
      SecurityGroupIngress:
        - IpProtocol: tcp
          FromPort: '22'
          ToPort: '22'
          CidrIp: '0.0.0.0/0'
  MyInstance:
    Type: AWS::EC2::Instance
    Properties:
      ImageId: !Ref 'MyImageId'
      SecurityGroups:
        - !Ref 'MySecurityGroup'
      KeyName: !Ref 'MyKeyPair'
This template creates an instance with a security group that allows global SSH access (port 22), but uses a keypair to log in. It requires two parameters, MyImageId , which is the image ID of the instance to create, and MyKeyPair , which is the name of the keypair to use to log in with. You could use both values with the euca-run-instances or aws ec2 run-instances commands to create an instance manually (for example, euca-run-instances -k mykey emi-371ada125a928669e ) so the arguments needed here are standard instance arguments.
The steps to run this template through the system are explained in the following steps.
Note
These steps require that you have an available image and that the CloudFormation service is runningVerify connectivity to the CloudFormation service.
euform-describe-stacks
# Or
aws cloudformation describe-stacks
You should not see anything returned, including any errors. Create a file called ex_template.yaml that contains the YAML template content shown in the introduction above.
Create a keypair.
euca-create-keypair myKey > myKey.pem
# Or
aws ec2 create-key-pair --key-name myKey > myKey.pem
Set the permissions on the keypair.
Find what resources have been created., run the command and the euca-describe-groups commands. Make note of the output for later. Run:
euca-describe-images -a
# Or
aws ec2 describe-images
Note the output for later use.
Create the stack referencing the existing resources.
# euform-create-stack --template-file ex_template.yaml -p MyImageId=<image_id> -p MyKeyPair=myKey MyStack
arn:aws:cloudformation::000575948401:stack/MyStack/26daf046-3776-4b97-9444-5edae2f2eceb
of with the AWS CLI:
# aws cloudformation create-stack --template-body file://ex_template.yaml --parameters ParameterKey=MyImageId,ParameterValue=emi-371ada125a928669e ParameterKey=MyKeyPair,ParameterValue=myKey --stack-name MyStack
arn:aws:cloudformation::000575948401:stack/MyStack/26daf046-3776-4b97-9444-5edae2f2eceb
Run the checks you want on your stack. Check the status of the stack.
# euform-describe-stacks
STACK	MyStack	CREATE_COMPLETE			2020-10-20T18:31:15.662Z
PARAMETER	MyImageId		emi-371ada125a928669e
PARAMETER	MyKeyPair		myKey
#
# aws cloudformation describe-stacks
STACKS	2020-10-20T18:31:15.662Z	False	2020-10-20T18:31:51.316Z	arn:aws:cloudformation::000575948401:stack/MyStack/26daf046-3776-4b97-9444-5edae2f2eceb	MyStack	CREATE_COMPLETE
PARAMETERS	MyImageId	emi-371ada125a928669e
PARAMETERS	MyKeyPair	myKey
Check the stack at any time to see all the events that have occurred during the stack lifecycle.
# euform-describe-stack-events MyStack
EVENT	MyStack	d87c4381-b765-4d44-a5ba-a952855ffd79	AWS::CloudFormation::Stack	MyStack	arn:aws:cloudformation::000575948401:stack/MyStack/26daf046-3776-4b97-9444-5edae2f2eceb	2020-10-20T18:31:51.310Z	CREATE_COMPLETE
EVENT	MyStack	MyInstance-CREATE_COMPLETE-1603218711063	AWS::EC2::Instance	MyInstance	i-687f112f4c99e9a98	2020-10-20T18:31:51.063Z	CREATE_COMPLETE
EVENT	MyStack	MyInstance-CREATE_IN_PROGRESS-1603218676951	AWS::EC2::Instance	MyInstance	i-687f112f4c99e9a98	2020-10-20T18:31:16.951Z	CREATE_IN_PROGRESS	Resource creation Initiated
EVENT	MyStack	MyInstance-CREATE_IN_PROGRESS-1603218676783	AWS::EC2::Instance	MyInstance		2020-10-20T18:31:16.783Z	CREATE_IN_PROGRESS
EVENT	MyStack	MySecurityGroup-CREATE_COMPLETE-1603218676599	AWS::EC2::SecurityGroup	MySecurityGroup	MyStack-MySecurityGroup-SWUBTU8TQ9MBV	2020-10-20T18:31:16.599Z	CREATE_COMPLETE
EVENT	MyStack	MySecurityGroup-CREATE_IN_PROGRESS-1603218676174	AWS::EC2::SecurityGroup	MySecurityGroup	MyStack-MySecurityGroup-SWUBTU8TQ9MBV	2020-10-20T18:31:16.174Z	CREATE_IN_PROGRESS	Resource creation Initiated
EVENT	MyStack	MySecurityGroup-CREATE_IN_PROGRESS-1603218676038	AWS::EC2::SecurityGroup	MySecurityGroup		2020-10-20T18:31:16.038Z	CREATE_IN_PROGRESS
EVENT	MyStack	9212e1ff-6c7a-4710-96a2-d83606a3c34f	AWS::CloudFormation::Stack	MyStack	arn:aws:cloudformation::000575948401:stack/MyStack/26daf046-3776-4b97-9444-5edae2f2eceb	2020-10-20T18:31:15.780Z	CREATE_IN_PROGRESS	User Initiated
Run euca-describe-instances and euca-describe-groups to see the newly created resources:
# euca-describe-instances i-687f112f4c99e9a98
RESERVATION	r-2381c3e652dd942f2	000575948401	MyStack-MySecurityGroup-SWUBTU8TQ9MBV
INSTANCE	i-687f112f4c99e9a98	emi-371ada125a928669e	euca-192-168-134-181.eucalyptus.mycloud.example.com	euca-172-31-15-210.eucalyptus.internal	running	myKey	0		t2.micro	2020-10-20T18:31:16.920Z	cloud-1a				monitoring-disabled	192.168.134.181	172.31.15.210	vpc-837bc081de161f8c0	subnet-1503566df094fe78a	instance-store					hvm			sg-98da12246d91375e3				x86_64
NETWORKINTERFACE	eni-42a4a3bf7d1075735	subnet-1503566df094fe78a	vpc-837bc081de161f8c0	000575948401	in-use	172.31.15.210	euca-172-31-15-210.eucalyptus.internal	true
ATTACHMENT		eni-attach-cc38f4f4ef78a6469	0	attached	2020-10-20T18:31:16.923Z	true
ASSOCIATION	192.168.134.181		172.31.15.210
GROUP	sg-98da12246d91375e3	MyStack-MySecurityGroup-SWUBTU8TQ9MBV
PRIVATEIPADDRESS	172.31.15.210	euca-172-31-15-210.eucalyptus.internal	primary
TAG	instance	i-687f112f4c99e9a98	aws:cloudformation:logical-id	MyInstance
TAG	instance	i-687f112f4c99e9a98	aws:cloudformation:stack-id	arn:aws:cloudformation::000575948401:stack/MyStack/26daf046-3776-4b97-9444-5edae2f2eceb
TAG	instance	i-687f112f4c99e9a98	aws:cloudformation:stack-name	MyStack
TAG	instance	i-687f112f4c99e9a98	euca:node	10.117.111.18
#
# euca-describe-groups sg-98da12246d91375e3
GROUP	sg-98da12246d91375e3	000575948401	MyStack-MySecurityGroup-SWUBTU8TQ9MBV	Security Group with Ingress Rule for MyInstance	vpc-837bc081de161f8c0
PERMISSION	000575948401	MyStack-MySecurityGroup-SWUBTU8TQ9MBV	ALLOWS	tcp	22	22	FROM	CIDR	0.0.0.0/0	ingress
PERMISSION	000575948401	MyStack-MySecurityGroup-SWUBTU8TQ9MBV	ALLOWS	-1			TO	CIDR	0.0.0.0/0	egress
TAG	security-group	sg-98da12246d91375e3	aws:cloudformation:logical-id	MySecurityGroup
TAG	security-group	sg-98da12246d91375e3	aws:cloudformation:stack-id	arn:aws:cloudformation::000575948401:stack/MyStack/26daf046-3776-4b97-9444-5edae2f2eceb
TAG	security-group	sg-98da12246d91375e3	aws:cloudformation:stack-name	MyStack
To SSH into the instance:
ssh -i myKey.pem root@192.168.134.181
Note
Username might depend on the image, and might be root, centos, ubuntu or ec2-user.Delete the stack.
euform-delete-stack MyStack
# Or
aws cloudformation delete-stack --stack-name MyStack
You can run euform-describe-stacks and all the other describe commands to check the progress until the delete is complete.
3.14.2 - CloudFormation Templates
This topic details templates that have been tested with Eucalyptus.
Warning
These examples use the older JSON format, YAML format is recommended for Eucalyptus 5AccessKeys.template
{
  "AWSTemplateFormatVersion":"2010-09-09",
  "Parameters":{
    "Username":{
      "Description":"Username",
      "Type":"String"
    }
  },
  "Resources":{
    "Key1":{
      "Type":"AWS::IAM::AccessKey",
      "Properties":{
        "UserName":{"Ref":"Username"},
        "Serial":"1",
        "Status":"Active"
      }
    },
    "Key2":{
      "Type":"AWS::IAM::AccessKey",
      "Properties":{
        "UserName":{"Ref":"Username"},
       "Serial":"1",
       "Status":"Inactive"
      }
    }
  },
  "Outputs":{
    "Key1AK":{
      "Value":{"Ref":"Key1"}
    },
    "Key1SK":{
      "Value":{"Fn::GetAtt":["Key1","SecretAccessKey"]}
    },
    "Key2AK":{
      "Value":{"Ref":"Key2"}
    },
    "Key2SK":{
      "Value":{"Fn::GetAtt":["Key2","SecretAccessKey"]}
    }
  }
}
AutoscalingGroupsAndCloudWatchAlarm.template
{
  "AWSTemplateFormatVersion":"2010-09-09",
  "Parameters":{
    "ImageId":{
      "Description":"Image id",
      "Type":"String"
    }
  },
  "Resources":{
    "LaunchConfig":{
      "Type":"AWS::AutoScaling::LaunchConfiguration",
      "Properties":{
        "ImageId":{"Ref":"ImageId"},
        "InstanceType":"m1.small",
        "BlockDeviceMappings":[
          {"DeviceName":"/dev/sdc","VirtualName":"ephemeral0"},
          {"DeviceName":"/dev/sdc","Ebs":{"VolumeSize":"10"}}
        ],
        "SecurityGroups":[{"Ref":"InstanceSecurityGroup"}]}
      },
      "ASG1":{
        "UpdatePolicy":{
          "AutoScalingRollingUpdate":{
            "MinInstancesInService":"1",
            "MaxBatchSize":"1",
            "PauseTime":"PT12M5S"
          }
        },
        "Type":"AWS::AutoScaling::AutoScalingGroup",
        "Properties":{
          "AvailabilityZones":{"Fn::GetAZs":{"Ref":"AWS::Region"}
        },
        "LaunchConfigurationName":{"Ref":"LaunchConfig"},
        "MaxSize":"3",
        "MinSize":"1"
      }
    },
    "ScaleUpPolicy":{
      "Type":"AWS::AutoScaling::ScalingPolicy",
        "Properties":{
          "AdjustmentType":"ChangeInCapacity",
          "AutoScalingGroupName":{"Ref":"ASG1"},
          "Cooldown":"1",
          "ScalingAdjustment":"1"
        }
      },
      "CPUAlarmHigh":{
        "Type":"AWS::CloudWatch::Alarm",
        "Properties":{
          "EvaluationPeriods":"1",
          "Statistic":"Average",
          "Threshold":"10",
          "AlarmDescription":"Alarm if CPU too high or metric disappears indicating instance is down",
          "Period":"60",
          "AlarmActions":[{"Ref":"ScaleUpPolicy"}],
          "Namespace":"AWS/EC2",
          "Dimensions":[{
            "Name":"AutoScalingGroupName",
            "Value":{"Ref":"ASG1"}
          }],
          "ComparisonOperator":"GreaterThanThreshold",
          "MetricName":"CPUUtilization"
        }
      },
      "InstanceSecurityGroup":{
        "Type":"AWS::EC2::SecurityGroup",
        "Properties":{
          "GroupDescription":"Cloudformation Group",
          "SecurityGroupIngress":[{
            "IpProtocol":"tcp",
            "FromPort":"22",
            "ToPort":"22",
             "CidrIp":"0.0.0.0/0"
          }]
        }
      },
      "IngressRule":{
        "Type":"AWS::EC2::SecurityGroupIngress",
        "Properties":{
          "GroupName":{"Ref":"InstanceSecurityGroup"},
          "FromPort":"80",
          "ToPort":"80",
          "IpProtocol":"tcp",
          "SourceSecurityGroupName":{"Ref":"InstanceSecurityGroup"}
      }
    }
  }
}
BlockDeviceMappings.template
{
  "AWSTemplateFormatVersion":"2010-09-09",
  "Description":"Create an EC2 instance running a specified EMI with block device mappings.",
  "Parameters":{
    "ImageId":{
      "Description":"Image id",
      "Type":"String"
    },
    "KeyName":{
      "Description":"KeyName",
      "Type":"String"
    },
    "SnapshotId":{
      "Type":"String"
    }
  },
  "Resources":{
    "Ec2Instance1":{
      "Type":"AWS::EC2::Instance",
      "Properties":{
        "ImageId":{"Ref":"ImageId"},
        "BlockDeviceMappings":[{"DeviceName":"/dev/sdc","VirtualName":"ephemeral0"}]
      }
    },
    "Ec2Instance2":{
      "Type":"AWS::EC2::Instance",
      "Properties":{
        "ImageId":{"Ref":"ImageId"},
        "KeyName":{"Ref":"KeyName"},
        "BlockDeviceMappings":[{
          "DeviceName":"/dev/sdc",
          "Ebs":{"SnapshotId":{"Ref":"SnapshotId"},"DeleteOnTermination":"false"}
        }]
      }
    },
    "Ec2Instance3":{
      "Type":"AWS::EC2::Instance",
      "Properties":{
        "ImageId":{"Ref":"ImageId"},
        "KeyName":{"Ref":"KeyName"},
        "BlockDeviceMappings":[{
          "DeviceName":"/dev/sdc",
          "Ebs":{"VolumeSize":"10","DeleteOnTermination":"true"}
        }]
      }
    }
  }
}
ConditionsAndFunctions.template
{
  "Mappings":{
    "Mapping01":{
      "Key01":{"Value":["1","2"]},
      "Key02":{"Value":"3"},
      "Key03":{"Value":"4"}
    }
  },
  "AWSTemplateFormatVersion":"2010-09-09",
  "Description":"Create an EC2 instance running a specified EMI, also test functions and conditions.",
  "Parameters":{
    "ImageId":{
      "Description":"Image id",
      "Type":"String",
      "NoEcho":"True"
    },
    "Split":{
      "Default":"1,2,3",
      "Type":"CommaDelimitedList"
    }
  },
  "Resources":{
    "Ec2Instance1":{
      "Type":"AWS::EC2::Instance",
        "Properties":{
          "ImageId":{"Ref":"ImageId"}
        },
      "Condition":"True"
    },
    "Ec2Instance2":{
      "Type":"AWS::EC2::Instance",
      "Properties":{
        "ImageId":{"Ref":"ImageId"}
      },
      "Condition":"False"
    }
  },
  "Conditions":{
    "True":{"Fn::Equals":["x","x"]},
    "False":{"Fn::Not":[{"Condition":"True"}]},
    "NotTrue":{"Fn::Not":[{"Condition":"True"}]},
    "NotFalse":{"Fn::Not":[{"Condition":"False"}]},
    "TrueAndTrue":{"Fn::And":[{"Condition":"True"},{"Condition":"True"}]},
    "TrueAndFalse":{"Fn::And":[{"Condition":"True"},{"Condition":"False"}]},
    "FalseAndTrue":{"Fn::And":[{"Condition":"False"},{"Condition":"True"}]},
    "FalseAndFalse":{"Fn::And":[{"Condition":"False"},{"Condition":"False"}]},
    "TrueOrTrue":{"Fn::Or":[{"Condition":"True"},{"Condition":"True"}]},
    "TrueOrFalse":{"Fn::Or":[{"Condition":"True"},{"Condition":"False"}]},
    "FalseOrTrue":{"Fn::Or":[{"Condition":"False"},{"Condition":"True"}]},
    "FalseOrFalse":{"Fn::Or":[{"Condition":"False"},{"Condition":"False"}]}
  },
  "Outputs":{
    "Region":{
      "Value":{"Ref":"AWS::Region"}
    },
    "JoinAndAZ":{
      "Value":{"Fn::Join":[",",{"Fn::GetAZs":""}]}
    },
    "FindInMap1AndSelect":{
      "Value":{"Fn::Select":["0",{"Fn::FindInMap":["Mapping01","Key01","Value"]}]}
    },
    "FindInMap2AndSelect":{
     "Value":{"Fn::Select":["1","Fn::FindInMap":["Mapping01","Key01","Value"]}]}
    },
    "FindInMap3AndSelect":{
      "Value":{"Fn::FindInMap":["Mapping01","Key02","Value"]}
    },
    "FindInMap4AndSelect":{
      "Value":{"Fn::FindInMap":["Mapping01","Key03","Value"]}
    },
    "GetAtt":{
      "Value":{"Fn::GetAtt":["Ec2Instance1","PrivateIp"]}
    },
    "StackId":{
      "Value":{"Ref":"AWS::StackId"}
    },
    "StackName":{
      "Value":{"Ref":"AWS::StackName"}
    },
    "AccountId":{
      "Value":{"Ref":"AWS::AccountId"}
    },
    "True":{
      "Value":{"Fn::Join" : [",",[{"Fn::If": ["True","True","False"]}]]}},
    },
    "False":{
      "Value":{"Fn::Join" : [",",[{"Fn::If": ["False","True","False"]}]]}},
    },
    "NotTrue":{
      "Value":{"Fn::Join" : [",",[{"Fn::If": ["NotTrue","True","False"]}]]}},
    },
    "NotFalse":{
      "Value":{"Fn::Join" : [",",[{"Fn::If": ["NotFalse","True","False"]}]]}},
    },
    "TrueAndTrue":{
      "Value":{"Fn::Join" : [",",[{"Fn::If": ["TrueAndTrue","True","False"]}]]}},
    },
    "TrueAndFalse":{
      "Value":{"Fn::Join" : [",",[{"Fn::If": ["TrueAndFalse","True","False"]}]]}},
    },
    "FalseAndTrue":{
      "Value":{"Fn::Join" : [",",[{"Fn::If": ["FalseAndTrue","True","False"]}]]}},
    },
    "FalseAndFalse":{
      "Value":{"Fn::Join" : [",",[{"Fn::If": ["FalseAndFalse","True","False"]}]]}},
    },
    "TrueOrTrue":{
      "Value":{"Fn::Join" : [",",[{"Fn::If": ["TrueOrTrue","True","False"]}]]}},
    },
    "TrueOrFalse":{
      "Value":{"Fn::Join" : [",",[{"Fn::If": ["TrueOrFalse","True","False"]}]]}},
    },
    "FalseOrTrue":{
      "Value":{"Fn::Join" : [",",[{"Fn::If": ["FalseOrTrue","True","False"]}]]}},
    },
    "FalseOrFalse":{
      "Value":{"Fn::Join" : [",",[{"Fn::If": ["FalseOrFalse","True","False"]}]]}},
    }
  }
}
ElasticIP.template
This template attaches an Elastic IP to a new and existing instance. You must pass along the existing instance ID.
{
  "AWSTemplateFormatVersion":"2010-09-09",
  "Description":"Create an EC2 instance running a specified EMI and some elastic IP addresses.",
  "Parameters":{
    "ImageId":{
      "Description":"Image id",
      "Type":"String"
    },
    "OtherInstanceId":{
      "Description":"Other instance id",
      "Type":"String"
    }
    },
    "Resources":{
      "Ec2Instance1":{
        "Type":"AWS::EC2::Instance",
        "Properties":{
          "ImageId":{"Ref":"ImageId"}
        }
      },
      "EIP1":{
        "Type":"AWS::EC2::EIP",
        "Properties":{
          "InstanceId":{"Ref":"Ec2Instance1"}
        }
      },
      "EIP2":{
        "Type":"AWS::EC2::EIP",
        "Properties":{
        }
      },
      "EIPAssociation2":{
        "Type":"AWS::EC2::EIPAssociation",
        "Properties":{
          "InstanceId":{"Ref":"OtherInstanceId"},
          "EIP":{"Ref":"EIP2"}
        }
      }
    },
    "Outputs":{
      "Output1":{
        "Value":{"Ref":"EIPAssociation2"}
      }
  }
}
ElasticLoadBalancer.template
There is a hard-coded image ID in the Mapping section here to test FindInMap . Change the value to an instance that exists in your cloud.
{
  "AWSTemplateFormatVersion":"2010-09-09",
  "Description":"Based on the AWS Cloudformation Sample Template for ELB.  Modify this template, and put the correct emi-XXXX in the value fields with a blank key of the AWSRegionArch2AMI mapping.",
  "Parameters":{
    "InstanceType":{
      "Description":"WebServer EC2 instance type",
      "Type":"String",
      "Default":"m1.small",
      "AllowedValues":["t1.micro","m1.small","m1.medium","m1.large","m1.xlarge","m2.xlarge","m2.2xlarge",
                       "m2.4xlarge","m3.xlarge","m3.2xlarge","c1.medium","c1.xlarge","cc1.4xlarge",
                       "cc2.8xlarge","cg1.4xlarge"],
      "ConstraintDescription":"must be a valid EC2 instance type."
    },
    "WebServerPort":{
      "Description":"TCP/IP port of the web server",
      "Type":"String",
      "Default":"8888"
    },
    "KeyName":{
      "Description":"Name of an existing EC2 KeyPair to enable SSH access to the instances",
      "Type":"String",
      "MinLength":"1",
      "MaxLength":"255",
      "AllowedPattern":"[\\x20-\\x7E]*",
      "ConstraintDescription":"can contain only ASCII characters."
    },
    "SSHLocation":{
      "Description":"The IP address range that can be used to SSH to the EC2 instances",
      "Type":"String",
      "MinLength":"9",
      "MaxLength":"18",
      "Default":"0.0.0.0/0",
      "AllowedPattern":"(\\d{1,3})\\.(\\d{1,3})\\.(\\d{1,3})\\.(\\d{1,3})/(\\d{1,2})",
      "ConstraintDescription":"must be a valid IP CIDR range of the form x.x.x.x/x."
    }
  },
  "Mappings":{
    "AWSInstanceType2Arch":{
      "t1.micro":{"Arch":"64"},
      "m1.small":{"Arch":"64"},
      "m1.medium":{"Arch":"64"},
      "m1.large":{"Arch":"64"},
      "m1.xlarge":{"Arch":"64"},
      "m2.xlarge":{"Arch":"64"},
      "m2.2xlarge":{"Arch":"64"},
      "m3.xlarge":{"Arch":"64"},
      "m3.2xlarge":{"Arch":"64"},
      "m2.4xlarge":{"Arch":"64"},
      "c1.medium":{"Arch":"64"},
      "c1.xlarge":{"Arch":"64"}
    },
    "AWSRegionArch2AMI":{
      "":{"32":"emi-ddbacddf","64":"emi-ddbacddf"}
    }
  },
  "Resources":{
    "ElasticLoadBalancer":{
      "Type":"AWS::ElasticLoadBalancing::LoadBalancer",
      "Properties":{
        "AvailabilityZones":{"Fn::GetAZs":""},
        "Instances":[{"Ref":"Ec2Instance1"},{"Ref":"Ec2Instance2"}],
        "Listeners"{"LoadBalancerPort":"80","InstancePort":{"Ref":"WebServerPort"},"Protocol":"HTTP"}],
        "HealthCheck":{
          "Target":{"Fn::Join":["",["HTTP:",{"Ref":"WebServerPort"},"/"]]},
          "HealthyThreshold":"3",
          "UnhealthyThreshold":"5",
          "Interval":"30",
          "Timeout":"5"
        }
      }
    },
    "Ec2Instance1":{
      "Type":"AWS::EC2::Instance",
      "Properties":{
        "SecurityGroups":[{"Ref":"InstanceSecurityGroup"}],
        "KeyName":{"Ref":"KeyName"},
        "InstanceType":{"Ref":"InstanceType"},
        "ImageId":{
          "Fn::FindInMap":[
            "AWSRegionArch2AMI",
            {"Ref":"AWS::Region"},
            {"Fn::FindInMap":["AWSInstanceType2Arch",{"Ref":"InstanceType"},"Arch"]}
          ]
        },
        "UserData":{"Fn::Base64":{"Ref":"WebServerPort"}}
      }
    },
    "Ec2Instance2":{
      "Type":"AWS::EC2::Instance",
      "Properties":{
        "SecurityGroups":[{"Ref":"InstanceSecurityGroup"}],
        "KeyName":{"Ref":"KeyName"},
        "InstanceType":{"Ref":"InstanceType"},
        "ImageId":{
          "Fn::FindInMap":[
            "AWSRegionArch2AMI",
            {"Ref":"AWS::Region"},
            {"Fn::FindInMap":["AWSInstanceType2Arch",{"Ref":"InstanceType"},"Arch"]}
          ]
        },
        "UserData":{"Fn::Base64":{"Ref":"WebServerPort"}}
      }
    },
    "InstanceSecurityGroup":{
      "Type":"AWS::EC2::SecurityGroup",
      "Properties":{
        "GroupDescription":"Enable SSH access and HTTP access on the inbound port",
        "SecurityGroupIngress":[
          {
            "IpProtocol":"tcp",
            "FromPort":"22",
            "ToPort":"22",
            "CidrIp":{"Ref":"SSHLocation"}
          },
          {
             "IpProtocol":"tcp",
             "FromPort":{"Ref":"WebServerPort"},
             "ToPort":{"Ref":"WebServerPort"},
             "CidrIp":"0.0.0.0/0"
          }
        ]
      }
    }
  },
  "Outputs":{
    "URL":{
      "Description":"URL of the sample website",
      "Value":{"Fn::Join":["",["http://",{"Fn::GetAtt":["ElasticLoadBalancer","DNSName"]}]]}
    }
  }
}
IAMGroup.template
{
  "AWSTemplateFormatVersion":"2010-09-09",
  "Resources":{
    "Group1":{
      "Type":"AWS::IAM::Group",
      "Properties":{
        "Path":"/myapplication/",
        "Policies":[{
          "PolicyName":"myapppolicy",
          "PolicyDocument":{
            "Version":"2012-10-17",
            "Statement":[
              {"Effect":"Allow","Action":["ec2:*"],"Resource":["*"]},
              {"Effect":"Deny","Action":["s3:*"],"NotResource":["*"]}
            ]
          }
        }]
      }
    }
  },
  "Outputs":{
    "Group1Ref":{
      "Value":{"Ref":"Group1"}
    },
    "Group1Arn":{
      "Value":{"Fn::GetAtt":["Group1","Arn"]}
    }
  }
}
IAMRole.template
{
"AWSTemplateFormatVersion":"2010-09-09",
"Resources":{
"Role1":{
"Type":"AWS::IAM::Role",
"Properties":{
"AssumeRolePolicyDocument":{
"Version":"2012-10-17",
"Statement":[{
"Effect":"Allow",
"Principal":{"Service":["ec2.amazonaws.com"]},
"Action":["sts:AssumeRole"]
}]
},
"Path":"/",
"Policies":[{
"PolicyName":"root",
"PolicyDocument":{
"Version":"2012-10-17",
"Statement":[{"Effect":"Allow","Action":"*","Resource":"*"}]
}
}]
}
},
"IP1":{
"Type":"AWS::IAM::InstanceProfile",
"Properties":{
"Path":"/",
"Roles":[{"Ref":"Role1"}]
}
}
},
"Outputs":{
"Role1Ref":{
"Value":{"Ref":"Role1"}
},
"Role1Arn":{
"Value":{"Fn::GetAtt":["Role1","Arn"]}
},
"IP1Ref":{
"Value":{"Ref":"IP1"}
},
"IP1Arn":{
"Value":{"Fn::GetAtt":["IP1","Arn"]}
}
}
}
IAM_Users_Groups_and_Policies.template
{
"AWSTemplateFormatVersion":"2010-09-09",
"Description":"AWS CloudFormation Sample Template IAM_Users_Groups_and_Policies: Sample template showing how to create IAM users, groups and policies. It creates a single user that is a member of a users group and an admin group. The groups each have different IAM policies associated with them. Note: This example also creates an AWSAccessKeyId/AWSSecretKey pair associated with the new user. The example is somewhat contrived since it creates all of the users and groups, typically you would be creating policies, users and/or groups that contain references to existing users or groups in your environment. Note that you will need to specify the CAPABILITY_IAM flag when you create the stack to allow this template to execute. You can do this through the AWS management console by clicking on the check box acknowledging that you understand this template creates IAM resources or by specifying the CAPABILITY_IAM flag to the cfn-create-stack command line tool or CreateStack API call. ",
"Parameters":{
"Password":{
"NoEcho":"true",
"Type":"String",
"Description":"New account password",
"MinLength":"1",
"MaxLength":"41"
}
},
"Resources":{
"CFNUser":{
"Type":"AWS::IAM::User",
"Properties":{
"LoginProfile":{"Password":{"Ref":"Password"}}
}
},
"Role1":{
"Type":"AWS::IAM::Role",
"Properties":{
"AssumeRolePolicyDocument":{
"Version":"2012-10-17",
"Statement":[{
"Effect":"Allow",
"Principal":{"Service":["ec2.amazonaws.com"]},
"Action":["sts:AssumeRole"]
}]
},
"Path":"/",
"Policies":[{
"PolicyName":"root",
"PolicyDocument":{
"Version":"2012-10-17",
"Statement":[{"Effect":"Allow","Action":"*","Resource":"*"}]
}
}]
}
},
"CFNUserGroup":{
"Type":"AWS::IAM::Group"
},
"CFNAdminGroup":{
"Type":"AWS::IAM::Group"
},
"Users":{
"Type":"AWS::IAM::UserToGroupAddition",
"Properties":{
"GroupName":{"Ref":"CFNUserGroup"},
"Users":[{"Ref":"CFNUser"}]
}
},
"Admins":{
"Type":"AWS::IAM::UserToGroupAddition",
"Properties":{
"GroupName":{"Ref":"CFNAdminGroup"},
"Users":[{"Ref":"CFNUser"}]
}
},
"CFNUserPolicies":{
"Type":"AWS::IAM::Policy",
"Properties":{
"PolicyName":"CFNUsers",
"PolicyDocument":{
"Statement":[{
"Effect":"Allow",
"Action":["cloudformation:Describe*","cloudformation:List*","cloudformation:Get*"],
"Resource":"*"
}]
},
"Groups":[{"Ref":"CFNUserGroup"}],
"Users":[{"Ref":"CFNUser"}],
"Roles":[{"Ref":"Role1"}]
}
},
"CFNAdminPolicies":{
"Type":"AWS::IAM::Policy",
"Properties":{
"PolicyName":"CFNAdmins",
"PolicyDocument":{
"Statement":[{"Effect":"Allow","Action":"cloudformation:*","Resource":"*"}]
},
"Groups":[{"Ref":"CFNAdminGroup"}]
}
},
"CFNKeys":{
"Type":"AWS::IAM::AccessKey",
"Properties":{
"UserName":{"Ref":"CFNUser"}
}
}
},
"Outputs":{
"AccessKey":{
"Value":{"Ref":"CFNKeys"},
"Description":"AWSAccessKeyId of new user"
},
"SecretKey":{
"Value":{"Fn::GetAtt":["CFNKeys","SecretAccessKey"]},
"Description":"AWSSecretKey of new user"
}
}
}
IAMUser.template
{
"AWSTemplateFormatVersion":"2010-09-09",
"Parameters":{
"Password":{
"NoEcho":"true",
"Type":"String",
"Description":"New account password",
"MinLength":"1",
"MaxLength":"41"
}
},
"Resources":{
"CFNUserGroup":{
"Type":"AWS::IAM::Group",
"Properties":{
"Policies":[{
"PolicyName":"CFNUsers",
"PolicyDocument":{
"Statement":[{
"Effect":"Allow",
"Action":["cloudformation:Describe*","cloudformation:List*","cloudformation:Get*"],
"Resource":"*"
}]
}
}]
}
},
"CFNAdminGroup":{
"Type":"AWS::IAM::Group"
},
"CFNUser":{
"Type":"AWS::IAM::User",
"Properties":{
"LoginProfile":{"Password":{"Ref":"Password"}},
"Groups":[{"Ref":"CFNUserGroup"},{"Ref":"CFNAdminGroup"}],
"Policies":[{
"PolicyName":"CFNUsers",
"PolicyDocument":{
"Statement":[{
"Effect":"Allow",
"Action":["cloudformation:Describe*","cloudformation:List*","cloudformation:Get*"],
"Resource":"*"
}]
}
}]
}
}
}
}
SecurityGroupRule.template
{
"AWSTemplateFormatVersion":"2010-09-09",
"Description":"Create an EC2 instance running a specified EMI, a security group, and an ingress rule.",
"Parameters":{
"ImageId":{
"Description":"Image id",
"Type":"String"
}
},
"Resources":{
"Ec2Instance1":{
"Description":"My instance",
"Type":"AWS::EC2::Instance",
"Properties":{
"ImageId":{"Ref":"ImageId"}
},
"DependsOn":"Ec2Instance2"
},
"Ec2Instance2":{
"Type":"AWS::EC2::Instance",
"Properties":{
"ImageId":{"Ref":"ImageId"},
"SecurityGroups":[{"Ref":"InstanceSecurityGroup"}]
}
},
"InstanceSecurityGroup":{
"Type":"AWS::EC2::SecurityGroup",
"Properties":{
"GroupDescription":"Cloudformation Group",
"SecurityGroupIngress":[{"IpProtocol":"tcp","FromPort":"22","ToPort":"22","CidrIp":"0.0.0.0/0"}]
}
},
"IngressRule":{
"Type":"AWS::EC2::SecurityGroupIngress",
"Properties":{
"GroupName":{"Ref":"InstanceSecurityGroup"},
"FromPort":"80",
"ToPort":"80",
"IpProtocol":"tcp",
"SourceSecurityGroupName":{"Ref":"InstanceSecurityGroup"}
}
}
}
}
Volumes.template
{
"AWSTemplateFormatVersion":"2010-09-09",
"Description":"Create an EC2 instance running a specified EMI and attached volumes.",
"Parameters":{
"ImageId":{
"Description":"Image id",
"Type":"String"
}
},
"Resources":{
"Volume1":{
"Type":"AWS::EC2::Volume",
"Properties":{
"Size":"5",
"AvailabilityZone":{"Fn::GetAtt":["Instance1","AvailabilityZone"]}
}
},
"Volume2":{
"Type":"AWS::EC2::Volume",
"Properties":{
"Size":"5",
"AvailabilityZone":{"Fn::GetAtt":["Instance1","AvailabilityZone"]}
}
},
"MountPoint1":{
"Type":"AWS::EC2::VolumeAttachment",
"Properties":{
"InstanceId":{"Ref":"Instance1"},
"VolumeId":{"Ref":"Volume1"},
"Device":"/dev/sdc"
}
},
"Instance1":{
"Type":"AWS::EC2::Instance",
"Properties":{
"ImageId":{"Ref":"ImageId"}
}
},
"Instance2":{
"Type":"AWS::EC2::Instance",
"Properties":{
"ImageId":{"Ref":"ImageId"},
"Volumes":[{"VolumeId":{"Ref":"Volume2"},"Device":"/dev/sdc"}]
}
}
}
}
3.14.3 - Troubleshooting CloudFormation
This topic describes some of the issues that can happen with CloudFormation. It also talks about how you can detect these issues, and offers some ways to fix the issues.
Invalid JSON
JSON must be syntactically valid. For example, if you don’t type in the final } character in a template, the euform-create-stack command returns an error message.
euform-create-stack: error (ValidationError): Unexpected end-of-input:
expected close marker for OBJECT (from [Source: java.io.StringReader@56b3916d;
line: 1, column: 0]) at [Source: java.io.StringReader@56b3916d; line: 38,
column : 849]
If you see an error like this, there is most likely something syntactically wrong with your JSON template. Some editors can detect things like unbalanced parentheses, but in the worst case you can paste your template into this URL http://jsonparseronline.com/ and it will help you find syntax errors.
Invalid Argument
If you try to create, for example, a stack that already exists, you will get a simple error message.
euform-create-stack: error (AlreadyExists): Stack already exists
Invalid Reference
If you use an invalid reference to, for example, a resource that doesn’t exit, Eucalyptus returns a simple error message.
euform-create-stack: error (ValidationError): Template format error: Unresolved resource dependencies [MySecurityGroup2] in the Resources block of the template>
Complex Errors
Not all errors are simple. We recommend that you use euform-describe-stacks (or aws cloudformation describe-stacks) and euform-describe-stack-resources to determine the current state of the stack. If there’s an error, it will usually be shown in the euform-describe-stack-events output. Otherwise, you will have to dig into the cloud-output.log file for further information. You can also manually delete resources if they are causing issues. If a euform-delete-stack fails, you can delete the offending resource and try again.
3.15 - Using Virtual Private Cloud
Using Virtual Private Cloud
Eucalyptus Virtual Private Cloud (VPC) is an implementation of Amazon VPC that allows you to define a logically isolated virtual network that can contain Eucalyptus resources. A virtual network enhances security by allowing you to have fine-grained, explicit control over network gateways, subnets, IP address ranges, and inbound and outbound connectivity. This section of the User Guide covers how Eucalyptus VPC works and how to use it.
Note
For more information about Amazon Virtual Private Cloud, see the .3.15.1 - How VPC Works
How VPC Works
Eucalyptus Virtual Private Cloud (VPC) is an implementation of Amazon VPC that allows you to run instances inside an isolated virtual network that you define. Eucalyptus VPC enables you to have control over subnets, internet gateways, and IP address ranges and allocations inside of this virtual network, as well as the ability to define and use multiple layers of security with security groups.
3.15.1.1 - Default VPCs
Starting with Eucalyptus versions 4.1 and later, when you create an account in your Eucalyptus cloud in VPCMIDO network mode, you get a default VPC with a single public subnet and an attached Internet gateway. All instances that are created in this account that do not explicitly specify a VPC are placed into this default VPC and given a public IP address and behave like ‘classic’ AWS EC2 instances.
3.15.1.2 - Subnets and IP Addressing
A virtual private cloud (VPC) is a virtual network that is logically isolated from other virtual networks in your Eucalyptus cloud.
Note
For more information about CIDR notation, see the on Wikipedia.Private IP AddressesWhen you create a VPC, you can specify the range of IP addresses for your VPC using Classless Inter-Domain Routing (CIDR) notation. When you launch an instance (VM) in your VPC, you can assign a private IP address to the instance from this IP address range. If you don’t explicitly assign a private IP address, one is assigned to the instance for you.
Public IP Addresses
By default, instances launched into the default subnet in your VPC receive a public IP address. This public IP address is assigned from a pool of public IP addresses, and is not associated with your account. This public IP address can’t be manually added or removed from the VPC instance. The public IP address is mapped to the instance’s private IP address using Network Address Translation (NAT).
You can control whether or not your VPC instances get a public IP address by either enabling/disabling the public IP address attribute of the subnet, or by overriding the subnet’s behavior when launching an instance into the VPC.
If you want a persistent IP address for your VPC instance, you can use the euca-allocate-address to create an elastic IP address, and then use euca-associate-address to assign this address.
Subnets
Once you’ve created a VPC, you can create one or more subnets inside the VPC. A subnet is simply a logical subdivision of a network of IP addresses. Subnets can be used to enable tighter security, allow separate administration of the network by organization, and enable more efficient network traffic by containing traffic between nodes in a subnet and using route tables for traffic that needs to move between subnets.
Note that subnets in a VPC cannot overlap; and the first four IP addresses and the last IP address are reserved for internal use. For example, of the 16 IP addresses of a /28 subnet, 11 are available for instances; of the 256 IP addresses of a /24 subnet, 251 are available for instances. Subnets must be larger than /28 and smaller than /16.
Note
For more information about subnets, see the on Wikipedia.3.15.2 - Understanding VPC Networking Concepts
Understanding VPC Networking Concepts
This section discusses VPC networking concepts and terminology.
Note
This documentation assumes that you have some knowledge of IP addressing, CIDR, route tables, and subnets. See the links included throughout the documentation for more information on these topics.3.15.2.1 - Domain Name System (DNS)
The Domain Name System (DNS) is an Internet standard that maps unique DNS names (for example: www.example.com) to the underlying public IP address (for example: 128.0.0.1).
Eucalyptus provides a DNS service with your cloud. By default, EC2 classic (EDGE mode) and VPCMIDO mode default subnet instances that are launched in your Eucalyptus cloud are automatically assigned public and private DNS names from the Eucalyptus DNS service.
3.15.2.2 - Elastic Network Interfaces (ENIs)
In Eucalyptus VPC, networking to instances (VMs) is delivered in the form of Elastic Network Interfaces (ENIs). ENIs are virtual network interfaces that can be attached to and/or detached from instances in a VPC.
Attributes of an ENI (private address, public address, Elastic IP, MAC address, security groups, and source/destination check flag) follow the ENI as it is detached from an instance and attached to another instance. An instance in a VPC has a default ENI attached, which is called the primary ENI. The Primary ENI cannot be detached.
Additional ENIs (up to a total of eight) can be attached to instances as needed. ENIs in different subnets can be attached to the same instance, but all ENIs and the instance must reside in the same Availability Zone. Users may need to manually bring up and configure secondary ENIs from within instances.
3.15.2.3 - Route Tables
A route table defines how traffic is directed in your network. Each subnet in your network has to be associated with one (and only one) route table, but a route table can have multiple subnets associated with it. A default route table (which simply contains a local route that allows communication within the VPC) is automatically created for you when you create your VPC. New subnets will get this route table by default, but you can replace it with a custom route table that enables you to explicitly control subnet traffic.
Note
For more information on route tables, see the on Wikipedia.3.15.2.4 - Internet Gateways
An Internet gateway is an object that runs inside of your VPC and provides communication between VPC instances and the Internet.
To use an Internet gateway in your VPC, you attach the gateway to your VPC, make sure your route tables direct Internet traffic to the Internet gateway, and configure your security groups to allow traffic through.
By default, instances loaded into any non-default VPC have private IP addresses (so they can communicate with other instances in the same VPC), but they do not have public IP addresses. For an instance to be able to communicate with the Internet gateway, it must have an associated public IP address. The default VPC comes with a pre-configured Internet gateway, and all instances that are launched into the default subnet receive a public IP address, so these instances have Internet access.
3.15.2.5 - Network Address Translation (NAT) Gateways
NAT Gateways enable instances in private VPC subnets to initiate communication with the Internet (and receive responses), but prevents connections to be initiated from the Internet. Traffic bound to the Internet from instances in private subnets should be directed to a NAT gateway (through the use of route tables), which will translate the source address to its own Elastic IP and route it to the Internet. The destination will send a response back to the Elastic IP (i.e., the NAT gateway), where the address translation will be reversed and delivered to the originating private IP.
NAT Gateways should be created in public VPC subnets, and have an Elastic IP associated. Private VPC subnets should have its route table manually updated to direct Internet-bound traffic to a NAT gateway.
3.15.3 - VPC Security Concepts
VPC Security Concepts
This section discusses VPC security concepts and terminology.
3.15.3.1 - Security Groups
A security group is a mechanism that allows you to control inbound and outbound traffic for your VPC. A security group has rules that specify what kinds of traffic are allowed in and out of instances (VMs) running in your VPC.
A VPC comes with a default security group that allows inbound traffic from other instances assigned to the same security group, and allows all outbound traffic. You can change the rules for the default security group, but you can’t delete it.
If you don’t specify a security group when you launch an instance in your VPC, the instance will be associated with the default security group.
4 - Identity and Access Management (IAM) Guide
Identity and Access Management (IAM) Guide
This section contains concepts and tasks to help you securely control access to services and resources for your Eucalyptus cloud users.
4.1 - IAM Overview
Welcome to the IAM Guide. IAM is an acronymn for Identity Access Management. IAM is used for account management where a cloud administrator establishs accounts, users and their identities. You can do many things with IAM, including:
- Create and manage IAM users and groups
- Set quotas
- Establish access policies
- Create and manage roles
This document is intended to be a reference. You do not need to read it in order, unless you are following the directions for a particular task.
4.2 - Work with IAM
The Eucalyptus IAM design provides more layers in the hierarchical organization of user identities, and more refined control over resource access. This complies with the Amazon AWS IAM service. There are a few Eucalyptus-specific extensions to meet the needs of enterprise customers. The IAM service is a global service, meaning a user can interact with any region using the same credentials, subjected to the same policies, and having uniformly accessible and structured principals (accounts, users, groups, roles, etc.)
4.3 - Manage Identities Overview
Like IAM, the user identities in Eucalyptus are organized into Accounts. An account is the unit of resource usage accounting, and also a separate name space for many resources, for example, security groups, key pairs, users, and so on. Unique ID (UUID) or a unique name identifies an account. The account name is equivalent to IAM’s account alias. In Eucalyptus, the account name is used to manipulate accounts in most cases. However, to be compatible with AWS, the EC2 commands often use account ID to display resource ownership. There are command line tools to discover the correspondence of account ID with the account name. For example, lists all the accounts with both their IDs and names.
 An account can have multiple users, but a user can only be in one account. Within an account, users can be associated with Groups. A Group is used to attach access permissions to multiple users. A user can be associated with multiple groups. Because an account is a separate name space, user names and group names have to be unique only within an account. Therefore, user X in account A and user X in account B are two different identities. Both users and groups are identified by their names, which are unique within an account (they also have UUIDs, but rarely used).
4.4 - Authentication and Access Control Best Practices
This topic describes best practices for Identity and Access Management and the account.
Identity and Access Management
Eucalyptus manages access control through an authentication, authorization, and accounting system. This system manages user identities, enforces access controls over resources, and provides reporting on resource usage as a basis for auditing and managing cloud activities. The user identity organizational model and the scheme of authorizations used to access resources are based on and compatible with the AWS Identity and Access Management (IAM) system, with some Eucalyptus extensions provided that support ease-of-use in a private cloud environment.
For a general introduction to IAM in Eucalyptus, see Access Concepts in the IAM Guide. For information about using IAM quotas to enforce limits on resource usage by users and accounts in Eucalyptus, see the Quotas section in the IAM Guide.
The Amazon Web Services IAM Best Practices are also generally applicable to Eucalyptus.
Credential Management
Protection and careful management of user credentials (passwords, access keys, X.509 certificates, and key pairs) is critical to cloud security. When dealing with credentials, we recommend:
- Limit the number of active credentials and do not create more credentials than needed.
- Only create users and credentials for the interfaces that you will actually use. For example, if a user is only going to use the Management Console, do not create credentials access keys for that user.
- Use and or to get a specific set of credentials if needed.
- Regularly check for active credentials using commands and remove unused credentials. Ideally, only one pair of active credentials should be available at any time.
- Rotate credentials regularly and delete old credentials as soon as possible. Credentials can be created and deleted using commands, such as and .
- When rotating credentials, there is an option to deactivate, instead of removing, existing access/secret keys and X.509 certificates. Requests made using deactivated credentials will not be accepted, but the credentials remain in the Eucalyptus database and can be restored if needed. You can deactivate credentials using and .
Privileged Roles
The eucalyptus account is a super-privileged account in Eucalyptus. It has access to all cloud resources, cloud setup, and management. The users within this account do not obey IAM policies and compromised credentials can result in a complete cloud compromisation that is not easy to contain. We recommend limiting the use of this account and associated users’ credentials as much as possible.
For all unprivileged operations, use regular accounts. If you require super-privileged access (for example, management of resources across accounts and cloud setup administration), we recommend that you use one of the predefined privileged roles.
The Account, Infrastructure, and Resource Administrator roles provide a more secure way to gain super privileges in the cloud. Credentials returned by an assume-role operation are short-lived (unlike regular user credentials). Privileges available to each role are limited in scope and can be revoked easily by modifying the trust or access policy for the role.
4.5 - Manage Users and Groups
Manage Users and Groups
Eucalyptus IAM supports user, group, and role based access controls and STS (Security Token Service) for temporary credentials.
4.5.1 - Access Overview
Access Overview
The Eucalyptus design of user identity and access management provides layers in the organization of user identities. This gives you refined control over resource access. Though compatible with the AWS IAM, there are also a few Eucalyptus-specific extensions.
4.5.1.1 - Access Concepts
Access Concepts
This section describes what Eucalyptus access is and what you need to know about it so that you can configure access to your cloud.
4.5.1.1.1 - User Identities
In Eucalyptus, user identities are organized into accounts. An account is the unit of resource usage accounting, and also a separate namespace for many resources (security groups, key pairs, users, etc.).Accounts are identified by either a unique ID (UUID) or a unique name. The account name is like IAM’s account alias. It is used to manipulate accounts. However, for AWS compatibility, the EC2 commands often use account ID to display resource ownership.
There are command line tools to discover the correspondence of account ID and account name. For example, euare-accountlist lists all the accounts with both their IDs and names.
An account can have multiple users, but a user can only be in one account. Within an account, users can be associated with Groups. Group is used to attach access permissions to multiple users. A user can be associated with multiple groups. Because an account is a separate name space, user names and group names have to be unique only within an account. Therefore, user X in account A and user X in account B are two different identities.
Both users and groups are identified by their names, which are unique within an account (they also have UUIDs, but are rarely used).
4.5.1.1.2 - Special Identities
Eucalyptus has two special identities for the convenience of administration and use of the system.
- The account: Each user in the eucalyptus account has unrestricted access to all of the cloud’s resources, similar to the superuser on a typical Linux system. These users are often referred to as system administrators or cloud administrators. This account is automatically created when the system starts for the first time. You cannot remove the eucalyptus account from the system.
- The user of an account: Each account, including the eucalyptus account, has a user named admin. This user is created automatically by the system when an account is created. The admin of an account has full access to the resources owned by the account. You can not remove the admin user from an account. The admin can delegate resource access to other users in the account by using policies.
4.5.1.1.3 - Credentials
This topic describes the different types of credentials used by Eucalyptus.Each user has a unique set of credentials. These credentials are used to authenticate access to resources. There are three types of credentials:
- An is used to authenticate requests to the SOAP API service.
- A is used to authenticate requests to the REST API service.
You can manage credentials using the command line tools (the
euare- commands).
In IAM, each account has its own credentials. In Eucalyptus, the equivalent of account credentials are the credentials of admin user of the account.
4.5.1.1.4 - Account Creation
This topic describes the process for creating an account using the command line tool.You must be a cloud administrator to use this command. Accounts created are available for immediate access.
To create an account, run the following command:
euare-accountcreate -a account_name
When an account is created by euare-accountcreate command, an “admin” user is created by default.
Note
Note the following security considerations of the “admin” user when an account is initially created:Note
Eucalyptus has discontinued account registration status retrieval, however, for compatibility with older versions of Eucalyptus, the ability to view and manipulate registration status is limited to the system administrator through Euca2ools. For more information about the command line tools, see the .4.5.1.1.5 - Special User Attributes
Eucalyptus extends the IAM model by providing the following extra attributes for a user.
- This is only meaningful for the account administrator (that is, the account level).
- . Use this attribute to temporarily disable a user.
- Add any name-value pair to a user’s custom information attribute. This is useful for attaching pure text information, like an address, phone number, or department.
You can retrieve and modify the registration status, enabled status, and password expiration date using the
euare-usergetattributes and euare-usermod commands. You can retrieve and modify custom information using euare-usergetinfo and euare-userupdateinfo commands.
4.5.1.1.6 - Roles
A role A role is a mechanism that enables the delegation of access to users or applications.
A role is associated with an account, and has a set of permissions associated with it that are defined in the form of an IAM policy . A policy specifies a set of actions and resources within that account that the role is allowed to access.
Note
For more information on policies, see Policy Overview.By assuming a role, a user or an applications gets a set of permissions associated with that role. When a role is assumed, the Eucalyptus STS service returns a set of temporary security credentials that can then be used to make programmatic requests to resources in your account. This eliminates the need to share or hardcode security credentials with applications that need access to resources in your cloud.
Eucalyptus roles are managed through the Eucalyptus Euare service, which is compatible with Amazon’s Identity and Access Management service. For more information on IAM and roles, please see the Amazon IAM User Guide .
Usage Scenarios for Roles
There are several scenarios in which roles can be useful, including:
Applications
Applications running on instances in your Eucalyptus cloud will often need access to other resources in your cloud. Instead of creating AWS credentials for each application, or distributing your own credentials,, you can use roles to enable you to delegate permission to the application to make API requests. For more information, see Launch an Instance with a Role .
Account Delegation
You can use roles to allow one account to access resources owned by another account. IAM Roles under the ’eucalyptus’ account can be assumed by users under ’non-eucalyptus’ account(s). For example, if you had an ‘infrastructure auditing’ account, and an audit was needed to be performed on all the cloud resources used on the cloud, a user could assume the ‘Resource Administrator’ role and audit all the resources used by all the accounts on the cloud. For more information on IAM account delegation, see Using Roles to Delegate Permissions and Federate Identities . Also, go to the walkthrough provided in the AWS Identity and Access Management section of the AWS documentation.
Pre-Defined Roles
Eucalyptus offers a number of pre-defined privileged roles. These roles are associated with the eucalyptus account, and have privileges to manage resources across the cloud and non-privileged accounts. Only the eucalyptus account can manage or modify these roles.
To see the pre-defined roles, use euare-rolelistbypath with the credentials of a user that is part of the eucalyptus account. For example:
# euare-rolelistbypath
arn:aws:iam::944786667073:role/eucalyptus/AccountAdministrator
arn:aws:iam::944786667073:role/eucalyptus/InfrastructureAdministrator
arn:aws:iam::944786667073:role/eucalyptus/ResourceAdministrator
Account Administrator
The Account Administrator (AA) can manage Eucalyptus accounts. To view the policy associated with the Account Administrator role, use euare-rolelistpolicies with the credentials of a user that is part of the eucalyptus account. For example:
# euare-rolelistpolicies --role-name AccountAdministrator --verbose
AccountAdministrator
{
"Statement":[ {
"Effect": "Allow",
"Action": [
"iam:*"
],
"NotResource": "arn:aws:iam::eucalyptus:*",
"Condition": {
"Bool": { "iam:SystemAccount": "false" }
}
} ]
}
IsTruncated: false
Resource Administrator
The Resource Administrator (RA) can manage AWS-defined resources (such as S3 objects, instances, users, etc) across accounts. To view the policy associated with the Resource Administrator role, use euare-rolelistpolicies with the credentials of a user that is part of the eucalyptus account. For example:
# euare-rolelistpolicies --role-name ResourceAdministrator --verbose
ResourceAdministrator
{
"Statement":[ {
"Effect": "Allow",
"Action": [
"autoscaling:*",
"cloudwatch:*",
"ec2:DescribeInstanceAttribute",
"ec2:DescribeInstances",
"ec2:DescribeInstanceStatus",
"ec2:DescribeInstanceTypes",
"ec2:GetConsoleOutput",
"ec2:GetPasswordData",
"ec2:ImportInstance",
"ec2:ModifyInstanceAttribute",
"ec2:MonitorInstances",
"ec2:RebootInstances",
"ec2:ReportInstanceStatus",
"ec2:ResetInstanceAttribute",
"ec2:RunInstances",
"ec2:StartInstances",
"ec2:StopInstances",
"ec2:TerminateInstances",
"ec2:UnmonitorInstances",
"ec2:*AccountAttributes*",
"ec2:*Address*",
"ec2:*AvailabilityZones*",
"ec2:*Bundle*",
"ec2:*ConversionTask*",
"ec2:*CustomerGateway*",
"ec2:*DhcpOptions*",
"ec2:*ExportTask*",
"ec2:*Image*",
"ec2:*InternetGateway*",
"ec2:*KeyPair*",
"ec2:*NetworkAcl*",
"ec2:*NetworkInterface*",
"ec2:*PlacementGroup*",
"ec2:*ProductInstance*",
"ec2:*Region*",
"ec2:*ReservedInstance*",
"ec2:*Route*",
"ec2:*SecurityGroup*",
"ec2:*Snapshot*",
"ec2:*SpotDatafeedSubscription*",
"ec2:*SpotInstance*",
"ec2:*SpotPrice*",
"ec2:*Subnet*",
"ec2:*Tag*",
"ec2:*Volume*",
"ec2:*Vpc*",
"ec2:*Vpn*",
"ec2:*VpnGateway*",
"elasticloadbalancing:*",
"s3:*"
],
"Resource": "*"
}, {
"Effect": "Allow",
"Action": [
"iam:Get*",
"iam:List*"
],
"NotResource": "arn:aws:iam::eucalyptus:*"
} ]
}
IsTruncated: false
Infrastructure Administrator
The Infrastructre Administrator (IA) can perform operations related to cloud setup and management. Typical responibilities include:
Installation and configuration (prepare environment, install Eucalyptus, configure Eucalyptus)
Monitoring and maintenance (infrastructure supporting the cloud, cloud management layer, upgrades, security patches, diagnostics and troubleshooting)
Backup and restoration
To view the policy associated with the Infrastructure Administrator role, use euare-rolelistpolicies with the credentials of a user that is part of the eucalyptus account. For example:
euare-rolelistpolicies –role-name InfrastructureAdministrator –verbose
InfrastructureAdministrator
{
“Statement”:[ {
“Effect”: “Allow”,
“Action”: [
“euprop:”,
“euserv:”,
“euconfig:”,
“ec2:MigrateInstances”
],
“Resource”: “”
} ]
}
IsTruncated: false
4.5.1.2 - Policy Overview
Policy Overview
Eucalyptus uses the policy language to specify user level permissions as AWS IAM. Policies are written in JSON. Each policy file can contain multiple statements, each specifying a permission.A permission statement specifies whether to allow or deny a list of actions to be performed on a list of resources, under specific conditions.
A permission statement has the following components:
- Begins the decision that applies to all following components. Either: or
- Indicates service-specific and case-sensitive commands. For example:
- Indicates selected resources, each specified as an Amazon resource name (ARN). For example:
- Indicates additional constraints of the permission. For example:
The following policy example contains a statement that gives a user with full permission. This is the same access as the account administrator:
{
"Version":"2011-04-01",
"Statement":[{
"Sid":"1",
"Effect":"Allow",
"Action":"*",
"Resource":"*"
}]
}
For more information about policy language, go to the IAM User Guide .
Policy Notes
You can combine IAM policies with account level permissions. For example, the admin of account A can give users in account B permission to launch one of account A’s images by changing the image attributes. Then the admin of account B can use IAM policy to designate the users who can actually use the shared images.
You can attach IAM policies to both users and groups. When attached to groups, a policy is equivalent to attaching the same policy to the users within that group. Therefore, a user might have multiple policies attached, both policies attached to the user, and policies attached to the group that the user belongs to.
Do not attach IAM policies (except quota policies, a Eucalyptus extension) to account admins. At this point, doing so won’t result in a failure but may have unexpected consequences.
4.5.1.2.1 - Default Permissions
Different identities have different default access permissions. When no policy is associated with them, these identities have the permission listed in the following table.
| Identity | Permission |
|---|
| System admin | Access to all resources in the system |
| Account admin | Access to all account resources, including those shared resources from other accounts like public images and shared snapshots |
| Regular user | No access to any resource |
4.5.1.2.2 - Quotas
Eucalyptus adds quota enforcement to resource usage. To avoid introducing another configuration language into Eucalyptus, and simplify the management, we extend the IAM policy language to support quotas.The only addition added to the language is the new limit effect. If a policy statement’s effect is limit , it is a quota statement.
A quota statement also has action and resource fields. You can use these fields to match specific requests, for example, quota only being checked on matched requests. The actual quota type and value are specified using special quota keys, and listed in the condition part of the statement. Only condition type NumericLessThanEquals can be used with quota keys.
Note
An account can only have a quota policy. Accounts can only accept IAM policies where Effect is “Deny” or “Limit”. If you attach an IAM policy to an account where the Effect is “Allow”, you will get unexpected results.The following quota policy statement limits the attached user to only launch a maximum of 16 instances in an account.
{
"Version":"2011-04-01",
"Statement":[{
"Sid":"4",
"Effect":"Limit",
"Action":"ec2:RunInstances",
"Resource":"*",
"Condition":{
“NumericLessThanEquals”:{
“ec2:quota-vminstancenumber”:”16”
}
}
}]
}
You can attach quotas to both users and accounts, although some of the quotas only apply to accounts. Quota attached to groups will take no effect.
When a quota policy is attached to an account, it actually is attached to the account administrator user. Since only system administrator can specify account quotas, the account administrator can only inspect quotas but can’t change the quotas attached to herself.
The following is all the quota keys implemented in Eucalyptus:
| Quota Key | Description | Applies to |
|---|
| autoscaling:quota-autoscalinggroupnumber | The number of Autoscaling Groups | account and user |
| autoscaling:quota-launchconfigurationnumber | Number of Autoscaling Group Launch Configurations | account and user |
| autoscaling:quota-scalingpolicynumber | Number of Autoscaling Group Scaling Policies | account and user |
| cloudformation:quota-stacknumber | Number of Cloudformation stacks allowed to create | account |
| ec2:quota-addressnumber | Number of elastic IPs | account and user |
| ec2:quota-cputotalsize | Number of Total CPUs Used by EC2 Instances | account and user |
| ec2:quota-disktotalsize | Number of Total Disk Space (in GB) of EC2 Instances | account and user |
| ec2:quota-imagenumber | Number of EC2 images | account and user |
| ec2:quota-internetgatewaynumber | Number of EC2 VPC Internet Gateways | account and user |
| ec2:quota-memorytotalsize | Number of Total Amount of Memory Used by EC2 Instances | account and user |
| ec2:quota-securitygroupnumber | Number of EC2 security groups | account and user |
| ec2:quota-snapshotnumber | Number of EC2 snapshots | account and user |
| ec2:quota-vminstancenumber | Number of EC2 instances | account and user |
| ec2:quota-vminstanceactivenumber | Number of EC2 Instances Using Node Resources (pending, running, shutting-down, etc.) | account and user |
| ec2:quota-volumenumber | Number of EC2 volumes | account and user |
| ec2:quota-volumetotalsize | Number of total volume size, in GB | account and user |
| ec2:quota-vpcnumber | Number of EC2 VPCs | account and user |
| elasticloadbalancing:quota-loadbalancernumber | Number of Elastic Load Balancers | account |
| iam:quota-groupnumber | Number of IAM groups | account |
| iam:quota-instanceprofilenumber | Number of IAM Instance Profiles | account and user |
| iam:quota-rolenumber | Number of IAM Roles | account and user |
| iam:quota-servercertificatenumber | Number of IAM Server Certificates | account and user |
| iam:quota-usernumber | Number of IAM users | account |
| s3:quota-bucketnumber | Number of S3 buckets | account and user |
| s3:quota-bucketobjectnumber | Number of objects in each bucket | account and user |
| s3:quota-bucketsize | Size of bucket, in MB | account and user |
| s3:quota-buckettotalsize | total size of all buckets, in MB | account and user |
Default Quota
Contrary to IAM policies, by default, there is no quota limits (except the hard system limit) on any resource allocations for a user or an account. Also, system administrators are not constrained by any quota. Account administrators are only be constrained by account quota.
4.5.1.2.3 - Algorithms
This topic describes the algorithms used by Eucalyptus to determine access.
Policy Evaluation Algorithm
You can associated multiple policies and permission statements with a user. The way these are combined together to control the access to resources in an account is defined by the policy evaluation algorithm. Eucalyptus implements the same policy evaluation algorithm as AWS IAM :
- If the request user is account admin, access is allowed.
- Otherwise, collect all the policy statements associated with the request user (attached to the user and all the groups the user belongs to), which match the incoming request (i.e. based on the API being invoked and the resources it is going to access).
Access Evaluation Algorithm
Now we give the overall access evaluation combining both account level permissions and IAM permissions, which decides whether a request is accepted by Eucalyptus:
- If the request user is sys admin, access is allowed.
- Otherwise, check account level permissions, e.g. image launch permission, to see if the request user’s account has access to the specific resources.
Quota Evaluation Algorithm
Like the normal IAM policies, a user may be associated with multiple quota policies (and multiple quota statements). How all the quota policies are combined to take effect is defined by the quota evaluation algorithm:
- If the request user is sys admin, there is no limit on resource usage.
- Otherwise, collect all the quotas associated with the request user, including those attached to the request user’s account and those attached to the request user himself/herself (for account admin, we only need collect account quotas).
- Evaluate each quota one by one. Reject the request as long as there is one quota being exceeded by the request. Otherwise, accept the request.
Note
The hard limits on some resources override quota limits. For example, (system property) overrides the (quota key).4.5.1.2.4 - Sample Policies
A few example use cases and associated policies.Here are some example use cases and associated polices. You can edit these polices for your use, or use them as examples of JSON syntax and form.
Note
For more information about JSON syntax used with AWS resources, go to .Examples: Allowing Specific Actions
The following policy allows a user to only run instances and describe things.
{
"Statement":[{
"Effect":"Allow",
"Action":["ec2:*Describe*","ec2:*Run*"],
"Resource":"*",
}
]
}
The following policy allows a user to only list things:
{
"Statement": [
{
"Sid": "Stmt1313686153864",
"Action": [
"iam:List*"
],
"Effect": "Allow",
"Resource": "*"
}
]
}
The following policy grants a generic basic user permission for running instances and describing things.
{
"Statement": [
{
"Sid": "Stmt1313605116084",
"Action": [
"ec2:AllocateAddress",
"ec2:AssociateAddress",
"ec2:AttachVolume",
"ec2:Authorize*",
"ec2:CreateKeyPair",
"ec2:CreateSecurityGroup",
"ec2:CreateSnapshot",
"ec2:CreateVolume",
"ec2:DeleteKeyPair",
"ec2:DeleteSecurityGroup",
"ec2:DeleteSnapshot",
"ec2:DeleteVolume",
"ec2:Describe*",
"ec2:DetachVolume",
"ec2:DisassociateAddress",
"ec2:GetConsoleOutput",
"ec2:RunInstances",
"ec2:TerminateInstances"
"ec2:ReleaseAddress"
],
"Effect": "Allow",
"Resource": "*"
}
]
}
Examples: Denying Specific Actions
The following policy allows a user to do anything but delete.
{
"Statement": [
{
"Action": [
"ec2:Delete*"
],
"Effect": "Deny",
"Resource": "*"
}
]
}
The following policy denies a user from creating other users.
{
"Statement": [
{
"Sid": "Stmt1313686153864",
"Action": [
"iam:CreateUser"
],
"Effect": "Deny",
"Resource": "*"
}
]
}
Examples: Specifying Time Limits
The following policy allows a user to run instances within a specific time.
{
"Statement": [
{
"Sid": "Stmt1313453084396",
"Action": [
"ec2:RunInstances"
],
"Effect": "Allow",
"Resource": "*",
"Condition": {
"DateLessThanEquals": {
"aws:CurrentTime": "2011-08-16T00:00:00Z"
}
}
}
]
}
The following policy blocks users from running instances at a specific time.
{
"Statement": [
{
"Sid": "Stmt1313453084396",
"Action": [
"ec2:RunInstances"
],
"Effect": "Allow",
"Resource": "*",
"Condition": {
"DateLessThanEquals": {
"aws:CurrentTime": "2011-08-16T00:00:00Z"
}
}
}
]
}
The following policy keeps alive an instance for 1,000 hours (60,000 minutes).
{
"Statement": [
{
"Action": ["ec2:RunInstances" ],
"Effect": "Allow",
"Resource": "*",
"Condition": { "NumericEquals":{"ec2:KeepAlive":"60000"}}
}
]
}
The following policy sets an expiration date on running instances.
{
"Statement": [
{
"Action": ["ec2:RunInstances" ],
"Effect": "Allow",
"Resource": "*",
"Condition": { "DateEquals":{"ec2:ExpirationTime":"2011-08-16T00:00:00Z"}}
}
]
}
Examples: Restricting Resources
The following policy allows users to only launch instances with a large image type.
{
"Statement": [
{
"Action": [
"ec2:RunInstances"
],
"Effect": "Allow",
"Resource": "arn:aws:ec2:::vmtype/m1.xlarge"
}
]
}
The following policy restricts users from launching instances with a specific image ID.
{
"Statement": [
{
"Action": [
"ec2:RunInstances"
],
"Effect": "Deny",
"Resource": "arn:aws:ec2:::image/emi-0FFF1874"
}
]
}
The following policy restricts users from allocating addresses to a specific elastic IP address.
{
"Statement": [
{
"Sid": "Stmt1313626078249",
"Action": "*",
"Effect": "Deny",
"Resource": "arn:aws:ec2:::address/192.168.10.140"
}
]
}
The following policy denies volume access.
{
"Statement": [
{
"Action": [
"ec2:*"
],
"Effect": "Deny",
"Resource": "arn:aws:ec2:::volume/*"
}
]
}
Note
For policies attached to an account, quota limits can be specified. See the Quotas section for further details.4.5.2 - Access Tasks
Access Tasks
This section provides details about the tasks you perform using policies and identities. The tasks you can perform are divided up into tasks for users, tasks for groups, and tasks for policies.
4.5.2.1 - Use Case: Create an Administrator
This use case details tasks for creating an administrator. These tasks require that you have your account credentials for sending requests to Eucalyptus using the command line interface (CLI) tools. To create an administrator account, perform the following tasks.
Create an Admin Group
Eucalyptus recommends using account credentials as little as possible. You can avoid using account credentials by creating a group of users with administrative privileges.
Create a group called administrators.
euare-groupcreate -g administrators
Verify that the group was created.
euare-grouplistbypath
Eucalyptus returns a listing of the groups that have been created, as in the following example.
arn:aws:iam::123456789012:group/administrators
Add a Policy to the Group
Add a policy to the administrators group that allows its members to perform all actions in Eucalyptus.
Enter the following command to create a policy called admin-root that grants all actions on all resources to all users in the administrators group:
euare-groupaddpolicy -p admin-root -g administrators -e Allow -a "*" -r "*" -o
Create an Administrative User
Create a user for day-to-day administrative work and add that user to the administrators group.
Eucalyptus admin tools and Euca2ools commands need configuration from ~/.euca . If the directory does not yet exist, create it:
mkdir ~/.euca
Create an administrative user, for example alice and create it along with an access key:
euare-usercreate -wd DOMAIN USER >~/.euca/FILE.ini
where:
means output access keys and region information in a euca2ools.ini type configuration file.
DOMAIN is the DNS domain to use for region information in configuration file output (default: based on IAM URL).
USER is the name of the new admin user: alice.
FILE can be anything; we recommend a descriptive name that includes the user’s name; for example:
euare-usercreate -wd DNS_DOMAIN alice >~/.euca/alice.ini
This creates a user admin file with a region name that matches that of your cloud’s DNS domain.
Add the new admin user to the administrators group.
euare-groupadduser -u alice administrators
To list the new user’s access keys:
euare-userlistkeys --region alice@DNS_DOMAIN
4.5.2.2 - Use Case: Create a User
This use case details tasks needed to create a user with limited access.
Create a Group
We recommend that you apply permissions to groups, not users. In this example, we will create a group for users with limited access.
Enter the following command to create a group for users who will be allowed create snapshots of volumes in Eucalyptus.
euare-groupcreate -g ebs-backup
Open an editor and enter the following JSON policy:
{
"Statement": [
{
"Action": [
"ec2:CreateSnapshot"
],
"Effect": "Allow",
"Resource": "*"
}
]
}
Save and close the file. Enter the following to add the new policy name allow-snapshot and the JSON policy file to the ebs-backup group:
euare-groupuploadpolicy -g ebs-backup -p allow-snapshot -f allow-snapshot.json
Create the User
Create the user for the group with limited access.
Enter the following command to create the user sam in the group ebs-backup and generate a new key pair for the user:
euare-usercreate -u sam -g ebs-backup -k
Eucalyptus responds with the access key ID and the secret key, as in the following example:
AKIAJ25S6IJ5K53Y5GCA
QLKyiCpfjWAvlo9pWqWCbuGB9L3T61w7nYYF057l
4.5.2.3 - Accounts
Accounts
Accounts are the primary unit for resource usage accounting. Each account is a separate name space and is identified by its account number (fixed) and account alias/name (modifiable). Tasks performed at the account level can only be done by the users in the eucalyptus account.
4.5.2.3.1 - Add an Account
To add an account perform the steps listed in this topic.To add a new account:
Enter the following command:
euare-accountcreate -a <account_name>
Eucalyptus returns the account name and its ID, as in this example:
account01 592459037010
4.5.2.3.2 - Rename an Account
To rename an account perform the steps listed in this topic.To change an account’s name:
Enter the following command:
uare-accountaliascreate -a <new_name>
4.5.2.3.3 - List Accounts
To list accounts perform the steps in this topic.Use the euare-accountlist command to list all the accounts in an account or to list all the users with a particular path prefix. The output lists the ARN for each resulting user.
euare-userlistbypath -p <path>
4.5.2.3.4 - Delete an Account
To delete an account perform the steps listed in this topic.
Note
If there are resources tied to the account that you delete, the resources remain. We recommend that you delete these resources first.Enter the following command:
euare-accountdel -a <account_name> -r true
Use the -r option set to true to delete the account recursively. You don’t have to use this option if have already deleted users, keys, and passwords in this account.
Eucalyptus does not return any message.
4.5.2.4 - Groups
Groups
Groups are used to share resource access authorizations among a set of users within an account. Users can belong to multiple groups.
Note
A group in the context of access is not the same as a security group.This section details tasks that can be performed on groups.
4.5.2.4.1 - Create a Group
To create a group perform the steps listed in this topic.Enter the following command:
euare-groupcreate -g <group_name>
Eucalyptus does not return anything.
4.5.2.4.2 - Add a Group Policy
To add a group policy perform the steps listed in this topic.Enter the following command:
euare-groupaddpolicy -g <group_name> -p <policy_name> -e <effect> -a
<actions> -o
The optional -o parameter tells Eucalyptus to return the JSON policy, as in this example:
{"Version":"2008-10-17","Statement":[{"Effect":"Allow", "Action":["ec2:RunInstances"], "Resource":["*"]}]}
4.5.2.4.3 - Modify a Group
To modify a group perform the steps listed in this topic.Modifying a group is similar to a “move” operation. Whoever wants to modify the group must have permission to do it on both sides of the move. That is, you need permission to remove the group from its current path or name, and put that group in the new path or name.
For example, if a group changes from one area in a company to another, you can change the group’s path from /area_abc/ to /area_efg/ . You need permission to remove the group from /area_abc/ . You also need permission to put the group into /area_efg/ . This means you need permission to call UpdateGroup on both arn:aws:iam::123456789012:group/area_abc/* and arn:aws:iam::123456789012:group/area_efg/* .
Enter the following command to modify the group’s name:
euare-groupmod -g <group_name> --new-group-name <new_name>
Eucalyptus does not return a message. Enter the following command to modify a group’s path:
euare-groupmod -g <group_name> -p <new_path>
Eucalyptus does not return a message.
4.5.2.4.4 - Remove a User from a Group
To remove a user from a group perform the steps listed in this topic.Enter the following command:
euare-groupremoveuser -g <group_name> -u <user-name>
4.5.2.4.5 - List Groups
To list groups perform the steps listed in this topic.Enter the following command:
euare-grouplistbypath
Eucalyptus returns a list of paths followed by the ARNs for the groups in each path. For example:
arn:aws:iam::eucalyptus:group/groupa
4.5.2.4.6 - List Policies for a Group
To list policies for a group perform the steps listed in this topic.Enter the following command:
euare-grouplistpolicies -g <group_name>
Eucalyptus returns a listing of all policies associated with the group.
4.5.2.4.7 - Delete a Group
To delete a group perform the steps listed in this topic.When you delete a group, you have to remove users from the group and delete any policies from the group. You can do this with one command, using the euare-groupdel command with the -r option. Or you can follow the following steps to specify who and what you want to delete.
Individually remove all users from the group.
euare-groupremoveuser -g <group_name> -u <user_name>
Delete the policies attached to the group.
euare-groupdelpolicy -g <group_name> -p <policy_name>
Delete the group.
euare-groupdel -g <group_name>
The group is now deleted.
4.5.2.5 - Users
Users
Users are subsets of accounts and are added to accounts by an appropriately credentialed administrator. While the term user typically refers to a specific person, in Eucalyptus, a user is defined by a specific set of credentials generated to enable access to a given account. Each set of user credentials is valid for accessing only the account for which they were created. Thus a user only has access to one account within a Eucalyptus system. If an individual person wishes to have access to more than one account within a Eucalyptus system, a separate set of credentials must be generated (in effect a new ‘user’) for each account (though the same username and password can be used for different accounts).
When you need to add a new user to your Eucalyptus cloud, you’ll go through the following process:
- Create a user
- Add user to a group
- Give user a login profile
4.5.2.5.1 - Add a User
To add a user, perform the steps in this topic.Enter the following command
euare-usercreate -u <user_name> -g <group_name> -k
Eucalyptus does not return a response.
Note
If you include the parameter, Eucalyptus returns a response that includes the user’s ARN and GUID.4.5.2.5.2 - Add a User to a Group
To add a user to a group perform the steps listed in this topic.Enter the following command:
euare-groupadduser -g <group_name> -u <user-name>
4.5.2.5.3 - Create a Login Profile
To create a login profile, perform the tasks in this topic.Enter the following command:
euare-useraddloginprofile -u <user_name> -p <password>
Eucalyptus does not return a response.
4.5.2.5.4 - Generating User Credentials
The first time you get credentials using the clcadmin-assume-system-credentials command, a new secret access key is generated. On each subsequent request to get credentials, an existing active secret key is returned. You can also generate new keys using the euare-useraddkey command.
Note
Each request to get a user’s credentials generates a new pair of a private key and X.509 certificate..To generate a new key for a user by an account administrator, enter the following
euare-useraddkey USER_NAME
To generate a private key and an X.509 certificate pair, enter the following:
euare-usercreatecert USER_NAME
The cloud administrator can obtain temporary access credentials for any cloud user via the clcadmin-impersonate-user command.
4.5.2.5.5 - Uploading a Certificate
To upload a certificate provided by a user:
Enter the following command:
euare-useraddcert -f CERT_FILE USER_NAME
4.5.2.5.6 - Modify a User
Modifying a user is similar to a “move” operation. To modify a user, you need permission to remove the user from the current path or name, and put that user in the new path or name.For example, if a user changes from one team in a company to another, you can change the user’s path from /team_abc/ to /team_efg/ . You need permission to remove the user from /team_abc/ . You also need permission to put the user into /team_efg/ . This means you need permission to call UpdateUser on both arn:aws:iam::123456789012:user/team_abc/* and arn:aws:iam::123456789012:user/team_efg/* .
To rename a user:
Enter the following command to rename a user:
euare-usermod -u <user_name> --new-user-name <new_name>
Eucalyptus does not return a message. Enter the following command:
euare-groupmod -u <user_name> -p <new_path>
Eucalyptus does not return a message.
4.5.2.5.7 - List Users
To list users within a path, perform the steps in this topic.Use the euare-userlistbypath command to list all the users in an account or to list all the users with a particular path prefix. The output lists the ARN for each resulting user.
euare-userlistbypath -p <path>
4.5.2.5.8 - Delete a User
To delete a user, perform the tasks in this topic.Enter the following command
euare-userdel -u <user_name>
Eucalyptus does not return a response.
4.5.2.6 - Roles
Roles
A role is a mechanism that allows applications to request temporary security credentials on a user or application’s behalf.
Note
Eucalyptus roles are managed through the Eucalyptus Euare service, which is compatible with Amazon’s Identity and Access Management (IAM) service.4.5.2.6.1 - Launch an Instance with a Role
To create a role for a Eucalyptus instance, you must first create a trust policy that you can use for it.
Create Trust Policy
You can create trust policies in two ways:
- a file method
- a command line method
Create trust policy using a file
Create a trust policy file with the contents below and save it in a text file called role-trust-policy.json :
{
"Version": "2012-10-17",
"Statement": [
{
"Effect": "Allow",
"Principal": { "Service": "ec2.amazonaws.com"},
"Action": "sts:AssumeRole"
}
]
}
Create the role using the euare-rolecreate command, specifying the trust policy file that was previously created:
# euare-rolecreate --role-name describe-instances -f role-trust-policy.json
# euare-rolelistbypath
arn:aws:iam::408396244283:role/describe-instances
Proceed with applying an access policy to a role.
Create trust policy using the command line
The other way to create the role is to use the command line options to specify the trust policy:Issue the following string on the command line:
# euare-rolecreate --role-name describe-instances --service http://compute.acme.eucalyptus-systems.com:8773/
# euare-rolelistbypath
arn:aws:iam::408396244283:role/describe-instances
Proceed with applying an access policy to a role.
Create and apply an access policy to a role
Create a policy and save it in a text file with a .json extension. The following example shows a policy that allows listing the contents of an S3 bucket called “mybucket”:
{
"Statement": [
{
"Action": [
"s3:ListBucket"
],
"Effect": "Allow",
"Resource": "arn:aws:s3:::mybucket"
}
]
}
Note
For more information on policies, see .Apply the access policy to the role using the
euare-roleuploadpolicy command, passing in the filename of the policy you created in the previous step:
euare-roleuploadpolicy --role-name mytestrole --policy-name s3-list-bucket --policy-document my-test-policy.json4.5.2.6.2 - Use a Role with an Instance Application
You can use the AWS Java SDK to programmatically perform IAM role-related operations in your Eucalyptus cloud. This example shows how to use the AWS SDK to retrieve the credentials for the IAM role associated with the Eucalyptus instance.The following program lists the contents of the bucket “my-test-bucket” using the credentials stored in the Java system properties:
import com.amazonaws.auth.*;
import com.amazonaws.AmazonClientException;
import com.amazonaws.AmazonServiceException;
import com.amazonaws.auth.AWSCredentialsProvider;
import com.amazonaws.auth.ClasspathPropertiesFileCredentialsProvider;
import com.amazonaws.services.ec2.AmazonEC2;
import com.amazonaws.services.ec2.AmazonEC2Client;
import com.amazonaws.services.s3.*;
import com.amazonaws.services.s3.model.*;
public class MyTestApp {
static AmazonEC2 ec2;
static AmazonS3 s3;
private static void init() throws Exception {
AWSCredentialsProvider credentials = new ClasspathPropertiesFileCredentialsProvider();
s3 = new AmazonS3Client(credentials);
s3.setEndpoint("http://128.0.0.1:8773/services/Walrus");
}
public static void main(String[] args) throws Exception {
init();
try {
String bucketName = "my-test-bucket";
System.out.println("Listing bucket " + bucketName + ":");
ListObjectsRequest listObjectsRequest = new ListObjectsRequest(bucketName, "", "", "", 200);
ObjectListing bucketList;
do {
bucketList = s3.listObjects(listObjectsRequest);
for (S3ObjectSummary objectInfo :
bucketList.getObjectSummaries()) {
System.out.println(" - " + objectInfo.getKey() + " " +
"(size = " + objectInfo.getSize() +
")");
}
listObjectsRequest.setMarker(bucketList.getNextMarker());
} while (bucketList.isTruncated());
} catch (AmazonServiceException eucaServiceException ) {
System.out.println("Exception: " + eucaServiceException.getMessage());
System.out.println("Status Code: " + eucaServiceException.getStatusCode());
System.out.println("Error Code: " + eucaServiceException.getErrorCode());
System.out.println("Request ID: " + eucaServiceException.getRequestId());
} catch (AmazonClientException eucaClientException) {
System.out.println("Error Message: " + eucaClientException.getMessage());
}
System.out.println("===== FINISHED =====");
}
}
This application produces output similar to the following:
Listing bucket my-test-bucket:
- precise-server-cloudimg-amd64-vmlinuz-virtual.manifest.xml (size = 3553)
- precise-server-cloudimg-amd64-vmlinuz-virtual.part.0 (size = 4904032)
- precise-server-cloudimg-amd64.img.manifest.xml (size = 7014)
- precise-server-cloudimg-amd64.img.part.0 (size = 10485760)
- precise-server-cloudimg-amd64.img.part.1 (size = 10485760)
- precise-server-cloudimg-amd64.img.part.10 (size = 10485760)
- precise-server-cloudimg-amd64.img.part.11 (size = 10485760)
- precise-server-cloudimg-amd64.img.part.12 (size = 10485760)
- precise-server-cloudimg-amd64.img.part.13 (size = 10485760)
- precise-server-cloudimg-amd64.img.part.14 (size = 10485760)
- precise-server-cloudimg-amd64.img.part.15 (size = 10485760)
- precise-server-cloudimg-amd64.img.part.16 (size = 10485760)
- precise-server-cloudimg-amd64.img.part.17 (size = 10485760)
- precise-server-cloudimg-amd64.img.part.18 (size = 10485760)
- precise-server-cloudimg-amd64.img.part.19 (size = 10485760)
- precise-server-cloudimg-amd64.img.part.2 (size = 10485760)
- precise-server-cloudimg-amd64.img.part.20 (size = 10485760)
- precise-server-cloudimg-amd64.img.part.21 (size = 10485760)
- precise-server-cloudimg-amd64.img.part.22 (size = 2570400)
- precise-server-cloudimg-amd64.img.part.3 (size = 10485760)
- precise-server-cloudimg-amd64.img.part.4 (size = 10485760)
- precise-server-cloudimg-amd64.img.part.5 (size = 10485760)
- precise-server-cloudimg-amd64.img.part.6 (size = 10485760)
- precise-server-cloudimg-amd64.img.part.7 (size = 10485760)
- precise-server-cloudimg-amd64.img.part.8 (size = 10485760)
- precise-server-cloudimg-amd64.img.part.9 (size = 10485760)
===== FINISHED =====
The problem with this approach is that the credentials are hardcoded into the application - this makes them less secure, and makes the application more difficult to maintain. Using IAM roles is a more secure and easier way to manage credentials for applications that run on Eucalyptus cloud instances.
Create a role with a policy that allows an instance to list the contents of a specific bucket, and then launch an instance with that role (for an example, see Launch an Instance with a Role . An example policy that allows listing of a specific bucket will look similar to the following:
{
"Statement": [
{
"Action": [
"s3:ListBucket"
],
"Effect": "Allow",
"Resource": "arn:aws:s3:::my-test-bucket"
}
]
}
The following line of code retrieves the credentials that are stored in the application’s credentials profile: AWSCredentialsProvider credentials = new ClasspathPropertiesFileCredentialsProvider(); To use the role-based credentials associated with the instance, replace that line of code with the following: AWSCredentialsProvider credentials = new InstanceProfileCredentialsProvider(); The program now looks like this:
import com.amazonaws.auth.*;
import com.amazonaws.AmazonClientException;
import com.amazonaws.AmazonServiceException;
import com.amazonaws.auth.AWSCredentialsProvider;
import com.amazonaws.auth.ClasspathPropertiesFileCredentialsProvider;
import com.amazonaws.services.ec2.AmazonEC2;
import com.amazonaws.services.ec2.AmazonEC2Client;
import com.amazonaws.services.s3.*;
import com.amazonaws.services.s3.model.*;
public class MyTestApp {
static AmazonEC2 ec2;
static AmazonS3 s3;
private static void init() throws Exception {
AWSCredentialsProvider credentials = new InstanceProfileCredentialsProvider();
s3 = new AmazonS3Client(credentials);
s3.setEndpoint("http://128.0.0.1:8773/services/Walrus");
}
public static void main(String[] args) throws Exception {
init();
try {
String bucketName = "my-test-bucket";
System.out.println("Listing bucket " + bucketName + ":");
ListObjectsRequest listObjectsRequest = new ListObjectsRequest(bucketName, "", "", "", 200);
ObjectListing bucketList;
do {
bucketList = s3.listObjects(listObjectsRequest);
for (S3ObjectSummary objectInfo :
bucketList.getObjectSummaries()) {
System.out.println(" - " + objectInfo.getKey() + " " +
"(size = " + objectInfo.getSize() +
")");
}
listObjectsRequest.setMarker(bucketList.getNextMarker());
} while (bucketList.isTruncated());
} catch (AmazonServiceException eucaServiceException ) {
System.out.println("Exception: " + eucaServiceException.getMessage());
System.out.println("Status Code: " + eucaServiceException.getStatusCode());
System.out.println("Error Code: " + eucaServiceException.getErrorCode());
System.out.println("Request ID: " + eucaServiceException.getRequestId());
} catch (AmazonClientException eucaClientException) {
System.out.println("Error Message: " + eucaClientException.getMessage());
}
System.out.println("===== FINISHED =====");
}
}
NOTE: Running this code outside of an instance will result in the following error message:
Listing bucket my-test-bucket:
Error Message: Unable to load credentials from Amazon EC2 metadata service
When the application is running on an instance that was launched with the role you created, the credentials for the role assigned to the instance will be retrieved from the Instance Metadata Service.
4.5.2.6.3 - Assume a Role
A role is assigned a specific set of tasks and permissions. Users may assume a different role than the one they have in order to perform a different set of tasks. For example, the primary administrator is unavailable and the backup administrator is asked to assume the role of the primary administrator during his or her absence. A few points to consider before assuming a role:
- A role must first be set up by an administrator.
- You must log in as an IAM user, not as an account root user.
- Once you assume another role, you temporarily give up your existing user permissions and assume the permissions of your new role.
- When you are no longer assuming another role, your usual user permissions are automatically restored.
Create Role
The scenario described in this section outlines the procedure for creating a role in order to delegate permissions to an IAM user.Create a role that allows users of an account to manage keypairs. Management of keypairs include the following EC2 actions:
CreateKeyPair
DeleteKeyPair
DescribeKeyPairs
ImportKeyPair
Create a role for managing keypairs for the account. In this example, the admin user of ‘devops’ account (001827830003) is creating the role:
cat devops-role-trustpolicy.json
{
“Version”: “2012-10-17”,
“Statement”: [{
“Effect”: “Allow”,
“Principal”: {“AWS”: “arn:aws:iam::001827830003:root”},
“Action”: “sts:AssumeRole”
}]
}
euare-rolecreate -f devops-role-trustpolicy.json devops-ec2-keypair-mgmt-role –region devops-admin@future
Add IAM access policy for keypair management to the role:
# cat keypair-mgmt-policy.json
{
"Version": "2012-10-17",
"Statement": [
{
"Sid": "Stmt1445362739663",
"Action": [
"ec2:CreateKeyPair",
"ec2:DeleteKeyPair",
"ec2:DescribeKeyPairs",
"ec2:ImportKeyPair"
],
"Effect": "Allow",
"Resource": "*"
}
]
}
# euare-roleuploadpolicy --policy-name ec2-keypair-actions --policy-document keypair-mgmt-policy.json devops-ec2-keypair-mgmt-role --region devops-admin@future
Now that the role has been created, follow the AWS IAM best practice of using groups to assign permission to IAM users and attach an IAM access policy to the group to allow any members (example shows ‘user01’ user) to assume the ‘devops-ec2-keypair-mgmt-role’ role:
# euare-groupcreate -g Key-Managers --region devops-admin@future
# euare-groupadduser -u user01 -g Key-Managers --region devops-admin@future
# cat devops-keypair-mgmt-assume-role-policy.json
{
"Version": "2012-10-17",
"Statement": [{
"Effect": "Allow",
"Action": "sts:AssumeRole",
"Resource": "arn:aws:iam::001827830003:role/devops-ec2-keypair-mgmt-role"
}]
}
# euare-groupuploadpolicy -p keypair-mgmt-role-perm -f devops-keypair-mgmt-assume-role-policy.json Key-Managers --region devops-admin@future
Now that members can assume the ‘devops-ec2-keypair-mgmt-role’ role, run the following command to list all keypairs under the account:
# eval `/usr/bin/euare-assumerole devops-ec2-keypair-mgmt-role --region devops-user01@future`
# euca-describe-keypairs --region @future
KEYPAIR devops-admin 9e:1a:bc:ac:98:b1:97:7c:65:b0:b3:7c:96:f5:d5:7b:a1:3e:36:a6
When done assuming the role, the role must be released using euare-releaserole :
# eval `/usr/bin/euare-releaserole --region devops-user01@future`
4.5.2.6.4 - Delegate Access Across Your Accounts Using Roles
A role can be used to delegate access to resources that are in different accounts that you own.Using roles to access resources across different accounts allows users to assume a role that can access all the resources in in different acccounts, rather than having users log into different accounts to achieve the same result.
Using Roles to Access Resources in Another Account
The scenario described in this section outlines the procedure for a user in Account B to create a role that provides access to a particular OSGObject Storage Gateway (OSG) bucket owned by Account B, which can be assumed by user in Account A.Using s3cmd , list bucket that will be shared through role:
# ./s3cmd/s3cmd --config=.s3cfg-acctB-user11 ls s3://mongodb-snapshots
2014-12-01 22:34 188563920 s3://mongodb-snapshots/mongodb-backup-monday.img.xz
2014-12-02 13:34 188564068 s3://mongodb-snapshots/mongodb-backup-tuesday.img.xz
Create Role in Account B with Trust Policy for User from Account A:
# cat acctB-role-trust-acctA-policy.json
{
"Version": "2012-10-17",
"Statement": [{
"Effect": "Allow",
"Principal": {"AWS": "arn:aws:iam::290122656840:user/user01"},
"Action": "sts:AssumeRole"
}]
}
# euare-rolecreate --role-name cross-bucket-access-mongodb-logs --policy-document acctB-role-trust-acctA-policy.json
Upload IAM Access Policy for Role in Account B:
# cat acctB-mongodb-snapshots-bucket-access-policy.json
{
"Version": "2012-10-17",
"Statement": [
{
"Effect": "Allow",
"Action": "s3:ListBucket",
"Resource": "arn:aws:s3:::mongodb-snapshots"
},
{
"Effect": "Allow",
"Action": [
"s3:GetObject",
"s3:PutObject",
"s3:DeleteObject"
],
"Resource": "arn:aws:s3:::mongodb-snapshots/*"
}
]
}
# euare-roleuploadpolicy --role-name cross-bucket-access-mongodb-logs --policy-document acctB-mongodb-snapshots-bucket-access-policy.json --policy-name mongodb-logs-bucket-access
Upload IAM access policy to Group (e.g. Testers) associated with user in Account A to allow for Role in Account B to be assumed. For more information, go to Amazon Web Services IAM Best Practices .
# cat acctA-assume-role-acctB-policy.json
{
"Statement": [
{
"Sid": "Stmt1417531456446",
"Action": [
"sts:AssumeRole"
],
"Effect": "Allow",
"Resource": "arn:aws:iam::325271821652:role/cross-bucket-access-mongodb-logs"
}
]
}
# euare-groupuploadpolicy --policy-name mongodb-bucket-access-role --group-name Testers --policy-document acctA-assume-role-acctB-policy.json
The example below demonstrates how to use a python script leveraging the boto library. Another way to assume this role is to run the Euca2ools command, euare-assumerole , using the AccountA/user01 credentials. For more information regarding assuming a role, see an example from the Assume a Role section. The script below performs the following actions:
Accesses STS to get temporary access key, secret key and token
List contents of bucket “mongodb-snapshots”
=======================
#!/bin/env python
import boto
from boto.sts import STSConnection
from boto.s3.connection import S3Connection
from boto.s3.connection import OrdinaryCallingFormat
if name == “main”:
"""
Assuming ‘cross-bucket-access-mongodb-logs’ role by AccountA, User01 user
"""
STSConnection.DefaultRegionEndpoint = “tokens.future.euca-hasp.cs.prc.eucalyptus-systems.com”
sts_connection = STSConnection(aws_access_key_id="",
aws_secret_access_key="",
is_secure=False, port=“8773”)
assumedRoleObject = sts_connection.assume_role(
role_arn=“arn:aws:iam::325271821652:role/cross-bucket-access-mongodb-logs”,
role_session_name=“AcctAUser01MongoDBBucketAccess”)
s3 = S3Connection(aws_access_key_id=assumedRoleObject.credentials.access_key,
aws_secret_access_key=assumedRoleObject.credentials.secret_key,
security_token=assumedRoleObject.credentials.session_token,
host="objectstorage.future.euca-hasp.cs.prc.eucalyptus-systems.com",
is_secure=False, port=8773, calling_format=OrdinaryCallingFormat())
bucket_name = "mongodb-snapshots"
bucket = s3.lookup(bucket_name)
if bucket:
print "Bucket Information [%s]:" % bucket_name
print "------------------------------------------------------------"
for key in bucket:
print "\t" + key.name
else:
print "Bucket is not available: " + bucket_name + "\n"
==================
Run the script:
# ./describe-bucket-script.py
Bucket Information [mongodb-snapshots]:
------------------------------------------------------------
mongodb-backup-monday.img.xz
mongodb-backup-tuesday.img.xz
5 - Image Management Guide
Image Management Guide
This guide contains concepts and tasks to help you work with images in your cloud.
5.1 - Image Management Overview
Welcome to the Eucalyptus Image Management Guide. This guide contains conceptual overview about what images are, as well as best practices and common tasks for using images in your cloud.
Note
This guide assumes a moderately high level of expertise with the Linux command line.Note
Because of the wide variety of Linux distributions (and other operating systems) that may be running on an instance, specific examples may vary.5.2 - Image Overview
An image defines what will run on a guest instance in your Eucalyptus cloud. An image contains everything necessary to boot and run an operating system, e.g. a Linux distribution – CentOS, Fedora, Ubuntu, Debian, etc.
Images of two types are supported by Eucalyptus:
- HVM images are raw disks that can boot independently. HVM stands for Hardware-assisted Virtual Machine because such images can only run efficiently on hardware that supports virtualization. When an HVM image is uploaded and registered, it becomes a Eucalyptus Machine Image (EMI) of type “hvm”, with a unique ID.
- Paravirtual images are Linux images that can boot if they are paired with a kernel and ramdisk that are compatible with the host’s hypervisor. Currently only root file system images are supported (on AWS, a paravirtual image can be a file system or a full disk). When a paravirtual image is uploaded and registered, it also becomes an EMI of “paravirtual” type, which needs to be paired with a kernel (EKI) and ramdisk (ERI) images to be usable. EKI contains a kernel (i.e., the ‘vmlinuz’ file typically found in the /boot directory of a Linux system). ERI contains the kernel modules (i.e., the ‘initrd’ file from the /boot directory).
Depending on the method used for upload, an instance’s disk will reside on one of two types of storage:
- volumes are located on temporary disk space that is destroyed when instances shut down. These volumes are based on a template residing in Object Storage. Instance Store can host either HVM or paravirtual images.
- volumes are disks with lifetimes that can be independent of instances. These volumes are based on snapshots of EBS volumes (instead of templates in Object Storage). Only HVM images can be deployed on EBS in Eucalyptus (in AWS, EBS can also host paravirtual images).
To help get you started, Eucalyptus provides pre-packaged virtual machine images that are ready to run in your cloud. You can download them from the Eucalyptus Machine Image catalog . Both HVM and paravirtual images are available there. Each paravirtual image comes bundled with a corresponding EKI and ERI.
If you find that the pre-packaged images don’t meet your needs, you can migrate an image from another cloud system (such as Amazon Web Services) or create your own image. See the rest of this guide for more information.
Note
For a list of supported guest operating systems, .5.3 - Image Tasks
Image Tasks
An image is the basis for instances that you spin up for your computing needs. This section explains how to create or acquire an image and then add it to your Eucalyptus cloud. There are a few ways you can create or acquire an image for use in a Eucalyptus cloud:
- Add an image based on an existing image. For more information, see https://www.eucalyptus.cloud/index.html#Images.
- Add an image that you create from scratch, by installing an operating system into a virtual machine.
- Migrate an image or an instance from another cloud, such as Amazon Web Services (AWS) or a virtualization platform.
5.3.1 - Browse and Download from Eucalyptus
Eucalyptus provides a few prebuilt “starter” images that you can download and install. This is one of the simplest ways to get started with Eucalyptus. Many other organizations, including Linux distributions, publish starter images for use on cloud systems, which can also be installed on Eucalyptus using the steps in this guide.With your Web browser, explore the Eucalyptus Machine Image catalog . Download an image of your choice (we suggest starting with images that have “hvm” as their Virtualization Type, as they are easier to install and work for both Instance Store and EBS-backed instances). Optionally, if the image is compressed (has a .tgz or .gz extension), you will have to uncompress it. If you obtained an HVM image, you now have a raw disk file that can be installed using instructions in the Install an HVM image section. If you obtained a paravirtual image with kernel and ramdisk, you can install them with instructions in the Install a paravirtual image section.
5.3.2 - Install an HVM Image
HVM (Hardware-assisted Virtual Machine) images are sequences of raw sectors of a complete bootable disk, including a boot loader and one or more partitions with an operating system. Such images are self-contained and can be booted on hardware that supports virtualization or on a full software emulation of hardware (QEMU).
At run time, HVM images can be deployed to disks local to the hypervisor (so-called Instance Store images) or they can run off of dynamic volumes on EBS (so-called EBS-backed instances or boot-from-EBS instances). This topic covers methods for installing an HVM image into either type of EMI.
Install an HVM image as an Instance Store EMI
Bundle, upload, and register the HVM image. All of this can be accomplished with a single command. For Linux images, the required options are:
euca-install-image -i /path/to/hvm-image -n name-of-the-image -r x86_64 --virtualization-type hvm -b bucket-name-for-image
Install an HVM image as an EBS-Backed EMI
An EBS-backed image (sometimes referred to as a “bfEBS” image) is an image with a root device that is an EBS volume created from an EBS snapshot. An EBS-backed image has a number of advantages (over an Instance Store image), including:
- Faster boot time
- Larger volume size limits
- Changes to the data on the image persist after instance termination
Option A: Install an EBS image with euca-import-vol
With this method, a single command uploads image data into Object Store and triggers a conversion task, which copies the data into an EBS volume. The volume will be the source of the snapshot behind the EBS-backed EMI.Import the HVM image file into Object Storage and then copy it into EBS. For example: euca-import-volume /path/to/hvm-image --format raw --availability-zone AZ-NAME --bucket bucket-for-hvm-image --owner-akid $EC2_ACCESS_KEY --owner-sak $EC2_SECRET_KEY --prefix image-name-prefix --description "textual description"
Note
If the volume import process was interrupted, import can be resumed (within a one-week deadline) with the following command:After the volume data has been uploaded to Object Store, an internal conversion task will copy the data into a new EBS volume. You can query the progress of this task with the following command:
euca-describe-conversion-tasks import-vol-fae1e94d Once the task has finished successfully and the volume is available, you can take a snapshot of the volume:
euca-create-snapshot <volume-id> You can now register the snapshot:
euca-register --name <image-name> --snapshot <snapshot-id> --root-device-name <device> You’ve now created a EBS-backed image. To maintain data persistence, be sure to use
euca-stop-instances and
euca-start-instances to stop and start your EBS-backed instance.
Option B: Install an EBS image with euca-import-instance
With this method, a single command uploads image data into the Object Store and triggers a conversion task; this conversion task copies the data into an EBS volumetakes a snapshot of the volume, registers the snapshot as an EMI, and deploys the EMI as an instance.Turn an HVM image into a running EBS instance with a single command:
Note
Just as with euca-run-instance, one can specify the Instance Type for the instance that will run, as well as the SSH key. For example:euca-import-instance /root/paravirtualimage/ubuntuJune06.img --format raw --architecture x86_64 --platform Linux --availability-zone EDU --bucket import_instance --owner-akid $EC2_ACCESS_KEY --owner-sak $EC2_SECRET_KEY --prefix eduii --description "import instance" --key admin --instance-type m1.smallNote
If volume import process was interrupted (by an interruption of the command or due to a network mishap, import can be resumed (within a one-week deadline).
euca-resume-import -t import-i-b393f3f6 /path/to/hvm-image
After the volume data has been uploaded to Object Store, an internal conversion task will copy the data into a new EBS volume. You can query the progress of this task with the following command:
euca-describe-conversion-tasks import-i-b393f3f6 Once the conversion task has finished successfully, you should see a running instance. You may log into that instance if you specified an SSH key. To maintain data persistence, be sure to use
euca-stop-instances and
euca-start-instances to stop and start your EBS-backed instance.
Option C: Install an EBS image using a helper instance
This is a more manual method for installing an HVM image into an EBS-backed EMI. Instead of importing the image data into an EBS volume directly, a helper instance is used to copy data from the image file into the volume. The helper instance can be either an instance store or an EBS-backed instance, and can be deleted when finished. The volume will be the source of the snapshot behind the EBS-backed EMI.Create and launch a help instance. Create a volume big enough to hold the bootable image file: euca-create-volume -z <cluster_name> -s <size_in_GB> Attach the volume to the helper instance: euca-attach-volume <volume-id> -i <instance-id> -d <device> Log in to the instance and copy the bootable image to the attached volume by performing one of the following steps: If the bootable image is saved in an http or ftp repository, use curl or wget to download the .img file to the attached volume. For example: curl <path_to_bootable_image> > <device>
If the bootable image is from a source other than an http or FTP repository, copy the bootable image from its source to the helper instance, and then copy it to the attached volume using the dd command. For example: dd if=<path_to_bootable_image> of=<device> bs=1M
Detach the volume from the instance: euca-detach-volume <volume-id> Create a snapshot of the volume: euca-create-snapshot <volume-id> Register the snapshot: euca-register --name <image-name> --snapshot <snapshot-id> --root-device-name <device> You’ve now created a EBS-backed image. To maintain data persistence, be sure to use euca-stop-instances and euca-start-instances to stop and start your EBS-backed instance.
5.3.3 - Create an HVM Image
Create an HVM Image
This section covers how to create a new image for use in your Eucalyptus cloud.
5.3.3.1 - Create an HVM Image from a Linux Distribution ISO (KVM)
This topic shows how to install a Linux distribution ISO and prepare an image for registration with Eucalyptus.Use the QEMU disk utility to create a disk image. In the following example, we create a 5GB disk image: qemu-img create -f raw centos7.img 5G Use the parted utility to set the disk label. parted centos7.img mklabel msdos Use virt-install to start a new virtual machine installation, as in the following example (note the example has been broken into multiple lines for formatting purposes):
virt-install --name centos7 --ram 1024 --os-type linux --os-variant rhel7
-c /tmp/CentOS-7.0-x86_64-bin-DVD1.iso --disk path=/tmp/centos7.img,device=disk,bus=virtio
--graphics vnc,listen=0.0.0.0 --force
Use the VNC client of your choice to connect to the new virtual machine and complete the installation. Modify the following libvirt.xml template to create the VM and run virsh create <libvirt.xml>" .
<domain type='kvm'>
<name>eucalyptus-centos</name>
<os>
<type>hvm</type>
</os>
<features>
<acpi/>
</features>
<memory>1073741</memory>
<vcpu>1</vcpu>
<devices>
<!--<emulator>/usr/bin/kvm</emulator>-->
<disk type='file'>
<source file='/tmp/centos7.img'/>
<target dev='hda'/>
</disk>
<interface type='bridge'>
<source bridge='br0'/>
<model type='virtio'/>
</interface>
<graphics type='vnc' port='-1' autoport='yes' listen='0.0.0.0'/>
</devices>
</domain>
Connect to the virtual machine using your VNC client of choice and make the following configuration changes: Modify the /etc/sysconfig/network-scripts/ifcfg-eth0 file and set the ONBOOT option to “yes”. For example:
DEVICE="eth0"
BOOTPROTO="dhcp"
#HWADDR="B8:AC:6F:83:1C:45"
IPV6INIT="yes"
MTU="1500"
NM_CONTROLLED="yes"
ONBOOT="yes"
TYPE="Ethernet"
UUID="499c07cc-4a53-408c-87d2-ce0db991648e"
PERSISTENT_DHCLIENT=1
Enable a serial console on the virtual machine by adding the following option to the end of the /boot/grub/menu.lst: console=ttyS0 Remove the quiet option from the kernel parameters and the grub menu splash image in the /boot/grub/menu.lst file. For example:
# grub.conf generated by anaconda
#
# Note that you do not have to rerun grub after making changes to this file
# NOTICE: You have a /boot partition. This means that
# all kernel and initrd paths are relative to /boot/, eg.
# root (hd0,0)
# kernel /vmlinuz-version ro root=/dev/sda2
# initrd /initrd-[generic-]version.img
#boot=/dev/sda
default=0
timeout=5
#splashimage=(hd0,0)/grub/splash.xpm.gz
hiddenmenu
title Eucalyptus (n.n.32-358.18.1.el7.x86_64)
root (hd0,0)
kernel /vmlinuz-n.n.32-358.18.1.el7.x86_64 ro root=UUID=062b9c31-95f3-424f-8b47-35107cfdfc08 rd_NO_LUKS rd_NO_LVM LANG=en_US.UTF-8 rd_NO_MD SYSFONT=latarcyrheb-sun16 crashkernel=auto KEYBOARDTYPE=pc KEYTABLE=us rd_NO_DM rhgb
initrd /initramfs-n.n.32-358.18.1.el7.x86_64.img
Add the following line to the /etc/sysconfig/network file to disable the zeroconf route, which can interfere with access to the metadata service: NOZEROCONF=yes Edit the /etc/udev/rules.d/70-persistent-net.rules file and remove all entries for the existing network interface. Make sure that you delete all entries before terminating the virtual machine and registering it with Eucalyptus. Eucalyptus instances use cloud-init to specify actions to run on your instance at boot time, which can be passed using the userdata parameter. To install and configure cloud-init on your instance: Install cloud-init:
# rpm -Uvh http://dl.fedoraproject.org/pub/epel/epel-release-latest-7.noarch.rpm
# yum install cloud-init
By default, cloud-init uses ec2-user as the log-in user. Add ec2-user to your instance and give it appropriate sudo permissions:
# adduser ec2-user
# passwd ec2-user
Run visudo and add the following entries at the bottom of the sudoers file:
## Allow root to run any commands anywhere
root ALL=(ALL) ALL
ec2-user ALL=(ALL) NOPASSWD: ALL
You can optionally copy Eucalyptus rc.local file (available at ) to the /etc directory on your virtual machine and modify it as needed. You now have a raw disk file that can be installed using instructions in the Install an HVM image section.
5.3.4 - Migrate an Image
Migrate an Image
This section covers migrating images to and from your Eucalyptus cloud.
5.3.4.1 - Create an Image from an Existing EBS-Backed Instance
A common way to create a new image is to customize an existing instance. This topic describes how to create a new image by modifying an existing EBS-backed instance.This example shows how to create a new EBS-backed Eucalyptus image based on an existing EBS-backed Eucalyptus instance.
Log on to an existing Eucalyptus EBS-backed instance and customize the instance. Prepare the image. See for instructions. Create a new image based on the image you just modified by using the eucalyptus-create-image command, specifying a name, a description, and the instance ID of the Eucalyptus instance you customized in the previous step. For example: euca-create-image -n "mynewimage" -d "This is my new custom recycled image" i-1ABCDEFF This command will show the ID of the new machine image and exit immediately. In the background, Eucalyptus will begin the process of creating a new image based on the instance you supplied.
You can monitor the status of the image using the euca-describe-images command, supplying the ID of the image returned from the euca-create-image command. For example:
euca-describe-images i-e12398ab
5.3.4.2 - Create an Image from an Existing Instance-Store Instance
A common way to create a new image is to customize an existing instance.This example shows how to create a new instance store Eucalyptus image based on an existing instance store Eucalyptus instance. This topic describes how to create a new image by modifying an existing instance-store instance.
Log on to an existing Eucalyptus instance-store instance and customize the instance. See Prepare a Linux Image for Eucalyptus for instructions on required changes the instance needs before re-bundling. Create a new image based on the image you just modified by using the euca-bundle-instance command, specifying a name, a description, and the instance ID of the Eucalyptus instance you customized in the previous step. For example:
euca-bundle-instance -b mybundle -p mycentos6 -o $EC2_ACCESS_KEY -w $EC2_SECRET_KEY i-96154365
BUNDLE bun-96154365 i-96154365 mybundle mycentos 62013-11-05T21:37:23.469Z2013-11-05T21:37:23.469Z pending 0
This command will the bundle task ID and exit immediately. In the background, Eucalyptus will begin the bundling process. Depending on the size of the instance, it can take several minutes for the bundling task to complete.
You can monitor the status of the bundle task using the euca-describe-bundle-tasks command, supplying the ID of the image returned from the eucalyptus-bundle-instance command. For example:
euca-describe-bundle-tasks
BUNDLE bun-96154365 i-96154365 mybundle mycentos6 2013-11-05T21:37:23.469Z2013-11-05T21:37:58.446Z storing 0
Once the bundle task is complete, you can register thebundle as an instance-store image using the euca-register command, specifying the path to the bundle manifest in the format [bucket]/[prefix].manifest.xml .
Note
You should always explicitly declare the instance type of a bundle created with as an HVM type using –virtualization-type parameter. For example:euca-register --virtualization-type=hvm mybundle/mycentos6.manifest.xml. Your new image is now ready for use in your Eucalyptus cloud.
5.3.4.3 - Prepare a Linux System for Eucalyptus
This section explains how to prepare a running Linux system (cloud instance, virtual machine, or a system running on bare metal) before importing it for use in Eucalyptus.Install cloud software and drivers: Make sure Virtio drivers are installed if the image is going to be run in a KVM cluster which has virtio enabled, and verify use if possible (ie. set disks and network interface in hypervisor, try hot plug in for disks, etc). For most recent Linux distributions nothing is needed to be done. Make sure appropriate init scripts are in place; for example: cloud-init packages (if appropriate), and rc.local or similar scripts to prepare new instances at boot time utilizing user/meta-data.
Install cloud-init:
For Red Hat Enterprise Linux, and CentOS 7:
yum install cloud-init
Install and configure ssh: For Red Hat and CentOS:
yum install openssh-server
systemctl enable sshd.service
Install Euca2ools: For Red Hat and CentOS:
yum install euca2ools
Optionally, update existing packages. For RHEL and CentOS:
yum update
Prepare the network: Disable the firewall. It is recommended that the firewall is disabled and network rules are instead enforced in the security-group the instances run in. If the guest’s firewall is not disabled, review the existing rules and make sure they are appropriate for the guest’s future use within a cloud environment. Clear or disable iptable rules: Save the rules in case you want to restore them later:
sudo iptables-save > /root/firewall.rules
Clear the rules:
iptables -F
iptables -X
iptables -t nat -F
iptables -t nat -X
iptables -t mangle -F
iptables -t mangle -X
iptables -P INPUT ACCEPT
iptables -P OUTPUT ACCEPT
iptables -P FORWARD ACCEPT
For RHEL and CentOS 7, see the Red Hat Migration and Planning Guide Security and Access Control section .
Make sure there is only a single primary network interface. Check the configuration for:
- Enabled on boot (ONBOOT=“yes”)
- IP provisioning is done via DHCP (BOOTPROTO=“dhcp”)
- MAC address is commented out (for example: #HWADDR=“AA:BB:CC:DD:EE:FF”)
For RHEL and CentOS images, the configuration for the default network interface can usually be found in the following file:
/etc/sysconfig/network-scripts/ifcfg-eth0
The following is an example of an ifcfg-eth0 configuration file:
DEVICE=eth0
ONBOOT=yes
#THE HWADDR LINE MUST BE COMMENTED OUT OR REMOVED
#HWADDR=AA:BB:CC:DD:EE:FF
TYPE=Ethernet
BOOTPROTO=dhcp
PERSISTENT_DHCLIENT=yes
Remove persistent udev rules:
echo "" > /etc/udev/rules.d/70-persistent-net.rules
echo "" > /lib/udev/rules.d/75-persistent-net-generator.rules
On CentOS and RHEL, disable zeroconf by adding an entry to the /etc/sysconfig/network file:
NETWORKING=yes
NOZEROCONF=yes
Clean the image: We recommend that you remove all non-root, non-administrator users before bundling the image. Remove root/Administrator password. We recommend that you remove root’s password for Linux systems.
Note
Once these passwords are removed, access to this system will be limited or blocked until this image is recreated as a cloud instance. SSH host and authorization keys for Linux will be used going forward.Remove any unwanted programs. Configure a serial port by adding an option to the end of the
/boot/grub/menu.lst file:
console=ttyS0 You’ve now prepared your instance for image creation.
5.3.4.4 - Migrate a Linux Image from AWS to Eucalyptus
You can migrate an S3-backed image from AWS to Eucalyptus.
Note
This topic assumes you are migrating an S3-backed Amazon Machine Image (AMI) that you own. For instructions on creating an S3-backed AMI from an existing AMI, see .Note
Specific examples may vary depending on the distro running on the image that you want to migrate.Set up your Euca2ools configuration to work with both Eucalyptus and Amazon Web Services. Check ownership of the AMI that you want to migrate to Eucalyptus by using the euca-describe-images command. For example:
euca-describe-images --region us-east-1 --owner 999999999999
IMAGE ami-e1a1e888 999999999999/precise-test 999999999999 available private x86_64 machine aki-88aa75e1 instance-store paravirtual xen
BLOCKDEVICEMAPPING EPHEMERAL sda2 ephemeral0
Run the AWS instance.
euca-run-instance ami-e1a1e888 --region us-east-1
Install Euca2ools on the instance. For instructions, see the Euca2ools Guide. Make sure that you have enough space on a volume to hold the bundle that we will create. Bundle the running AWS instance. For example:
sudo -s
ec2-bundle-vol -b testbucket -d /mnt -u 4299-4227-3585 -k my-aws.pem -c my-aws-cert.pem -r x86_64 -s 2048
Copying / into the image file /mnt/image...
Excluding:
/dev/pts
/
/sys
/proc
/proc/sys/fs/binfmt_misc
/dev
/media
/mnt
/proc
/sys
/mnt/image
/mnt/img-mnt
1+0 records in
1+0 records out
1048576 bytes (1.0 MB) copied, 0.00209056 s, 502 MB/s
mke2fs 1.42.3 (14-May-2012)
Bundling image file...
Splitting /mnt/image.tar.gz.enc...
Created image.part.00
Created image.part.01
[example truncated]
Created image.part.30
Generating digests for each part...
Digests generated.
Unable to read instance meta-data for ancestor-ami-ids
Unable to read instance meta-data for ramdisk-id
Unable to read instance meta-data for product-codes
Creating bundle manifest...
ec2-bundle-vol complete.
Switch the Euca2ools configuration file to use Eucalyptus. You can do this by specifying the Eucalyptus region as defined in your Euca2ools configuration file by specifying the --region parameter on the command line, or by changing the default-region option in the Euca2ools configuration file:
default-region = euca-release
Download the bundle from the AWS S3 bucket:
euca-download-bundle --bucket testbucket --directory /tmp/aws-image/ --region us-east-1
Unbundle the AWS instance bundle:
euca-unbundle --manifest /tmp/aws-image/image.manifest.xml --source /tmp/aws-image/ --destination /tmp/aws-image/ --region us-east-1
Run some checks to make sure that the image can be used with Eucalyptus: Mount the image via loopback:
# sudo mkdir /mnt/aws-image
# sudo mount -o loop /tmp/aws-image/image /mnt/aws-image
# df -ah
……
/tmp/aws-image/image
9.9G 1.1G 8.3G 12% /mnt/aws-image
Make sure that the distro repositories in the image do not point to EC2-specific repositories. TODO: Need an actual example here. Install a non-Xen kernel into the image from distro and make sure VirtIO modules are added. TODO: Need an actual example here. Extract the ramdisk and kernel to be bundled, uploaded and registered as ERI and EKI files. In this example, initrd.img-3.2.0-53-virtual and vmlinuz-3.2.0-53-virtual will be copied from /mnt/aws-image/boot to the /tmp/aws-image directory:
# sudo cp /mnt/aws-image/boot/initrd.img-3.2.0-53-virtual /tmp/aws-image/.
# sudo cp /mnt/aws-image/boot/vmlinuz-3.2.0-53-virtual /tmp/aws-image/.
Make sure that the file system of the image is either ext2, ext3, or ext4 by using the file command. For example:
# file /tmp/aws-image/image
/tmp/aws-image/image: Linux rev 1.0 ext4 filesystem data (extents) (large files) (huge files)
Bundle the image using euca-bundle-image:
euca-bundle-image -i /tmp/aws-image/image
Upload the AWS bundled instance to Eucalyptus.
euca-upload-bundle -b hybrid-guide-sample-bucket -m /tmp/aws-image/image.manifest.xml --access-key myaccesskey --secret-key mysecretkey
Test the new uploaded image.
euca-run-instance emi-a6e15bcf
5.3.4.5 - Migrate a Linux Image from Eucalyptus to AWS
This topic describes how to migrate an image from Eucalyptus to AWS.
Note
These are high-level guidelines for moving an instance from Eucalyptus to AWS. Specific examples will vary depending on the distro running on the image.Run an instance from the image you chose.
euca-run-instance emi-1A6338AE
SSH into the instance and verify that the instance is valid for use with AWS: Download the latest ec2-modules from and put them into the /lib/modules directory on the instance. Copy the AWS EC2 certificate and private key from the AWS instance to your local workstation. Shut down unneeded services on the AWS instance (for example, Apache and MySQL). Clear out log files and bash history files. Remove your ssh keys from the instance. Reset passwords for the instance, and for any services that maintain their own password database. Clear out any temporary directories. Install Euca2ools on the instance.
Mount a volume that is at least 1.5 times as large as the entire instance. Bundle the running instance.
euca-bundle-instance
Switch the Euca2ools configuration file to use Eucalyptus
default-region = euca-release
Upload the AWS bundled instance to Eucalyptus.
euca-upload-bundle -b bucket_name -m manifest_file
Test the new uploaded image.
euca-run-instance emi-a6e15bcf
5.3.5 - Install a paravirtual image
Install a paravirtual image
Note
As of Eucalyptus version 4.0, it is now required to pass a Eucalyptus Kernel Image (EKI) and a Eucalyptus Ramdisk Image (ERI) when uploading and registering a paravirtual Eucalyptus Machine Image (EMI) using the , , and command line tools.Once you’ve customized or acquired a paravirtual image to use with Eucalyptus, you can enable the image as an executable entity with the following steps:
- Unless a suitable kernel is already registered, bundle the kernel, upload it to Object Storage, and register it as a new EKI.
- Unless a suitable ramdisk is already registered, bundle the ramdisk, upload it to Object Storage, and register it as a new ERI
- Bundle the root disk image, which must be a Linux partition, requesting the kernel and ramdisk that you desire, upload the bundle to Object Storage, and register it as a new EMI.
Note
Note that while all users can bundle, upload and register images, only users under the account have the required permissions to upload and register kernels and ramdisks.Once you have an image that meets your needs, perform the tasks listed in this section to add the image to your cloud.
5.3.5.1 - Add a Kernel
When you add a kernel to Walrus, you bundle the kernel file, upload the file to a bucket in Walrus that you name, and then register the kernel with Eucalyptus.
To add a kernel to Walrus:
Use the following three commands:
euca-bundle-image -i <kernel_file> --kernel true --arch <architecture>
euca-upload-bundle -b <kernel_bucket> -m /tmp/<kernel_file>.manifest.xml
euca-register <kernel_bucket>/<kernel_file>.manifest.xml -a x86_64 -n mynewkernel
For example:
euca-bundle-image -i euca-fedora-10-x86_64/xen-kernel/vmlinuz-2.6.27.21-0.1-xen --kernel true --arch x86_64
...
Generating manifest /tmp/vmlinuz-2.6.27.21-0.1-xen.manifest.xml
euca-upload-bundle -b example_kernel_bucket -m /tmp/vmlinuz-2.6.27.21-0.1-xen.manifest.xml
...
Uploaded image as example_kernel_bucket/vmlinuz-2.6.27.21-0.1-xen.manifest.xml
euca-register example_kernel_bucket/vmlinuz-2.6.27.21-0.1-xen.manifest.xml -a x86_64 -n mynewkernel
IMAGE eki-XXXXXXXX
Where the returned value eki-XXXXXXXX is the unique ID of the registered kernel image.
5.3.5.2 - Add a Ramdisk
When you add a ramdisk to Walrus, you bundle the ramdisk file, upload the file to a bucket in Walrus that you name, and then register the ramdisk with Eucalyptus.
To add a ramdisk to Walrus:
Use the following three commands:
euca-bundle-image -i <ramdisk_file> --ramdisk true -r x86_64
euca-upload-bundle -b <ramdisk_bucket> -m /tmp/<ramdisk_file>.manifest.xml
euca-register <ramdisk_bucket>/<ramdisk_file>.manifest.xml -n <name_of_ramdisk>
For example:
euca-bundle-image -i euca-fedora-10-x86_64/xen-kernel/initrd-2.6.27.21-0.1-xen
--ramdisk true -r x86_64
...
Generating manifest /tmp/initrd-2.6.27.21-0.1-xen.manifest.xml
euca-upload-bundle -b example_rd_bucket -m /tmp/initrd-2.6.27.21-0.1-xen.manifest.xml
...
Uploaded image as example_rd_bucket/initrd-2.6.27.21-0.1-xen.manifest.xm
euca-register example_rd_bucket/initrd-2.6.27.21-0.1-xen.manifest.xml -n mynewramdisk
IMAGE eri-XXXXXXXX
Where the returned value eri-XXXXXXXX is the unique ID of the registered ramdisk image.
5.3.5.3 - Add a Root Filesystem
When you add a root filesystem to Walrus, you bundle the root filesystem file, upload the file to a bucket in Walrus that you name, and then register the root filesystem with Eucalyptus. The bundle operation can include a registered ramdisk (ERI ID) and a registered kernel (EKI ID). The resulting image will associate the three images.
You can also bundle the root file system independently and associate the ramdisk and kernel with the resulting EMI at run time.
To add a root filesystem to Walrus:
Use the following three commands:
euca-bundle-image -i <root_filesystem_file> -r <architecture>
euca-upload-bundle -b <root_filesystem_file_bucket> -m /tmp/<root_filesystem_file>.manifest.xml
euca-register <root_filesystem_file_bucket>/<root_filesystem_file>.manifest.xml -n <rootfs_name> -a <architecture>
For example:
euca-bundle-image -i euca-fedora-10-x86_64/fedora.10.x86-64.img --ramdisk eri-722B3CBA --kernel eki-5B3D3859 -r x86_64
...
Generating manifest /tmp/fedora.10.x86-64.img.manifest.xml
euca-upload-bundle -b example_rf_bucket -m /tmp/fedora.10.x86-64.img.manifest.xml
...
Generating manifest /tmp/fedora.10.x86-64.img.manifest.xml
euca-register example_rf_bucket/fedora.10.x86-64.img.manifest.xml -n example_rf -a x86_64
IMAGE emi-XXXXXXXX
Where the returned value emi-XXXXXXXX is the unique ID of the registered machine image.
5.3.6 - Remove an Image
When a new image is uploaded to Eucalyptus, Eucalyptus saves the bundle and the image manifest to a bucket in Walrus. This bucket is stored in the Walrus directory that is defined in the Eucalyptus property walrusbackend.storageDir . The default value for this property is /var/lib/eucalyptus/bukkits .
When you register an image, Eucalyptus creates the actual image file. Both the image manifest and the bundle must remain intact to run as an instance.
To delete an image fully, you must deregister the image and delete the bundle. To successfully remove an image and associated bundle files:
Find the image you want to remove.
euca-describe-images
IMAGE emi-E533392E alpha/centos.5-3.x86-64.img.manifest.xml 965590394582
available public i386 machine eki-345135C9 eri-C4F135BC instance-store
IMAGE emi-623C38B0 alpha/ubuntu.9-04.x86-64.img.manifest.xml 965590394582
available public i386 machine eki-E6B13926 eri-94DB3AB9 instance-store
Note the image file name (for example, emi-623C38B0). Deregister the image.
euca-deregister emi-623C38B0
IMAGE emi-623C38B0
Delete the bundle.
euca-delete-bundle -b alpha -p ubuntu.9-04.x86-64.img
Note
If you accidentally try to delete a bundle for a second time, you might see an error message: . This error only displays if you try to delete a bundle that no longer exists.When you have finished these steps, display all images to confirm that the image was removed.
euca-describe-images
IMAGE emi-E533392E alpha/centos.5-3.x86-64.img.manifest.xml 965590394582
available public i386 machine eki-345135C9 eri-C4F135BC instance-store