Manual Eucalyptus Installation
This section details steps to install Eucalyptus manually. To install Eucalyptus, perform the following tasks in the order presented.
This is the multi-page printable view of this section. Click here to print.
This section details steps to install Eucalyptus manually. To install Eucalyptus, perform the following tasks in the order presented.
Before you install Eucalyptus components on your machines, we recommend that you take the time to plan how you want to install it.
To successfully plan for your Eucalyptus installation, you must determine two things:
This section describes how to evaluate each tradeoff to determine the best choice to make, and how to verify that the resource environment can support the features that are enabled as a consequence of making a choice.
By the end of this section, you should be able to specify how you will deploy Eucalyptus in your environment, any tradeoffs between feature set and flexibility, and where your deployment will integrate with existing infrastructure systems.
This topics describes the relationship of the components in a Eucalyptus installation.
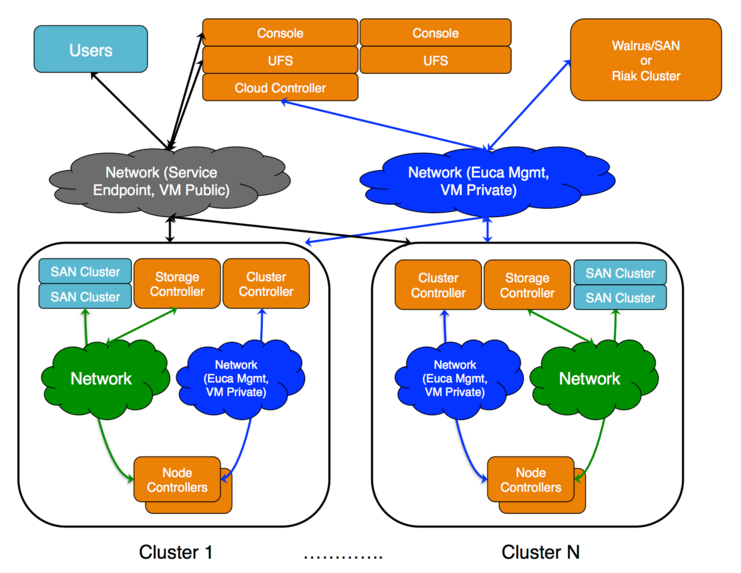 The cloud components: Cloud Controller (CLC) and Walrus, as well as user components: User-Facing Services (UFS) and the Management Console, communicate with cluster components: the Cluster Controllers (CCs) and Storage Controllers (SCs). The CCs and SCs, in turn, communicate with the Node Controllers (NCs). The networks between machines hosting these components must be able to allow TCP connections between them.
Ceph provides an alternative to Walrus as an object storage provider, and can also be used as a block storage provider (EBS).
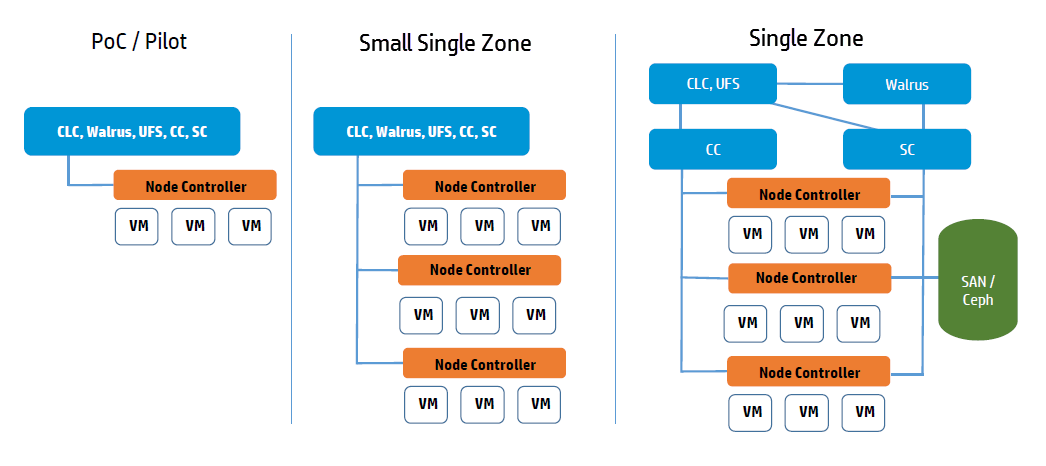
This topic describes ways you can install Eucalyptus services on your physical servers.You can run Eucalyptus services in any combination on the various physical servers in a data center. For example, you can install the Cloud Controller (CLC), Walrus, CC, and SC on one host machine, and NCs on one or more host machines. Or you can install each service on an independent physical server. This gives each service its own local resources to work with.
Often in installation decisions, you must trade deployment simplicity for performance. For example, if you place all cloud (CLC) and zone (CC) services on a single machine, it makes for simple administration. This is because there is only one machine to monitor and control for the Eucalyptus control services. But, each service acts as an independent web service; so if they share a single machine, the reduced physical resources available to each service might become a performance bottleneck.
The main decision for cloud services is whether to install the Cloud Controller (CLC) and Walrus on the same server. If they are on the same server, they operate as separate web services within a single Java environment, and they use a fast path for inter-service communication. If they are not on the same server, they use SOAP and REST to work together.
Sometimes the key factor for cloud services is not performance, but server cost and data center configuration. If you only have one server available for the cloud, then you have to install the services on the same server.
All services should be in the same data center. They use aggressive time-outs to maintain system responsiveness so separating them over a long-latency, lossy network link will not work.
The User Facing Services (UFS) handle all of the AWS APIs and provide an entry point for clients and users interacting with the Eucalyptus cloud. The UFS and the Management Console are often hosted on the same machine since both must be accessible from the public, client-facing network.
You may optionally choose to have redundant UFS and Management Console host machines behind a load balancer.
The Eucalyptus services deployed in the zone level of a Eucalyptus deployment are the Cluster Controller (CC) and Storage Controller (SC).
You can install all zone services on a single server, or you can distribute them on different servers. The choice of one or multiple servers is dictated by the demands of user workload in terms of number of instances (CC) and EBS volume access (SC).
Things to consider for CC placement:
Place the CC on a server that has TCP/IP connectivity to the front-end servers and the NC servers in its zone.
Each CC can manage a maximum of 4000 instances. Things to consider for SC placement:
The SC host machine must always have TCP/IP connectivity to the CLC and be able use multicast to the CLC.
The SC must have TCP/IP connectivity to the UFS/OSG hosts for uploading snapshots into the object store. (The SC does not require connectivity directly to users, it is an internal component and does not serve user EBS API requests; that job is done by the UFS.)
The SC must be reachable via TCP/IP from all NCs in the zone within which the SC is registered. The SC and NC exchange tokens to authorize volume attachment, so they must be able to directly communicate. The SC provides the NCs with network access to the dynamic block volumes on the SC’s storage (if the SC is configured for overlay local filesystem or DAS-JBOD).
IF using Ceph the SC must also have TCP/IP connectivity to the Ceph cluster.
If you are going to use overlay local filesystem or DAS-JBOD configurations to export local SC storage for EBS, then SC storage should consist of a fast, reliable disk pool (either local file-system or block-attached storage) so that the SC can create and maintain volumes for the NCs. The capacity of the disk pool should be sufficient to provide the NCs with enough space to accommodate all dynamic block volumes requests from end users.
The Node Controllers are the services that comprise the Eucalyptus backend. All NCs must have network connectivity to whatever machine(s) host their EBS volumes. Hosts are either a Ceph deployment or the SC.
We recommend that you choose a disk for the Walrus that is large enough to hold all objects and buckets you ever expect to have, including all images that will ever be registered to your system, plus any Amazon S3 application data. For heavy S3 usage, Riak CS is a better choice for object storage.
| Service | Directory | Minimum Size |
|---|---|---|
| Cloud Controller (CLC)CLC logging | /var/lib/eucalyptus/db/var/log/eucalyptus | 20GB2GB |
| WalrusWalrus logging | /var/lib/eucalyptus/bukkits/var/log/eucalyptus | 250GB2GB |
| Storage Controller (SC) (EBS storage) This disk space on the SC is only required if you are not using Ceph. For DAS the space must not be used by an existing filesystem. | /var/lib/eucalyptus/volumes/var/log/eucalyptus | 250GB |
| User-Facing Services (UFS)UFS logging | /var/lib/eucalyptus/var/log/eucalyptus | 5GB 2GB |
| Management ConsoleConsole logging | /var/log/eucalyptus-console | 5GB 2GB |
| Cluster Controller (CC)CC logging | /var/lib/eucalyptus/CC/var/log/eucalyptus | 5GB2GB |
| Node Controller (NC)NC logging | /var/lib/eucalyptus/instances/var/log/eucalyptus | 250GB2GB |
If necessary, create symbolic links or mount points to larger filesystems from the above locations. Make sure that the ’eucalyptus’ user owns the directories.
Before you install Eucalyptus , we recommend that you think about the features you plan to implement with Eucalyptus. These features are detailed in the following sections.
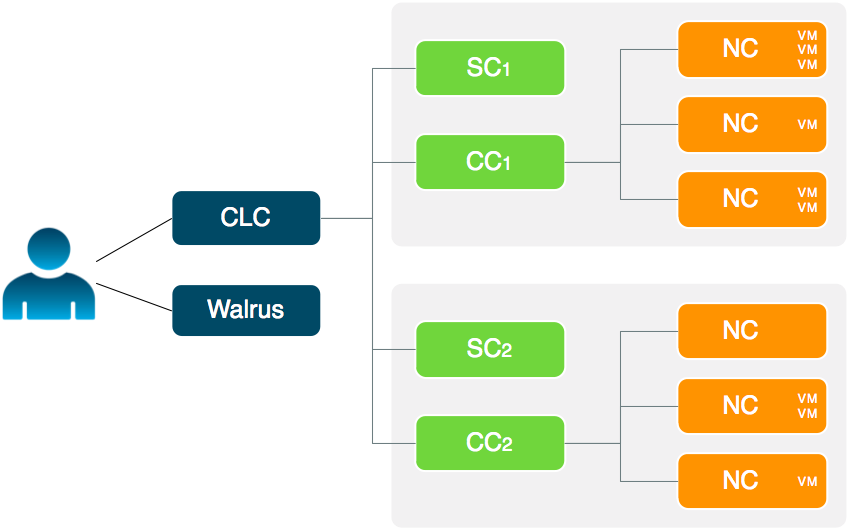
Eucalyptus offers the ability to create multiple local availability zones.An availability zone for AWS denotes a large subset of their cloud environment. Eucalyptus refines this definition to denote a subset of the cloud that shares a local area network. Each Eucalyptus zone has its own Cluster Controller and Storage Controller.
Eucalyptus supports Walrus and Riak CS as its object storage backend. There is no extra planning if you use Walrus. If you use Riak CS, you can use a single Riak CS cluster for several Eucalyptus clouds. Basho (the vendor of RiakCS) recommends five nodes for each Riak CS cluster. This also means that you have to set up and configure a load balancer between the Riak CS nodes and the object storage gateway (OSG).
These networking modes are designed to allow you to choose an appropriate level of security and flexibility for your cloud. The purpose is to direct Eucalyptus to use different network features to manage the virtual networks that connect VMs to each other and to clients external to Eucalyptus .
Eucalyptus networking modes are generally modeled after AWS networking capabilities. In legacy AWS accounts, you have the ability to choose EC2 Classic network mode or VPC network mode. New AWS accounts do not have this flexibility and are forced into using VPC. Eucalyptus VPCMIDO mode is similar to AWS VPC in that it allows users to fully manage their cloud network, including the definition of a Classless Inter-Domain Routing (CIDR) block, subnets, and security groups with rules for additional protocols beyond the default three (UDP, TCP, and ICMP) available in EC2 Classic networking.
Your choice of networking mode depends on the following considerations:
Each networking mode is described in the following sections.
The eucanetd service implements artifacts to manage and define Eucalyptus cloud networking. Eucanetd runs alongside the CLC or NC services, depending on the configured networking mode. Eucanetd manages network functionality. For example:
Deploy eucanetd depending on the selected network mode:
| Host Machine | EDGE mode | VPCMIDO mode |
|---|---|---|
| CLC | No | Yes |
| NC | Yes | No |
When required for a mode eucanetd should be deployed on all hosts for that service.
In EDGE networking mode, the components responsible for implementing Eucalyptus VM networking artifacts are running at the edge of a Eucalyptus deployment: the Linux host machines acting as Node Controllers (NCs). On each NC host machine, a Eucalyptus stand-alone service, eucanetd, runs side-by-side with the NC service. The eucanetd service receives dynamically changing Eucalyptus networking views and is responsible for configuring the Linux networking subsystem to reflect the latest view.
EDGE networking mode integrates with your existing network infrastructure, allowing you to inform Eucalyptus , through configuration parameters for EDGE mode, about the existing network, which Eucalyptus then will consume when implementing the networking view.
EDGE networking mode integrates with two basic types of pre-existing network setups:
This topic describes MidoNet components and their Eucalyptus deployment options, which provide support for VPC on Eucalyptus. Eucalyptus VPCMIDO mode resembles the Amazon Virtual Private Cloud (VPC) product wherein the network is fully configurable by users. In Eucalyptus, it is implemented with a Software-Defined Networking (SDN) technology called MidoNet. MidoNet is a network virtualization platform for Infrastructure-as-a-Service (IaaS) clouds that implements and exposes virtual network components as software abstractions, enabling programmatic provisioning of virtual networks.
This network mode requires configuration of MidoNet in order to make cloud networking functional. It offers the most advanced networking capabilities and therefore it is recommended to be used on all new Eucalyptus installations.
A MidoNet deployment consists of four types of nodes (according to their logical functions or services offered), connected via four IP networks as depicted in Figure 1. MidoNet does not require any specific hardware, and can be deployed in commodity x86_64 servers. Interactions with MidoNet are accomplished through Application Programming Interface (API) calls, which are translated into (virtual) network topology changes. Network state information is stored in a logically centralized data store, called the Network State Database (NSDB), which is implemented on top of two open-source distributed coordination and data store technologies: ZooKeeper and Cassandra. Implementation of (virtual) network topology is realized via cooperation and coordination among MidoNet agents, which are deployed in nodes that participate in MidoNet.
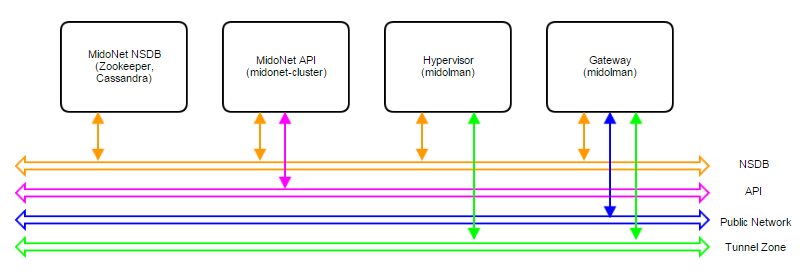 Figure 1: Logical view of a MidoNet deployment. Four components are connected via four networks.
Node types:
Physical Networks:
Three reference architectures are presented in this document, ordered by complexity and size:
Production: Large reference architecture represents the most complete and recommended deployment model of MidoNet for Eucalyptus. Whenever possible (such as when resources are available), deployments should closely match with the Production: Large reference architecture (even on small scale clouds).
All MidoNet components are designed and implemented to horizontally scale. Therefore, it is possible to start small and add resources as they become available.
A Eucalyptus with MidoNet deployment consists of the following components:
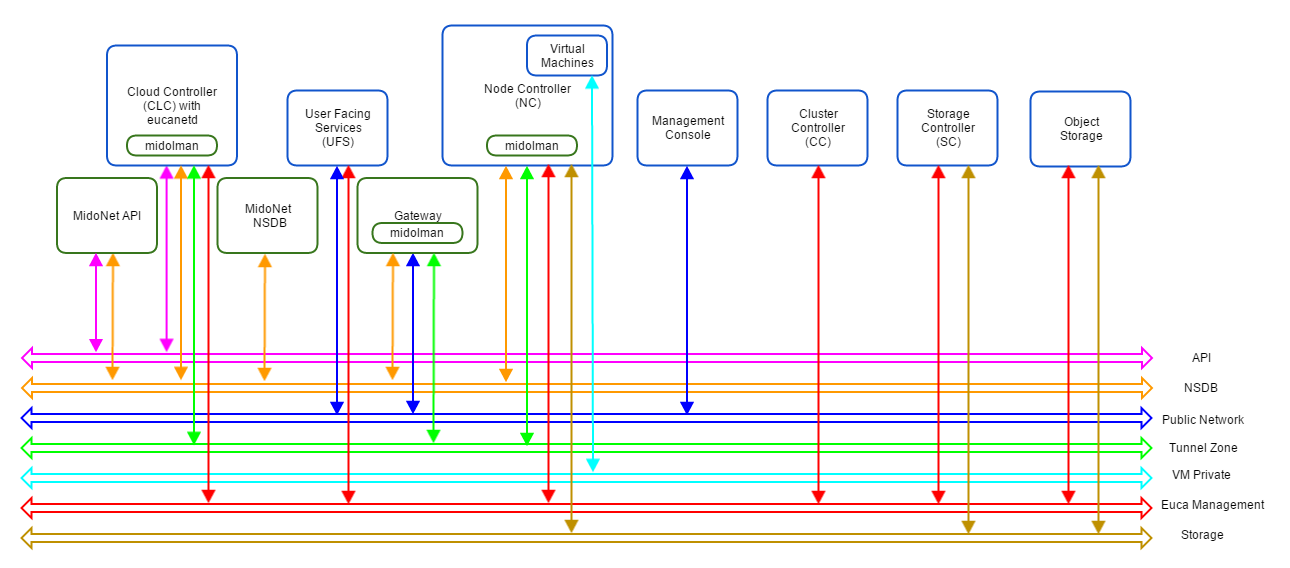 Figure 2: Logical view of a Eucalyptus with MidoNet deployment. VM private network is created/virtualized by MidoNet, and ‘software-defined’ by eucanetd. Ideally, each component and network should have its own set of independent resources. In practice, components are grouped and consolidated into a set of servers, as detailed in different reference architectures.
MidoNet components, Eucalyptus components, and three extra networks are present.
The PoC reference architecture is designed for very small and transient workloads, typical in development and testing environments. Quick deployment with minimal external network requirements are the key points of PoC reference architecture.
Requirements
Servers:
Physical Network:
Limits:
Deployment Topology
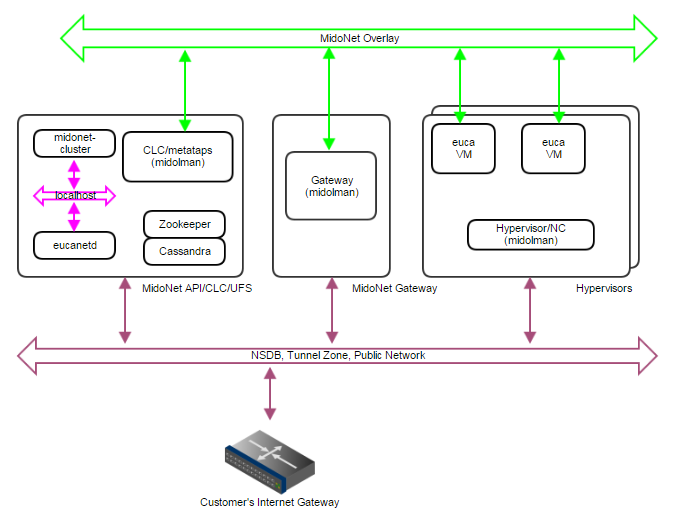 Figure 3: PoC deployment topology. A single IP network carries NSDB, Tunnel Zone, and Public Network traffic. A single server handles MidoNet NSDB, API (and possibly Gateway) functionality.
MidoNet Gateway Bindings
Three ways to realize MidoNet Gateway bindings are discussed below, starting with the most recommended setup.
Public CIDR block(s) allocated for Eucalyptus (Euca_Public_IPs) needs to be routed to MidoNet Gateway by the customer network - this is an environment requirement, outside of control of both MidoNet and Eucalyptus systems. One way to accomplish this is to have a BGP terminated link available. MidoNet Gateway will establish a BGP session with the customer router to: (1) advertise Euca_Public_IPs to the customer router; and (2) get the default route from the customer router.
If a BGP terminated link is not available, but the routing of Euca_Public_IPs is delegated to MidoNet Gateway (configuration of customer routing infrastructure), similar setup can be used. In such scenario, static routes are configured on the customer router (to route Euca_Public_IPs to MidoNet Gateway), and on MidoNet (to use the customer router as the default route).
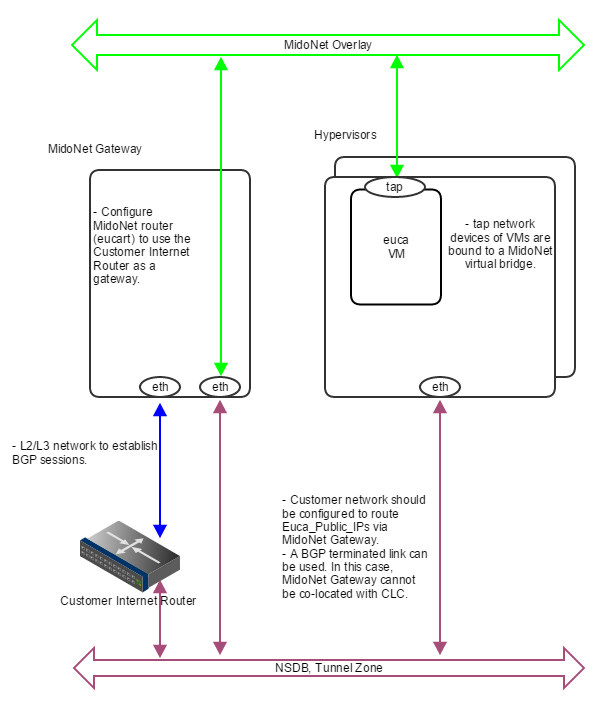 Figure 4: How servers are bound to MidoNet in a PoC deployment with BGP. A BGP terminated link is required: the gateway node eth device is bound to MidoNet virtual router (when BGP is involved, the MidoNet Gateway and Eucalyptus CLC cannot be co-located). Virtual machine tap devices are bound to MidoNet virtual bridges.
If routed Euca_Public_IPs are not available, static routes on all involved nodes (L2 connectivity is required among nodes) can be used as illustrated below.
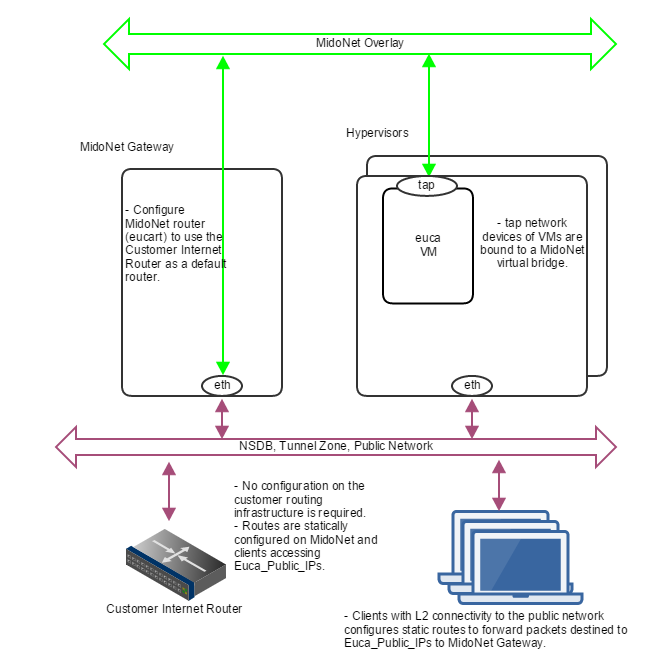 Figure 5: How servers are bound to MidoNet in a PoC deployment without routed Euca_Public_IPs. Clients that need communication with Euca_Public_IPs configure static routes using MidoNet Gateway as the router. MidoNet Gateway configures a static default route to customer router.
In the case nodes outside the public network broadcast domain (L2) needs to access Euca_Public_IPs, a setup using proxy_arp, as illustrated below, can be used.
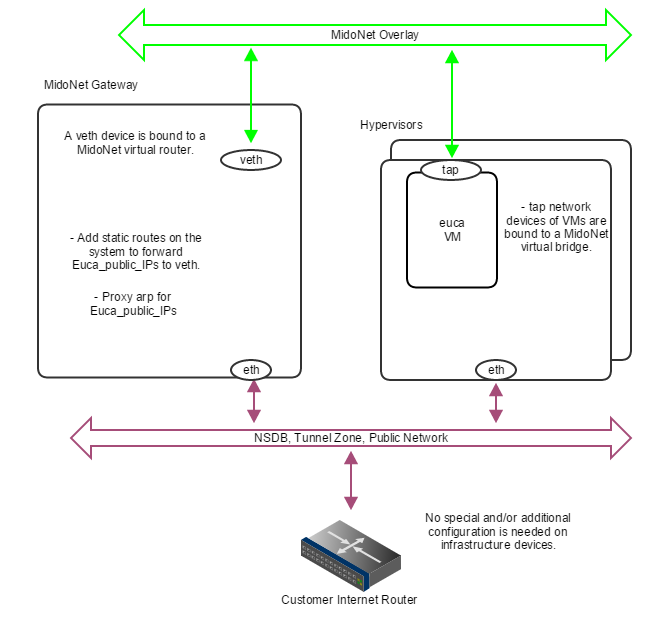 Figure 6: How servers are bound to MidoNet in a PoC deployment with proxy_arp. When routed Euca_Public_IPs are not available, the gateway node should proxy arp for public IP addresses allocated for Eucalyptus , and forward to a veth device that is bound to a MidoNet virtual router. Virtual machine tap devices are bound to MidoNet virtual bridges.
The Production: Small reference architecture is designed for small scale production quality deployments. It supports MidoNet NSDB fault tolerance (partial failures), and limited MidoNet Gateway failover and load balancing/sharing.
Border Gateway Protocol (BGP) terminated uplinks are recommended for production quality deployments.
Requirements
Servers:
Physical Network:
Limits:
Deployment Topology
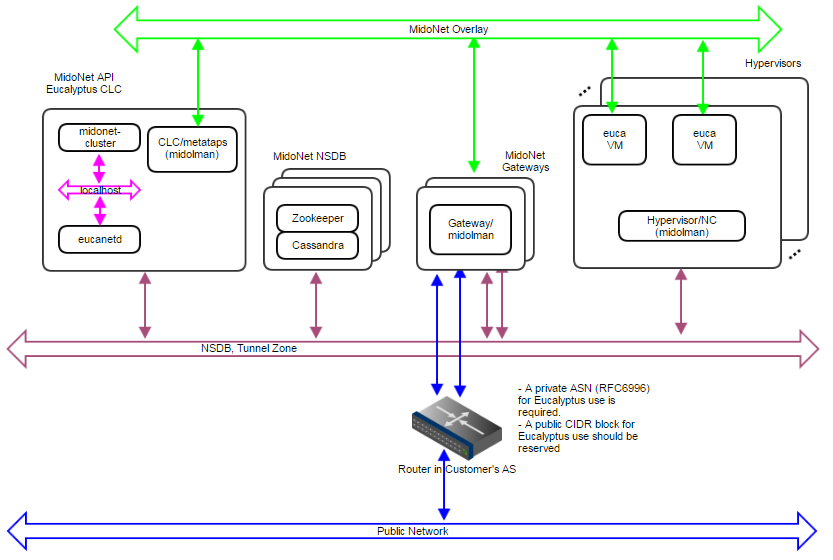 Figure 7: Production:Small deployment topology. A 10Gbps IP network carries NSDB and Tunnel Zone traffic. Another 10Gbps IP network carries Public Network traffic. A 3-node cluster for NSDB tolerates 1 server failure, and 2 gateways enable network failover and limited load balancing/sharing.
 Figure 8: How servers are bound to MidoNet in a Production:Small deployment. Gateway Nodes have physical devices bound to a MidoNet virtual router. These devices should have L2 and L3 connectivity to the Customer’s Router, and with BGP terminated links. Virtual machine tap devices are bound to MidoNet virtual bridges.
NSDB Data Replication
MidoNet Gateway Failover
MidoNet Gateway Load Balancing and Sharing
The Production:Large reference architecture is designed for large scale (500 to 600 MidoNet agents) production quality deployments. It supports MidoNet NSDB fault tolerance (partial failures), and MidoNet Gateway failover and load balancing/sharing.
Border Gateway Protocol (BGP) terminated uplinks are required. Each uplink should come from an independent router.
Requirements:
Physical Network:
Limits:
Deployment Topology
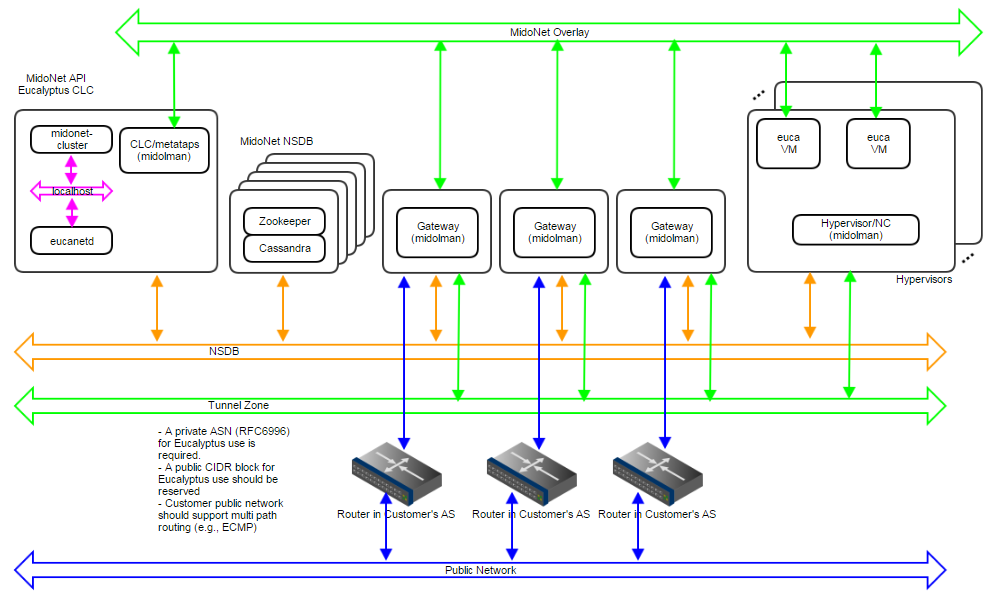 Figure 9: Production:Large deployment topology. A 1Gbps IP network carries NSDB; a 10Gbps IP network carries Tunnel Zone traffic; and another 10Gbps IP network carries Public Network traffic. A 5-node cluster for NSDB tolerates 2 server failures, and 3 gateways enable network failover and load balancing/sharing. Servers are bound to MidoNet in a way similar to Production:Small.
NSDB Data Replication
MidoNet Gateway Failover
MidoNet Gateway Load Balancing/Sharing
| Port | Description |
|---|---|
| TCP 5005 | DEBUG ONLY: This port is used for debugging (using the –debug flag). |
| TCP 8772 | DEBUG ONLY: JMX port. This is disabled by default, and can be enabled with the –debug or –jmx options for CLOUD_OPTS. |
| TCP 8773 | Web services port for the CLC, user-facing services (UFS), object storage gateway (OSG), Walrus SC; also used for external and internal communications by the CLC and Walrus. Configurable with euctl. |
| TCP 8774 | Web services port on the CC. Configured in the eucalyptus.conf configuration file |
| TCP 8775 | Web services port on the NC. Configured in the eucalyptus.conf configuration file. |
| TCP 8777 | Database port on the CLC |
| TCP 8779 (or next available port, up to TCP 8849) | jGroups failure detection port on CLC, UFS, OSG, Walrus SC. If port 8779 is available, it will be used, otherwise, the next port in the range will be attempted until an unused port is found. |
| TCP 8888 | The default port for the Management Console. Configured in the /etc/eucalyptus-console/console.ini file. |
| TCP 16514 | TLS port on Node Controller, required for instance migrations |
| UDP 7500 | Port for diagnostic probing on CLC, UFS, OSG, Walrus SC |
| UDP 8773 | Membership port for any UFS, OSG, Walrus, and SC |
| UDP 8778 | The bind port used to establish multicast communication |
| TCP/UDP 53 | DNS port on UFS |
| UDP 63822 | eucanetd binds to localhost port 63822 and uses it to detect and avoid running multiple instances (of eucanetd) |
Verify connection from an end-user to the CLC on TCP port 8773 Verify connection from an end-user to Walrus on TCP port 8773 Verify connection from the CLC, SC, and NC to SC on TCP port 8773 Verify connection from the CLC, SC, and NC to Walrus on TCP port 8773 Verify connection from Walrus and SC to CLC on TCP port 8777 Verify connection from CLC to CC on TCP port 8774 Verify connection from CC to NC on TCP port 8775 Verify connection from NC to Walrus on TCP port 8773. Or, you can verify the connection from the CC to Walrus on port TCP 8773, and from an NC to the CC on TCP port 8776 Verify connection from public IP addresses of Eucalyptus instances (metadata) and CC to CLC on TCP port 8773 Verify TCP connectivity between CLC, Walrus, and SC on TCP port 8779 (or the first available port in range 8779-8849) Verify connection between CLC, Walrus, and SC on UDP port 7500 Verify multicast connectivity for IP address 239.193.7.3 between CLC and UFS, OSG, Walrus, and SC on UDP port 8773 If DNS is enabled, verify connection from an end-user and instance IPs to DNS ports If you use tgt (iSCSI open source target) for EBS in DAS or Overlay modes, verify connection from NC to SC on TCP port 3260
Before you install Eucalyptus , ensure you have the appropriate dependencies installed and configured.
To configure a bridge on CentOS 7 or RHEL 7, you need to create a file with bridge configuration (for example, ifcfg-brX) and modify the file for the physical interface (for example, ifcfg-ethX). The following steps describe how to set up a bridge on both CentOS 7 and RHEL 7. We show examples for configuring bridge devices that either obtain IP addresses using DHCP or statically.
Install the bridge-utils package.
yum install bridge-utils
Go to the /etc/sysconfig/network-scripts directory:
cd /etc/sysconfig/network-scripts
Open the network script for the device you are adding to the bridge and add your bridge device to it. The edited file should look similar to the following:
DEVICE=eth0
# change the hardware address to match the hardware address your NIC uses
HWADDR=00:16:76:D6:C9:45
ONBOOT=yes
BRIDGE=br0
NM_CONTROLLED=no
Create a new network script in the /etc/sysconfig/network-scripts directory called ifcfg-br0 or something similar. The br0 is the name of the bridge, but this can be anything as long as the name of the file is the same as the DEVICE parameter, and the name is specified correctly in the previously created physical interface configuration (ifcfg-ethX).
DEVICE=br0
TYPE=Bridge
BOOTPROTO=dhcp
ONBOOT=yes
DELAY=0
If you are using a static IP address, the configuration will look similar to:
DEVICE=br0
TYPE=Bridge
BOOTPROTO=static
IPADDR=static_IP_address
NETMASK=netmask
GATEWAY=gateway
ONBOOT=yes
Enter the following command:
systemctl restart network.service
This topic describes how to stop and disable FirewallD on RHEL 7.Prerequisites
For more information, see FirewallD on RHEL 7 or FirewallD on CentOS .
To stop and disable FirewallD Check the status of the firewalld service:
systemctl status firewalld.service
The status displays as active (running) or inactive (dead) . If the firewall is active / running, enter this command to stop it:
systemctl stop firewalld.service
To completely disable the firewalld service, so it does not reload when you restart the host machine:
systemctl disable firewalld.service
Verify the status of the firewalld service:
systemctl status firewalld.service
The status should display as disabled and inactive (dead) .
firewalld.service - firewalld - dynamic firewall daemon
  Loaded: loaded (/usr/lib/systemd/system/firewalld.service; disabled; vendor preset: enabled)
  Active: inactive (dead)
Repeat these steps for all host machines. The firewalld service is stopped and disabled. You can now start the CLC and other host machines.
Postrequisites
To use NTP:
Install NTP on the machines that will host Eucalyptus components.
yum install ntp
Open the /etc/ntp.conf file and add NTP servers, if necessary, as in the following example.
server 0.pool.ntp.org
server 1.pool.ntp.org
server 2.pool.ntp.org
Save and close the file. Synchronize your server.
ntpdate -u YOUR_NTP_SERVER
Configure NTP to run at reboot.
systemctl enable ntpd.service
Start NTP.
systemctl start ntpd.service
Synchronize your system clock, so that when your system is rebooted, it does not get out of sync.
hwclock --systohc
Repeat on each host machine that will run a Eucalyptus service.
For the supported version of the Java Virtual Machine (JVM), see the Compatibility Matrix in the Release Notes .
As of Eucalyptus 4.3, JVM 8 is required. Eucalyptus RPM packages require java-1.8.0-openjdk, which will be installed automatically.
To use Java with Eucalyptus cloud:
Open the /etc/eucalyptus/eucalyptus.conf file. Verify that the CLOUD_OPTS setting does not set –java-home , or that –java-home points to a supported JVM version.
You can use Sendmail, Exim, postfix, or something simpler. The MTA server does not have to be able to receive incoming mail.
Many Linux distributions satisfy this requirement with their default MTA. For details about configuring your MTA, go to the documentation for your specific product.
To test your mail relay for localhost, send email to yourself from the terminal using mail .
Eucalyptus requires MidoNet for VPC functionality. This section describes how to install MidoNet for use with Eucalyptus.
Before you begin:
This topic discusses the prerequisites for installing MidoNet 5.2.
You need to configure software repositories and install Network State Database (NSDB) services: ZooKeeper and Cassandra.
In order to use MidoNet with Eucalyptus you need to configure the MidoNet repositories.
Create /etc/yum.repos.d/midonet.repo and /etc/yum.repos.d/midonet-misc.repo on all host machines that will run MidoNet components including ZooKeeper and Cassandra. For example:
[midonet]
name=MidoNet
baseurl=http://builds.midonet.org/midonet-5.2/stable/el7/
enabled=1
gpgcheck=1
gpgkey=https://builds.midonet.org/midorepo.key
and:
[midonet-misc]
name=MidoNet 3rd Party Tools and Libraries
baseurl=http://builds.midonet.org/misc/stable/el7/
enabled=1
gpgcheck=1
gpgkey=https://builds.midonet.org/midorepo.key
See MidoNet Repository Configuration.
MidoNet uses Apache ZooKeeper to store critical path data about the virtual and physical network topology.
For a simple single-server installation, install ZooKeeper on any server that is IP accessible from all Midolman agents (for example: on the CLC host machine itself). You can also cluster ZooKeeper for fault tolerance. See MidoNet NSDB ZooKeeper Installation.
Enable and start the ZooKeeper service before installing the other MidoNet services.
MidoNet uses Apache Cassandra to store flow state information.
For a simple single-server installation, install Cassandra on any server that is IP accessible from all Midolman agents (for example: on the CLC host machine itself). You can also cluster Cassandra for fault tolerance. See MidoNet NSDB Cassandra Installation.
Enable and start the Cassandra service before installing the other MidoNet services.
This topic lists topology recommendations for installing MidoNet.
The following Eucalyptus network YAML file shows a sample VPCMIDO mode configuration:
Mode: VPCMIDO

InstanceDnsServers:
- "10.10.10.1"

PublicIps:
- "1.A.B.1-1.A.B.255"

Mido:
  Gateways:
  - ExternalCidr: "172.19.0.0/30"
    ExternalDevice: "veth1"
    ExternalIp: "172.19.0.2"
    ExternalRouterIp: "172.19.0.1"
    Ip: "10.10.10.1"
Where 1.A.B.1-1.A.B.255 represents the public IP address range for your cloud.
This topic shows how to install MidoNet for use in your Eucalyptus cloud.
This topic describes how to install the MidoNet Cluster. MidoNet Cluster services provide a means to manage MidoNet functions that MidoNet agents (Midolman) are unable to perform on their own. MidoNet Cluster services include state synchronization of VxLAN gateways and the MidoNet REST API. A MidoNet v5 deployment requires at least one MidoNet cluster node, and it must be co-located on the CLC host machine in Eucalyptus deployments. For security reasons, the MidoNet REST API is accessed only on the CLC (localhost interface).
To install the MidoNet Cluster on the CLC
Add the MidoNet repo file as described in Prerequisites . Install MidoNet Cluster packages.
yum install midonet-cluster python-midonetclient
Edit the /etc/midonet/midonet.conf file to set the ZooKeeper host IP(s). Replace ZOOKEEPER_HOST_IP in the following example:
[zookeeper]
zookeeper_hosts = ZOOKEEPER_HOST_IP:2181
Configure cloud-wide access to the NSDB services:
cat << EOF | mn-conf set -t default
zookeeper {
  zookeeper_hosts = “ZOOKEEPER_HOST:2181"
}

cassandra {
  servers = “CASSANDRA_HOST"
}
EOF
Enable and start the MidoNet Cluster:
systemctl enable midonet-cluster.service
systemctl start midonet-cluster.service
Set the midonet-api end point:
mn-conf set cluster.rest_api.http_port=8080
mn-conf set cluster.rest_api.http_host="127.0.0.1"
Restart the Midonet Cluster so the rest_api parameters take effect:
systemctl restart midonet-cluster.service
This topic describes how to install the Midolman agent. Midolman is the MidoNet Agent, which is a daemon that runs on all hosts where traffic enters and leaves MidoNet. The Midolman agent is required on the Cloud Controller (CLC), Node Controllers (NCs), and any host that is a MidoNet Gateway node (e.g., UFS).
To install Midolman agent
Edit the /etc/midolman/midolman.conf file to set the ZooKeeper host IP(s). Replace ZOOKEEPER_HOST_IP in the following example:
[zookeeper]
zookeeper_hosts = ZOOKEEPER_HOST_IP:2181
Enable and start Midolman:
systemctl enable midolman.service
systemctl start midolman.service
Configure a Midolman resource usage template. For large Eucalyptus clouds, use the agent-compute-large template. For standard (small or medium) Eucalyptus clouds, use the default template. For gateway nodes, use the agent-gateway templates.
See the Midolman Installation documentation for more information.
Choose the Midolman resource usage template name, based on the size and type of installation:
agent-compute-large
agent-compute-medium
agent-gateway-large
agent-gateway-medium
default
Run this command, replacing TEMPLATE_NAME with your chosen template:
mn-conf template-set -h local -t TEMPLATE_NAME
This topic describes how to create a MidoNet tunnel zone. In MidoNet, a tunnel zone is an isolation zone for hosts. Physical hosts that are members of a given tunnel zone communicate directly with one another and establish network tunnels as needed, and on demand. These network tunnels are used to transport overlay traffic (e.g., inter-VM communication) and isolate the underlay physical network communication (i.e., inter-physical hosts communication). On a Eucalyptus deployment, one MidoNet tunnel zone is expected with the IP address on the physical network designated to carry VM traffic being used when configuring its members. Eucalyptus accepts the following tunnel zone names:
For more information, see What are Tunnel Zones?
To create a tunnel zone in MidoNet
Log into the MidoNet shell. For example:
midonet-cli -A --midonet-url=http://127.0.0.1:8080/midonet-api
Create a GRE tunnel zone:
[root@clcfrontend mido-docs]# midonet-cli -A --midonet-url=http://127.0.0.1:8080/midonet-api
midonet> tunnel-zone add name eucatz type gre
midonet> tunnel-zone list
tzone tzone0 name eucatz type gre
midonet> host list
host host0 name node1 alive true
host host1 name clcfrontend alive true
host host2 name node2 alive true
You should see a host listed for each of your Node Controllers and for your User Facing Service host; if not, check the /var/log/midolman/midolman.log log file on the missing hosts to ensure there are no error messages.
After verifying all your hosts are listed, add each host to your tunnel zone as follows. Replace HOST_N_IP with the IP of your Node Controller or User Facing Service host that you used to register the component with Eucalyptus :
midonet> tunnel-zone tzone0 add member host host0 address HOST_0_IP
midonet> tunnel-zone tzone0 add member host host1 address HOST_1_IP
midonet> tunnel-zone tzone0 add member host host2 address HOST_2_IP
You are now ready to install and configure Eucalyptus to use this MidoNet installation.
Ongoing data directory cleanup is required for ZooKeeper. The following parameters should be added in /etc/zookeeper/zoo.cfg for automatic purging of the snapshots and corresponding transaction logs:
autopurge.snapRetainCount=3  # The number of snapshots to retain in dataDir
autopurge.purgeInterval=1  # Purge task interval in hours
For more information, see ZooKeeper Admin Guide, Ongoing Data Directory Cleanup.
This section guides you through installing Eucalyptus from RPM package downloads.The first step to installing Eucalyptus is to download the RPM packages. When you’re ready, continue to Software Signing .
The following terminology might help you as you proceed through this section.
Eucalyptus open source software — Eucalyptus release packages and dependencies, which enable you to deploy a Eucalyptus cloud.
Euca2ools CLI — Euca2ools is the Eucalyptus command line interface for interacting with web services. It is compatible with many Amazon AWS services, so can be used with Eucalyptus as well as AWS.
RPM and YUM and software signing — Eucalyptus CentOS and RHEL download packages are in RPM (Red Hat Package Manager) format and use the YUM package management tool. We use GPG keys to sign our software packages and package repositories.
EPEL software — EPEL (Extra Packages for Enterprise Linux) are free, open source software, which is fully separated from licensed RHEL distribution. It requires its own package.
This topic describes Eucalyptus software signing keys.We use a number of GPG keys to sign our software packages and package repositories. The necessary public keys are provided with the relevant products and can be used to automatically verify software updates. You can also verify the packages or package repositories manually using the keys on this page.
Use the rpm --checksig command on a download file to verify a RPM package for an Eucalyptus product. For example:
rpm --checksig -v myfilename.rpm
Follow the procedure detailed on Debian’s SecureApt web page to verify a deb package for an Eucalyptus product.
Please do not use package signing keys to encrypt email messages.
The following keys are used for signing Eucalyptus software:
This key is used for signing Eucalyptus products released after July 2011 and their updates.
This key is used for signing Eucalyptus pre-release products due for release after July 2011.
This key is used for signing nightly builds of Eucalyptus products published after July 2011.
To install Eucalyptus from release packages, perform the tasks listed in this topic.
Prerequisites
To install Eucalyptus from release packages
Configure the Eucalyptus package repository on each host machine that will run a Eucalyptus service:
yum install https://downloads.eucalyptus.cloud/software/eucalyptus/5/rhel/7/x86_64/eucalyptus-release-5-1.11.as.el7.noarch.rpm
Enter y when prompted to install this package.
Configure the Euca2ools package repository on each host machine that will run a Eucalyptus service or Euca2ools:
yum install https://downloads.eucalyptus.cloud/software/euca2ools/3.4/rhel/7/x86_64/euca2ools-release-3.4-2.2.as.el7.noarch.rpm
Enter y when prompted to install this package.
Configure the EPEL package repository on each host machine that will run a Eucalyptus service or Euca2ools:
yum install epel-release
Enter y when prompted to install this package.
If you are installing on RHEL 7, you must enable the Optional repository in Red Hat Network for each NC, as follows: Go to http://rhn.redhat.com and navigate to the system that will run the NC. Click Alter Channel Subscriptions . Make sure the RHEL Server Optional check-box is selected. Click Change Subscriptions .
On CentOS enable the QEMU Enterprise Virtualization repository for each NC:
yum install centos-release-qemu-ev
The following steps should be performed on each NC host machine. Install the Eucalyptus Node Controller software on each NC host:
yum install eucalyptus-node
Remove the default libvirt network. This step allows the eucanetd dhcpd server to start.
virsh net-destroy default
virsh net-autostart default --disable
Check that the KVM device node has proper permissions. Run the following command:
ls -l /dev/kvm
Verify the output shows that the device node is owned by user root and group kvm.
crw-rw-rw- 1 root kvm 10, 232 Nov 30 10:27 /dev/kvm
If your KVM device node does not have proper permissions, you need to reboot your NC host.
On each CLC host machine, install the Eucalyptus Cloud Controller software.
yum install eucalyptus-cloud
Install the backend service image package on the machine hosting the CLC:
yum install eucalyptus-service-image
This installs worker images for both the load balancer and imaging services. On the UFS host machine, install the Eucalyptus Cloud Controller software.
yum install eucalyptus-cloud
(Optional) On the UFS host machine, also install the Management Console.
yum install eucaconsole
The Management Console can run on any host machine, even one that does not have other Eucalyptus services . Install the software for the remaining Eucalyptus services. The following example shows services being installed on the same host machine.
yum install eucalyptus-cluster eucalyptus-sc eucalyptus-walrus
This installs the cloud controller (CC), storage controller (SC), and Walrus Backend (Optional) services.
Your package installation is complete. You are now ready to Configure Eucalyptus .
This section describes the parameters you need to set in order to launch Eucalyptus for the first time.
The first launch of Eucalyptus is different than a restart of a previously running Eucalyptus deployment in that it sets up the security mechanisms that will be used by the installation to ensure system integrity.
Eucalyptus configuration is stored in a text file, /etc/eucalyptus/eucalyptus.conf, that contains key-value pairs specifying various configuration parameters.
We recommend enabling SELinux on host systems running Eucalyptus 4.4 services to improve their security on RHEL 7. Enabling SELinux, as described in this topic, can help contain break-ins. For more information, see RedHat SELinux documentation.
You need to set boolean values on Storage Controller (SC) and Management Console host machines. If your network mode is VPCMIDO, you also set a boolean value on the Cloud Controller (CLC) host machines. To configure SELinux on Eucalyptus 4.4 :
On each Storage Controller (SC) host machine, run the following command:
setsebool -P eucalyptus_storage_controller 1
This allows Eucalyptus to manage EBS volumes.
On each Management Console host machine, run the following command:
setsebool -P httpd_can_network_connect 1
This allows the Management Console’s HTTP proxy to access the back end.
If your cloud uses VPCMIDO networking mode, on the Cloud Controller (CLC), run the following command:
setsebool -P httpd_can_network_connect 1
This allows the CLC’s HTTP proxy to access the back end.
SELinux is now configured and ready to use with your Eucalyptus 4.4 cloud.
This section provides configuration instructions for Eucalyptus networking modes. Eucalyptus overlays a virtual network on top of your existing network. In order to do this, Eucalyptus supports these networking modes: EDGE (AWS EC2 Classic compatible) and VPCMIDO (AWS VPC compatible).
This topic provides configuration instructions for Eucalyptus EDGE network mode. Eucalyptus requires network connectivity between its clients (end-users) and the cloud components (e.g., CC, CLC, and Walrus).
To configure Eucalyptus for EDGE mode, most networking configuration is handled through settings in a global Cloud Controller (CLC) property file.
The /etc/eucalyptus/eucalyptus.conf file contains some network-related options in the “Networking Configuration” section. These options use the prefix VNET_. The most commonly used VNET options are described in the following table.
The most commonly used VNET options are described in the following table.
| Option | Description | Component |
|---|---|---|
| VNET_BRIDGE | This is the name of the bridge interface to which instances’ network interfaces should attach. A physical interface that can reach the CC must be attached to this bridge. Common setting for KVM is br0. | Node Controller |
| VNET_DHCPDAEMON | The ISC DHCP executable to use. This is set to a distro-dependent value by packaging. The internal default is /usr/sbin/dhcpd3. | Node Controller |
| VNET_MODE | The networking mode in which to run. The same mode must be specified on all CCs and NCs in your cloud. Valid values: EDGE | All CCs and NCs |
| VNET_PRIVINTERFACE | The name of the network interface that is on the same network as the NCs. Default: eth0 | Node Controller |
| VNET_PUBINTERFACE | This is the name of the network interface that is connected to the same network as the CC. Depending on the hypervisor’s configuration this may be a bridge or a physical interface that is attached to the bridge. Default: eth0 | Node Controller |
You must edit eucalyptus.conf on the Cluster Controller (CC) and Node Controller (NC) hosts. You must also create a network configuration file and upload it the Cloud Controller (CLC).
Log in to the CC and open the /etc/eucalyptus/eucalyptus.conf file. Go to the Network Configuration section, uncomment and set the following:
VNET_MODE="EDGE"
Save the file. Repeat on each CC in your cloud.
Log into an NC machine and open the /etc/eucalyptus/eucalyptus.conf file. Go to the Network Configuration section, uncomment and set the following parameters:
VNET_MODE
VNET_PRIVINTERFACE
VNET_PUBINTERFACE
VNET_BRIDGE
VNET_DHCPDAEMON
For example:
VNET_MODE="EDGE"
VNET_PRIVINTERFACE="br0"
VNET_PUBINTERFACE="br0"
VNET_BRIDGE="br0"
VNET_DHCPDAEMON="/usr/sbin/dhcpd"
Save the file. Repeat on each NC.
To configure the rest of the EDGE mode parameters, you must create a network.yaml configuration file. Later in the installation process you will Upload the Network Configuration to the CLC.
Create the network configuration file. Open a text editor. Create a file similar to the following structure.
# A list of servers that instances receive to resolve DNS names
InstanceDnsServers:
- ""

# List of public IP addresses or address ranges
PublicIps:
- ""

# A list of cluster objects that define each availability zone (AZ) in your cloud
Clusters:
-
  # Name of the cluster as it was registered
  Name: ""

  # Subnet definition that this cluster will use for private addressing
  Subnet:
    # Arbitrary name for the subnet
    Name: ""

    # The subnet that will be used for private addressing
    Subnet: ""

    # Netmask for the subnet defined above
    Netmask: ""

    # Gateway that will route packets for the private subnet
    Gateway: ""

  # List of Private IP addresses or address ranges for instances
  PrivateIps:
  - ""
Save the network.json file. The following example is for a setup with one cluster (AZ), called PARTI00, with a flat network topology.
InstanceDnsServers:
- "10.1.1.254"

PublicIps:
- "10.111.101.84"
- "10.111.101.91-10.111.101.93"

Clusters:
- Name: PARTI00

  Subnet:
    Name: "10.111.0.0"
    Subnet: "10.111.0.0"
    Netmask: "255.255.0.0"
    Gateway: "10.111.0.1"

  PrivateIps:
  - "10.111.101.94"
  - "10.111.101.95"
For a multi-cluster deployment, add an additional cluster to your configuration for each cluster you have. The following example has an two clusters, PARTI00 and PARTI01.
InstanceDnsServers:
- "10.1.1.254"

PublicIps:
- "10.111.101.84"
- "10.111.101.91-10.111.101.93"

Clusters:
- Name: PARTI00

  Subnet:
    Name: "10.111.0.0"
    Subnet: "10.111.0.0"
    Netmask: "255.255.0.0"
    Gateway: "10.111.0.1"

  PrivateIps:
  - "10.111.101.94"
  - "10.111.101.95"

- Name: PARTI01

  Subnet:
    Name: "10.111.0.0"
    Subnet: "10.111.0.0"
    Netmask: "255.255.0.0"
    Gateway: "10.111.0.1"

  PrivateIps:
  - "10.111.101.96"
  - "10.111.101.97"
This topic provides configuration instructions for Eucalyptus VPCMIDO network mode. Eucalyptus requires network connectivity between its clients (end-users) and the cloud components (e.g., CC, CLC, and storage).
To configure VPCMIDO mode parameters, you must create a network.yaml configuration file. Later in the installation process you will Upload the Network Configuration to the CLC.
Create the network configuration file. Open a text editor. Create a file similar to the following structure. This example demonstrates two gateways and two BGP peers (sections relevant to VPCMIDO are shown here).
Mode: VPCMIDO

PublicIps:
- "10.116.150.10-10.116.150.254"
- "10.117.150.10-10.117.150.254"

Mido:
  BgpAsn: "64512"
  Gateways:
  - Ip: "10.111.5.11"
    ExternalDevice: "em1.116"
    ExternalCidr: "10.116.128.0/17"
    ExternalIp: "10.116.133.11"
    BgpPeerIp: "10.116.133.173"
    BgpPeerAsn: "65000"
    BgpAdRoutes:
    - "10.116.150.0/24"
  - Ip: "10.111.5.22"
    ExternalDevice: "em1.117"
    ExternalCidr: "10.117.128.0/17"
    ExternalIp: "10.117.133.22"
    BgpPeerIp: "10.117.133.173"
    BgpPeerAsn: "65001"
    BgpAdRoutes:
    - "10.117.150.0/24"
Save the network.yaml file. The following example demonstrates a gateway with static routing configuration.
Mode: VPCMIDO

PublicIps:
- "10.116.150.10-10.116.150.254"

Mido:
  Gateways:
  - Ip: "10.111.5.11"
    ExternalDevice: "em1.116"
    ExternalCidr: "10.116.128.0/17"
    ExternalIp: "10.116.133.11"
    ExternalRouterIp: "10.116.133.173"
This topic provides detailed configuration parameter information for Eucalyptus VPCMIDO network mode.
The following table provides a list of VPCMIDO parameters.
| Parameter | Description | Validation |
|---|---|---|
| BgpAsn | (Optional) Global BGP configuration *BGP Autonomous System Number assigned (to be decided by administrator/installer) for this VPCMIDO deployment. Private ASN range should be used:16-bit: 64512 - 6553432-bit: 131072 - 4199999999 (RFC6996) | Private use blocks recommended, but owners of public ASNs can use public ASNs or other blocks if they wish.Valid range is 1 - 4294967295. |
| Gateways | (The VPCMIDO gateway parameters are below.) | Per MidoNet/BGP limitation, a maximum of 6 MidoGateways can be used. |
| Ip | Internal IP address of Mido Gateway (not to be confused with the IP address of the gateway interface used in external communications). Note: Replaces 4.3 GatewayHost parameter. | Must be a valid IP address.Must be a live IP address configured on the machine. |
| ExternalDevice | Device name of Mido Gateway interface that is physically connected to the external network (i.e., has L2 connectivity to the infrastructure router or BGP peer). This interface is dedicated for MidoNet use (Mido Gateway Operating System should not have control of this device). Note: Replaces 4.3 GatewayInterface parameter. | Must be a valid network interface connected to the network where L2 communication with BgpPeerIp (or ExternalRouterIp) can be established. |
| ExternalCidr | CIDR block used in the external routing. Note: Replaces 4.3 PublicNetworkCidr parameter. | Must be a valid CIDR block. |
| ExternalIp | IP address to be configured on ExternalDevice by eucanetd. Its subnet is as specified in ExternalCidr (ExternalCidr must contain ExternalIp). Note: Replaces 4.3 GatewayIP parameter. | Must be a valid and unused IP address.Must be within ExternalCidr.Must not be a network or broadcast address. |
| ExternalRouterIp | IP address of an external router (for static configuration). This is the router IP address used in default routes for traffic originating from MidoNet. Note: Partially replaces 4.3 PublicGatewayIp parameter. | Must be a valid and unused IP address.Must be within ExternalCidr.Must not be a network or broadcast address.Either ExternalRouterIp or BgpPeerIp is required. |
| BgpPeerIp | (Optional) BGP configuration * IP address of a BGP peer. This is the IP address to where MidoNet router will attempt to establish a BGP session.Note: Partially replaces 4.3 PublicGatewayIp parameter. | Must be a valid and unused IP address.Must be within ExternalCidr.Must not be a network or broadcast address.Either ExternalRouterIp or BgpPeerIp is required. |
| BgpPeerAsn | (Optional) BGP configuration * BGP peer ASN for this MidoGateway. | Valid range is 1 - 4294967295. |
| BgpAdRoutes | (Optional) BGP configuration * A list of CIDR blocks delegated to this VPCMIDO deployment. VPCMIDO BGP will be configured to advertise these routes. public IPs must be within these CIDR blocks. The same list can be used for all MidoGateways. The advantage of having a separate list per MidoGateway is that it allows different MidoGateways to be responsible for different CIDR blocks. If the same list of CIDR blocks is used for all MidoGateways, MidoNet built-in load sharing/balancing mechanism is used. | Each entry must be a valid CIDR block. |
| PublicIps | The public IP address ranges associated with VPCMIDO. | With BGP: Each public IP must be within one of the CIDR blocks in the union of all BgpAdRoutes entries.Must be a valid IP address range.Must not contain network or broadcast address of the CIDR blocks in the union of all BgpAdRoutes.Without BGP: On-premise infrastructure must route all PublicIps to one of the MidoGateways. |
Gateways with BGP require BgpPeerAsn , BgpAdRoutes , and BgpAsn . If all gateways are static (no BGP), BgpAsn is optional. A gateway with BGP has BgpPeerAsn and BgpAdRoutes parameters; a static gateway does not.
This topic describes how to set up the Cluster Controller (CC) to choose which Node Controller (NC) to run each new instance.In the CC, open the /etc/eucalyptus/eucalyptus.conf file. In the SCHEDPOLICY= parameter, set the value to one of the following: GREEDY When the CC receives a new instance run request, it runs the instance on the first NC in an ordered list of NCs that has capacity to run the instance. At partial capacity with some amount of churn, this policy generally results in a steady state over time where some nodes are running many instances, and some nodes are running few or no instances. ROUNDROBIN (Default) When the CC receives a new instance run request, it runs the instance on the next NC in an ordered list of NCs that has capacity. The next NC is determined by the last NC to have received an instance. At partial capacity with some amount of churn, this policy generally results in a steady state over time where instances are more evenly distributed across the set of NCs. Save the file.
Start the Eucalyptus services in the order presented in this section. Make sure that each host machine you installed a Eucalyptus service on resolves to an IP address. Edit the /etc/hosts file if necessary.
Prerequisites You should have installed and configured Eucalyptus before starting the CLC.
To initialize and start the CLC
Log in to the Cloud Controller (CLC) host machine. Enter the following command to initialize the CLC:
clcadmin-initialize-cloud
This command might take a minute or more to finish. If it fails, check /var/log/eucalyptus/cloud-output.log . If you want the CLC service to start at each boot-time, run this command:
systemctl enable eucalyptus-cloud.service
Enter the following command to start the CLC:
systemctl start eucalyptus-cloud.service
If you are running in VPCMIDO networking mode: If you want the eucanetd service to start at each boot-time, run this command:
systemctl enable eucanetd.service
Start the eucanetd service:
systemctl start eucanetd.service
Prerequisites You should have installed and configured Eucalyptus before starting the UFS.
To start the UFS
Log in to the User-Facing Services (UFS) host machine. If you want the UFS service to start at each boot-time, run this command:
systemctl enable eucalyptus-cloud.service
Enter the following command to start the UFS:
systemctl start eucalyptus-cloud.service
Repeat for each UFS host machine.
Prerequisites
You should have installed and configured Eucalyptus before starting the Walrus Backend.
To start the Walrus
If you want the Walrus Backend service to start at each boot-time, run this command:
systemctl enable eucalyptus-cloud.service
Log in to the Walrus Backend host machine and enter the following command:
systemctl start eucalyptus-cloud.service
Prerequisites
You should have installed and configured Eucalyptus before starting the CC.
To start the CC
Log in to the Cluster Controller (CC) host machine. If you want the CC service to start at each boot-time, run this command:
systemctl enable eucalyptus-cluster.service
Enter the following command to start the CC:
systemctl start eucalyptus-cluster.service
If you have a multi-zone setup, repeat this step on the CC in each zone.
Prerequisites
You should have installed and configured Eucalyptus before starting the SC.
To start the SC
Log in to the Storage Controller (SC) host machine. If you want the SC service to start at each boot-time, run this command:
systemctl enable eucalyptus-cloud.service
If you want the tgtd service to start at each boot-time, run this command:
systemctl enable tgtd.service
Enter the following commands to start the SC:
systemctl start tgtd.service

systemctl start eucalyptus-cloud.service
If you have a multi-zone setup, repeat this step on the SC in each zone.
Prerequisites You should have installed and configured Eucalyptus before starting the NC.
To start the NC
Log in to the Node Controller (NC) host machine. If you want the NC service to start at each boot-time, run this command:
systemctl enable eucalyptus-node.service
Enter the following command to start the NC:
systemctl start eucalyptus-node.service
If you are running in EDGE networking mode: If you want the eucanetd service to start at each boot-time, run this command:
systemctl enable eucanetd.service
Start the eucanetd service:
systemctl start eucanetd.service
Repeat for each NC host machine.
Log in to the Management Console host machine. If you want the console service to start at each boot-time, run this command:
systemctl enable eucaconsole.service
Enter the following command to start the console:
systemctl start eucaconsole.service
Repeat for each Management Console host machine.
At this point, all Eucalyptus services are enabled and starting up. Some of these services perform intensive initialization at start-up, particularly the first time they are started. You might have to wait a few minutes until they are fully operational.
One quick way to determine if the components are running is to run netstat on the various hosts and look to see when the service ports are allocated to a process. Specifically, the CLC, Walrus, and the SC allocate ports 8773. The CC listens to port 8774, and the NC uses port 8775.
Verify that everything has started without error. Expected outcomes include:
This section describes how to register Eucalyptus services.
Eucalyptus implements a secure protocol for registering separate services so that the overall system cannot be tricked into including a service run by an unauthorized administrator or user.
You need only register services once. Most registration commands run on the CLC server.
Note that each registration command will attempt an SSH as root to the remote physical host where the registering service is assumed to be running. The registration command also contacts the service so it must be running at the time the command is issued. If a password is required to allow SSH access, the command will prompt the user for it.
Registration commands need the following information:
This topic describes how to register the User-Facing Services (UFS) with the Cloud Controller (CLC).
Prerequisites
To register the User-Facing Services with the Eucalyptus cloud
On the CLC host machine, obtain your temporary access keys for the Eucalyptus set up by running the following command:
eval `clcadmin-assume-system-credentials`
Also on the CLC host machine, run the following command:
euserv-register-service -t user-api -h IP SVCINSTANCE
where:
SVCINSTANCE is the IP address of the UFS you are registering.For example:
euserv-register-service -t user-api -h 10.111.5.183 user-api-1
Repeat for each UFS host, replacing the UFS IP address and UFS name. Copy the security credentials from the CLC to each machine running User-Facing Services. Run this command on the CLC host machine:
clcadmin-copy-keys HOST [HOST ...]
For example:
clcadmin-copy-keys 10.111.5.183
Verify that the User-Facing service is registered with the following command for each instance of the UFS:
euserv-describe-services SVCINSTANCE
The registered UFS instances are now ready for your cloud.
This topic describes how to register the Walrus Backend service with the Cloud Controller (CLC).
Prerequisites
To register the Walrus Backend service with the Eucalyptus cloud
On the CLC host machine, run the following command:
euserv-register-service -t walrusbackend -h IP SVCINSTANCE
where:
SVCINSTANCE is the IP of the Walrus Backend you are registering with this CLC.For example:
euserv-register-service -t walrusbackend -h 10.111.5.182 walrus-10.111.5.182
Copy the security credentials from the CLC to each machine running a Walrus Backend service. Run this command on the CLC host machine:
clcadmin-copy-keys HOST [HOST ...]
For example:
clcadmin-copy-keys 10.111.5.182
Verify that the Walrus Backend service is registered with the following command:
euserv-describe-services SVCINSTANCE
The registered Walrus Backend service is now ready for your cloud.
This topic describes how to register a Cluster Controller (CC) with the Cloud Controller (CLC).
Prerequisites
To register the Cluster Controller service with the Eucalyptus cloud
On the CLC host machine, run the following command:
euserv-register-service -t cluster -h IP -z ZONE SVCINSTANCE
where:
SVCINSTANCE is the IP address of the CC you are registering with this CLC.For example:
euserv-register-service -t cluster -h 10.111.5.182 -z zone-1 cc-10.111.5.182
Copy the security credentials from the CLC to each machine running Cluster Controller services. Run this command on the CLC host machine:
clcadmin-copy-keys -z ZONE HOST
For example:
clcadmin-copy-keys -z zone-1 10.111.5.182
Repeat the above steps for each Cluster Controller in each zone. Verify that the Cluster Controller service is registered with the following command:
euserv-describe-services SVCINSTANCE
The registered Cluster Controller service is now ready for your cloud.
This topic describes how to register a Storage Controller (SC) with the Cloud Controller (CLC).
Prerequisites
To register the Storage Controller service with the Eucalyptus cloud
Copy the security credentials from the CLC to each machine running Storage Controller services. Run this command on the CLC host machine:
clcadmin-copy-keys -z ZONE HOST
For example:
clcadmin-copy-keys -z zone-1 10.111.5.182
On the CLC host machine, run the following command:
euserv-register-service -t storage -h IP -z ZONE SVCINSTANCE
where:
SVCINSTANCE is the IP address of the SC you are registering with this CLC.For example:
euserv-register-service -t storage -h 10.111.5.182 -z zone-1 sc-10.111.5.182
Repeat the above steps for each Storage Controller in each zone. Verify that the Storage Controller service is registered with the following command:
euserv-describe-services SVCINSTANCE
The registered Storage Controller service is now ready for your cloud.
This topic describes how to register a Node Controller (NC) with a Cluster Controller (CC).
Prerequisites
To register the Node Controller service with the Eucalyptus cloud
SSH to the Cluster Controller in the zone. On the CC, register all NCs using the following command with the IP address of each NC host machine:
clusteradmin-register-nodes node0_IP_address ... [nodeN_IP_address]
For example:
clusteradmin-register-nodes 10.111.5.160 10.111.5.161 10.111.5.162
Copy the CC’s security credentials using the following command:
clusteradmin-copy-keys node0_IP_address ... [nodeN_IP_address]
For example:
clusteradmin-copy-keys 10.111.5.160 10.111.5.161 10.111.5.162
Repeat the steps for each zone in your cloud. The registered Node Controller service is now ready for your cloud.
After Eucalyptus is installed and registered, perform the tasks in this section to configure the runtime environment.Now that you have installed Eucalyptus , you’re ready to begin configuring and using it.
Eucalyptus provides a DNS service that maps service names, bucket names, and more to IP addresses. This section details how to configure the Eucalyptus DNS service.
Before using the DNS service, configure the DNS subdomain name that you want Eucalyptus to handle using the steps that follow.
Log in to the CLC and enter the following:
euctl system.dns.dnsdomain=mycloud.example.com
You can configure the load balancer DNS subdomain. To do so, log in to the CLC and enter the following:
euctl services.loadbalancing.dns_subdomain=lb
To enable mapping of instance IPs to DNS host names:
Enter the following command on the CLC:
euctl bootstrap.webservices.use_instance_dns=true
When this option is enabled, public and private DNS entries are created for each launched instance in Eucalyptus . This also enables virtual hosting for Walrus. Buckets created in Walrus can be accessed as hosts. For example, the bucket mybucket is accessible as mybucket.objectstorage.mycloud.example.com .
Instance IP addresses will be mapped as euca-A-B-C-D.eucalyptus.mycloud.example.com , where A-B-C-D is the IP address (or addresses) assigned to your instance.
If you want to modify the subdomain that is reported as part of the instance DNS name, enter the following command:
euctl cloud.vmstate.instance_subdomain=.custom-dns-subdomain
When this value is modified, the public and private DNS names reported for each instance will contain the specified custom DNS subdomain name, instead of the default value, which is eucalyptus . For example, if this value is set to foobar , the instance DNS names will appear as euca-A-B-C-D.foobar.mycloud.example.com .
DNS delegation allows you to forward DNS traffic for the Eucalyptus subdomain to the Eucalyptus CLC host. This host acts as a name server. This allows interruption-free access to Eucalyptus cloud services in the event of a failure. The CLC host is capable of mapping cloud host names to IP addresses of the CLC and UFS / OSG host machines.
For example, if the IP address of the CLC is 192.0.2.5 , and the IP address of Walrus is 192.0.2.6 , the host compute.mycloud.example.com resolves to 192.0.2.5 and objectstorage.mycloud.example.com resolves to 192.0.2.6 .
To enable DNS delegation:
Enter the following command on the CLC:
euctl bootstrap.webservices.use_dns_delegation=true
Set up your master DNS server to delegate the Eucalyptus subdomain to the UFS host machines, which act as name servers.
The following example shows how the Linux name server bind is set up to delegate the Eucalyptus subdomain.
Open /etc/named.conf and set up the example.com zone. For example, your /etc/named.conf may look like the following:
zone "example.com" IN {
	      type master;
	      file "/etc/bind/db.example.com";
	      };
Create /etc/bind/db.example.com if it does not exist. If your master DNS is already set up for example.com , you will need to add a name server entry for UFS host machines. For example:
$ORIGIN example.com.
$TTL 604800

@ IN    SOA ns1 admin.example.com 1 604800 86400 2419200 604800
        NS  ns1
ns1     A   MASTER.DNS.SERVER_IP
ufs1    A   UFS1_IP
mycloud NS  ufs1
After this, you will be able to resolve your instances’ public DNS names such as euca-A-B-C-D.eucalyptus.mycloud.example.com .
Restart the bind nameserver service named restart . Verify your setup by pointing /etc/resolv.conf on your client to your primary DNS server and attempt to resolve compute.example.com using ping or nslookup. It should return the IP address of a UFS host machine.
Recursive lookups and split-horizon DNS are available in Eucalyptus .
To enable any of the DNS resolvers, set dns.enabled to true . To enable the recursive DNS resolver, set dns.recursive.enabled to true . To enable split-horizon DNS resolution for internal instance public DNS name queries, set dns.split_horizon.enabled to true .
You can configure instances to use AWS region FQDNs for service endpoints by enabling DNS spoofing.
Set up a Eucalyptus cloud with Eucalyptus DNS and HTTPS endpoints. When creating CSR, make sure and add Subject Alternative Names for all the supported AWS services for the given region that’s being tested. For example:
$ openssl req -in wildcard.c-06.autoqa.qa1.eucalyptus-systems.com.csr
						-noout -text | less X509v3 Subject Alternative Name:
     DNS:ec2.us-east-1.amazonaws.com, DNS:autoscaling.us-east-1.amazonaws.com,
     DNS:cloudformation.us-east-1.amazonaws.com, DNS:monitoring.us-east-1.amazonaws.com,
     DNS:elasticloadbalancing.us-east-1.amazonaws.com, DNS:s3.amazonaws.com,
     DNS:sts.us-east-1.amazonaws.com
Set DNS spoofing:
[root@d-17 ~]#  euctl dns.spoof_regions --region euca-admin@future
dns.spoof_regions.enabled = true
dns.spoof_regions.region_name =
dns.spoof_regions.spoof_aws_default_regions = true
dns.spoof_regions.spoof_aws_regions = true
Launch an instance, and allow SSH access. SSH into the instance and install AWS CLI.
ubuntu@euca-172-31-12-59:~$ sudo apt-get install -y python-pip
ubuntu@euca-172-31-12-59:~$ sudo -H pip install --upgrade pip
ubuntu@euca-172-31-12-59:~$ sudo -H pip install --upgrade awscli
Run aws configure and set access and secret key information if not using instance profile. Confirm AWS CLI works with HTTPS Eucalyptus service endpoint:
ubuntu@euca-172-31-12-59:~$ aws --ca-bundle euca-ca-0.crt
--endpoint-url https://ec2.c-06.autoqa.qa1.eucalyptus-systems.com/ ec2 describe-key-pairs
{
    "KeyPairs": [
        {
            "KeyName": "devops-admin",
            "KeyFingerprint": "ee:4f:93:a8:87:8d:80:8d:2c:d6:d5:60:20:a3:2d:b2"
        }
    ]
}
Test against AWS FQDN service endpoint that matches one of the SANs in the signed certificate:
ubuntu@euca-172-31-12-59:~$ aws --ca-bundle euca-ca-0.crt
--endpoint-url https://ec2.us-east-1.amazonaws.com ec2 describe-key-pairs{
    "KeyPairs": [
        {
            "KeyName": "devops-admin",
            "KeyFingerprint": "ee:4f:93:a8:87:8d:80:8d:2c:d6:d5:60:20:a3:2d:b2"
        }
    ]
}
After your cloud is running and DNS is functional, create a user and access key for day-to-day cloud administration.
Eucalyptus admin tools and Euca2ools commands need configuration from ~/.euca . If the directory does not yet exist, create it:
mkdir ~/.euca
Choose a name for the new user and create it along with an access key:
euare-usercreate -wld DOMAIN USER >~/.euca/FILE.ini
where:
This creates a file with a region name that matches that of your cloud’s DNS domain; you can edit the file to change the region name if needed.
Switch to the new admin user:
# eval `clcadmin-release-credentials`
# export AWS_DEFAULT_REGION=REGION
where:
As long as this file exists in ~/.euca , you can use it by repeating the export command above. These euca2ools.ini configuration files are a flexible means of managing cloud regions and users.
Alternatively you can configure the default region in the global section of your Euca2ools configuration:
# cat ~/.euca/global.ini
[global]
default-region = REGION
setting the REGION to the one from the earlier step means you do not have to use export to select the region.
The eucalyptus account can act as other accounts for administrative purposes. To act as the admin user in the account-1 account run:
# eval `clcadmin-impersonate-user -a account-1 -u admin`
Impersonating an account allows you to view and modify resources for that account. For example, you can clean up resources in an account before deleting it.
To stop impersonating run:
clcadmin-release-credentials
The remainder of this guide assumes you have completed the above steps.
Use these credentials after this point.
This topic describes how to upload the network configuration created earlier in the installation process. To upload your networking configuration:
Run the following command to upload the configuration file to the CLC (with valid Eucalyptus admin credentials):
euctl cloud.network.network_configuration=@/path/to/your/network_config_file
To review the existing network configuration run:
euctl --dump --format=raw cloud.network.network_configuration
When you use the Ansible playbook for deployment a network configuration file is available at /etc/eucalyptus/network.yaml on the CLC.
These are the types of storage available for your Eucalyptus cloud. Object storage Eucalyptus provides an AWS S3 compatible object storage service that provides users with web-based general purpose storage, designed to be scalable, reliable and inexpensive. You choose the object storage backend provider: Walrus or Ceph RGW. The Object Storage Gateway (OSG) provides access to objects via the backend provider you choose.
Block storage Eucalyptus provides an AWS EBS compatible block storage service that provides block storage for EC2 instances. Volumes can be created as needed and dynamically attached and detached to instances as required. EBS provides persistent data storage for instances: the volume, and the data on it, can exist beyond the lifetime of an instance. You choose the block storage backend provider for a deployment.
This topic describes how to configure block storage on the Storage Controller (SC) for the backend of your choice.
The Storage Controller (SC) provides functionality similar to the Amazon Elastic Block Store (Amazon EBS). The SC can interface with various storage systems. Eucalyptus block storage (EBS) exports storage volumes that can be attached to a VM and mounted or accessed as a raw block device. EBS volumes can persist past VM termination and are commonly used to store persistent data.
Eucalyptus provides the following open source (free) backend providers for the SC:
You must configure the SC to use one of the backend provider options.
This topic describes how to configure Ceph-RBD as the block storage backend provider for the Storage Controller (SC).Prerequisites
Successful completion of all the install sections prior to this section.
The SC must be installed, registered, and running.
You must execute the steps below as a administrator.
You must have a functioning Ceph cluster.
Ceph user credentials with the following privileges are available to SCs and NCs (different user credentials can be used for the SCs and NCs).
Hypervisor support for Ceph-RBD on NCs. Node Controllers (NCs) are designed to communicate with the Ceph cluster via libvirt. This interaction requires a hypervisor that supports Ceph-RBD. See to satisfy this prerequisite. To configure Ceph-RBD block storage for the zone, run the following commands on the CLC Configure the SC to use Ceph-RBD for EBS.
euctl ZONE.storage.blockstoragemanager=ceph-rbd
The output of the command should be similar to:
one.storage.blockstoragemanager=ceph-rbd
Verify that the property value is now ceph-rbd :
euctl ZONE.storage.blockstoragemanager
Check the SC to be sure that it has transitioned out of the BROKEN state and is in the NOTREADY , DISABLED or ENABLED state before configuring the rest of the properties for the SC. The ceph-rbd provider will assume defaults for the following properties for the SC:
euctl ZONE.storage.ceph

PROPERTY        one.storage.cephconfigfile  /etc/ceph/ceph.conf
DESCRIPTION     one.storage.cephconfigfile  Absolute path to Ceph configuration (ceph.conf) file. Default value is '/etc/ceph/ceph.conf'

PROPERTY        one.storage.cephkeyringfile /etc/ceph/ceph.client.eucalyptus.keyring
DESCRIPTION     one.storage.cephkeyringfile Absolute path to Ceph keyring (ceph.client.eucalyptus.keyring) file. Default value is '/etc/ceph/ceph.client.eucalyptus.keyring'

PROPERTY        one.storage.cephsnapshotpools       rbd
DESCRIPTION     one.storage.cephsnapshotpools       Ceph storage pool(s) made available to  for EBS snapshots. Use a comma separated list for configuring multiple pools. Default value is 'rbd'

PROPERTY        one.storage.cephuser        eucalyptus
DESCRIPTION     one.storage.cephuser        Ceph username employed by  operations. Default value is 'eucalyptus'

PROPERTY        one.storage.cephvolumepools rbd
DESCRIPTION     one.storage.cephvolumepools Ceph storage pool(s) made available to  for EBS volumes. Use a comma separated list for configuring multiple pools. Default value is 'rbd'
The following steps are optional if the default values do not work for your cloud: To set the Ceph username (the default value for Eucalyptus is ’eucalyptus’):
euctl ZONE.storage.cephuser=myuser
To set the absolute path to keyring file containing the key for the ’eucalyptus’ user (the default value is ‘/etc/ceph/ceph.client.eucalyptus.keyring’):
euctl ZONE.storage.cephkeyringfile='/etc/ceph/ceph.client.myuser.keyring'
euctl ZONE.storage.cephconfigfile=/path/to/ceph.conf
To change the comma-delimited list of Ceph pools assigned to Eucalyptus for managing EBS volumes (default value is ‘rbd’) :
euctl ZONE.storage.cephvolumepools=rbd,myvolumes
To change the comma-delimited list of Ceph pools assigned to Eucalyptus for managing EBS snapshots (default value is ‘rbd’) :
euctl ZONE.storage.cephsnapshotpools=mysnapshots
If you want to enable snapshot deltas for your Ceph backend:
euctl ZONE.storage.shouldtransfersnapshots=true
Set the maximum number of deltas to be created before creating a new full snapshot:
euctl ZONE.storage.maxsnapshotdeltas=NON_ZERO_INTEGER
CEPH_USER_NAME="eucalyptus"
CEPH_KEYRING_PATH="/etc/ceph/ceph.client.eucalyptus.keyring"
CEPH_CONFIG_PATH="/etc/ceph/ceph.conf"
To override the above defaults, add/edit the following properties in the /etc/eucalyptus/eucalyptus.conf on the specific NC file:
CEPH_USER_NAME="ceph-username-for-use-by-this-NC"
CEPH_KEYRING_PATH="path-to-keyring-file-for-ceph-username"
CEPH_CONFIG_PATH="path-to-ceph.conf-file"
Repeat this step for every NC in the specific Eucalyptus zone. Your Ceph backend is now ready to use with Eucalyptus .
This topic describes how to configure the hypervisor for Ceph-RBD support.The following instructions will walk you through steps for verifying and or installing the required hypervisor for Ceph-RBD support. Repeat this process for every NC in the Eucalyptus zone
Verify if qemu-kvm and qemu-img are already installed.
rpm -q qemu-kvm qemu-img
Proceed to the preparing the RHEV qemu packages step if they are not installed.
Verify qemu support for the ceph-rbd driver.
qemu-img --help
qemu-img version 0.12.1, Copyright (c) 2004-2008 Fabrice Bellard
...
Supported formats: raw cow qcow vdi vmdk cloop dmg bochs vpc vvfat qcow2 qed vhdx parallels nbd blkdebug host_cdrom
host_floppy host_device file gluster gluster gluster gluster rbd
eucalyptus-node service is running, terminate/stop all instances. After all instances are terminated, stop the eucalyptus-node service.systemctl stop eucalyptus-node.service
Prepare the RHEV qemu packages:
If this NC is a RHEL system and the RHEV subscription to qemu packages is available, consult the RHEV package procedure to install the qemu-kvm-ev and qemu-img-ev packages. Blacklist the RHEV packages in the repository to ensure that packages from the RHEV repository are installed.
If this NC is a RHEL system and RHEV subscription to qemu packages is unavailable, built and maintained qemu-rhev packages may be used. These packages are available in the same yum repository as other packages. Note that using built RHEV packages voids the original RHEL support for the qemu packages.
If this NC is a non-RHEL (CentOS) system, -built and maintained qemu-rhev packages may be used. These packages are available in the same yum repository as other packages.
If you are not using the RHEV package procedure to install the qemu-kvm-ev and qemu-img-ev packages, install Eucalyptus -built RHEV packages: qemu-kvm-ev and qemu-img-ev , which can be found in the same yum repository as other Eucalyptus packages.
yum install qemu-kvm-ev qemu-img-ev
Start the libvirtd service.
systemctl start libvirtd.service
Verify qemu support for the ceph-rbd driver.
qemu-img --help
qemu-img version 0.12.1, Copyright (c) 2004-2008 Fabrice Bellard
...
Supported formats: raw cow qcow vdi vmdk cloop dmg bochs vpc vvfat qcow2 qed vhdx parallels nbd blkdebug host_cdrom
host_floppy host_device file gluster gluster gluster gluster rbd
Make sure the eucalyptus-node service is started.
systemctl start eucalyptus-node.service
Your hypervisor is ready for Eucalyptus Ceph-RBD support. You are now ready to configure Ceph-RBD for Eucalyptus .
This topic describes the initial state of the Storage Controller (SC) after you have registered it with the Cloud Controller (CLC).The SC automatically goes to the broken state after being registered with the CLC; it will remain in that state until you explicitly configure the SC by telling it which backend storage provider to use.
You can check the state of a storage controller by running euserv-describe-services --expert and note the state and status message of the SC(s). The output for an unconfigured SC looks something like this:
SERVICE	storage        	ZONE1        	SC71           	BROKEN    	37  	http://192.168.51.71:8773/services/Storage	arn:euca:eucalyptus:ZONE1:storage:SC71/
SERVICEEVENT	6c1f7a0a-21c9-496c-bb79-23ddd5749222	arn:euca:eucalyptus:ZONE1:storage:SC71/
SERVICEEVENT	6c1f7a0a-21c9-496c-bb79-23ddd5749222	ERROR
SERVICEEVENT	6c1f7a0a-21c9-496c-bb79-23ddd5749222	Sun Nov 18 22:11:13 PST 2012
SERVICEEVENT	6c1f7a0a-21c9-496c-bb79-23ddd5749222	SC blockstorageamanger not configured. Found empty or unset manager(unset). Legal values are: das,overlay,ceph
Note the error above: SC blockstoragemanager not configured. Found empty or unset manager(unset). Legal values are: das,overlay,ceph .
This indicates that the SC is not yet configured. It can be configured by setting the ZONE.storage.blockstoragemanager property to ‘das’, ‘overlay’, or ‘ceph’.
You can verify that the configured SC block storage manager using:
euctl ZONE.storage.blockstoragemanager
to show the current value.
This topic describes how to configure the DAS-JBOD as the block storage backend provider for the Storage Controller (SC).Prerequisites
Successful completion of all the install sections prior to this section.
The SC must be installed, registered, and running.
Direct Attached Storage requires that have enough space for locally cached snapshots.
You must execute the steps below as a administrator. To configure DAS-JBOD block storage for the zone, run the following commands on the CLC Configure the SC to use the Direct Attached Storage for EBS.
euctl ZONE.storage.blockstoragemanager=das
The output of the command should be similar to:
one.storage.blockstoragemanager=das
Verify that the property value is now: ‘das’
euctl ZONE.storage.blockstoragemanager
Set the DAS device name property. The device name can be either a raw device (/dev/sdX, for example), or the name of an existing Linux LVM volume group.
euctl ZONE.storage.dasdevice=DEVICE_NAME
For example:
euctl one.storage.dasdevice=/dev/sdb
Your DAS-JBOD backend is now ready to use with Eucalyptus .
This topic describes how to configure the local filesystem as the block storage backend provider for the Storage Controller (SC).Prerequisites
To configure overlay block storage for the zone, run the following commands on the CLC Configure the SC to use the local filesystem for EBS.
euctl ZONE.storage.blockstoragemanager=overlay
The output of the command should be similar to:
one.storage.blockstoragemanager=overlay
Verify that the property value is now: ‘overlay’
euctl ZONE.storage.blockstoragemanager
Your local filesystem (overlay) backend is now ready to use with Eucalyptus .
This topic describes how to configure object storage on the Object Storage Gateway (OSG) for the backend of your choice. The OSG passes requests to object storage providers and talks to the persistence layer (DB) to authenticate requests. You can use Walrus, MinIO, or Ceph-RGW as the object storage provider.
Walrus - the default backend provider. It is a single-host Eucalyptus -integrated provider which provides basic object storage functionality for the small scale. Walrus is intended for light S3 usage.
MinIO - a high performing scalable object storage provider. MinIO implements the S3 API which is used by the OSG, not directly by end users. Distributed MinIO provides protection against multiple node/drive failures and bit rot using erasure code.
Ceph-RGW - an object storage interface built on top of Librados to provide applications with a RESTful gateway to Ceph Storage Clusters. Ceph-RGW uses the Ceph Object Gateway daemon (radosgw), which is a FastCGI module for interacting with a Ceph Storage Cluster. Since it provides interfaces compatible with OpenStack Swift and Amazon S3, the Ceph Object Gateway has its own user management. Ceph Object Gateway can store data in the same Ceph Storage Cluster used to store data from Ceph Filesystem clients or Ceph Block Device clients. The S3 and Swift APIs share a common namespace, so you may write data with one API and retrieve it with the other.
You must configure the OSG to use one of the backend provider options.
Example showing unconfigured objectstorage:
# euserv-describe-services --show-headers --filter service-type=objectstorage
SERVICE  TYPE              	ZONE    	NAME                   	  STATE
SERVICE  objectstorage      user-api-1  user-api-1.objectstorage  broken
This topic describes how to configure Ceph Rados Gateway (RGW) as the backend for the Object Storage Gateway (OSG).
For more information on Ceph-RGW, see the Ceph-RGW documentation.
You must execute the steps below as a administrator.
Configure ceph-rgw as the storage provider using the euctl command:
euctl objectstorage.providerclient=ceph-rgw
Configure objectstorage.s3provider.s3endpoint to the ip:port of the host running the ceph-radosgw service:
euctl objectstorage.s3provider.s3endpoint=<radosgw-host-ip>:<radosgw-webserver-port>
Configure objectstorage.s3provider.s3accesskey and objectstorage.s3provider.s3secretkey with the radosgw user credentials:
euctl objectstorage.s3provider.s3accesskey=<radosgw-user-accesskey>
euctl objectstorage.s3provider.s3secretkey=<radosgw-user-secretkey>
The Ceph-RGW backend and OSG are now ready for production.
This topic describes how to configure MinIO as the object storage backend provider for the Object Storage Gateway (OSG).
For more information on MinIO installation and configuration see the MinIO Server Documentation
You must execute the steps below as a administrator.
Configure minio as the storage provider using the euctl command:
euctl objectstorage.providerclient=minio
Configure objectstorage.s3provider.s3endpoint to the ip:port of a host running the minio server:
euctl objectstorage.s3provider.s3endpoint=<minio-host-ip>:<minio-port>
Configure objectstorage.s3provider.s3accesskey and objectstorage.s3provider.s3secretkey with credentials for minio:
euctl objectstorage.s3provider.s3accesskey=<minio-accesskey>
euctl objectstorage.s3provider.s3secretkey=<minio-secretkey>
Configure the expected response code for minio:
euctl objectstorage.s3provider.s3endpointheadresponse=400
The MinIO backend and OSG are now ready for production.
This topic describes how to configure Walrus as the object storage backend provider for the Object Storage Gateway (OSG).
You must execute the steps below as a administrator.
Configure walrus as the storage provider using the euctl command.
euctl objectstorage.providerclient=walrus
Check that the OSG is enabled.
euserv-describe-services
If the state appears as disabled or broken , check the cloud-*.log files in the /var/log/eucalyptus directory. A disabled state generally indicates that there is a problem with your network or credentials. See Log File Location and Content for more information.
The Walrus backend and OSG are now ready for production.
The Eucalyptus Imaging Service, introduced in Eucalyptus 4.0, makes it easier to deploy EBS images in your Eucalyptus cloud and automates many of the labor-intensive processes required for uploading data into EBS images.
The Eucalyptus Imaging Service is implemented as a system-controlled “worker” virtual machine that is monitored and controlled via Auto Scaling. Once the Imaging Service is configured, the Imaging Service VM will be started automatically upon the first request that requires it: such as an EBS volume ingress. Specifically, in this release of Eucalyptus , these are the usage scenarios for the Eucalyptus Imaging Service:
euca-import-volume command. If the volume was populated with a bootable disk, that volume can be snapshotted and registered as an image.euca-import-instance command, which has options for specifying the instance type and the SSH key for the instance to use.Eucalyptus provides a command-line tool for installing and registering the Imaging Worker image. Once you have run the tool, the Imaging Worker will be ready to use.Run the following commands on the machine where you installed the eucalyptus-service-image RPM package (it will set the imaging.imaging_worker_emi property to the newly created EMI of the imaging worker):
esi-install-image --region localhost --install-default
Consider setting the imaging.imaging_worker_keyname property to an SSH keyname (previously created with the euca-create-keypair command), so that you can perform troubleshooting inside the Imaging Worker instance, if necessary:
euctl services.imaging.worker.keyname=mykey
Eucalyptus automatically starts Imaging Worker instances when there are tasks for workers to perform.The cloud administrator can list the running Imaging Worker instances, if any, by running the command:
euca-describe-instances --filter tag-value=euca-internal-imaging-workers
To delete / stop the imaging worker:
esi-manage-stack -a delete imaging
To create / start the imaging worker:
esi-manage-stack -a create imaging
Consider setting the imaging.imaging_worker_instance_type property to an Instance Type with enough ephemeral disk to convert any of your paravirtual images. The Imaging Worker root filesystem takes up about 2GB, so the maximum paravirtual image that the Imaging Worker will be able to convert is the disk allocation of the Instance Type minus 2GBs.
euctl services.imaging.worker.instance_type=m3.xlarge
If the Imaging Worker is configured correctly, users will be able to import data into EBS volumes with euca-import-* commands, and paravirtual EMIs will run as instances. In some cases, though, paravirtual images may fail to convert (e.g., due to intermittent network failures or a network setup that doesn’t allow the Imaging Worker to communicate with the CLC), leaving the images in a special state. To troubleshoot:If the Imaging Worker Instance Type does not provide sufficient disk space for converting all paravirtual images, the administrator may have to change the Instance Type used by the Imaging Worker. After changing the instance type, the Imaging Worker instance should be restarted by terminating the old Imaging Worker instance:
euctl services.imaging.worker.instance_type=m2.2xlarge
euca-terminate-instances $(euca-describe-instances --filter tag-value=euca-internal-imaging-workers | grep INSTANCE | cut -f 2)
If the status of the conversion operation is ‘Image conversion failed’, but the image is marked as ‘available’ (in the output of euca-describe-images), the conversion can be retried by running the EMI again:
euca-run-instances ...
Eucalyptus provides a tool for installing and registering the Load Balancer image. Once you have run the tool, your Load Balancer will be ready to use.
Run the following commands on the machine where you installed the eucalyptus-service-image RPM package (it will set the imaging.imaging_worker_emi property to the newly created EMI of the imaging worker):
esi-install-image --install-default
If you would like to verify that Load Balancer support is enabled you can list installed Load Balancers. The currently active Load Balancer will be listed as enabled. If no Load Balancers are listed, or none are marked as enabled, then your Load Balancer support has not been configured properly.Run the following command to list installed Load Balancer images:
esi-describe-images
This will produce output similar to the followin:
SERVICE     VERSION  ACTIVE     IMAGE      INSTANCES
    imaging       2.2      *     emi-573925e5      0
 loadbalancing    2.2      *     emi-573925e5      0
    database      2.2      *     emi-573925e5      0
You can also check the enabled Load Balancer EMI with:
euctl services.loadbalancing.worker.image
If you need to manually set the enabled Load Balancer EMI use:
euctl services.loadbalancing.worker.image=emi-12345678
On some Linux installations, a sufficiently large amount of local disk activity can slow down process scheduling. This can cause other operations (e.g., network communication and instance provisioning) appear to stall. Examples of disk-intensive operations include preparing disk images for launch and creating ephemeral storage.
CONCURRENT_DISK_OPS parameter to the number of disk-intensive operations you want the NC to perform at once.CONCURRENT_DISK_OPS to 1 to serialize all disk-intensive operations. Or …