User Guide
User Guide
This User Guide instructs you how to use a Eucalyptus private cloud. As a cloud user, you will set up your account, work with images, launch instances, and so on. To install or administer and operate a Eucalyptus cloud, refer to the Eucalyptus Installation Guide and the Administration Guide, respectively.Enjoy using your Eucalyptus private cloud!
1 - Eucalyptus Overview
Eucalyptus is open source software for building AWS-compatible private and hybrid clouds. As an Infrastructure as a Service product, Eucalyptus allows you to flexibly provision your own collections of resources (both compute and storage), on an as-needed basis.
Who Should Read this Guide?
This guide is for Eucalyptus users who wish to run application workloads on a Eucalyptus cloud.
What’s in this Guide?
This guide contains instructions for users of the Eucalyptus cloud platform. While these instructions apply generally to all tools capable of interacting with Eucalyptus, such as the Eucalyptus Management Console or the AWS S3 toolset, but the primary focus is on the use of Euca2ools (Eucalyptus command line tools). The following is an overview of the contents of this guide.
Eucalyptus Features
Eucalyptus offers ways to implement, manage, and maintain your own collection of virtual resources (machines, network, and storage). The following is an overview of these features.
AWS API compatibility
Eucalyptus provides API compatibility with Amazon Web Services, to allow you to use familiar tools and commands to provision your cloud.
Block- and bucket-based storage abstractions
Eucalyptus provides storage options compatible with Amazon’s EBS (block-based) and S3 (bucket-based) storage products.
Self-service capabilities
Eucalyptus offers a Management Console, allowing your users to request the resources they need, and automatically provisioning those resources where available.
Web-based Interface
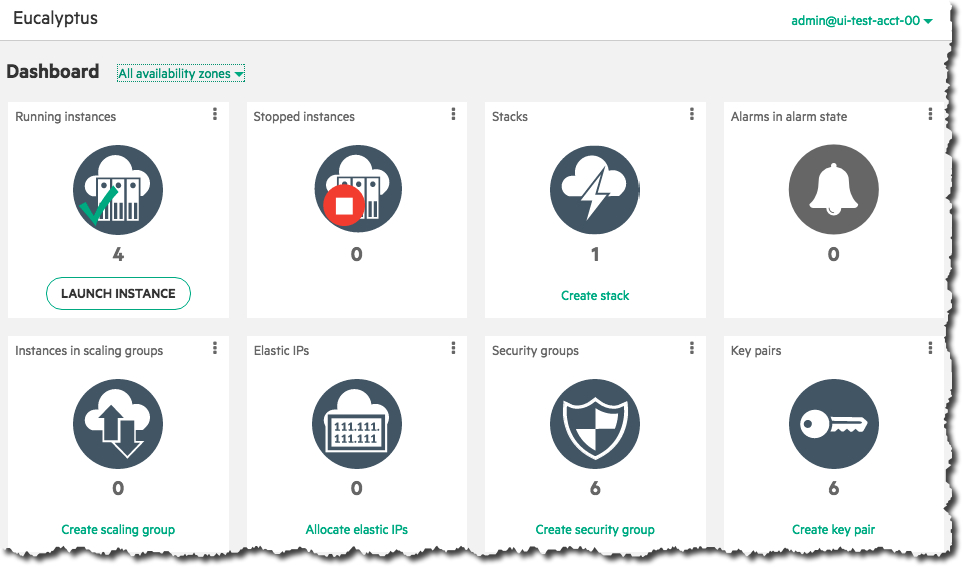
The Eucalyptus Management Console is accessible from any device via a browser. The Console initial page provides a Dashboard view of components available to you to manage, configure, provision, and generate various reports.
Resource Management
Eucalyptus offers tools to seamlessly manage a variety of virtual resources. The following is an overview of the types of resources your cloud platform.
SSH Key Management
Eucalyptus employs public and private keypairs to validate your identity when you log into VMs using SSH. You can add, describe, and delete keypairs.
Image Management
Before running instances, someone must prepare VM images for use in the cloud. This can be an administrator or a user. Eucalyptus allows you to bundle, upload, register, describe, download, unbundle, and deregister VM images.
Linux Guest OS Support
Eucalyptus lets you run your own VMs in the cloud. You can run, describe, terminate, and reboot a wide variety of Linux-based VMs that were prepared using image management commands.
IP Address Management
Eucalyptus can allocate, associate, disassociate, describe, and release IP addresses. Depending on the networking mode, you might have access to public IP addresses that are not statically associated with a VM ( Elastic IPs ). Eucalyptus provides tools to allow users to reserve and dynamically associate these elastic IPs with virtual machines.
Security Group Management
Security groups are sets of firewall rules applied to VMs associated with the group. Eucalyptus lets you create, describe, delete, authorize, and revoke security groups. How much of these things can a typical user actually do?
Volume and Snapshot Management
Eucalyptus allows you to create dynamic block volumes. A dynamic block volume is similar to a raw block storage device that can be used with virtual machines. You can create, attach, detach, describe, bundle, and delete volumes. You can also create and delete snapshots of volumes and create new volumes from snapshots.
2 - Getting Started
Getting Started
This section helps you get started using your Eucalyptus cloud, and covers setting up your user credentials, installing and configuring command line tools, and working with images and instances. As a cloud user, you can access the Eucalyptus cloud using a command line interface such as the AWS CLI, or by using a web-based interface such as the Eucalyptus Management Console.
To access Eucalyptus via the command line, you can use the AWS CLI or Euca2ools with access key credentials. To access Eucalyptus with the Management Console, you’ll need a password. Talk to your cloud administrator to get your keys and passwords.
2.1 - Getting Started with the Eucalyptus Management Console
Getting Started with the Eucalyptus Management Console
This section helps you get started using your Eucalyptus cloud with the Eucalyptus Management Console.To access Eucalyptus with the Management Console, you’ll need a password for the Management Console. Talk to your cloud administrator to get your keys and passwords.
2.1.1 - Console Login
This screen allows you to log in to the Eucalyptus Management Console with either your Eucalyptus or your Amazon Web Services account. If you’ve forgotten your password, don’t have login credentials, or do not know the URL for the Eucalyptus Management Console for your Eucalyptus account, please contact your system administrator.Navigate to the Eucalyptus Management Console by typing the URL of the Management Console into your browser’s navigation bar. The URL of the Eucalyptus Management Console depends on how the console was installed in your cloud; see your system administrator for the specific URL for your installation. Follow the appropriate instructions below for logging into either your Eucalyptus or your Amazon Web Services cloud.
Log in to your Eucalyptus cloud
This area of the login dialog allows you to log in to your Eucalyptus cloud.Click the Log in to Eucalyptus tab. Type your account name into the Account name text box. Type your user name into the User name text box. Type your password into the Password text box. Click the Log in to Eucalyptus button.
Log in to your Amazon Web Services cloud
This area of the login dialog allows you to log in to your Amazon Web Services cloud.Click the Log in to AWS tab.
Note
To obtain your AWS security credentials, go to Amazon’s page.Enter your AWS access key ID into the Access key ID text box. Enter your AWS secret access key into the Secret access key text box. Click the Log in to AWS button.
2.1.2 - Launch and Connect to an Instance with the Management Console
To launch an instance:
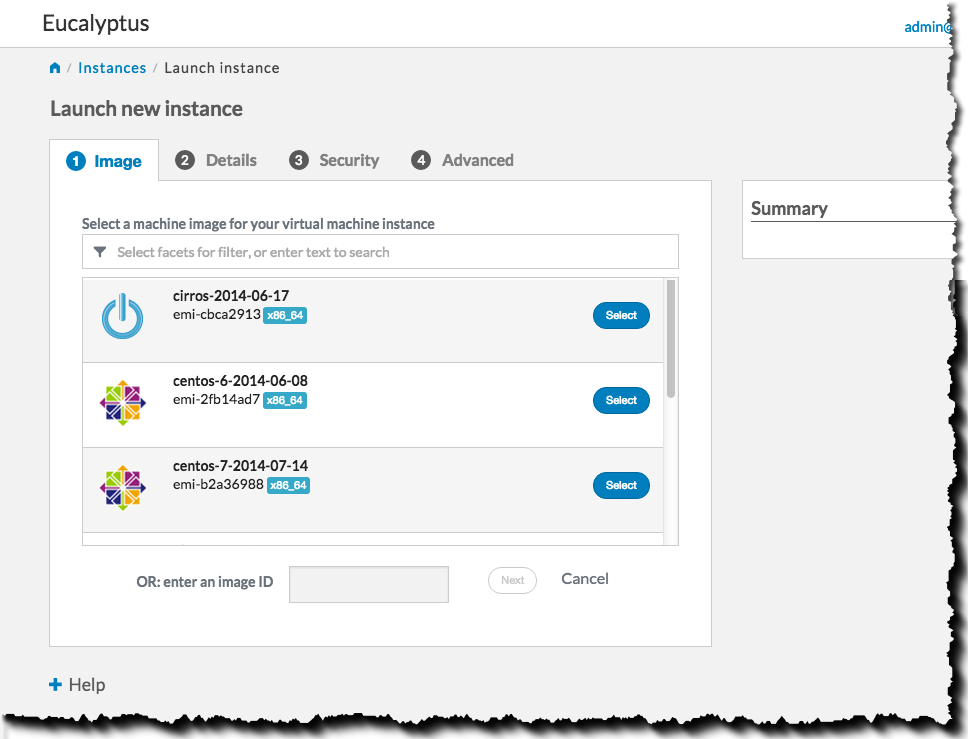
Click on the Launch Instance button on the main console page:
 Select an image from the list (for this example, we’ll select a CentOS image), then click the Next button:
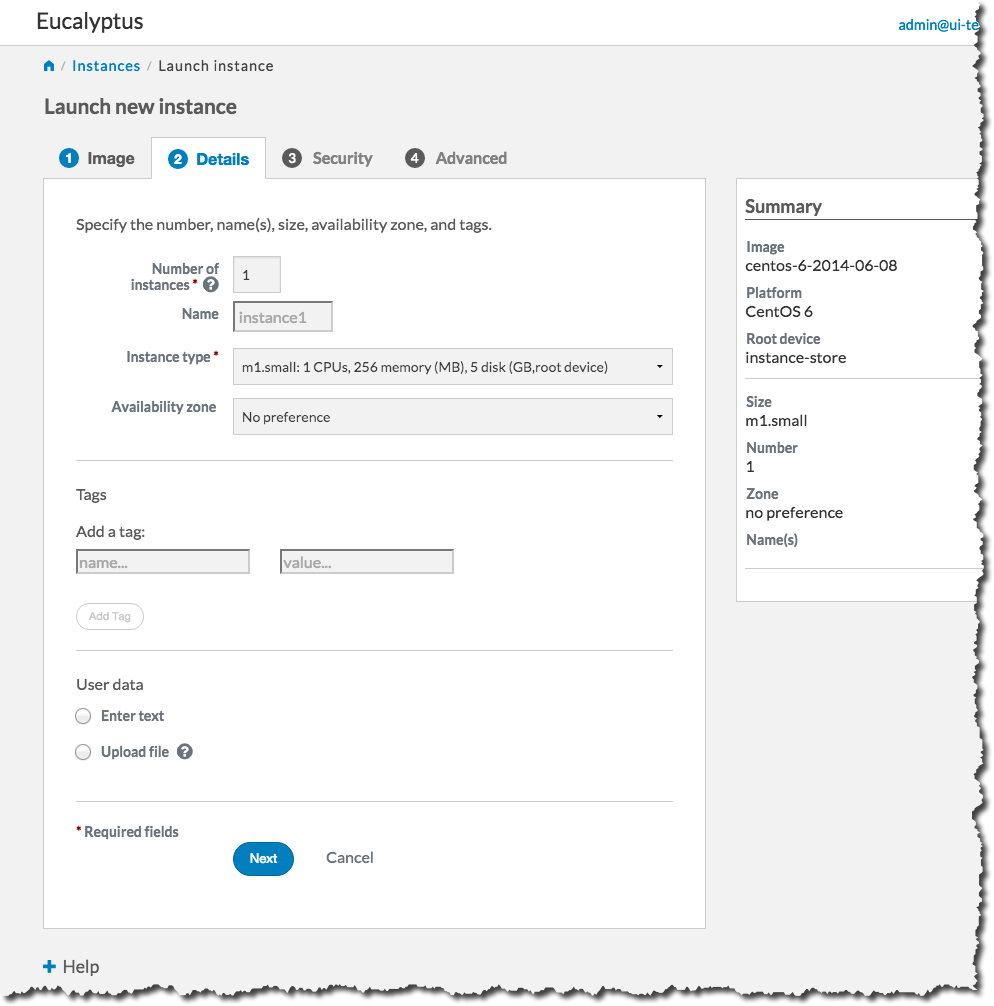
 Select an instance type and availability zone from the Details tab. For this example, select the defaults, and then click the Next button:
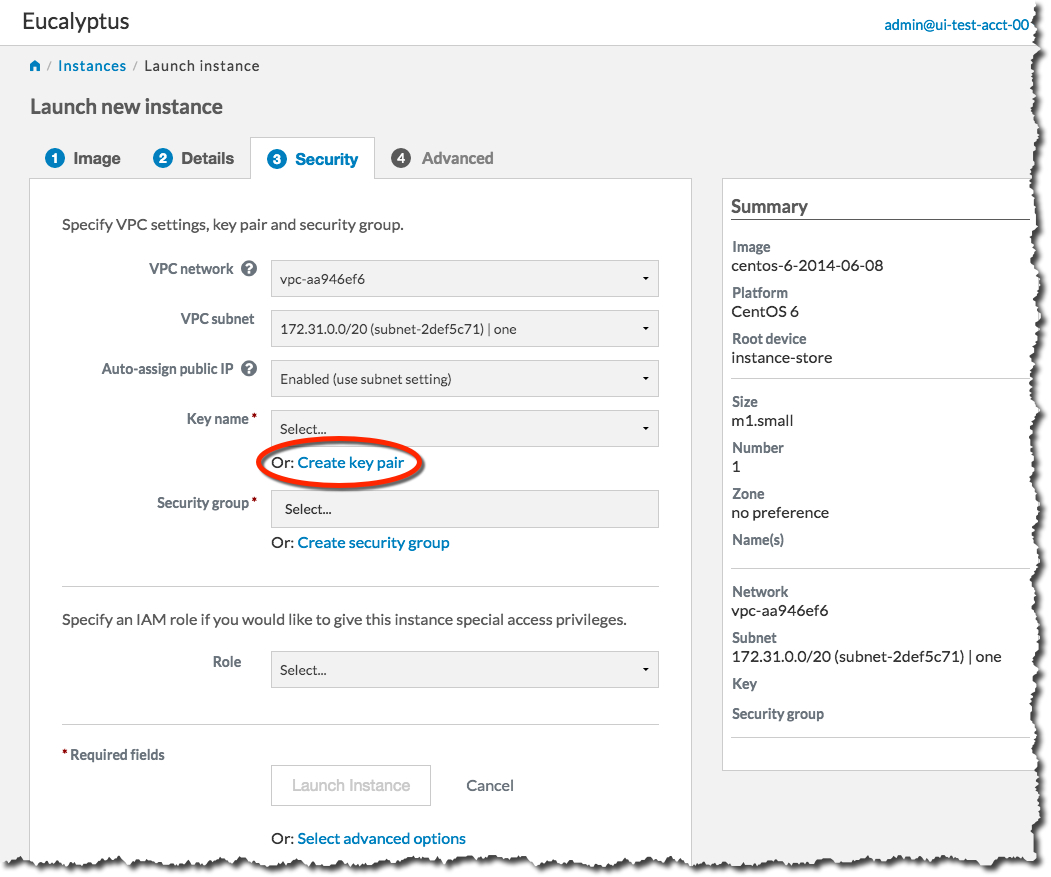
 On the Security tab, we’ll create a key pair and a security group to use with our new instance. A key pair will allow you to access your instance, and a security group allows you to define what kinds of incoming traffic your instance will allow.
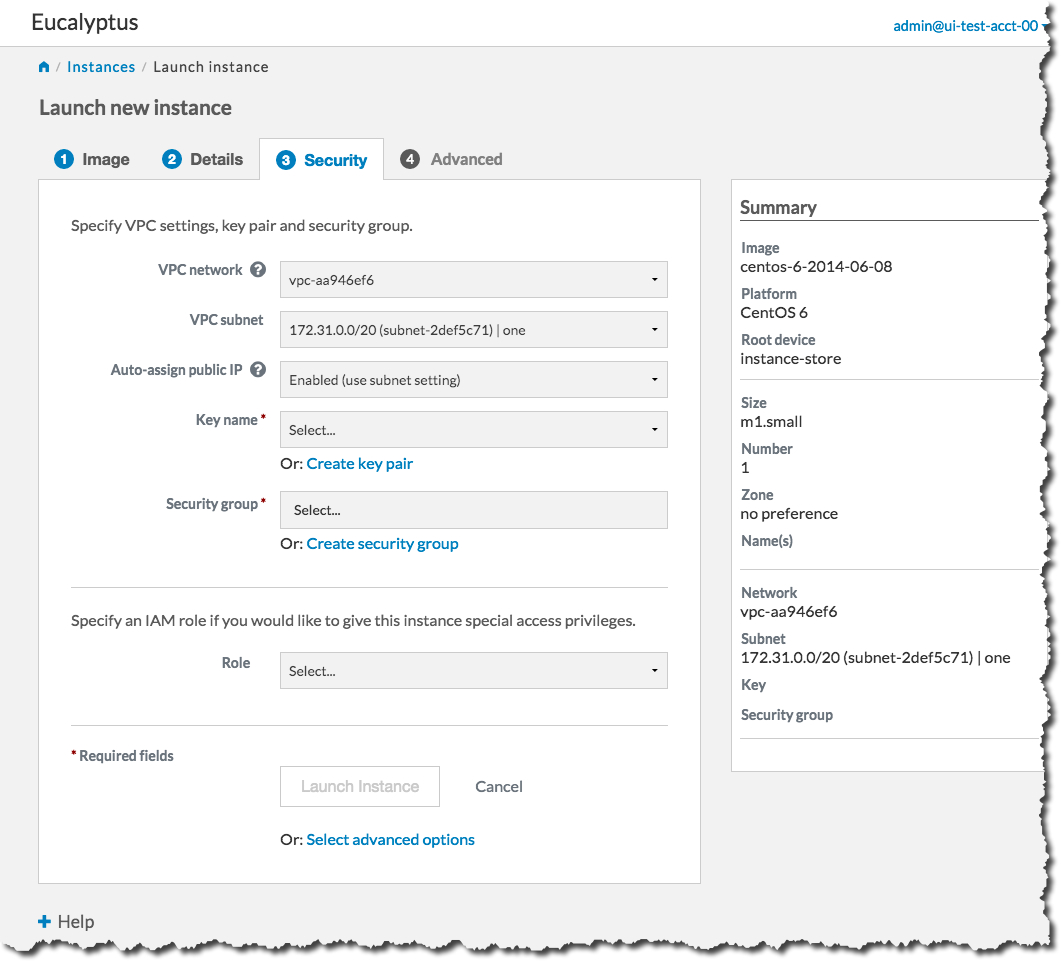 First, we will create a key pair. Click the Create key pair link to bring up the Create key pair dialog:
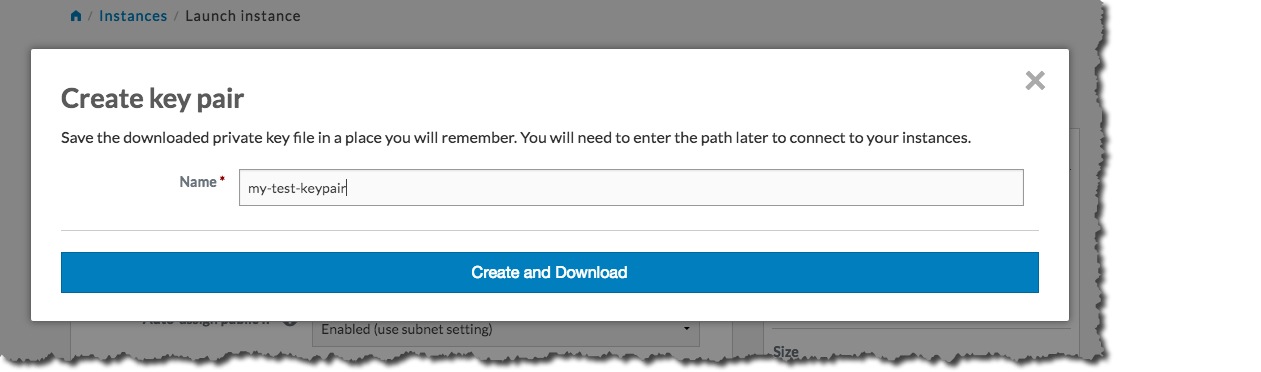
 Type the name of your new key pair into the Name text box, and then click the Create and Download button:
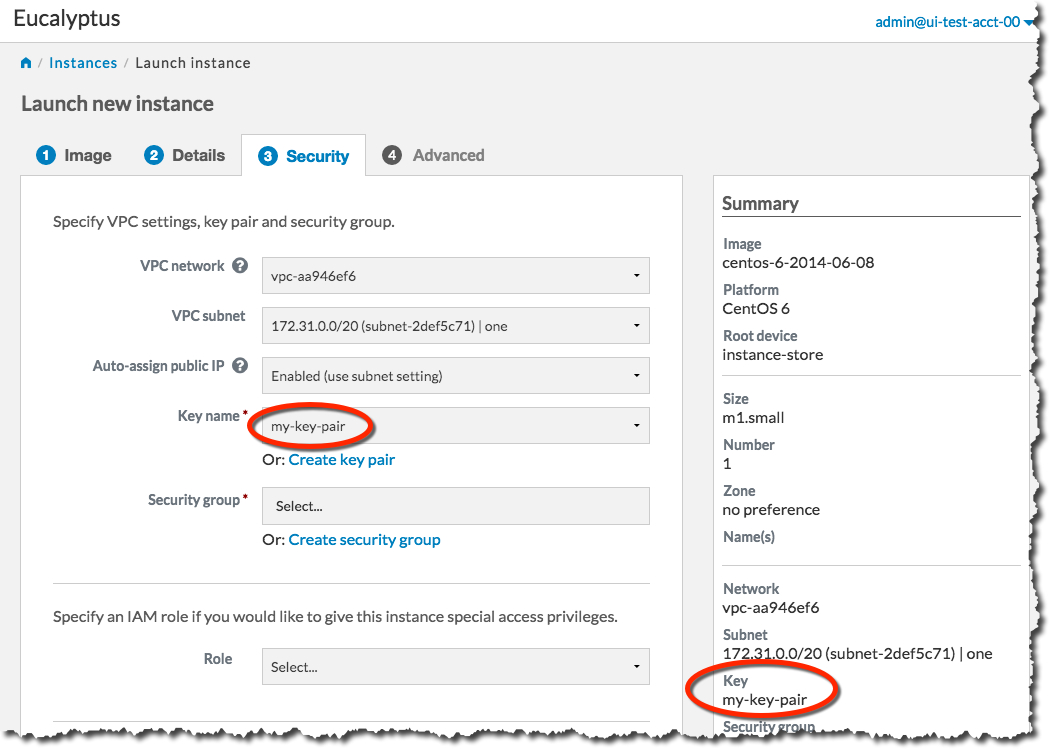
 The key pair automatically downloads to a location on your computer, typically in the Downloads folder. The Create key pair dialog will close, and the Key name text box will be populated with the name of the key pair you just created:
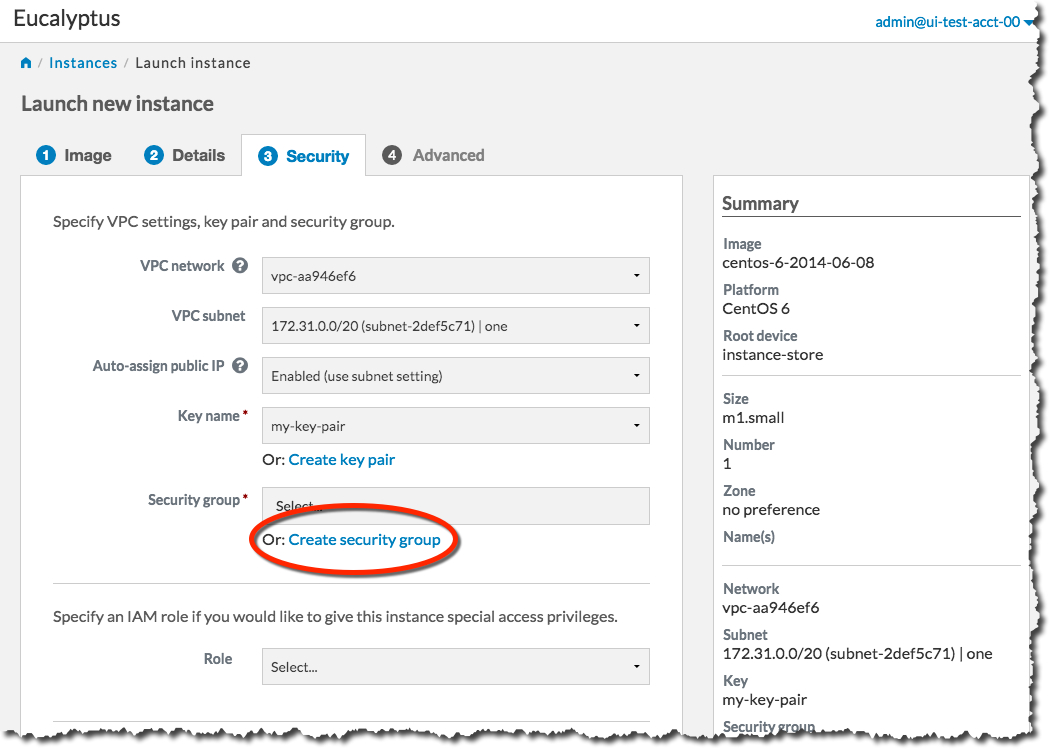
 Next, we will create a security group. Click the Create security group link to bring up the Create security group dialog:
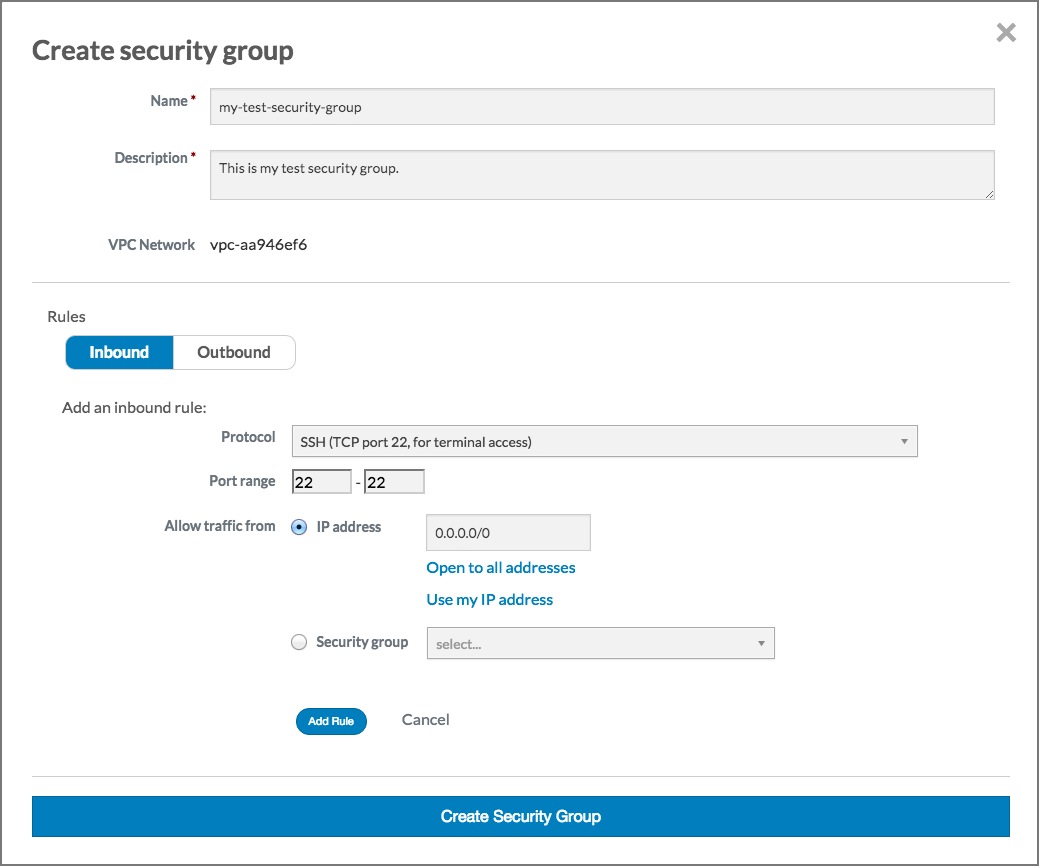
 On the Create security group dialog, type the name of your security group into the Name text box. Type a brief description of your security group into the Description text box. We’ll need to SSH into our instance later, so in the Rules section of the dialog, select the SSH protocol from the Protocol drop-down list box.
Note
In this example, we allow any IP address to access our new instance. For production use, please use appropriate caution when specifying an IP range. For more information on CIDR notation, go to .You need to specify an IP address or a range of IP addresses that can use SSH to access your instance. For this example, click the Open to all addresses link. This will populate the IP Address text box with 0.0.0.0/0, which allows any IP address to access your instance via SSH.
Click the Add rule button. The Create security group dialog should now look something like this:
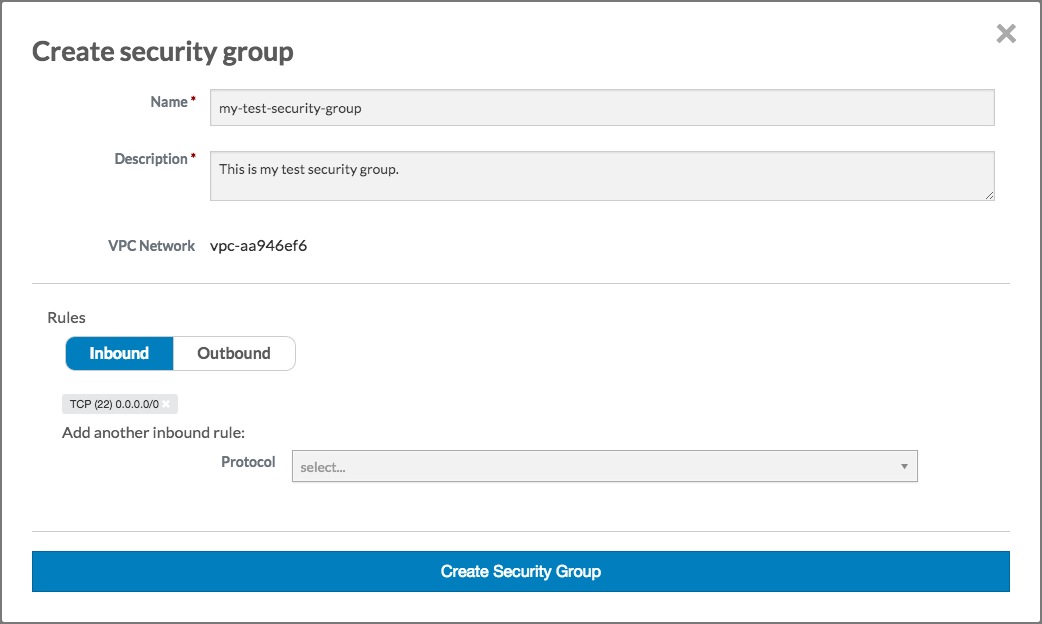
Click the Create security group button. The Create security group dialog will close, and the Security group text box will be populated with the name of the security group you just created:
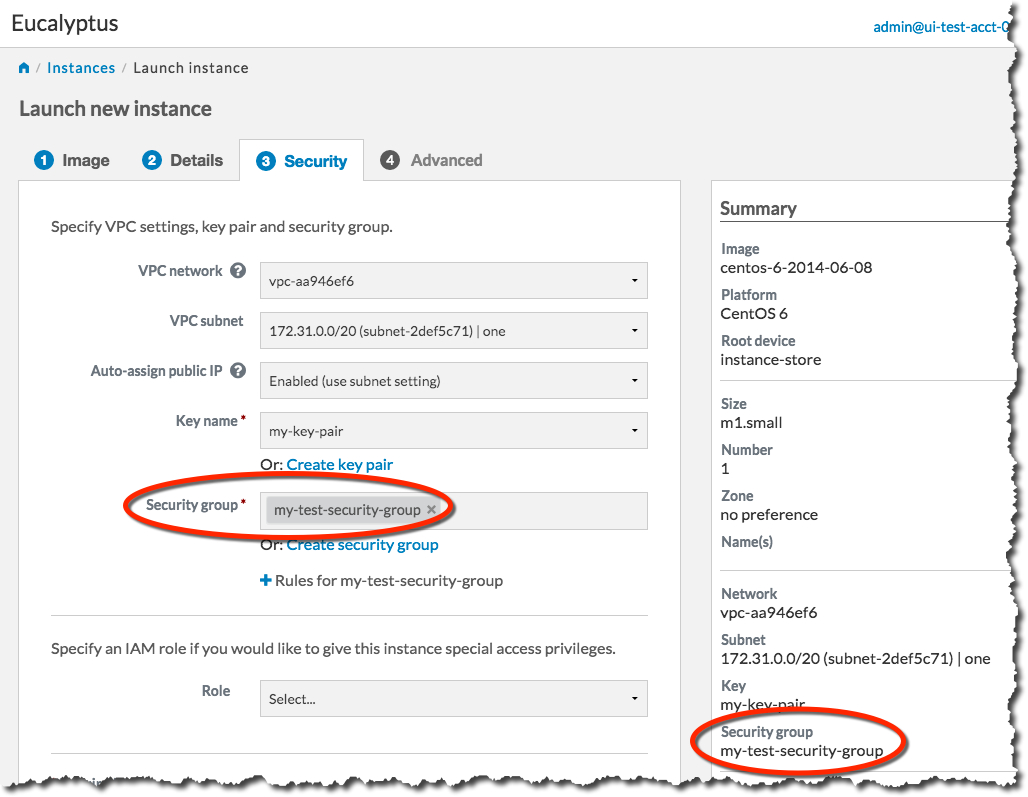
You’re now ready to launch your new instance. Click the Launch Instance button. The Launch Instance dialog will close, and the Instances screen will display. The instance you just created will display at the top of the list with a status of Pending:

When the status of your new instance changes to Running, click the instance in the list to bring up a page showing details of your instance. For example:
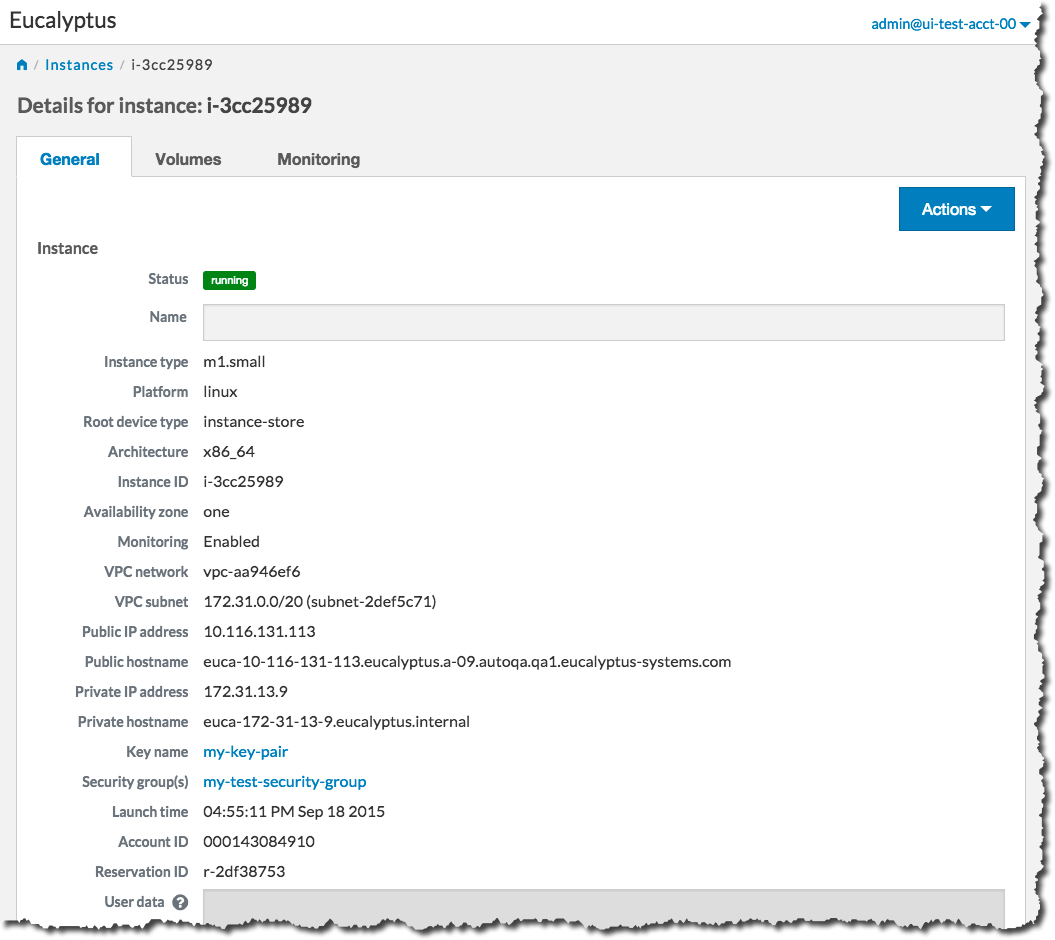
Note the Public IP address and/or the Public hostname fields. You will need this information to connect to your new instance. For example:
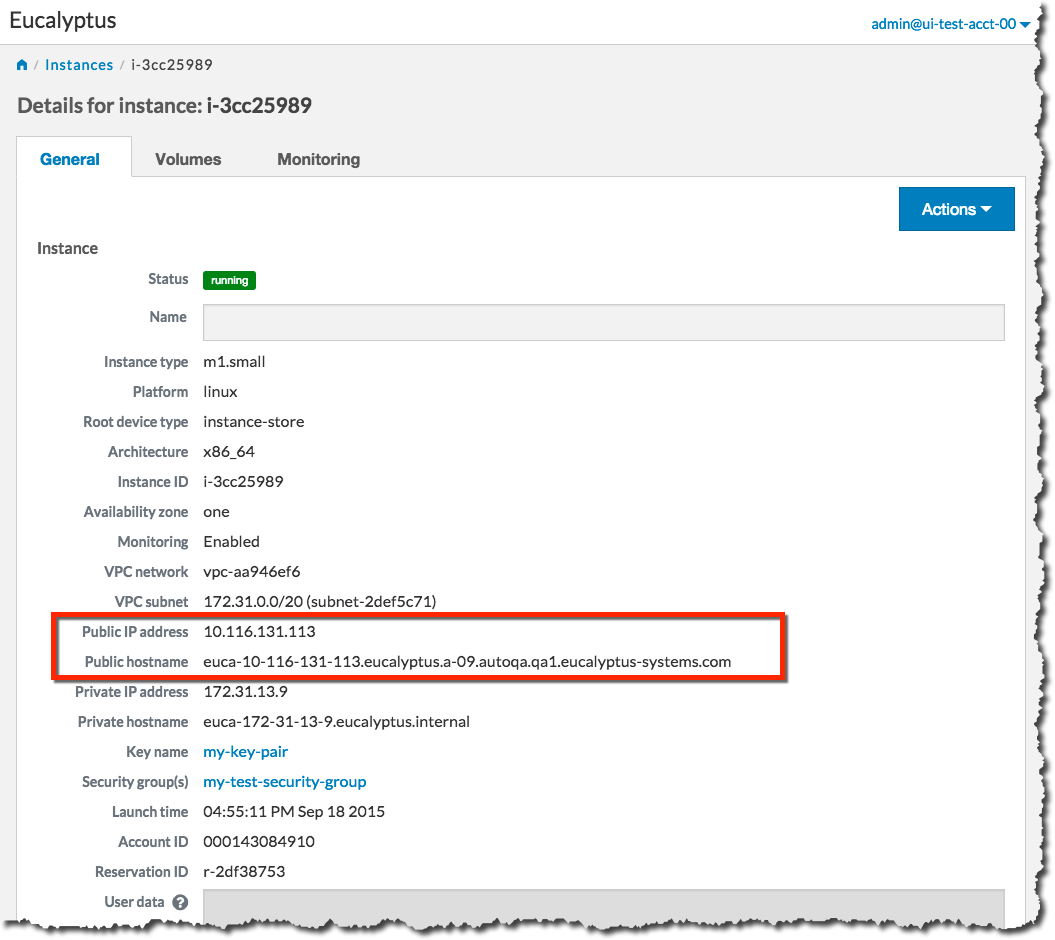
Using the public IP address or hostname of your new instance, you can now use SSH to log into the instance using the private key file you saved when you created a key pair. For example:
ssh -i my-test-keypair.private root@10.111.57.109
2.1.3 - Set Up A Web Server on an Instance
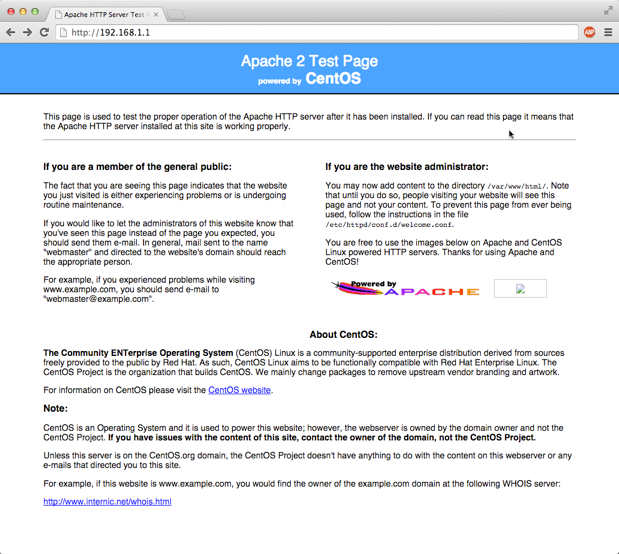
Once you’ve launched an instance and connected to it, you can test it by setting up a web server.
ssh into your instance.
ssh 192.168.1.1 -l root
Install Apache:
yum install -y httpd
You should see output similar to the following:
Loaded plugins: fastestmirror, security, versionlock
Loading mirror speeds from cached hostfile
 * extras: centos.sonn.com
centos-7-x86_64-os                                       | 3.7 kB     00:00
centos-7-x86_64-updates                                  | 3.4 kB     00:00
centos-7-x86_64-updates/primary_db                       | 5.4 MB     00:00
epel-7-x86_64                                            | 4.4 kB     00:00
epel-7-x86_64/primary_db                                 | 6.3 MB     00:00
extras                                                   | 3.3 kB     00:00
Setting up Install Process
Package httpd-2.2.15-31.el7.centos.x86_64 already installed and latest version
Nothing to do
Start the web server:
systemctl start httpd.service
You should see output similar to the following:
Starting httpd: [ OK ]
Test connectivity to your instance by using a web browser and connecting to the web service on your instance. For example:
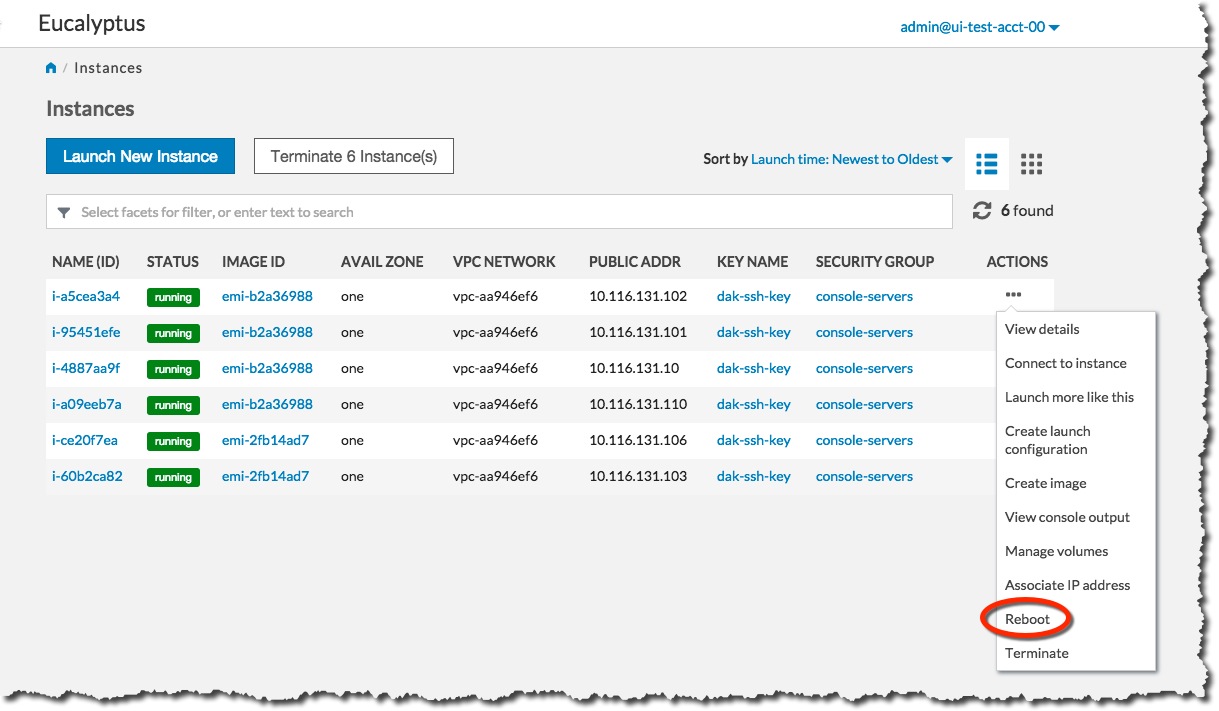
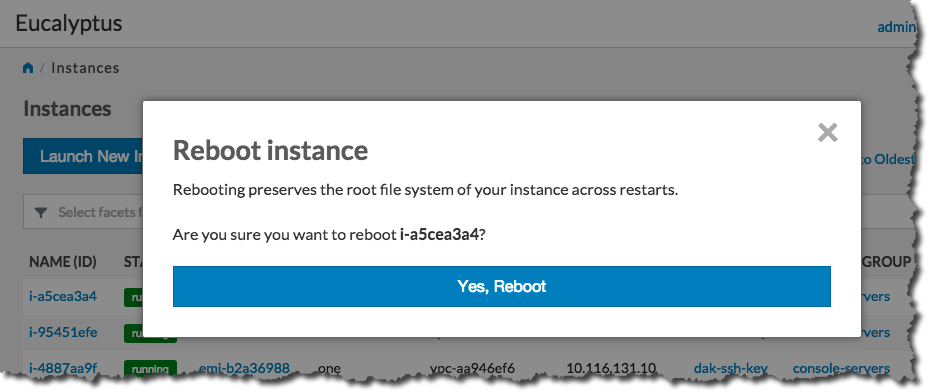
2.1.4 - Reboot an Instance with the Management Console
Rebooting preserves the root filesystem of an instance across restarts. To reboot an instance:
On the Instances page, select Reboot from the Actions menu next to the instance you want to reboot.
 Click the Yes, Reboot button.
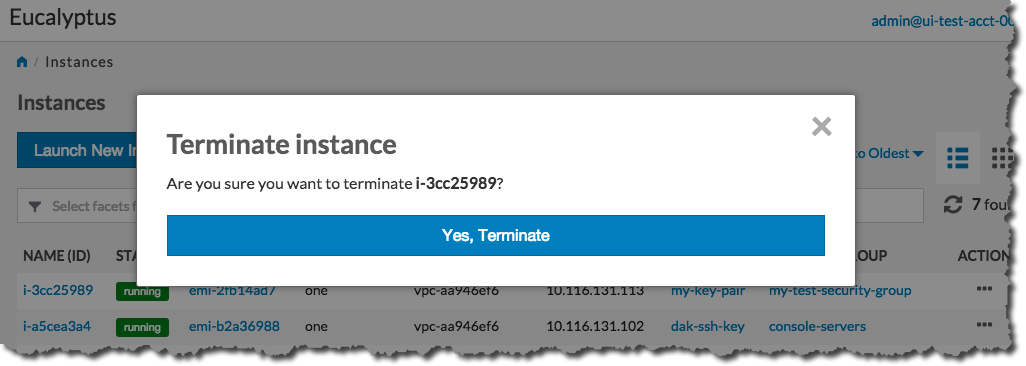
2.1.5 - Terminate an Instance with the Management Console
Warning
Terminating an instance can cause the instance and all items associated with the instance (data, packages installed, etc.) to be lost. Be sure to save any important work or data before terminating an instance.To terminate instances:
On the Instances page, Select Terminate from the Actions menu next to the instance you want to terminate.
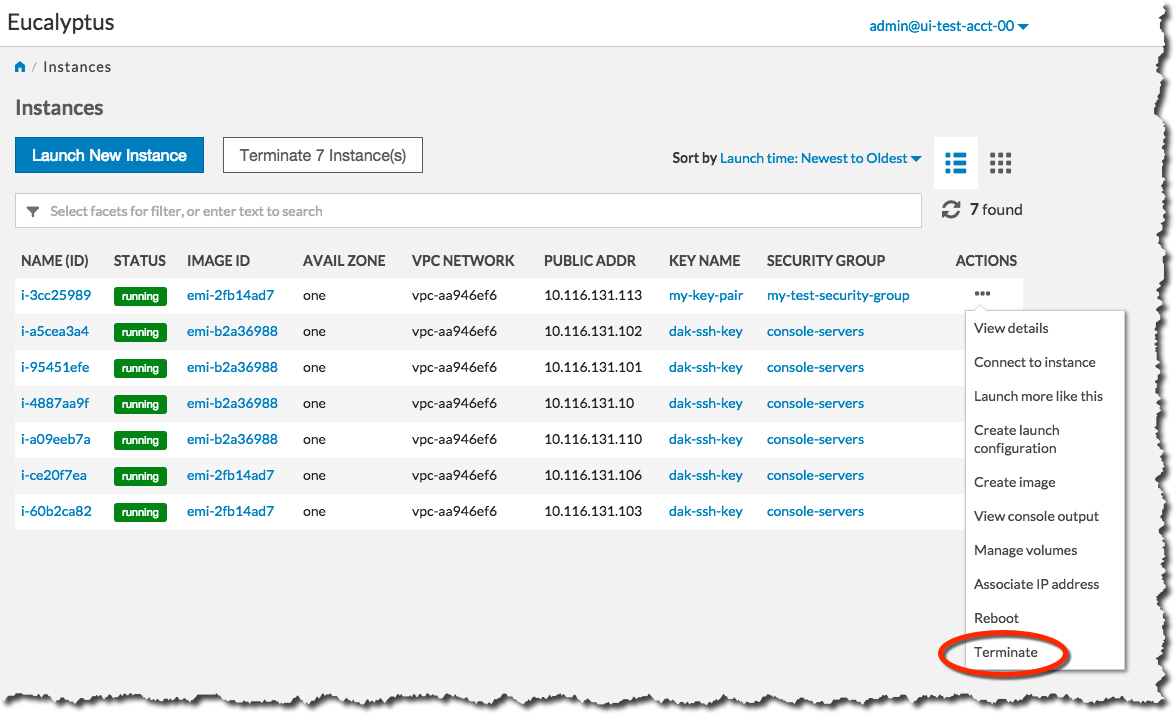 Click the Yes, Terminate button.
 The Status field of the instance will first change to Shutting-down :
 …and then change to Terminated :

2.2 - Getting Started with the AWS CLI
This section helps you get started using your Eucalyptus cloud, and covers setting up your user credentials, installing and configuring the AWS CLI, and working with images and instances. As a cloud user, you can access the Eucalyptus cloud using a command line interface such as the AWS CLI, or using a web-based interface such as the Eucalyptus Management Console.
Note
This section primarily deals with using the AWS CLI. For complete documentation on using web-based the Eucalyptus Console, see
Console Login.
The install guide covers “AWS CLI Installation”
Find Image
Enter the following command:
# aws ec2 describe-images
IMAGES	x86_64	2020-10-17T05:29:09.161Z	emi-0ba907069cb1845bc	ubuntu-focal/focal-server-cloudimg-amd64.raw.manifest.xml	machine	ubuntu-focal	000575948401		True	/dev/sda	instance-store	available	hvm
IMAGES	x86_64	2020-10-17T05:24:08.857Z	emi-371ada125a928669e	centos-7/CentOS-7-x86_64-GenericCloud-2003.raw.manifest.xml	machine	centos-7	000575948401		True	/dev/sda	instance-store	available	hvm
Look for the image ID and write it down. The image ID starts with emi- . Once you find a suitable image to use, make sure you have a keypair to use.
Note
Examples use the AWS CLI text output format. You can request this output for a command by adding an “–output text” argument to any command.Create KeyPairs
Enter the following command:
aws ec2 create-key-pair --key-name <keypair_name> > <keypair_name>.private
where <keypair_name> is a unique name for your keypair. For example:
aws ec2 create-key-pair --key-name "alice-keypair" > "alice-keypair.private"
The private key is saved to a file in your local directory. Query the system to view the public key:
# aws ec2 describe-key-pairs
KEYPAIRS	92:40:28:cb:08:54:80:95:8d:69:d9:ab:9a:ff:28:30:40:12:6a:66	alice-keypair
Authorize Security Groups
Before you can log in to an instance, you must authorize access to that instance. This done by configuring a security group for that instance.
A security group is a set of networking rules applied to instances associated with that group. When you first create an instance, it is assigned to a default security group that denies incoming network traffic from all sources. To allow login and usage of a new instance, you must authorize network access to the default security group with the authorize-security-group-ingress command.
To authorize a security group, use authorize-security-group-ingress with the name of the security group, and the options of the network rule permissions you want to apply.
aws ec2 authorize-security-group-ingress [--group-id <value>] [--group-name <value>] [--ip-permissions <value>]
Use the following command to grant unlimited network access using SSH (TCP, port 22) and VNC (TCP, ports 5900 to 5910) to the security group default :
# aws ec2 authorize-security-group-ingress --ip-permissions "IpProtocol=tcp,FromPort=22,ToPort=22,IpRanges={CidrIp=0.0.0.0/0}" --group-name default
# aws ec2 authorize-security-group-ingress --ip-permissions "IpProtocol=tcp,FromPort=5900,ToPort=5910,IpRanges={CidrIp=0.0.0.0/0}" --group-name default
Launch an Instance
Use the run-instances command and provide an image ID. For example:
aws ec2 run-instances --image-id emi-371ada125a928669e
For additional details and options that can be used with the run-instances command. Enter the following command to get the launch status of the instance:
aws ec2 describe-instances --instance-ids <instance_id>
Log in to an Instance
When you create an instance, Eucalyptus assigns the instance two IP addresses: a public IP address and a private IP address. The public IP address provides access to the instance from external network sources; the private IP address provides access to the instance from within the Eucalyptus cloud environment. For more information on Eucalyptus networking modes, see the Eucalyptus Administrator’s Guide.
To use an instance you must log into it via ssh using one of the IP addresses assigned to it. You can obtain the instance’s IP addresses using the describe-instances query as shown in the following example.
To log into a VM instance:
Enter the following command to view the IP addresses of your instance:
# aws ec2 describe-instances
RESERVATIONS	000332850814	r-825a2c9c04e97ee62
GROUPS	sg-84741faf0bd87ea73	default
INSTANCES	0	x86_64	emi-371ada125a928669e	i-131e5853a71c87f16	t2.micro	2020-10-19T16:35:36.120Z	euca-172-31-15-2.eucalyptus.internal	172.31.15.2	euca-192-168-134-74.eucalyptus.mycloud.example.com	192.168.134.74	/dev/sda1	instance-store	True	NORMAL:  -- []	subnet-1343e38b5566c8e90	hvm	vpc-bded94e5dd0a07bc3
MONITORING	disabled
NETWORKINTERFACES	Primary network interface	d0:0d:c1:ba:7d:64	eni-c1ba7d641cb70a7ee	000332850814	euca-172-31-15-2.eucalyptus.internal	172.31.15.2	True	in-usesubnet-1343e38b5566c8e90	vpc-bded94e5dd0a07bc3
ASSOCIATION	euca-192-168-134-74.eucalyptus.mycloud.example.com	192.168.134.74
ATTACHMENT	2020-10-19T16:35:36.125Z	eni-attach-d597b44874e84bbb2	True	0	attached
GROUPS	sg-84741faf0bd87ea73	default
PRIVATEIPADDRESSES	True	euca-172-31-15-2.eucalyptus.internal	172.31.15.2
ASSOCIATION	euca-192-168-134-74.eucalyptus.mycloud.example.com	192.168.134.74
PLACEMENT	cloud-1a
SECURITYGROUPS	sg-84741faf0bd87ea73	default
STATE	16	running
Note that the public IP address is on the INSTANCES line after “mycloud.example.com”, the private address is after “eucalyptus.internal”.
Look for the instance ID on the INSTANCE line and write it down. Use this ID to manipulate and terminate this instance.
Note
Be sure that the security group for the instance allows SSH access.Use SSH to log into the instance, using your private key and the public IP address. For example:
ssh -i alice-keypair.private root@192.168.134.74
You are now logged in to your Linux instance.
Terminate an Instance
The terminate-instances command lets you cancel running VM instances. When you terminate instances, you must specify the ID string of the instance(s) you wish to terminate. You can obtain the ID strings of your instances using the describe-instances or describe-instance-status commands.
Warning
Terminating an instance can cause the instance and all items associated with the instance (data, packages installed, etc.) to be lost. Be sure to save any important work or data to Object Storage or EBS before terminating an instance.To terminate VM instances:
Enter describe-instance-status to obtain the ID of the instances you wish to terminate. Note that an instance ID strings begin with the prefix i- followed by an 8-character string:
# aws ec2 describe-instance-status
INSTANCESTATUSES	cloud-1a	i-131e5853a71c87f16
INSTANCESTATE	16	running
INSTANCESTATUS	ok
DETAILS	reachability	passed
SYSTEMSTATUS	ok
DETAILS	reachability	passed
Enter terminate-instances and the ID string(s) of the instance(s) you wish to terminate:
# aws ec2 terminate-instances --instance-ids i-131e5853a71c87f16
TERMINATINGINSTANCES	i-131e5853a71c87f16
CURRENTSTATE	32	shutting-down
PREVIOUSSTATE	16	running
2.3 - Getting Started with Euca2ools
This section helps you get started using your Eucalyptus cloud, and covers setting up your user credentials, installing and configuring the command line tools, and working with images and instances.As a cloud user, you can access the Eucalyptus cloud using a command line interface such as Euca2ools, or using a web-based interface such as the Eucalyptus Management Console.
Note
This section primarily deals with using the Eucalyptus command line. For complete documentation on using web-based the Eucalyptus Console, see
Console Login.
To access Eucalyptus via the command line tools, you need keys for Euca2ools. To access Eucalyptus with the Management Console, you’ll need a password for the Management Console. Talk to your cloud administrator to get your keys and passwords.
Find Image
Enter the following command:
# euca-describe-images -a
IMAGE	emi-0ba907069cb1845bc	ubuntu-focal/focal-server-cloudimg-amd64.raw.manifest.xml	000575948401	available	public	x86_64	machine				instance-storehvm
IMAGE	emi-371ada125a928669e	centos-7/CentOS-7-x86_64-GenericCloud-2003.raw.manifest.xml	000575948401	available	public	x86_64	machine				instance-storehvm
Look for the image ID in the second column and write it down. The image ID starts with emi- . Once you find a suitable image to use, make sure you have a keypair to use.
Create KeyPairs
Enter the following command:
euca-create-keypair -f <keypair_name>.private <keypair_name>
where <keypair_name> is a unique name for your keypair. For example:
euca-create-keypair -f "alice-keypair.private" "alice-keypair"
The private key is saved to a file in your local directory. Query the system to view the public key:
# euca-describe-keypairs
KEYPAIR	alice-keypair	92:40:28:cb:08:54:80:95:8d:69:d9:ab:9a:ff:28:30:40:12:6a:66
Authorize Security Groups
Before you can log in to an instance, you must authorize access to that instance. This done by configuring a security group for that instance.
A security group is a set of networking rules applied to instances associated with that group. When you first create an instance, it is assigned to a default security group that denies incoming network traffic from all sources. To allow login and usage of a new instance, you must authorize network access to the default security group with the euca-authorize command.
To authorize a security group, use euca-authorize with the name of the security group, and the options of the network rules you want to apply.
euca-authorize <security_group>
Use the following command to grant unlimited network access using SSH (TCP, port 22) and VNC (TCP, ports 5900 to 5910) to the security group default :
# euca-authorize -P tcp -p 22 -s 0.0.0.0/0 default
# euca-authorize -P tcp -p 5900-5910 -s 0.0.0.0/0 default
Launch an Instance
Use the euca-run-instances command and provide an image ID and the user data file, in the format euca-run-instances <image_id> . For example:
euca-run-instances emi-371ada125a928669e
For additional details and options that can be used with the euca-run-instances command. Enter the following command to get the launch status of the instance:
euca-describe-instances <instance_id>
Log in to an Instance
When you create an instance, Eucalyptus assigns the instance two IP addresses: a public IP address and a private IP address. The public IP address provides access to the instance from external network sources; the private IP address provides access to the instance from within the Eucalyptus cloud environment. For more information on Eucalyptus networking modes, see the Eucalyptus Administrator’s Guide.
To use an instance you must log into it via ssh using one of the IP addresses assigned to it. You can obtain the instance’s IP addresses using the euca-describe-instances query as shown in the following example.
To log into a VM instance:
Enter the following command to view the IP addresses of your instance:
# euca-describe-instances
RESERVATION	r-825a2c9c04e97ee62	000332850814	default
INSTANCE	i-131e5853a71c87f16	emi-371ada125a928669e	euca-192-168-134-74.eucalyptus.mycloud.example.com	euca-172-31-15-2.eucalyptus.internal	running		0		t2.micro	2020-10-19T16:35:36.120Z	cloud-1a				monitoring-disabled	192.168.134.74	172.31.15.2	vpc-bded94e5dd0a07bc3	subnet-1343e38b5566c8e90	instance-store					hvm			sg-84741faf0bd87ea73				x86_64
NETWORKINTERFACE	eni-c1ba7d641cb70a7ee	subnet-1343e38b5566c8e90	vpc-bded94e5dd0a07bc3	000332850814	in-use	172.31.15.2	euca-172-31-15-2.eucalyptus.internal	true
ATTACHMENT		eni-attach-d597b44874e84bbb2	0	attached	2020-10-19T16:35:36.125Z	true
ASSOCIATION	192.168.134.74		172.31.15.2
GROUP	sg-84741faf0bd87ea73	default
PRIVATEIPADDRESS	172.31.15.2	euca-172-31-15-2.eucalyptus.internal	primary
Note that the public IP address appears after the monitoring-disabled text, with the private address immediately following.
Look for the instance ID in the second field of the INSTANCE line and write it down. Use this ID to manipulate and terminate this instance.
Note
Be sure that the security group for the instance allows SSH access.Use SSH to log into the instance, using your private key and the public IP address. For example:
ssh -i alice-keypair.private root@192.168.134.74
You are now logged in to your Linux instance.
Terminate an Instance
The euca-terminate-instances command lets you cancel running VM instances. When you terminate instances, you must specify the ID string of the instance(s) you wish to terminate. You can obtain the ID strings of your instances using the euca-describe-instances or euca-describe-instance-status commands.
Warning
Terminating an instance can cause the instance and all items associated with the instance (data, packages installed, etc.) to be lost. Be sure to save any important work or data to Object Storage or EBS before terminating an instance.To terminate VM instances:
Enter euca-describe-instance-status to obtain the ID of the instances you wish to terminate. Note that an instance ID strings begin with the prefix i-:
# euca-describe-instance-status
INSTANCE	i-131e5853a71c87f16	cloud-1a	running	16	ok	ok	active
SYSTEMSTATUS	reachability	passed
INSTANCESTATUS	reachability	passed
Enter euca-terminate-instances and the ID string(s) of the instance(s) you wish to terminate:
# euca-terminate-instances i-131e5853a71c87f16
INSTANCE	i-131e5853a71c87f16	running	shutting-down
3 - Using Instances
Using Instances
Any application that runs on a cloud, whether public or private or hybrid, runs inside at least one . To start using the cloud, you must launch one or more instances. Every instance is created from stored . An image contains the basic operating system and often other software that will be needed when the instance is running. When you launch an instance, you tell the cloud what image to base the instance on. Your cloud administrator should have set up a catalog of standard or customized images for you to use.To find out more about what instances are, see Instance Overview .
To find out how to use CloudWatch, see Instance Tasks .
3.1 - Instance Overview
Instance Overview
An instance is a virtual machine (VM). Eucalyptus allows you to run instances from registered images.
The following sections describe instances in more detail.
3.1.1 - Instance Concepts
This section describes conceptual information to help you understand instances.
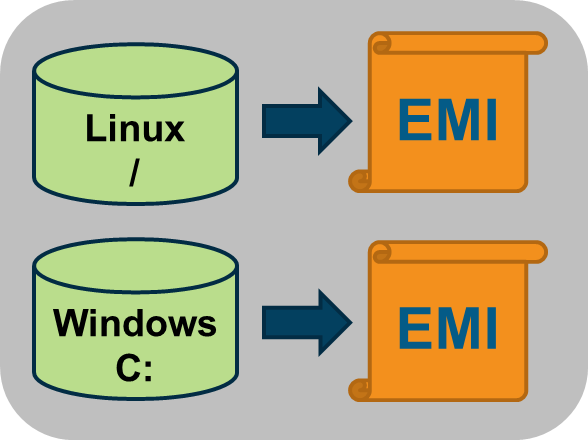
Eucalyptus Machine Image (EMI)
A Eucalyptus machine image (EMI) is a copy of a virtual machine bootable file system stored in the Walrus storage. An EMI is a template from you can use to deploy multiple identical instances—or copies of the virtual machine.
EMIs are analogous to Amazon Machine Images (AMIs) in AWS. In fact, you can download and deploy any of the 10,000+ AMIs as EMIs in a Eucalyptus cloud without significant modification. While it is possible to build your own EMI, it is might be just as simple to find a thoroughly vetted, freely available image in AWS, download it to your Eucalyptus cloud, and use that instead.
When registered in a Eucalyptus cloud, each distinct EMI is given a unique ID for identification. The ID is in the format emi-.
Instance
A instance is a virtual machine deployed from an EMI. An instance then, is simply a running copy of an EMI, which means it always starts from a known baseline. There are two types of instances; instance store-backed and EBS-backed. This section describes store-backed instances. For information about EBS-backed instances, see Using EBS .

Every instance receives a unique ID in the format i-.
You can deploy multiple instances using a single command. In this case all the instances will have unique instance IDs but will share a common reservation ID. This reservation ID can be seen, for example, from the euca2ools euca-describe-instances command that lists running instances. Reservations IDs appear in the format r-.
Note
A reservation is an EC2 term used to describe the resources reserved for one or more instances launched in the cloud.Persistence
Applications running in ephemeral instances that generate data that must be saved should write that data to some place other than the instance itself. There are two Eucalyptus options available. First, the data can be written to a volume that is attached to the instance. Volumes provided by the Storage Controller and attached to instances are persistent. Second, the data could be written to the Walrus using HTTP put/get operations. Walrus storage is also persistent.
If the application cannot be rewritten to send data to a volume or the Walrus, then the application should be deployed inside an EBS-backed instance. EBS-backed instances are persistent and operate in a manner more similar to a physical machine.
3.1.2 - Instance Basics
Instance Basics
This section describes information to help you decide which type of instance you need.
3.1.2.1 - Virtual Machine Types
A virtual machine type, known as a VM type, defines the number of CPUs, the size of memory, and the size of storage that is given to an instance when it boots. There are five pre-defined VM types in Eucalyptus. You can change the quantity of resources associated with each of the five VM types, but you cannot change the name of the VM types or the number of VM types available. If you customize the sizes they must be well-ordered. That means that the CPU, memory, and storage sizes of the next VM type must be equal to, or larger than, the size of the preceding VM type.
The VM type used to instantiate an EMI must have a defined disk size larger than the EMI file. If a 6GB EMI is loaded into an instance with a VM type defined with a 5GB disk, it will fail to boot. The status of the instance will show as pending . The pending status is the result of the fact that the Walrus cannot finish downloading the image to the Node Controller because the Node Controller has not allotted sufficient disk space for the download. Starting with Eucalyptus 3.2, if the user attempts to launch an instance with a VM type that is too small, they will receive an on-screen warning and the operation will terminate.
Available VM Types
Eucalyptus, like AWS, offers families of VM types. These families are composed of varying combinations of CPU, disk size, and memory. Eucalyptus offers enough VM types to give you the flexibility to choose the appropriate mix of resources for your applications. For the best experience, we recommend that you launch instance types that are appropriate for your applications.
This family includes the M1 and M3 VM types. These types provide a balance of CPU, memory, and network resources, which makes them a good choice for many applications. The VM types in this family range in size from one virtual CPU with two GB of RAM to eight virtual CPUs with 30 GB of RAM. The balance of resources makes them ideal for running small and mid-size databases, more memory-hungry data processing tasks, caching fleets, and backend servers. M1 types offer smaller instance sizes with moderate CPU performance. M3 types offer larger number of virtual CPUs that provide higher performance. We recommend you use M3 instances if you need general-purpose instances with demanding CPU requirements.
This family includes the C1 and CC2 instance types, and is geared towards applications that benefit from high compute power. Compute-optimized VM types have a higher ratio of virtual CPUs to memory than other families but share the NCs with non optimized ones. We recommend this type if you are running any CPU-bound scale-out applications. CC2 instances provide high core count (32 virtual CPUs) and support for cluster networking. C1 instances are available in smaller sizes and are ideal for scaled-out applications at massive scale.
This family includes the CR1 and M2 VM types and is designed for memory-intensive applications. We recommend these VM types for performance-sensitive database, where your application is memory-bound. CR1 VM types provide more memory and faster CPU than do M2 types. CR1 instances also support cluster networking for bandwidth intensive applications. M2 types are available in smaller sizes, and are an excellent option for many memory-bound applications.
This Micro family contains the T1 VM type. The t1.micro provides a small amount of consistent CPU resources and allows you to increase CPU capacity in short bursts when additional cycles are available. We recommend this type for lower throughput applications like a proxy server or administrative applications, or for low-traffic websites that occasionally require additional compute cycles. We do not recommend this VM type for applications that require sustained CPU performance.
The following tables list each VM type Eucalyptus offers. Each type is listed in its associate VM family.
| Instance Type | Virtual CPU | Disk Size | Memory |
|---|
| m1.small | 1 | 5 | 256 |
| m1.medium | 1 | 10 | 512 |
| m1.large | 2 | 10 | 512 |
| m1.xlarge | 2 | 10 | 1024 |
| m3.xlarge | 4 | 15 | 2048 |
| m3.2xlarge | 4 | 30 | 4096 |
| Instance Type | Virtual Cores | Disk Size | Memory |
|---|
| c1.medium | 2 | 10 | 512 |
| c1.xlarge | 2 | 10 | 2048 |
| cc1.4xlarge | 8 | 60 | 3072 |
| cc2.8xlarge | 16 | 120 | 6144 |
| Instance Type | Virtual Cores | Disk Size | Memory |
|---|
| m2.xlarge | 2 | 10 | 2048 |
| m2.2xlarge | 2 | 30 | 4096 |
| m2.4xlarge | 8 | 60 | 4096 |
| cr1.8xlarge | 16 | 240 | 16384 |
| Instance Type | Virtual Cores | Disk Size | Memory |
|---|
| t1.micro | 1 | 5 | 256 |
3.1.2.2 - Ephemeral Linux Instances
Instance store-backed instances are ephemeral instances. This means that any changes made to a running instance are lost if the instance is either purposely or accidentally terminated. Applications running in ephemeral instances should write their data to persistent storage for safe keeping. Persistent storage available to instances includes Storage Controller volumes and the Walrus.
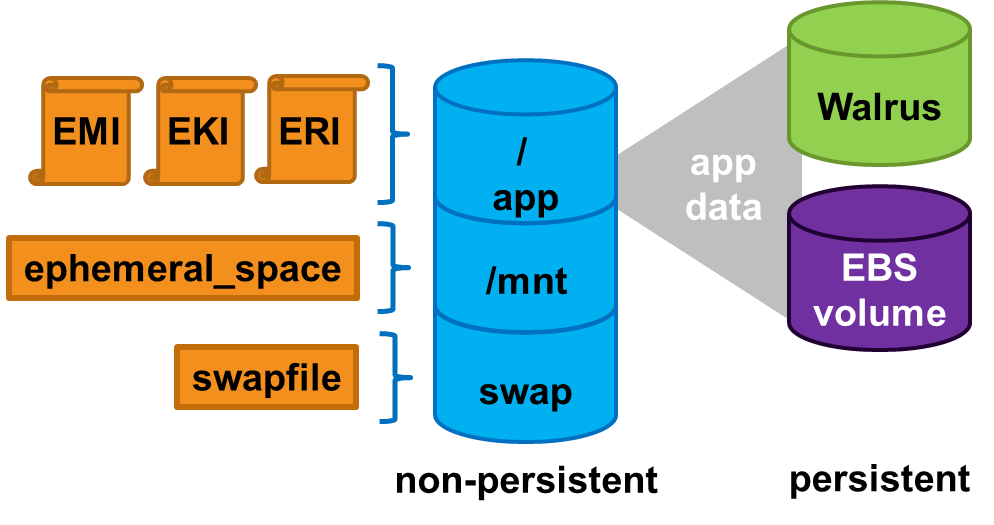
As an instance store-backed instance is launched, several files are brought together using loop devices on the Node Controller. As these files are brought together they form what looks like a disk to the instance’s operating system. The illustration below lists a some of the files that make up a running instance. Notice that the EKI, EMI, and ERI images are presented to the instance’s operating system as the partition /dev/sda1 and are mounted as the / file system.
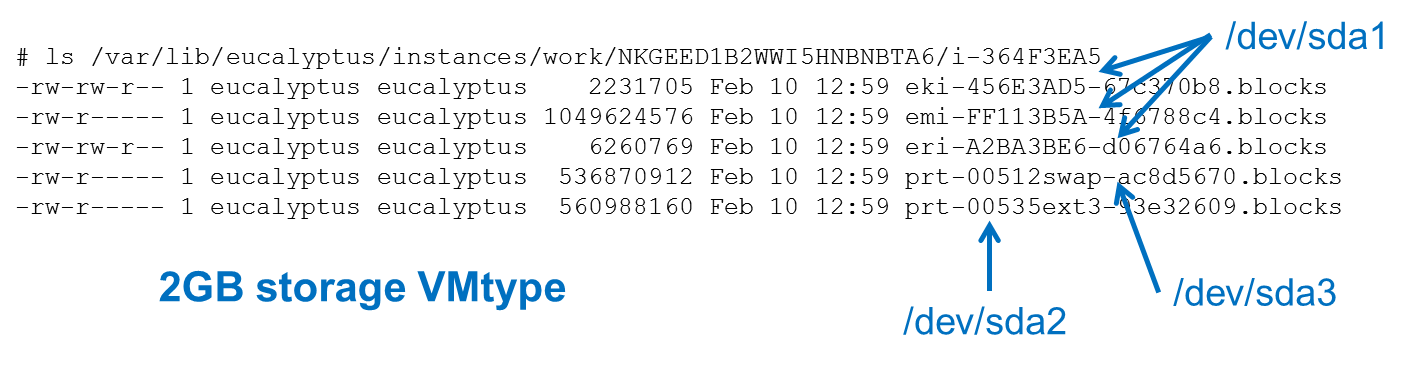
Assume that the illustration above shows some of the files that make up an instance that was launched in a vmtype with 2GB of storage. Notice that the eki-* , emi-* , and eri-* files have been downloaded from the Walrus and cached on the Node Controller. These three files consume around 1.06GB of storage space. Notice also that a swap file was automatically created for the instance. The swap file has the string swap in its name and the file is approximately 500MB in size. It is presented to the instance’s operating system as the partition /dev/sda3 .
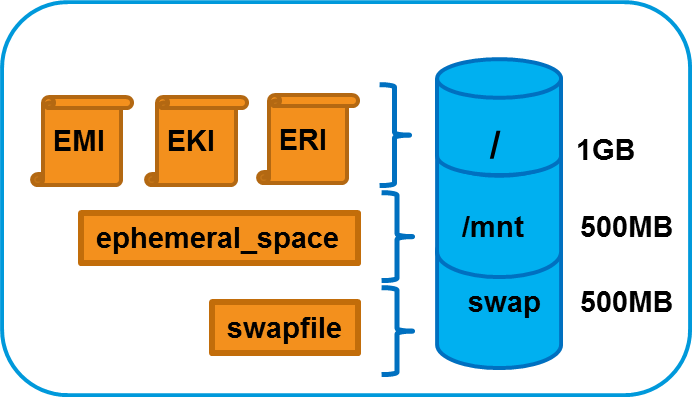
This means the EKI, ERI, EMI, and swap files have consumed approximately 1.5GB of the available 2GB of storage space. The remaining 500GB is allocated to the file with the string ext3 in its name. In our example, this space is formatted as an ext3 file system and is made available to the instance as the disk partition /dev/sda2 , and is actually mounted to the /mnt directory in the instance. An example of this configuration is shown below.
3.1.2.3 - EBS-Backed Instances
EBS-Backed Instances
Eucalyptus supports two different types of instances; instance store-backed instances and EBS-backed instances. This section describes EBS-backed instances.
With EBS-backed instances you are booting an instance from a volume rather than a bundled EMI image. The boot volume is created from a snapshot of a root device volume. The boot volume is persistent so changes to the instance are persistent.
Note
Linux boot-from-EBS instances do not require EKI and ERI images like paravirtual instance store-backed instances.
3.1.2.3.1 - Comparing Instance Types
The graphic below illustrates the differences between an instance store-backed instance and an EBS-backed instance. Both types of instances still boot from an EMI; the difference is what is behind the EMI. For an instance store-backed instance the EMI is backed by a bundled image. For an EBS-backed instance the EMI is backed by a snapshot of a volume that contains bootable software, similar to a physical host’s boot disk.
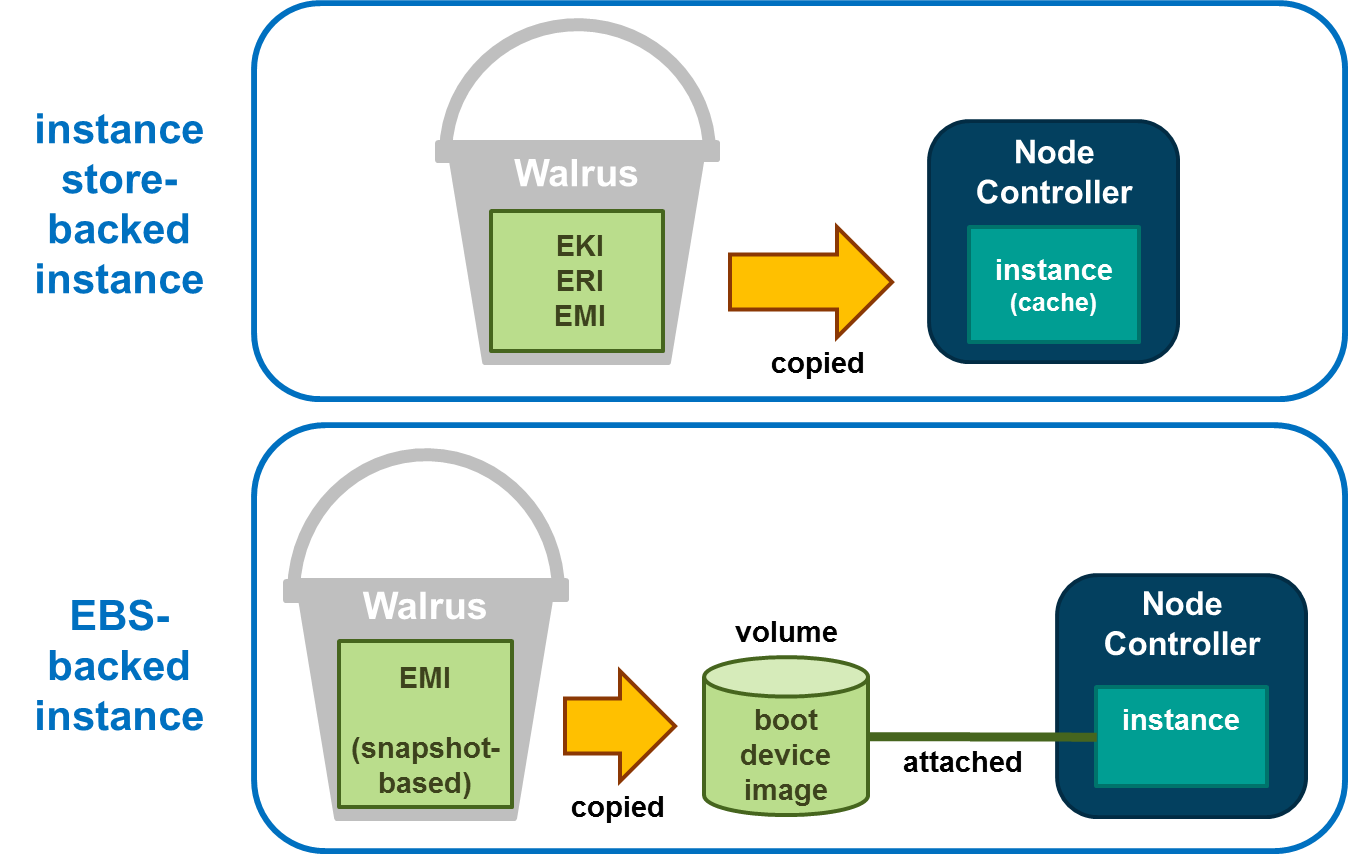
Note that for the instance store-backed instance, the EMI, EKI, and ERI (assuming Linux) are copied from the Walrus directly to Node Controller. Both disk and memory on the Node Controller are used as cache so an instance store-backed instance can be considered a cache-based instance and is not persistent. Once the instance is terminated both the RAM and the disk cache are cleared and any modifications to the instance are lost.
When an EBS-backed instance is launched, the snapshot on which the EMI is based is automatically copied to a new volume which is then attached to the instance. The instance then boots from the attached volume. Changes to the EBS-backed instance are persistent because the volume used to boot the EBS-backed instance is persistent. As a result, EBS-backed instances can be suspended and resumed and not just terminated like an instance store-backed instance.
3.1.2.3.2 - Using EBS-Backed Instances
An EBS-backed instance is very much like a physical machine in the way it boots and persists data. Because an EBS-backed instance functions in a manner similar to physical machine, it makes it a good choice to run legacy applications that cannot be re-architected for the cloud.

An EBS-backed boot volume can still be protected by taking a snapshot of it. In fact, other non-boot volumes can be attached to the EBS-backed instance and they can be protected using snapshots too.
3.1.2.3.3 - Suspending and Resuming EBS-Backed Instances
An EBS-backed instance can be suspended and resumed, similar to the operating system and applications on a laptop. The current state of the EBS-backed instance is saved in a suspend operation and restored in a resume operation. Like instance store-backed instances, an EBS-backed instance can also be rebooted and terminated.
To suspend a running EBS-backed instance:
euca-stop-instances i-<nnnnnnnn>
To resume a suspended EBS-backed instance:
euca-start-instances i-<nnnnnnnn>
To reboot an EBS-backed instance:
euca-reboot-instances i-<nnnnnnnn>
To terminate an EBS-backed instance:
euca-terminate-instances i-<nnnnnnnn>
3.1.2.3.4 - EBS EMI Creation Overview
EBS EMI Creation Overview
You can create an EBS EMI from an existing .img file or create your own .img file. One way to create your own EBS .img file is to use virt-install as described below.
Use virt-install on a system with the same operating system version and hypervisor as your Node Controller. When using virt-install , select scsi as the disk type for KVM if the VIRTIO paravirtualized devices are not enabled. If you have KVM with VIRTIO enabled (the default), select virtio as the disk type of the virtual machine. If you create, successfully boot, and connect the virtual machine to the network in this environment, it should boot as an EBS-backed instance in the Eucalyptus cloud.
Note
For CentOS or RHEL images, you will typically need to edit the file and remove the line. This is because an instance’s network interface will always be assigned a different hardware address at instantiation.Note
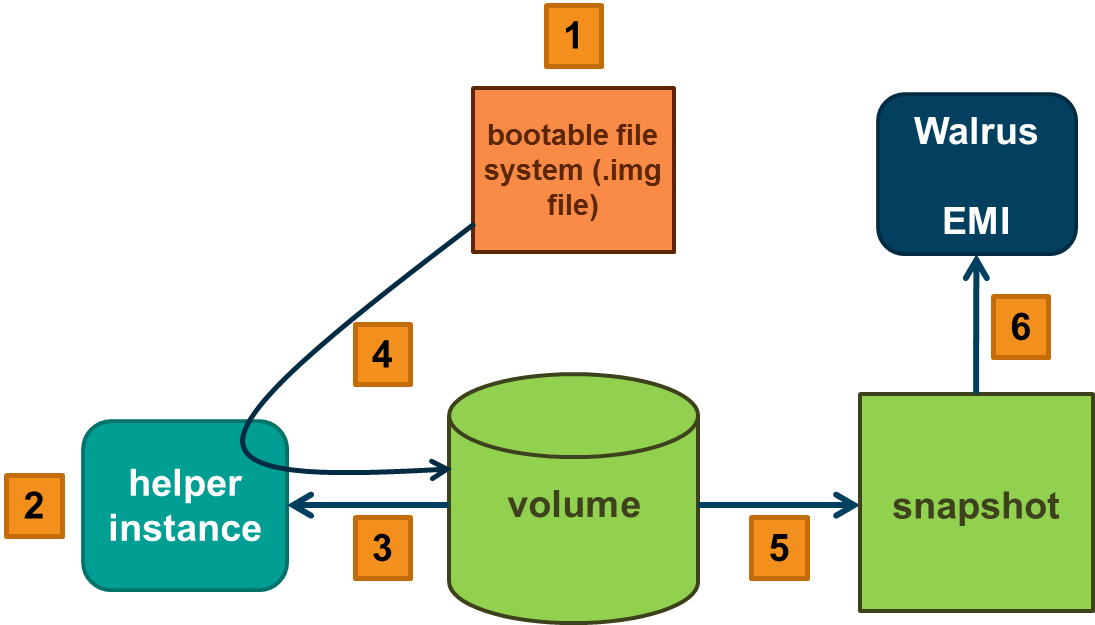
: If you use an image created by under a different distribution or hypervisor combination, it is likely that it will not install the correct drivers into the ramdisk and the image will not boot on your Node Controller.To create an EMI for EBS-backed instances will require initial assistance from a helper instance. The helper instance can be either an instance store-backed or EBS-backed instance and can be deleted when finished. It only exists to help create the initial volume that will be the source of the snapshot behind the EMI used to boot other EBS-backed instances.
First you will need to create a volume large enough to contain the boot image file that was created by virt-install . Once this volume has been created attach it to the helper instance. Then transfer the boot image file to the helper instance. The helper instance must have enough free disk space to temporarily hold the boot image file. Once there, transfer the boot image file, using the dd command, to the attached volume.
At this point the volume can be detached from the helper instance, a snapshot taken, and the snapshot registered as a new EMI.
The process to create a new EMI is summarized as follows:
- Create the file using (the file is the virtual machine’s disk file).
- Create the helper instance.
- Create and attach the volume to the helper instance.
- Copy the file to the helper instance and from there to the attached volume.
- Detach the volume and take a snapshot of it.
- Register the snapshot as a new EMI.
This process is illustrated below.
3.1.2.3.4.1 - Create an EBS EMI
To create a new EMI that is used to boot EBS-backed instances:
Create a new volume whose size matches the size of the bootable file:
Attach the volume to a helper instance:
Log in to the instance and copy the bootable image from its source to the helper instance.
While logged in to the helper instance, copy a bootable image to the attached volume:
While logged in to the helper instance, flush the file system buffers after running the command:
Detach the volume from the instance:
Create a snapshot of the bootable volume:
Register the bootable volume as a new EMI:
Run a new EBS-backed instance:
Note
The snapshot cannot be deleted unless the EMI is first deregistered.3.2 - Instance Tasks
Instance Tasks
This section describes the tasks you can perform with instances in Eucalyptus.
3.2.1 - Authorize Security Groups
Before you can log in to an instance, you must authorize access to that instance. This done by configuring a security group for that instance.
A security group is a set of networking rules applied to instances associated with a group. When you first create an instance, it is assigned to a default security group that denies incoming network traffic from all sources. To allow login and usage of a new instance, you must authorize network access to the default security group with the euca-authorize command.
To authorize a security group, use euca-authorize with the name of the security group, and the options of the network rules you want to apply.
euca-authorize <security_group>
Use the following command to grant unlimited network access using SSH (TCP, port 22) and VNC (TCP, ports 5900 to 5910) to the security group default :
euca-authorize -P tcp -p 22 -s 0.0.0.0/0 default
euca-authorize -P tcp -p 5900-5910 -s 0.0.0.0/0 default
3.2.2 - Create Key Pairs
Eucalyptus uses cryptographic key pairs to verify access to instances. Key pairs are used if you want to connect to your instance using SSH. Creating a key pair generates two keys: a public key (saved within Eucalyptus) and a corresponding private key (output to the user as a character string). To enable this private key you must save it to a file and set appropriate access permissions (using the chmod command), as shown in the example below.
Create Key Pairs with the Console
From the main dashboard screen, click the Key Pairs icon. The Key Pairs page opens. Click the Create Key Pair button. The Create new key pair window opens. Type a name for the new key pair into the Name text box. The name may contain up to 255 alphanumeric and special characters. Click the Create and Download button. The private half of the key pair (.pem file) is saved to the default download location for your browser.
Note
Keep your private key file in a safe place. If you lose it, you will be unable to access instances created with the key pair.Change file permissions to enable access to the private key file in the local directory. For example, on a Linux or Mac OS X system:
chmod 0600 <keypair_name>.private
Create Key Pairs with the Command Line
Enter the following command:
euca-create-keypair <keypair_name> -f <keypair_name>.private
where <keypair_name> is a unique name for your keypair. For example:
euca-create-keypair alice-keypair -f alice-keypair.private
The private key is saved to a file in your local directory. Query the system to view the public key:
euca-describe-keypairs
The command returns output similar to the following:
KEYPAIR alice-keypair ad:0d:fc:6a:00:a7:e7:b2:bc:67:8e:31:12:22:c1:8a:77:8c:f9:c4
3.2.3 - Find an Image
To find an image:
Enter the following command:
euca-describe-images
The output displays all available images.
IMAGE	emi-EC1410C1	centos-32/centos.5-3.x86.img.manifest.xml ↵
admin	available	public 	x86_64	machine
IMAGE	eki-822C1344	kernel-i386/vmlinuz-2.6.28-11-server.manifest.xml ↵
admin	available	public 	x86_64	kernel
IMAGE	eri-A98C13E4  initrd-64/initrd.img-2.6.28-11-generic.manifest.xml ↵
admin	available	public 	x86_64	ramdisk
Look for the image ID in the second column and write it down. The image ID starts with emi- . Once you find a suitable image to use, make sure you have a keypair to use.
3.2.4 - Launch an Instance
To launch an instance:
Use the euca-run-instances command and provide an image ID and the user data file, in the format euca-run-instances <image_id> . For example:
euca-run-instances emi-EC1410C1
For additional details and options that can be used with the euca-run-instances command. Enter the following command to get the launch status of the instance:
euca-describe-instances <instance_id>
Need response from Eucalyptus then uncomment the para below.
3.2.5 - Log in to an Instance
For a Linux Instance
When you create an instance, Eucalyptus assigns the instance two IP addresses: a public IP address and a private IP address. The public IP address provides access to the instance from external network sources; the private IP address provides access to the instance from within the Eucalyptus cloud environment. Note that the two IP addresses may be the same depending on the current networking mode set by the administrator. For more information on Eucalyptus networking modes, see the Eucalyptus Administrator’s Guide.
To use an instance you must log into it via ssh using one of the IP addresses assigned to it. You can obtain the instance’s IP addresses using the euca-describe-instances query as shown in the following example.
To log into a VM instance:
Enter the following command to view the IP addresses of your instance:
euca-describe-instances
Eucalyptus returns output similar to the following:
RESERVATION	r-338206B5	alice	default
INSTANCE	i-4DCF092C  emi-EC1410C1  192.168.7.24	  10.17.0.130 ↵ running 	alice-keypair 	0 	m1.small  2010-03-15T21:57:45.134Z
Note that the public IP address appears after the image name, with the private address immediately following.
Look for the instance ID in the second field and write it down. Use this ID to manipulate and terminate this instance.
Note
Be sure that the security group for the instance allows SSH access. For more information, seeUse SSH to log into the instance, using your private key and the external IP address. For example:
ssh -i alice-keypair.private root@192.168.7.24
You are now logged in to your Linux instance.
Using SSH to Connect via PuTTY
If you are a Windows user and want to securely connect to instances via PuTTY, you must first have a key pair.If you don’t have a key pair, you can create one through the Management Console or the command line. For the key pair to be used with PuTTY, convert your .pem file to a .ppk file by performing the last step in the Creating SSH Credentials for the Master Node: Modify Your PEM File procedure.
3.2.6 - Reboot an Instance
Rebooting preserves the root filesystem of an instance across restarts. To reboot an instance:
Enter the following command:
euca-reboot-instances <instance_id>
To reboot the instance i-34523332 , enter:
euca-reboot-instances i-34523332
3.2.7 - Terminate an Instance
The euca-terminate-instances command lets you cancel running VM instances. When you terminate instances, you must specify the ID string of the instance(s) you wish to terminate. You can obtain the ID strings of your instances using the euca-describe-instances command.
Warning
Terminating an instance can cause the instance and all items associated with the instance (data, packages installed, etc.) to be lost. Be sure to save any important work or data to Walrus or EBS before terminating an instance.To terminate VM instances:
Enter euca-describe instances to obtain the ID of the instances you wish to terminate. Note that an instance ID strings begin with the prefix i- followed by an 8-character string:
euca-describe-instances
RESERVATION	r-338206B5	alice	default
INSTANCE	i-4DCF092C  emi-EC1410C1	192.168.7.24	10.17.0.130 ↵
running 	mykey 	0 	m1.small 	2010-03-15T21:57:45.134Z ↵
wind 	eki-822C1344 	eri-BFA91429
Enter euca-terminate-instances and the ID string(s) of the instance(s) you wish to terminate:
euca-terminate-instances i-4DCF092C
 INSTANCE	i-3ED007C8
4 - Using EBS
Using EBS
This section details what you need to know about Eucalyptus Elastic Block Storage (EBS).
4.1 - EBS Overview
Eucalyptus Elastic Block Storage (EBS) provides block-level storage volumes that you can attach to instances running in your Eucalyptus cloud. An EBS volume looks like any other block-level storage device when attached to a running Eucalyptus instance, and may be formatted with an appropriate file system and used as you would a regular storage device. Any changes that you make to an attached EBS volume will persist after the instance is terminated.
You can create an EBS volume by using the Eucalyptus command line tools or by using the Eucalyptus management console and specifying the desired size (up to 10GB) and availability zone. Once you’ve created an EBS volume, you can attach it to any instance running in the same availability zone. An EBS volume can only be attached to one running instance at a time, but you can attach multiple EBS volumes to a running instance.
You can create a backup — called a snapshot — of any Eucalyptus EBS volume. You can create a snapshot by using the command-line tools or the Eucalyptus management console and simply specifying the volume from which you want to create the snapshot, along with a description of the snapshot. Snapshots can be used to create new volumes.
4.2 - EBS Tasks
EBS Tasks
This section contains examples of the most common Eucalyptus EBS tasks.
4.2.1 - Create and Attach an EBS Volume
The following example shows how to create a 10 gigabyte EBS volume and attach it to a running instance called i-00000000 running in availability zone zone1 .
Create a new EBS volume in the same availability zone as the running instance.
euca-create-volume --availability-zone zone1 --size 10
The command displays the ID of the newly-created volume. Attach the newly-created volume to the instance, specifying the local device name /dev/sdf .
euca-attach-volume vol-00000000 -i i-00000000 -d /dev/sdf
You’ve created a new EBS volume and attached it to a running instance. You can now access the EBS volume from your running instance.
4.2.2 - List Available EBS Volumes
You can use the Eucalyptus command line tools to list all available volumes and retrieve information about a specific volume.
To get a list of all available volumes in your Eucalyptus cloud, enter the following command:
euca-describe-volumes
To get information about one specific volume, use the euca-describe-volumes command and specify the volume ID.
euca-describe-volumes vol-00000000
4.2.3 - Detach an EBS Volume
To detach a block volume from an instance:
Enter the following command:
euca-detach-volume <volume_id>


euca-detach-volume vol-00000000
4.2.4 - Create a Snapshot
The following example shows how to create a snapshot.
Enter the following command:
euca-create-snapshot <volume_id>


euca-create-snapshot vol-00000000
4.2.5 - List Available Snapshots
You can use the Eucalyptus command line tools to list available snapshots and retrieve information about a specific snapshot.
To get a list of all available snapshots in your Eucalyptus cloud, enter the following command:
euca-describe-snapshots
To get information about one specific snapshot, use the euca-describe-snapshots command and specify the snapshot ID.
euca-describe-snapshots snap-00000000
4.2.6 - Delete a Snapshot
The following example shows how to delete a snapshot.
Enter the following command:
euca-delete-snapshot <snapshot_id>


euca-delete-snapshot mytestsnaphot
5 - Using Tags and Filters
This section describes features and tasks that enable you to manage your cloud resources, such as EMIs, instances, EBS volumes, and snapshots.
5.1 - Tagging and Filtering Overview
Tagging and Filtering Overview
This section describes what tagging is, its restrictions, and how tagging relates to filtering.
5.1.1 - Tagging Resources
To help you manage your cloud’s instances, images, and other Eucalyptus resources, you can assign your own metadata to each resource in the form of tags. You can use tags to create user-friendly names, make resource searching easier, and improve coordination between multiple users. This section describes tags and how to create them.
Tagging Overview
A tag consists of a key and an optional value for that key. You define both the key and the value for each tag. For example, you can define a tag for your instances that helps you track each instance’s owner and stack level.
Tags let you categorize your cloud resources in various ways. For example, you can tag resources based on their purpose, their owner, or their environment. We recommend that you devise a set of tag keys that meets your needs for each resource type. Using a consistent set of tag keys makes it easier for you to manage your resources. You can search and filter the resources based on the tags you add. For more information about filtering, see Filtering Resources .
Eucalyptus doesn’t apply any semantic meaning to your tags. Instead, Eucalyptus interprets your tags simply as strings of characters. Eucalyptus doesn’t automatically assign any tags on resources.
You can only assign tags to resources that already exist. However, if you use the Management Console, you can add tags when you launch an instance. If you add a tag that has the same key as an existing tag on that resource, the new value overwrites the old value. You can edit tag keys and values, and you can remove tags from a resource at any time. You can set a tag’s value to the empty string, but you can’t set a tag’s value to null.
Tagging Restrictions
The following restrictions apply to tags:
| Restriction | Description |
|---|
| Maximum number of tags per resource | 10 |
| Maximum key length | 128 Unicode characters |
| Maximum value length | 256 Unicode characters |
| Unavailable prefixes | You can’t use either euca: or aws: as a prefix to either a tag name or value. These are reserved by Eucalyptus. |
| Case sensitivity | Tag keys and values are case sensitive. |
You can’t terminate, stop, or delete a resource based solely on its tags. You must specify the resource identifier. For example, to delete snapshots that you tagged with a tag key called temporary , you must first get a list of those snapshots using euca-describe-snapshots with a filter that specifies the tag. Then you use euca-delete-snapshots with the IDs of the snapshots (for example, snap-1A2B3C4D). You can’t call euca-delete-snapshots with a filter that specified the tag. For more information about using filters when listing your resources, see Filtering Resources .
Available Resources
You can tag the following cloud resources:
Images (EMIs, kernels, RAM disks)
Instances
Volumes
Snapshots
Security Groups
You can’t tag the following cloud resources:
Elastic IP addresses
Key pairs
Placement groups
You can tag public or shared resources, but the tags you assign are available only to your account and not to the other accounts sharing the resource.
5.1.2 - Filtering Resources
You can search and filter resources based on the tags you use. For example, you can list a Eucalyptus Machine Image (EMI) using euca-describe-images, and you can list instances using euca-describe-instances .
Filtering Overview
Results from describe commands can be long. Use a filter to include only the resources that match certain criteria. For example, you can filter so that a returned list shows only the EMIs that use an EBS volume as the root device volumes.
Filtering also allows you to:
- Specify multiple filter values: For example, you can list all the instances whose type is either m1.small or m1.large.
- Specify multiple filters: for example, you can list all the instances whose type is either m1.small or m1.large, and that have an attached EBS volume that is set to delete when the instance terminates.
- Use wildcards with values: For example, you can use production as a filter value to get all EBS snapshots that include production in the description.
In each case, the instance must match all your filters to be included in the results. Filter values are case sensitive.
5.2 - Tagging and Filtering Tasks
Tagging and Filtering Tasks
This section details the tasks that you can with tagging and filtering. You can use the Management Console or the command line interface.
Eucalyptus supports three commands for tagging:
- euca-create-tags
- euca-describe-tags
- euca-delete-tags
Eucalyptus supports the following commands for filtering:
- euca-describe-addresses
- euca-describe-availability-zones
- euca-describe-bundle-tasks
- euca-describe-groups
- euca-describe-images
- euca-describe-instances
- euca-describe-keypairs
- euca-describe-regions
- euca-describe-snapshots
- euca-describe-tags
- euca-describe-volumes
5.2.1 - Add a Tag
Use the euca-create-tags command to add a tag to a resource.
Enter the following command and parameters:
euca-create-tags [resource_id] --tag [tag_key]=[tag_value]
Eucalyptus returns a the resource identifier and its tag key and value. The following example shows how to add a tag to an EMI. This tag key is dataserver and has no value.
euca-create-tags emi-1A2B3C4D --tag dataserver
TAG  emi-1a2b3c4d  image  dataserver
The following example shows how to add the same two tags to both an EMI and an instance. One tag key is dataserver, which has no value, an empty string. The other tag key is stack, which has a value of Production .
euca-create-tags emi-1A2B3C4D i-6F5D4E3A --tag dataserver --tag stack=Production
TAG  emi-1A2B3C4D  image  dataserver
TAG  emi-1A2B3C4D  image  stack  Production
TAG  i-6F5D4E3A  image  dataserver
TAG  i-6F5D4E3A  image  stack  Production
5.2.2 - List Tags
Use the euca-describe-tags command to list your tags and filter the results different ways.
Enter the following command and parameters:
euca-describe-tags --filter resource-type=[resource_type]" --filter
"key=[key_name]" --filter "value=[key_value]"
The following example describes all the tags belonging to your account.
euca-describe-tags
TAG  emi-1A2B3C4D  image  database_server
TAG  emi-1A2B3C4D  image  stack  Production
TAG  i-5F4E3D2A  instance  database_server
TAG  i-5F4E3D2A  instance  stack  Production
TAG  i-12345678  instance  webserver
TAG  i-12345678  instance  stack  Test
The following example describes the tags for the resource with ID emi-1A2B3C4D.
ec2-describe-tags --filter "resource-id=emi-1A2B3C4D"
TAG  emi-1A2B3C4D  image  database_server
TAG  emi-1A2B3C4D  image  stack  Production
The following example describes the tags for all your instances.
ec2-describe-tags --filter "resource-type=instance"
TAG  i-5F4E3D2A  instance  database_server
TAG  i-5F4E3D2A  instance  stack  Production
TAG  i-12345678  instance  webserver
TAG  i-12345678  instance  stack  Test
The following example describes the tags for all your instances that have a tag with the key webserver.
ec2-describe-tags --filter "resource-type=instance" --filter "key=database_server"
TAG  i-5F4E3D2A  instance  database_server
The following example describes the tags for all your instances that have a tag with the key stack that has a value of either Test or Production.
ec2-describe-tags --filter "resource-type=instance" --filter "key=stack"
--filter "value=Test" --filter "value=Production"
TAG  i-5F4E3D2A  instance  stack  Production
TAG  i-12345678  instance  stack  Test
The following example describes the tags for all your instances that have a tag with the key Purpose that has no value.
ec2-describe-tags --filter "resource-type=instance" --filter "key=Purpose" --filter "value="
5.2.3 - Change a Tag's Value
To change a tag’s value:
Enter the following command and parameters:
euca-create-tags [resource] --tag [key=value]
Eucalyptus returns a the resource identifier and its tag key and value. The following example changes the value of the stack tag for one of your EMIs from prod to test:
euca-create-tags emi-1a2b3c4d  --tag stack=dev
TAG  emi-1a2b3c4d  image  stack  dev
5.2.4 - Delete a Tag
To delete a tag:
Enter the following command and parameters:
euca-delete-tags resource_id [resource_id]" --tag
"key=[key_value]" --tag "value=[key_value]"
Note
If you specify a value, the tag is deleted only if its value matches the one you specified. If you specify an empty string as the value, the tag is deleted only if the tag’s value is an empty string.Eucalyptus does not return a message. The following example deletes two tags assigned to an EMI and an instance:
euca-delete-tags emi-1A2B3C4D i-6F5D4E3A --tag appserver --tag stack
The following example deletes a tag only if the value is an empty string:
euca-delete-tags snap-1A2B3C4D --tag Owner=
5.2.5 - Filter by Tag
You can describe your resources and filter the results based on the tags. To filter by tag:
Enter the following command and parameter:
euca-describe-tags --filter resource-type=[resource_type]
The following example describes all your tags.
euca-describe-tags
TAG  emi-1A2B3C4D  image  appserver
TAG  emi-1A2B3C4D  image  stack  dev
TAG  i-5F4E3D2A  instance  appserver
TAG  i-5F4E3D2A  instance  stack  dev
TAG  i-12345678  instance  database_server
TAG  i-12345678  instance  stack  test
The following example describes the tags for a resource with ID emi-1A2B3C4D.
euca-describe-tags --filter "resource-id=emi-1A2B3C4D"
TAG  emi-1A2B3C4D  image  appserver
TAG  emi-1A2B3C4D  image  stack  dev
The following example describes the tags for all your instances.
euca-describe-tags --filter "resource-type=instance"
TAG  i-5F4E3D2A  instance  appserver
TAG  i-5F4E3D2A  instance  stack  dev
TAG  i-12345678  instance  database_server
TAG  i-12345678  instance  stack  test
6 - Managing Access
Managing Access
Eucalyptus manages access to the cloud by policies attached to accounts, groups, and users. This section details access-related tasks you can perform once your administrator allows you access to Eucalyptus. These tasks are split into the following areas: tasks for groups, and tasks for users, and tasks for credential management.
6.1 - Groups
Groups
Groups are used to share resource access authorizations among a set of users within an account. Users can belong to multiple groups.
Note
A group in the context of access is not the same as a security group.This section details tasks that can be performed on groups.
6.1.1 - Create a Group
To create a group perform the steps listed in this topic.Enter the following command:
euare-groupcreate -g <group_name>
Eucalyptus does not return anything.
6.1.2 - Add a Group Policy
To add a group policy perform the steps listed in this topic.Enter the following command:
euare-groupaddpolicy -g <group_name> -p <policy_name> -e <effect> -a
							<actions> -o
The optional -o parameter tells Eucalyptus to return the JSON policy, as in this example:
{"Version":"2008-10-17","Statement":[{"Effect":"Allow", "Action":["ec2:RunInstances"], "Resource":["*"]}]}
6.1.3 - Modify a Group
To modify a group perform the steps listed in this topic.Modifying a group is similar to a “move” operation. Whoever wants to modify the group must have permission to do it on both sides of the move. That is, you need permission to remove the group from its current path or name, and put that group in the new path or name.
For example, if a group changes from one area in a company to another, you can change the group’s path from /area_abc/ to /area_efg/ . You need permission to remove the group from /area_abc/ . You also need permission to put the group into /area_efg/ . This means you need permission to call UpdateGroup on both arn:aws:iam::123456789012:group/area_abc/* and arn:aws:iam::123456789012:group/area_efg/* .
Enter the following command to modify the group’s name:
euare-groupmod -g <group_name> --new-group-name <new_name>
Eucalyptus does not return a message. Enter the following command to modify a group’s path:
euare-groupmod -g <group_name> -p <new_path>
Eucalyptus does not return a message.
6.1.4 - Add a User to a Group
To add a user to a group perform the steps listed in this topic.Enter the following command:
euare-groupadduser -g <group_name> -u <user-name>
6.1.5 - Remove a User from a Group
To remove a user from a group perform the steps listed in this topic.Enter the following command:
euare-groupremoveuser -g <group_name> -u <user-name>
6.1.6 - List Groups
To list groups perform the steps listed in this topic.Enter the following command:
euare-grouplistbypath
Eucalyptus returns a list of paths followed by the ARNs for the groups in each path. For example:
arn:aws:iam::eucalyptus:group/groupa
6.1.7 - Delete a Group
To delete a group perform the steps listed in this topic.When you delete a group, you have to remove users from the group and delete any policies from the group. You can do this with one command, using the euare-groupdel command with the -r option. Or you can follow the following steps to specify who and what you want to delete.
Individually remove all users from the group.
euare-groupremoveuser -g <group_name> -u <user_name>
Delete the policies attached to the group.
euare-groupdelpolicy -g <group_name> -p <policy_name>
Delete the group.
euare-groupdel -g <group_name>
The group is now deleted.
6.2 - Users
Users
Users are subsets of accounts and are added to accounts by an appropriately credentialed administrator. While the term user typically refers to a specific person, in Eucalyptus, a user is defined by a specific set of credentials generated to enable access to a given account. Each set of user credentials is valid for accessing only the account for which they were created. Thus a user only has access to one account within a Eucalyptus system. If an individual person wishes to have access to more than one account within a Eucalyptus system, a separate set of credentials must be generated (in effect a new ‘user’) for each account (though the same username and password can be used for different accounts).
When you need to add a new user to your Eucalyptus cloud, you’ll go through the following process:
- Create a user
- Add user to a group
- Give user a login profile
6.2.1 - Add a User
To add a user, perform the steps in this topic.Enter the following command
euare-usercreate -u <user_name> -g <group_name> -k
Eucalyptus does not return a response.
Note
If you include the parameter, Eucalyptus returns a response that includes the user’s ARN and GUID.6.2.2 - Create a Login Profile
To create a login profile, perform the tasks in this topic.Enter the following command:
euare-useraddloginprofile -u <user_name> -p <password>
Eucalyptus does not return a response.
6.2.3 - Modify a User
Modifying a user is similar to a “move” operation. To modify a user, you need permission to remove the user from the current path or name, and put that user in the new path or name.For example, if a user changes from one team in a company to another, you can change the user’s path from /team_abc/ to /team_efg/ . You need permission to remove the user from /team_abc/ . You also need permission to put the user into /team_efg/ . This means you need permission to call UpdateUser on both arn:aws:iam::123456789012:user/team_abc/* and arn:aws:iam::123456789012:user/team_efg/* .
To rename a user:
Enter the following command to rename a user:
euare-usermod -u <user_name> --new-user-name <new_name>
Eucalyptus does not return a message. Enter the following command:
euare-groupmod -u <user_name> -p <new_path>
Eucalyptus does not return a message.
6.2.4 - Change User Path
Enter the following command:
euare-usermod -u <user_name> -p <new_path>
Eucalyptus does not return a message.
6.2.5 - Change User Password
To change a user’s password using the CLI:
Enter the following command:
euare-usermodloginprofile -u [username] -p [password]
Eucalyptus does not return a message.
6.2.6 - List Users
To list users within a path, perform the steps in this topic.Use the euare-userlistbypath command to list all the users in an account or to list all the users with a particular path prefix. The output lists the ARN for each resulting user.
euare-userlistbypath -p <path>
6.2.7 - Delete a User
To delete a user, perform the tasks in this topic.Enter the following command
euare-userdel -u <user_name>
Eucalyptus does not return a response.
6.3 - Credentials
Credentials
Eucalyptus uses different types of credentials for different purposes. This section details tasks needed to allow access to Eucalyptus services.
6.3.1 - Create Credentials
The first time you get credentials using the Eucalyptus Administrator Console, a new secret access key is generated. On each subsequent request to get credentials, an existing active secret Key is returned. You can also generate new keys using the command.
Note
Each request to get a user’s credentials generates a new pair of a private key and X.509 certificate.To generate a new key for a user by an account administrator, enter the following
euare-useraddkey USERNAME
To generate a private key and an X.509 certificate pair, enter the following:
euare-usercreatecert USERNAME
6.3.2 - Upload a Certificate
To upload a certificate provided by a user:
Enter the following command:
euare-useraddcert -u <user_name> -f <cert_file>
7 - Using VM Networking and Security
Using VM Networking and Security
The Eucalyptus networking mode used, and it’s configuration, determine the features available to users; such as elastic IPs, which are public (external) IP addresses that users can reserve and dynamically associate with VM instance; and security groups, which are sets of firewall rules applied to VM instances associated with the group.
Euca2ools or the AWS CLI provide means for users to interact with these features with commands for allocating and associating IP addresses, as well as creating, deleting, and modifying security groups.
7.1 - Associate an IP Address with an Instance
To associate an IP address with an instance:
Allocate an IP address:
euca-allocate-address ADDRESS <IP_address>
Associate the allocated IP address with an instance ID:
euca-associate-address -i <instance_ID> <IP_address>


euca-associate-address -i i-56785678 192.168.17.103
7.2 - Release an IP Address
Use euca-disassociate-address and euca-release-address to disassociate an IP address from an instance and to release the IP address to the global pool, respectively.
To release an IP address:
Enter the following command to disassociate an IP address from an instance:
euca-disassociate-address <IP_address>
Enter the following command to release an IP address:
euca-disassociate-address <IP_address>
The following example releases the IP address, 192.168.17.103
euca-release-address 192.168.17.103
7.3 - Create a Security Group
Security groups let you control network access to instances by applying network rules to instances associated with a group.
To create a security group:
Enter the following command:
euca-add-group -d <description> <group_name>
Note
You can also create a security group you run an instance. Use the command with the option. Security group rules only apply to incoming traffic thus all outbound traffic is permitted.The following example creates a new security group named mygroup and described as newgroup .
euca-add-group -d "newgroup" mygroup
7.4 - Delete a Security Group
The euca-delete-group command lets you delete security groups. To delete a security group:
Enter the following command:
euca-delete-group <group_name>
The following example deletes the security group, mygroup .
euca-delete-group mygroup
7.5 - Authorize Security Group Rules
By default, a security group prevents incoming network traffic from all sources. You can modify network rules and allow incoming traffic to security groups from specified sources using the euca-authorize command.
To authorize security group rules:
Use euca-authorize to authorize port 22 access to your default group. Enter the following command:
euca-authorize -P <protocol> -p <port_number> \
-s <CIDR_source_network> <group_name>
The following example allows all incoming SSH traffic on port 22 to access to the security group mygroup . The CIDR source network, 0.0.0.0/0 , refers to any source.
euca-authorize -P tcp -p 22 -s 0.0.0.0/0 mygroup
 GROUP	mygroup ↵
 PERMISSION	mygroup	ALLOWS	tcp	22	22	FROM	CIDR
Instead of specifying a CIDR source, you can specify another security group. The following example allows access to the security group mygroup from the someothergroup security group using SSH on port 22.
euca-authorize --source-group someothergroup \
--source-group-user someotheruser -P tcp -p 22 mygroup
7.6 - Revoke Security Group Rules
To revoke security group rules:
Enter the following command:
euca-revoke -P <protocol> -p <port_number> -s <CIDR_source_network> <group_name>
The following example revokes the network rules authorized for the security group mygroup .
euca-revoke -P tcp -p 22 -s 0.0.0.0/0 mygroup
8 - Using Auto Scaling
Using Auto Scaling
Eucalyptus Auto Scaling automatically adds and removes instances based on demand. Auto Scaling scales dynamically based on metrics (for example, CPU utilization). The Auto Scaling service works in conjunction with the ElasticLoad Balancing and CloudWatch services.
8.1 - How Auto Scaling Works
Eucalyptus Auto Scaling is designed to address a common web application scenario: that you are running multiple copies of an application across several identical instances to adequately handle a certain volume of user requests. Eucalyptus Auto Scaling can help you make more efficient use of the computing resources in your cloud by automatically launching and terminating these instances, based on metrics and/or a schedule that you can define. There are three main Auto Scaling components that work together to provide this functionality: the Auto Scaling group , the launch configuration , and the scaling plan .
The Auto Scaling group contains the information about the instances that will be actually be used for scaling operations. The Auto Scaling group defines the minimum, desired, and maximum number of instances that you will use to scale your application.
The launch configuration contains all of the information necessary for Auto Scaling to launch instances, including instance type, image ID, key pairs, security groups, and block device mappings.
The scaling policy defines how to perform scaling actions. Scaling policies can execute automatically in response to CloudWatch alarms, or they you can execute them manually.
In addition to performing scaling operations based on the criteria defined in the scaling plan, Auto Scaling will periodically perform health checks to ensure that the instances in your Auto Scaling group are up and running. If an instance is determined to be unhealthy, Auto Scaling will terminate that instance and launch a new instance in order to maintain the minimum or desired number of instances in the scaling group.
8.2 - Auto Scaling Concepts
Auto Scaling Concepts
This section discusses Auto Scaling concepts and terminology.
8.2.1 - Understanding Launch Configurations
The launch configuration defines the settings used by the Eucalyptus instances launched within an Auto Scaling group. This includes the image name, the instance type, key pairs, security groups, and block device mappings. You associate the launch configuration with an Auto Scaling group. Each Auto Scaling group can have one (and only one) associated launch configuration.
Once you’ve created a launch configuration, you can’t change it; you must create a new launch configuration and then associate it with an Auto Scaling group. After you’ve created and attached a new launch configuration to an Auto Scaling group, any new instances will be launched using parameters defined in the new launch configuration; existing instances in the Auto Scaling group are not affected.
For more information, see Creating a Basic Auto Scaling Configuration .
8.2.2 - Understanding Auto Scaling Groups
An Auto Scaling group is the central component of Auto Scaling. An Auto Scaling group defines the parameters for the Eucalyptus instances are used for scaling, as well as the minimum, maximum, and (optionally) the desired number of instances to use for Auto Scaling your application. If you don’t specify the desired number of instances in your Auto Scaling group, the default value will be the same as the minimum number of instances defined.
In addition to instance and capacity definitions, each Auto Scaling group must specify one (and only one) launch configuration.
For more information, see Creating a Basic Auto Scaling Configuration .
8.2.3 - Understanding Auto Scaling Policies
An Auto Scaling policy defines how to perform scaling actions in response to CloudWatch alarms. Auto scaling policies can either scale-in , which terminates instances in your Auto Scaling group, or scale-out , which will launch new instances in your Auto Scaling group. You can define an Auto Scaling policy based on demand, or based on a fixed schedule.
Demand-Based Auto Scaling Policies
Demand-based Auto Scaling policies scale your application dynamically based on CloudWatch metrics (such as average CPU utilization) gathered from the instances running in your scaling group. For example, you can configure a CloudWatch alarm to monitor the CPU usages of the instances in your Auto Scaling group. A CloudWatch alarm definition includes thresholds - minimum and maximum values for the defined metric - that will cause the alarm to fire.
Note
For more information on CloudWatch, go to .For example, you can define the lower and upper thresholds of the CloudWatch alarm at 40% and 80% CPU usage. Once you’ve created the CloudWatch alarm, you can create a scale-out policy that launches 10 new instances when the CloudWatch alarm breaches the upper threshold (the average CPU usage is at or above 80%), and a scale-in policy that terminates 10 instances when the CloudWatch alarm breaches the lower threshold (the average CPU usage of the instances in the Auto Scaling group falls below 40%). Your Auto Scaling group will execute the appropriate Auto Scaling policy when it receives the message from the CloudWatch alarm.
Cooldown Period
A cooldown period is the amount of time after an Auto Scaling activity takes place where further Auto Scaling activity is suspended. This is to allow time for the Auto Scaling activities (such as new instance launches or terminations) to fully complete so that resources are not unnecessarily launched or terminated. You can specify this amount of time; if you don’t specify a cooldown period, Auto Scaling uses a default cooldown period of 300 seconds (5 minutes).
For more information, go to Configuring a Demand-Based Scaling Policy .
8.2.4 - Understanding Health Checks
Auto scaling periodically performs health checks on the instances in your Auto Scaling group. By default, Auto Scaling group determines the health state of each instance by periodically checking the results of Eucalyptus instance status checks. When Auto Scaling determines that an instance is unhealthy, it terminates that instance and launches a new one.
If your Auto Scaling group is using elastic load balancing, Auto Scaling can determine the health status of the instances by checking the results of both Eucalyptus instance status checks and elastic load balancing instance health.
Auto scaling determines an instance is unhealthy if the calls to either Eucalyptus instance status checks or elastic load balancing instance health status checks return any state other than OK (or InService ).
If there are multiple elastic load balancers associated with your Auto Scaling group, Auto Scaling will make health check calls to each load balancer. If any of the health check calls return any state other than InService , that instance will be marked as unhealthy. After Auto Scaling marks an instance as unhealthy, it will remain marked in that state, even if subsequent calls from other load balancers return an InService state for the same instance.
For more information, go to Configuring Health Checks .
8.2.5 - Understanding Instance Termination Policies
Before Auto Scaling selects an instance to terminate, it first identifies the availability zone used by the group that contains the most instances. If all availability zones have the same number of instances, Auto Scaling selects a random availability zone, and then uses the termination policy to select the instance within that randomly selected availability zone for termination.
By default, Auto Scaling chooses the instance that was launched with the oldest launch configuration. If more than one instance was launched using the oldest launch configuration, Auto Scaling the instance that was created first using the oldest launch configuration.
You can override the default instance termination policy for your Auto Scaling group with one of the following options:
| Option | Description |
|---|
| OldestInstance | The oldest instance in the Auto Scaling group should be terminated. |
| NewestInstance | The newest instance in the Auto Scaling group should be terminated. |
| OldestLaunchConfiguration | The first instance created using the oldest launch configuration should be terminated. |
| Default | Use the default instance termination policy. |
You can have more than one termination policy per Auto Scaling group. The termination policies are executed in the order they were created.
For more information, go to Configuring an Instance Termination Policy .
8.3 - Auto Scaling Usage Examples
Auto Scaling Usage Examples
This section contains examples of many common usage scenarios for Auto Scaling.
8.3.1 - Creating a Basic Auto Scaling Configuration
Auto scaling requires two basic elements to function properly: a launch configuration and an Auto Scaling group. The following examples show how to set up the basic elements of an Auto Scaling configuration.
Create a Launch Configuration
The launch configuration specifies the parameters that Auto Scaling will use when launching new instances for your Auto Scaling group. In this example, we will create a launch configuration with the minimum required parameters - in this case, we set up a launch configuration that specifies that all instances launched in the Auto Scaling group will be of instance type and use the image.To create a launch configuration:
Enter the following command: euscale-create-launch-config MyLaunchConfig --image-id emi-00123456 --instance-type m1.small To verify the launch configuration, enter the following command: euscale-describe-launch-configs MyLaunchConfig You should see output similar to the following:
LAUNCH-CONFIG MyLaunchConfig emi-00123456 m1.small
You’ve now created a launch configuration..
Create an Auto Scaling Group
The Auto Scaling group contains settings like the minimum, maximum, and desired number of Eucalyptus instances. At minimum, you must specify the name of the Auto Scaling group, the name of an existing launch configuration, the availability zone, and the minimum and maximum number of instances that should be running. In the following example, we will create an Auto Scaling group called MyScalingGroup in availability zone PARTI00, with a minimum size of 2 and a maximum size of 5.To create an Auto Scaling group: Enter the following command:
euscale-create-auto-scaling-group MyScalingGroup --launch-configuration
                    		MyLaunchConfig --availability-zones PARTI00 --min-size 2 --max-size 5
                    		--desired-capacity 2
Enter the following command to verify the Auto Scaling group you just created:
euscale-describe-auto-scaling-groups MyScalingGroup
This command will return output similar to the following:
AUTO-SCALING-GROUP	MyScalingGroup	MyLaunchConfig	PARTI00		2	5	2	Default
INSTANCE	i-1B853EC3	PARTI00	InService	Healthy	MyLaunchConfig
INSTANCE	i-ABC53ED7	PARTI00	InService	Healthy	MyLaunchConfig
Once you’ve created the Auto Scaling group, Auto Scaling will launch the appropriate number of instances.
8.3.2 - Configuring a Demand-Based Scaling Policy
An Auto Scaling group needs a scaling policy to determine when to perform scaling activities. Auto scaling policies work with CloudWatch to identify metrics and set alarms, which are triggered when the metrics fall outside of a specified value range. To configure a scale-based policy, you need to create the policy, and then create CloudWatch alarms to associate with the policy.In the following example, we will create a demand-based scaling policy.
Note
For more information on CloudWatch, go to .Create Auto Scaling Policies
To create the scaling policies:
Create a scale-out policy using the following command:
euscale-put-scaling-policy MyScaleoutPolicy --auto-scaling-group MyScalingGroup --adjustment=30 --type PercentChangeInCapacity
This command will return a unique Amazon Resource Name (ARN) for the new policy.
Note
You will need this ARN to create the Cloudwatch alarms in subsequent steps.Note
The following example has been split into two lines for legibility.arn:aws:autoscaling::706221218191:scalingPolicy:5d02981b-f440-4c8f-98f2-8a620dc2b787:
autoScalingGroupName/MyScalingGroup:policyName/MyScaleoutPolicy
Create a scale-in policy using the following command:
euscale-put-scaling-policy MyScaleinPolicy -g MyScalingGroup --adjustment=-2 --type ChangeInCapacity
This command will return output containing a unique Amazon Resource Name (ARN) for the new policy, similar to the following:
Note
You will need this ARN to create the Cloudwatch alarms in subsequent steps.Note
The following example has been split into two lines for legibility.arn:aws:autoscaling::706221218191:scalingPolicy:d28c6ffc-e9f1-4a48-a79c-8b431794c367:
autoScalingGroupName/MyScalingGroup:policyName/MyScaleinPolicy
Create CloudWatch Alarms
To create CloudWatch alarms:
Create a Cloudwatch alarm for scaling out when the average CPU usage exceeds 80 percent:
Note
The following example has been split into multiple lines for legibility.euwatch-put-metric-alarm AddCapacity --metric-name CPUUtilization --unit Percent
--namespace "AWS/EC2" --statistic Average --period 120 --threshold 80 --comparison-operator
GreaterThanOrEqualToThreshold --dimensions "AutoScalingGroupName=MyScalingGroup"
--evaluation-periods 2 --alarm-actions
arn:aws:autoscaling::706221218191:scalingPolicy:5d02981b-f440-4c8f-98f2-8a620dc2b787:
    autoScalingGroupName/MyScalingGroup:policyName/MyScaleoutPolicy
Create a Cloudwatch alarm for scaling in when the average CPU usage falls below 40 percent:
Note
The following example has been split into multiple lines for legibility.euwatch-put-metric-alarm RemoveCapacity --metric-name CPUUtilization --unit Percent
--namespace "AWS/EC2" --statistic Average --period 120 --threshold 40 --comparison-operator
LessThanOrEqualToThreshold --dimensions "AutoScalingGroupName=MyScalingGroup" --evaluation-periods 2
--alarm-actions
arn:aws:autoscaling::706221218191:scalingPolicy:d28c6ffc-e9f1-4a48-a79c-8b431794c367:
    autoScalingGroupName/MyScalingGroup:policyName/MyScaleinPolicy
Verify Your Alarms and Policies
Once you’ve created your Auto Scaling policies and CloudWatch alarms, you should verify them.To verify your alarms and policies:
Use the CloudWatch command euwatch-describe-alarms to see a list of the alarms you’ve created:
euwatch-describe-alarms
This will return output similar to the following:
AddCapacity	INSUFFICIENT_DATA	arn:aws:autoscaling::706221218191:scalingPolicy:5d02981b-f440-4c8f-98f2-8a620dc2b787:
   autoScalingGroupName/MyScalingGroup:policyName/MyScaleoutPolicy
   AWS/EC2	CPUUtilization	120	Average	2	GreaterThanOrEqualToThreshold	80.0
RemoveCapacity	INSUFFICIENT_DATA	arn:aws:autoscaling::706221218191:scalingPolicy:d28c6ffc-e9f1-4a48-a79c-8b431794c367:
autoScalingGroupName/MyScalingGroup:policyName/MyScaleinPolicy
   AWS/EC2	CPUUtilization	120	Average	2	LessThanOrEqualToThreshold	40.0
Use the euscale-describe-policies command to see the scaling policies you’ve created:
euscale-describe-policies --auto-scaling-group MyScalingGroup
This will return output similar to the following (note that this output has been split into multiple lines for legibility):
SCALING-POLICY	MyScalingGroup	MyScaleinPolicy	-2	ChangeInCapacity	arn:aws:autoscaling::706221218191:
  scalingPolicy:d28c6ffc-e9f1-4a48-a79c-8b431794c367:
  autoScalingGroupName/MyScalingGroup:policyName/MyScaleinPolicy
SCALING-POLICY	MyScalingGroup	MyScaleoutPolicy	30	PercentChangeInCapacity	arn:aws:autoscaling::706221218191:
  scalingPolicy:5d02981b-f440-4c8f-98f2-8a620dc2b787:
  autoScalingGroupName/MyScalingGroup:policyName/MyScaleoutPolicy
8.3.3 - Configuring Health Checks
By default, Auto Scaling group determines the health state of each instance by periodically checking the results of instance status checks. You can specify using the ELB health check method in addition to using the instance health check method.To use load balancing health checks for an Auto Scaling group:
Use the following command to specify ELB health checks for an Auto Scaling group:
euscale-update-auto-scaling-group MyScalingGroup –-health-check-type ELB –-grace-period 300
8.3.4 - Configuring an Instance Termination Policy
You can control how Auto Scaling determines which instances to terminate. You can specify a termination policy when you create an Auto Scaling group, and you can change the termination policy at any time using the command.You can override the default instance termination policy for your Auto Scaling group with one of the following options:
| Option | Description |
|---|
| OldestInstance | The oldest instance in the Auto Scaling group should be terminated. |
| NewestInstance | The newest instance in the Auto Scaling group should be terminated. |
| OldestLaunchConfiguration | The first instance created using the oldest launch configuration should be terminated. |
| Default | Use the default instance termination policy. |
To configure an instance termination policy:
Specify the –termination-policies parameter when creating or updating the Auto Scaling group. For example:
euscale-update-auto-scaling-group MyScalingGroup --termination-policies "NewestInstance"
Verify that your Auto Scaling group has updated the termination policy by running the following command: euscale-describe-auto-scaling-groups MyScalingGroup This command should return output similar to the following:
AUTO-SCALING-GROUP	MyScalingGroup	MyLaunchConfig	PARTI00		2	5	2	NewestInstance
INSTANCE	i-1B853EC3	PARTI00	InService	Healthy	MyLaunchConfig
INSTANCE	i-ABC53ED7	PARTI00	InService	Healthy	MyLaunchConfig
8.3.5 - Configuring Auto Scaling with Elastic Load Balancing
This example shows how to set up Auto Scaling with Elastic Load Balancing.To set up a load-balanced auto scaling configuration:
If you don’t already have a launch configuration, create one: euscale-create-launch-config MyLaunchConfig --image-id emi-50783D25 --instance-type m1.medium --group mysecuritygroup Create a new auto scaling group associated with a load balancer: euscale-create-auto-scaling-group MyScalingGroup --launch-configuration MyLaunchConfig --load-balancers MyLoadBalancer --availability-zones AcmeAvailabilityZone --min-size 2 --max-size 4 Authorize the security group used by the load balancer for back-end port communication. For example:
$ eulb-describe-lbs --show-long
LOAD_BALANCER	MyLoadBalancer	MyLoadBalancer-408396244283.elb.acme.eucalyptus-systems.com
{interval=200,target=HTTP:80/,timeout=3,healthy-threshold=2,unhealthy-threshold=4}		AcmeAvailabilityZone
{protocol=HTTP,lb-port=80,instance-protocol=HTTP,instance-port=80}
{owner-alias=944786667073,group-name=euca-internal-408396244283-MyLoadBalancer}
2014-05-28T18:13:17.902Z
euca-authorize mysecuritygroup -u 944786667073 -o euca-internal-408396244283-MyLoadBalancer -p -1 Verify that your Auto Scaling group has been created with a load balancer:
$ euscale-describe-auto-scaling-groups
AUTO-SCALING-GROUP	MyScalingGroup	MyLaunchConfig	AcmeAvailabilityZone	MyLoadBalancer	2	4	2	Default
INSTANCE	i-DFCD0CBC	AcmeAvailabilityZone	InService	Healthy	MyLaunchConfig
INSTANCE	i-B3431043	AcmeAvailabilityZone	InService	Healthy	MyLaunchConfig
9 - Using Elastic Load Balancing
Using Elastic Load Balancing
Elastic Load Balancing automatically distributes incoming traffic across your Eucalyptus cloud. It enables you to achieve even greater fault tolerance by automatically detecting instances that are overloaded, and rerouting traffic to other instances as needed.Elastic Load Balancing works in conjunction with Eucalyptus’s Auto Scaling and Cloud Watch services, to make your cloud more robust and efficient.
The following section describes how load balancing works, provides an overview of load balancing concepts, and includes a series of usage scenarios that will show you how to perform common load balancing tasks.
9.1 - Elastic Load Balancing Overview
Elastic Load Balancing Overview
Elastic Load Balancing is designed to provide an easy-to-use fault tolerant cloud platform. Using Elastic Load Balancing, you can automatically balance incoming traffic, ensuring that requests are sent to an instance that has the capacity to serve them. It allows you to add and remove instances as needed, without interrupting the operation of your cloud. If an instance fails or is removed, the load balancer stops routing traffic to that instance. If that instance is restored, or an instance is added, the load balancer automatically resumes or starts routing traffic to that instance.
If your cloud is serving traffic over HTTP, the Elastic Load Balancing service can provide session stickiness, allowing you to bind specific virtual instances to your load balancers.
Elastic Load Balancing can balance requests within a cluster, or across multiple clusters. If there are no more healthy instances in a cluster, the load balancer will route traffic to other clusters, until healthy instances are restored to that cluster.
9.1.1 - Elastic Load Balancing Concepts
This section describes the terminology and concepts you need for understanding and using the Elastic Load Balancing service.
DNS
When a new load balancer is created, Eucalyptus will assign a unique DNS A record to the load balancer. After the load balancer has been launched and configured, the IP address of its interface will be added to the DNS name. If more than one cluster is specified, there can be more than one IP addresses mapped to the DNS name.
The load balancers in one cluster will distribute traffic to the instances only in the same cluster. Application users can query the application service using the DNS name and the Eucalyptus DNS service will respond to the query with the list of IP addresses on a round-robin basis.
Eucalyptus generates a DNS name automatically (e.g., lb001.euca-cloud.example.com). Typically there will also be a CNAME record that maps from the meaningful domain name (e.g., service.example.com) to the automatically-generated DNS name. The CNAME records can be serviced anywhere on Internet.
Health Check
In order to route traffic to healthy instances, and prevent traffic from being routed to unhealthy instances, the Elastic Load Balancing service routinely checks the health of your service instances. The health check uses metrics such as latency, RequestCount and HTTP response code counts to ensure that service instances are responding appropriately to user traffic.
Load Balancer
Load balancers are the core of the Elastic Load Balancing service. Load balancers are special instances created from a Eucalyptus-provided VM image, and are managed by Eucalyptus. Instances off the image forward packets to your service instances using load-balancing software to ensure no instances are overloaded.
There may be a brief delay between the time that the first service instance is registered to a load balancer and the time the load balancer becomes operational. This is due to the virtual machine instantiation, and will not adversely affect the operation of your load balancer.
Each balancer VM will service only one load balancer. Launching unnecessary load balancers may be detrimental to your cloud’s performance.
Service Instance
A service instance is an instance created from an image in your cloud. These are the instances that serve your application and users. The Elastic Load Balancing service monitors the health of these instances and routes traffic only to healthy instances.
Sticky Sessions
By default, a load balancer routes each request independently to the application instance with the smallest load. However, you can use the sticky session feature (also known as session affinity), which enables the load balancer to bind a user’s session to a specific application instance. This ensures that all requests coming from the user during the session will be sent to the same application instance.
The key to managing the sticky session is determining how long your load balancer should consistently route the user’s request to the same application instance. If your application has its own session cookie, then you can set Elastic Load Balancing to create the session cookie to follow the duration specified by the application’s session cookie. If your application does not have its own session cookie, then you can set Elastic Load Balancing to create a session cookie by specifying your own stickiness duration. You can associate stickiness duration for only HTTP/HTTPS load balancer listeners.
An application instance must always receive and send two cookies: A cookie that defines the stickiness duration and a special Elastic Load Balancing cookie named AWSELB, that has the mapping to the application instance.
HTTPS/SSL Support
HTTPS Support is a feature that allows you to use the SSL/TLS protocol for encrypted connections (also known as SSL offload). This feature enables traffic encryption between the clients that initiate HTTPS sessions with your load balancer and also for connections between the load balancer and your back-end instances.
There are several advantages to using HTTPS/SSL connections with your load balancer:
The SSL server certificate used to terminate client connections can be managed centrally on the load balancer, rather than on every individual application instance.
The work of encrypting and decrypting SSL traffic is moved from the application instance to the load balancer.
The load balancer can ensure session affinity or “sticky sessions” by terminating the incoming HTTPS request and then re-encrypting the content to send to the back-end application instance.
All of the features available for HTTP can be used with HTTPS connections.
Using HTTPS/SSL protocols for both front-end and back-end connections ensures end-to-end traffic encryption. If you are using SSL and do not want Elastic Load Balancing to terminate, you can use a TCP listener and install certificates on all the back-end instances handling requests.
To enable HTTPS support for your load balancer, you’ll have to install an SSL server certificate on your load balancer by using Identity and Access Management (IAM) to upload your SSL certificate and key. After you upload your certificate, specify its Amazon Resource Name (ARN) when you create a new load balancer or update an existing load balancer. The load balancer uses the certificate to terminate and then decrypt requests before sending them to the back-end instances.
9.2 - Eucalyptus Load Balancing Usage Examples
Eucalyptus Load Balancing Usage Examples
This section contains examples of common usage scenarios for Eucalyptus Load Balancing.
9.2.1 - Eucalyptus ELB Listener Configurations
This section provides a reference to various possible ways to configure your listener, depending on how secure you want your load balancer. Currently, Eucalyptus supports the following HTTP/HTTPS Load Balancer use cases:
- Basic HTTP load balancer
- Secure website or application using ELB to offload SSL decryption.
- Secure website or application using end-to-end encryption
| Use Case | Front-end Protocol | Front-end Options | Back-end Protocol | Back-end Options | Notes |
|---|
| Basic HTTP load balancer | HTTP | NA | HTTP | NA | Supports X-forward for header. Go to AWS X-forwarding for more information. |
| Secure website or application using Elastic Load Balancing to offload SSL decryption | HTTPS | SSL Negotiation. | HTTP | NA | Supports X-forward for header. Go to AWS X-forwarding for more information. Requires an SSL certificate installed on the load balancer. |
| Secure website or application using end-to-end encryption | HTTPS | SSL Negotiation. | HTTPS | Back-end authentication | Supports X-forward for header. Go to AWS X-forwarding for more information. Requires an SSL certificate installed on the load balancer and registered instances. |
9.2.2 - Creating a Basic Elastic Load Balancing Configuration
Elastic load balancing requires two basic elements to function properly: a load balancer and instances registered with that load balancer. The following examples show how to set up the basic elements of an elastic load balancer configuration.
Create a Load Balancer
The load balancer manages incoming traffic, and monitors the health of your instances. The load balancer ensures that traffic is only sent to healthy instances.To create a load balancer:
Enter the following command, specifying availability zones:
eulb-create-lb -z one -l "lb-port=80, protocol=HTTP, instance-port=80,
instance-protocol=HTTP" MyLoadBalancer
To verify the elastic load balancer has been created, enter the following command: eulb-describe-lbs MyLoadBalancer You should see output similar to the following:
LOAD_BALANCER MyLoadBalancer MyLoadBalancer-587773761872.lb.localhost 2013-01-01T01:23:45.678Z
Optionally, you can create listeners for the load balancer as follows:
eulb-create-lb-listeners --listener "lb-port=80, protocol=HTTP,
    instance-port=80, instance-protocol=HTTP"
You’ve now created an elastic load balancer.
Register instances with the Load Balancer
The load balancer monitors the health of registered instances, and balances incoming traffic across the healthy instances.To register an instance with the load balancer: Enter the following command:
eulb-register-instances-with-lb --instances i-e0636aca,i-0c9c3967 MyLoadBalancer
Enter the following command to verify that the instances are registered with the load balancer: eulb-describe-instance-health MyLoadBalancer This command will return output similar to the following:
INSTANCE	i-6FAD3F7B	InService
INSTANCE	i-70FE4541	InService
Once you’ve created the load balancer and registered your instances with it, the load balancer will automatically route traffic from its endpoint URL to healthy instances.
9.2.3 - Configuring the Health Check
To determine which instances are healthy, the load balancer periodically polls the registered instances. You can use the command as described in this topic.Perform the following step to configure how the instances should be polled, how long to wait for a response, and how many consecutive successes or failures are required to mark an instance as healthy or unhealthy.
Note
After you initially set up your load balancer, Eucalyptus automatically performs a health check to protect against potential side-effects caused by instances being terminated without being deregistered. This health check uses the instance port defined in the load balancer configurationThe following shows an example health check configuration command:
eulb-configure-healthcheck --healthy-threshold 5 --unhealthy-threshold 5 --interval 30 --timeout 120 --target HTTP:80/ MyLoadBalancer
Use --healthy-threshold and --unhealthy-threshold to specify the number of consecutive health checks required to mark an instance as Healthy or Unhealthy respectively. Use --target to specify the connection target on your instances for these health checks. Use --interval and --timeout to specify the approximate frequency and maximum duration of these health checks.
9.2.4 - Modifying an Elastic Load Balancing Configuration
Elastic load balancing requires two basic elements to function properly: a load balancer and instances registered with that load balancer. The following examples show how to modify the basic elements of an elastic load balancer configuration.
De-register instances from the Load Balancer
The load balancer monitors the health of registered instances, and balances incoming traffic across the healthy instances.To deregister an instance from the load balancer: Enter the following command:
eulb-deregister-instances-from-lb --instances INSTANCE1,INSTANCE2,... MyLoadBalancer
Enter the following command to verify that the instances are deregistered from the load balancer: eulb-describe-instance-health MyLoadBalancer This command will return output similar to the following:
INSTANCE i-6FAD3F7B InService
Delete Load Balancer Listeners
To delete a load balancer listener:
Enter the following command:
eulb-delete-lb-listeners --lb-ports PORT1,PORT2,... MyLoadBalancer
Delete Load Balancer
To delete a load balancer:
Enter the following command:
eulb-delete-lb MyLoadBalancer
You’ve now deleted the elastic load balancer.
9.2.5 - Creating Elastic Load Balancing Sticky Sessions
By default, a load balancer routes each request independently to the application instance with the smallest load. However, you can use the sticky session feature (also known as session affinity) which enables the load balancer to bind a user’s session to a specific application instance. This ensures that all requests coming from the user during the session will be sent to the same application instance.
Enable Duration-Based Session Stickiness
To enable duration-based sticky sessions for a load balancer:
Use the eulb-create-lb-cookie-stickiness-policy command to create a load-balancer-generated cookie stickiness policy with a cookie expiration period of 60 seconds. eulb-create-lb-cookie-stickiness-policy MyLoadBalancer --policy-name MyLoadBalancerPolicy --expiration-period 60 Use the eulb-set-lb-policies-of-listener command to enable session stickiness for a load balancer using the MyLoadBalancerPolicy. eulb-set-lb-policies-of-listener MyLoadBalancer --lb-port 80 --policy-names MyLoadBalancerPolicy You can use the eulb-describe-lb-policies command to list the policies created for the load balancer. eulb-describe-lb-policies MyLoadBalancer --show-long
Enable Application-Controlled Session Stickiness
To enable application-controlled session stickiness: Use the eulb-create-app-cookie-stickiness-policy command to create a load application-generated cookie stickiness policy: eulb-create-app-cookie-stickiness-policy my-load-balancer -p my-app-cookie-lb-policy -c my-cookie Use the eulb-set-lb-policies-of-listener command to enable session stickiness for a load balancer using the my-load-balancer policy. eulb-set-lb-policies-of-listener example-lb --lb-port 80 --policy-names my-app-cookie-lb-policy You can use the eulb-describe-lb-policies command to list the policies created for the load balancer. eulb-describe-lb-policies example-lb --show-long
9.2.6 - Uploading SSL Certificates for Elastic Load Balancing
You must install an X.509 certificate on your load balancer in order to use HTTPS or SSL termination. The X.509 certificate is issued by a central Certificate Authority (CA) and contains identifying information, including a digital signature. X.509 certificates have a validity period. Once an X.509 certificate expires, you must create and install a new certificate.
Upload a Certificate
Once you’ve created a certificate, you must upload it to your cloud using the command.
Note
You must create the certificate and get it signed by a certificate authority (CA) before you can upload the certificate using the AWS Identity and Access Management (IAM) service. For instructions, go to .To upload a certificate :
Enter the euare-servercertupload command, specifying the name of your certificate, the contents of the PEM-encoded public- and private-keys:
euare-servercertupload -s cert-name --certificate-file ssl_server_cert.crt --private-key-file ssl_server_cert.pem
You’ve now created an elastic load balancer.
Verify Server Certificate
You can verify that an uploaded certificate is stored in IAM. Each certificate object has a unique Amazon Resource Name (ARN) and ID.To verify an uploaded certificate: Use the euare-servercertlistbypath command to verify the certificate is stored in IAM:
euare-servercertgetattributes -s elb-ssl-cert
The command will return the ARN, followed by the GUID. For example:
arn:aws:iam::495375389014:server-certificate/elb-ssl-cert
ASCWDKTJBXPSZTHWFERVP
9.2.7 - Adding SSL Support
This topic describes how to add SSL support to a new or existing load balancer.
Creating a new listener with SSL support
This task shows how to create a new listener with SSL support.
Note
In order to use HTTPS support, you’ll need to install an SSL server certificate on your load balancer. If you haven’t already done this, see .To add a new listener to your load balancer: Using the ARN for the certificate you installed, use the
eulb-create-listener command to create a new listener. For example:
eulb-create-lb-listeners MyLoadBalancer --listener "protocol=HTTPS,lb-port=443,instance-port=80,instance-protocol=HTTP, cert-id=arn:aws:iam::12345678901:my-server-certificate/testing/myNewCert" Use the
eulb-describe-lbs command to see the details of your load balancer. For example:
eulb-describe-lbs MyLoadBalancerUpdating a listener with a new SSL certificate
This task shows how to replace an SSL server certificate configured with listeners"
Note
In order to use HTTPS support, you’ll need to install an SSL server certificate on your load balancer. If you haven’t already done this, see .To update an existing listener with SSL support: Use the
eulb-set-lb-listener-ssl-certcommand with the ARN of your new server certificate to replace the certificate configured with listeners For example:
eulb-set-lb-listener-ssl-cert MyLoadBalancer --lb-port 443 --cert-id arn:aws:iam::12345678901:my-server-certificate/testing/myNewCert Use the
eulb-describe-lbs command to see the details of your load balancer. For example:
eulb-describe-lbs MyLoadBalancer9.2.8 - Updating the SSL Negotiation Configuration
Eucalyptus Elastic Load Balancing (ELB) uses SSL negotiation configurations to determine how SSL connections to your load balancer behave. This topic shows how to update an existing load balancer with an SSL negotiation configuration.
Get a list of predefined security policies using the eulb-describe-lb-policies command: eulb-describe-lb-policies This produces output similar to the following:
POLICY	ELBSample-AppCookieStickinessPolicy	AppCookieStickinessPolicyType
POLICY	ELBSample-LBCookieStickinessPolicy	LBCookieStickinessPolicyType
POLICY	ELBSecurityPolicy-2014-10	SSLNegotiationPolicyType
POLICY	ELBSecurityPolicy-2015-02	SSLNegotiationPolicyType
POLICY	ELBSecurityPolicy-2011-08	SSLNegotiationPolicyType
POLICY	ELBSecurityPolicy-2015-05	SSLNegotiationPolicyType
POLICY	ELBSecurityPolicy-2014-01	SSLNegotiationPolicyType
Use the eulb-create-lb-policy command to update the SSL negotiation configuration to use one of the predefined security policies. For example: eulb-create-lb-policy --policy-name mypredefinedsslpolicy --policy-type SSLNegotiationPolicyType --attributes "Reference-Security-Policy=ELBSecurityPolicy-2011-08" myloadbalancer Use the eulb-describe-lbs command to verify the update. For example: eulb-describe-lbs myloadbalancer
9.2.9 - Adding and Editing Predefined Security Policies
This topic describes how to add and edit ELB security policies.Default ELB policies are stored as JSON files in the /etc/eucalyptus/cloud.d/elb-security-policy directory. You can add or edit policy files here, and the changes will take effect when the CLC is restarted.
Copy one of the ELB policy files to a new file and edit the file. You must change the PolicyName attribute to a new name, with the name ending in a date. For example: ELBSecurityPolicy-2015-09 The policy file with the most recent date appended to the name will be used as the default policy when users create HTTPS/SSL listeners. The following is an example of an ELB policy file. You can modify this file and save it with a new filename in the /etc/eucalyptus/cloud.d/elb-security-policy directory.
{
    "PolicyAttributeDescriptions": [
        {
            "AttributeName": "Protocol-SSLv2",
            "AttributeValue": "false"
        },
        {
            "AttributeName": "Protocol-TLSv1",
            "AttributeValue": "true"
        },
        {
            "AttributeName": "Protocol-SSLv3",
            "AttributeValue": "false"
        },
        {
            "AttributeName": "Protocol-TLSv1.1",
            "AttributeValue": "true"
        },
        {
            "AttributeName": "Protocol-TLSv1.2",
            "AttributeValue": "true"
        },
        {
            "AttributeName": "Server-Defined-Cipher-Order",
            "AttributeValue": "true"
        },
        {
            "AttributeName": "ECDHE-ECDSA-AES128-GCM-SHA256",
            "AttributeValue": "true"
        },
        {
            "AttributeName": "ECDHE-RSA-AES128-GCM-SHA256",
            "AttributeValue": "true"
        },
        {
            "AttributeName": "ECDHE-ECDSA-AES128-SHA256",
            "AttributeValue": "true"
        },
        {
            "AttributeName": "ECDHE-RSA-AES128-SHA256",
            "AttributeValue": "true"
        },
        {
            "AttributeName": "ECDHE-ECDSA-AES128-SHA",
            "AttributeValue": "true"
        },
        {
            "AttributeName": "ECDHE-RSA-AES128-SHA",
            "AttributeValue": "true"
        },
        {
            "AttributeName": "DHE-RSA-AES128-SHA",
            "AttributeValue": "false"
        },
        {
            "AttributeName": "ECDHE-ECDSA-AES256-GCM-SHA384",
            "AttributeValue": "true"
        },
        {
            "AttributeName": "ECDHE-RSA-AES256-GCM-SHA384",
            "AttributeValue": "true"
        },
        {
            "AttributeName": "ECDHE-ECDSA-AES256-SHA384",
            "AttributeValue": "true"
        },
        {
            "AttributeName": "ECDHE-RSA-AES256-SHA384",
            "AttributeValue": "true"
        },
        {
            "AttributeName": "ECDHE-RSA-AES256-SHA",
            "AttributeValue": "true"
        },
        {
            "AttributeName": "ECDHE-ECDSA-AES256-SHA",
            "AttributeValue": "true"
        },
        {
            "AttributeName": "AES128-GCM-SHA256",
            "AttributeValue": "true"
        },
        {
            "AttributeName": "AES128-SHA256",
            "AttributeValue": "true"
        },
        {
            "AttributeName": "AES128-SHA",
            "AttributeValue": "true"
        },
        {
            "AttributeName": "AES256-GCM-SHA384",
            "AttributeValue": "true"
        },
        {
            "AttributeName": "AES256-SHA256",
            "AttributeValue": "true"
        },
        {
            "AttributeName": "AES256-SHA",
            "AttributeValue": "true"
        },
        {
            "AttributeName": "DHE-DSS-AES128-SHA",
            "AttributeValue": "false"
        },
        {
            "AttributeName": "CAMELLIA128-SHA",
            "AttributeValue": "false"
        },
        {
            "AttributeName": "EDH-RSA-DES-CBC3-SHA",
            "AttributeValue": "false"
        },
        {
            "AttributeName": "DES-CBC3-SHA",
            "AttributeValue": "true"
        },
        {
            "AttributeName": "ECDHE-RSA-RC4-SHA",
            "AttributeValue": "false"
        },
        {
            "AttributeName": "RC4-SHA",
            "AttributeValue": "false"
        },
        {
            "AttributeName": "ECDHE-ECDSA-RC4-SHA",
            "AttributeValue": "false"
        },
        {
            "AttributeName": "DHE-DSS-AES256-GCM-SHA384",
            "AttributeValue": "false"
        },
        {
            "AttributeName": "DHE-RSA-AES256-GCM-SHA384",
            "AttributeValue": "false"
        },
        {
            "AttributeName": "DHE-RSA-AES256-SHA256",
            "AttributeValue": "false"
        },
        {
            "AttributeName": "DHE-DSS-AES256-SHA256",
            "AttributeValue": "false"
        },
        {
            "AttributeName": "DHE-RSA-AES256-SHA",
            "AttributeValue": "false"
        },
        {
            "AttributeName": "DHE-DSS-AES256-SHA",
            "AttributeValue": "false"
        },
        {
            "AttributeName": "DHE-RSA-CAMELLIA256-SHA",
            "AttributeValue": "false"
        },
        {
            "AttributeName": "DHE-DSS-CAMELLIA256-SHA",
            "AttributeValue": "false"
        },
        {
            "AttributeName": "CAMELLIA256-SHA",
            "AttributeValue": "false"
        },
        {
            "AttributeName": "EDH-DSS-DES-CBC3-SHA",
            "AttributeValue": "false"
        },
        {
            "AttributeName": "DHE-DSS-AES128-GCM-SHA256",
            "AttributeValue": "false"
        },
        {
            "AttributeName": "DHE-RSA-AES128-GCM-SHA256",
            "AttributeValue": "false"
        },
        {
            "AttributeName": "DHE-RSA-AES128-SHA256",
            "AttributeValue": "false"
        },
        {
            "AttributeName": "DHE-DSS-AES128-SHA256",
            "AttributeValue": "false"
        },
        {
            "AttributeName": "DHE-RSA-CAMELLIA128-SHA",
            "AttributeValue": "false"
        },
        {
            "AttributeName": "DHE-DSS-CAMELLIA128-SHA",
            "AttributeValue": "false"
        },
        {
            "AttributeName": "ADH-AES128-GCM-SHA256",
            "AttributeValue": "false"
        },
        {
            "AttributeName": "ADH-AES128-SHA",
            "AttributeValue": "false"
        },
        {
            "AttributeName": "ADH-AES128-SHA256",
            "AttributeValue": "false"
        },
        {
            "AttributeName": "ADH-AES256-GCM-SHA384",
            "AttributeValue": "false"
        },
        {
            "AttributeName": "ADH-AES256-SHA",
            "AttributeValue": "false"
        },
        {
            "AttributeName": "ADH-AES256-SHA256",
            "AttributeValue": "false"
        },
        {
            "AttributeName": "ADH-CAMELLIA128-SHA",
            "AttributeValue": "false"
        },
        {
            "AttributeName": "ADH-CAMELLIA256-SHA",
            "AttributeValue": "false"
        },
        {
            "AttributeName": "ADH-DES-CBC3-SHA",
            "AttributeValue": "false"
        },
        {
            "AttributeName": "ADH-DES-CBC-SHA",
            "AttributeValue": "false"
        },
        {
            "AttributeName": "ADH-RC4-MD5",
            "AttributeValue": "false"
        },
        {
            "AttributeName": "ADH-SEED-SHA",
            "AttributeValue": "false"
        },
        {
            "AttributeName": "DES-CBC-SHA",
            "AttributeValue": "false"
        },
        {
            "AttributeName": "DHE-DSS-SEED-SHA",
            "AttributeValue": "false"
        },
        {
            "AttributeName": "DHE-RSA-SEED-SHA",
            "AttributeValue": "false"
        },
        {
            "AttributeName": "EDH-DSS-DES-CBC-SHA",
            "AttributeValue": "false"
        },
        {
            "AttributeName": "EDH-RSA-DES-CBC-SHA",
            "AttributeValue": "false"
        },
        {
            "AttributeName": "IDEA-CBC-SHA",
            "AttributeValue": "false"
        },
        {
            "AttributeName": "RC4-MD5",
            "AttributeValue": "false"
        },
        {
            "AttributeName": "SEED-SHA",
            "AttributeValue": "false"
        },
        {
            "AttributeName": "DES-CBC3-MD5",
            "AttributeValue": "false"
        },
        {
            "AttributeName": "DES-CBC-MD5",
            "AttributeValue": "false"
        },
        {
            "AttributeName": "RC2-CBC-MD5",
            "AttributeValue": "false"
        },
        {
            "AttributeName": "PSK-AES256-CBC-SHA",
            "AttributeValue": "false"
        },
        {
            "AttributeName": "PSK-3DES-EDE-CBC-SHA",
            "AttributeValue": "false"
        },
        {
            "AttributeName": "KRB5-DES-CBC3-SHA",
            "AttributeValue": "false"
        },
        {
            "AttributeName": "KRB5-DES-CBC3-MD5",
            "AttributeValue": "false"
        },
        {
            "AttributeName": "PSK-AES128-CBC-SHA",
            "AttributeValue": "false"
        },
        {
            "AttributeName": "PSK-RC4-SHA",
            "AttributeValue": "false"
        },
        {
            "AttributeName": "KRB5-RC4-SHA",
            "AttributeValue": "false"
        },
        {
            "AttributeName": "KRB5-RC4-MD5",
            "AttributeValue": "false"
        },
        {
            "AttributeName": "KRB5-DES-CBC-SHA",
            "AttributeValue": "false"
        },
        {
            "AttributeName": "KRB5-DES-CBC-MD5",
            "AttributeValue": "false"
        },
        {
            "AttributeName": "EXP-EDH-RSA-DES-CBC-SHA",
            "AttributeValue": "false"
        },
        {
            "AttributeName": "EXP-EDH-DSS-DES-CBC-SHA",
            "AttributeValue": "false"
        },
        {
            "AttributeName": "EXP-ADH-DES-CBC-SHA",
            "AttributeValue": "false"
        },
        {
            "AttributeName": "EXP-DES-CBC-SHA",
            "AttributeValue": "false"
        },
        {
            "AttributeName": "EXP-RC2-CBC-MD5",
            "AttributeValue": "false"
        },
        {
            "AttributeName": "EXP-KRB5-RC2-CBC-SHA",
            "AttributeValue": "false"
        },
        {
            "AttributeName": "EXP-KRB5-DES-CBC-SHA",
            "AttributeValue": "false"
        },
        {
            "AttributeName": "EXP-KRB5-RC2-CBC-MD5",
            "AttributeValue": "false"
        },
        {
            "AttributeName": "EXP-KRB5-DES-CBC-MD5",
            "AttributeValue": "false"
        },
        {
            "AttributeName": "EXP-ADH-RC4-MD5",
            "AttributeValue": "false"
        },
        {
            "AttributeName": "EXP-RC4-MD5",
            "AttributeValue": "false"
        },
        {
            "AttributeName": "EXP-KRB5-RC4-SHA",
            "AttributeValue": "false"
        },
        {
            "AttributeName": "EXP-KRB5-RC4-MD5",
            "AttributeValue": "false"
        }
    ],
    "PolicyName": "ELBSecurityPolicy-2015-05",
    "PolicyTypeName": "SSLNegotiationPolicyType"
}
Using a text editor, change the PolicyName attribute. For example: "PolicyName": "ELBSecurityPolicy-2015-05" Once you’ve edited and saved the JSON file, restart the CLC. Once the CLC has restarted, use the eulb-describe-lb-policies command to verify that your new policy is listed. For example:
POLICY	ELBSample-AppCookieStickinessPolicy	AppCookieStickinessPolicyType
POLICY	ELBSample-LBCookieStickinessPolicy	LBCookieStickinessPolicyType
POLICY	ELBSecurityPolicy-2014-10	SSLNegotiationPolicyType
POLICY	ELBSecurityPolicy-2015-02	SSLNegotiationPolicyType
POLICY	ELBSecurityPolicy-2011-08	SSLNegotiationPolicyType
POLICY	ELBSecurityPolicy-2015-05	SSLNegotiationPolicyType
POLICY	ELBSecurityPolicy-2014-01	SSLNegotiationPolicyType
POLICY	MyNewELBSecurityPolicy-2015-09	SSLNegotiationPolicyType
You can now use your new security policy using the eulb-create-lb-policy command. For more information, see Updating the SSL Negotiation Configuration .
9.2.10 - Configuring Back-end Server Authentication
When running a web application with HTTPS or SSL as the backend server’s protocol, you might want to authenticate the back-end servers using the public key of the back-end server’s certificate. This authentication can be used to ensure that back-end servers accept only encrypted communication and to ensure that the back-end servers have the correct certificate.To configure back-end server authentication:
Create a new loadbalancer with HTTPS as backend instance’s protocol:
eulb-create-lb -l "protocol=HTTPS,lb-port=443,instance-protocol=HTTPS,instance-port=8443,cert-id=arn:aws:iam::000550595745:server-certificate/mycert01"\
                        -z one myloadbalancer
Create a new PublicKeyPolicyType policy for the load balancer. In the example below, ‘server.crt’ is the file containing the public key of the backend server’s certificate.
eulb-create-lb-policy -n webservercert -t PublicKeyPolicyType -a "name=PublicKey, value=$(<./server.crt)" myloadbalancer
Use the eulb-describe-lb-policies to ensure that the policy was created. For example:
eulb-describe-lb-policies -p webservercert myloadbalancer
Create a new BackendServerAuthenticationPolicyType policy that refers to the public key policy created above.
eulb-create-lb-policy -n webserverauthentication -t BackendServerAuthenticationPolicyType -a "name=PublicKeyPolicyName, value=webservercert" myloadbalancer
Make sure the policy is created. For example:
eulb-describe-lb-policies -p webserverauthentication myloadbalancer
Set the created policy to the listener by specifying the instance’s port number. For example:
eulb-set-lb-policies-for-backend-server -i 443 -p webserverauthentication myloadbalancer
Make sure the policy is attached to the intended listener. For example:
eulb-describe-lbs --show-long myloadbalancer
LOAD_BALANCER myloadbalancer
myloadbalancer-000550595745.lb.c-04.autoqa.qa1.eucalyptus-systems.com
{interval=30,target=TCP:8443,timeout=5,healthy-threshold=3,unhealthy-threshold=3} one \
{protocol=HTTPS,lb-port=443,instance-protocol=HTTPS,instance-port=8443,cert-id=arn:aws:iam::000550595745:server-certificate/mycert01,\
{ELBSecurityPolicy-2015-05}}
{instance-port=8443,policies={webserverauthentication}}
{ELBSecurityPolicy-2015-05,webservercert,webserverauthentication}
{owner-alias=000936883517,group-name=euca-internal-000550595745-myloadbalancer}
2015-10-12T20:55:52.08Z
internet-facing
9.2.11 - Enabling Cross-Zone Load Balancing
When an ELB has instances in multiple available zones, enabling cross-zone load balancing will distribute traffics to instances across availability zones. If disabled, the load balancer in a zone will distribute traffics to instances within the zone. For example, if a Zone A has 10 instances, and a Zone B has 1 instance, and the client happens to use the load balancer of Zone B (via round-robin DNS), cross-zone load balancing will ensure that the clients will use all 11 instances, not just the one instance in Zone B.To enable cross-zone load balancing:
By default, cross-zone load balancing is not enabled for a new load balancer. To enable, modify the load balancer attribute using the eulb-modify-lb-attributes command. For example: eulb-modify-lb-attributes myloadbalancer CrossZoneLoadBalancing.Enabled=true Make sure the attribute is enabled. For example:
eulb-describe-lb-attributes myloadbalancer
AccessLog.Enabled false
ConnectionDraining.Enabled  false
ConnectionSettings.IdleTimeout 60
CrossZoneLoadBalancing.Enabled true
9.2.12 - Accessing Load Balancer Logs
To help analyze an application’s performances or troubleshoot problems, you can capture detailed information for all requests coming through your load balancers. When enabled, such access logs will be captured and stored in the S3 bucket.To access ELB logs:
Before enabling the access logs, update the access control of your S3 (Eucalyptus object-storage-gateway) bucket so that Eucalyptus’ load balancer has write permissions. The access control list requires the canonical ID of the grantee. To obtain the canonical ID of the load balancing service:
Note
If your cloud is using VPCMIDO networking mode, use the command in the next step.eulb-describe-lbs --show-long --region devops-admin@region-1
LOAD_BALANCER myloadbalancer
myloadbalancer-000476918024.lb.a-18.autoqa.qa1.eucalyptus-systems.com
{interval=30,target=TCP:80,timeout=5,healthy-threshold=3,unhealthy-threshold=3
cash,money i-6f2a1874,i-be660343
{protocol=HTTP,lb-port=80,instance-protocol=HTTP,instance-port=80}
{owner-alias=000865102303,group-name=euca-internal-000476918024-myloadbalancer}
2015-09-29T18:11:33.761Z
internet-facing
Note
Save the number at the end of the output to update the bucket’s ACL in .To obtain the canonical ID of the load balancing service in VPCMIDO networking mode:
Note
If your cloud is not using VPCMIDO networking mode, use the command in the previous step.euserv-describe-services --filter service-type=loadbalancing --expert
SERVICE arn:euca:bootstrap:API_10.111.1.19:loadbalancing:API_10.111.1.19.loadbalancing/ enabled 25
http://10.111.1.19:8773/services/LoadBalancing
(eucalyptus)loadbalancing=000036660381:28323c32338354b20255a633830524c1224434cb1a5254c1d614614841586042
Note
Save the number at the end of the output to update the bucket’s ACL in .Use any S3 client tools to update the bucket’s ACL. For example:
# aws --endpoint-url http://objectstorage.a-18.autoqa.qa1.eucalyptus-systems.com:8773/ s3 s3://webserverlog
# aws --endpoint-url http://objectstorage.a-18.autoqa.qa1.eucalyptus-systems.com:8773/ s3api put-bucket-acl --grant-write "id=000865102303" --bucket s3://webserverlog
Modify your load balancer’s attributes to enable the access logs. For example:
eulb-modify-lb-attributes myloadbalancer AccessLog.Enabled=true AccessLog.S3BucketName=webserverlog AccessLog.EmitInterval=5 AccessLog.S3BucketPrefix=myprefix
Check that the attribute has been updated correctly by using the eulb-describe-lb-attributes command:
eulb-describe-lb-attributes myloadbalancer
AccessLog.EmitInterval  5
AccessLog.Enabled true
AccessLog.S3BucketName  webserverlog
AccessLog.S3BucketPrefix  myprefix
ConnectionDraining.Enabled  false
ConnectionSettings.IdleTimeout 60
CrossZoneLoadBalancing.Enabled true
10 - Using CloudWatch
Using CloudWatch
CloudWatch is a Eucalyptus service that enables you to monitor, manage, and publish various metrics, as well as configure alarm actions based on data from metrics. You can use the default metrics that come with Eucalyptus, or you can use your own metrics.CloudWatch collects raw data from your cloud’s resources and generates the information into readable, near real-time metrics. These metrics are recorded for a period of two weeks. This allows you to access historical information and provides you with information about how your resource is performing.
To find out more about what CloudWatch is, see CloudWatch Overview .
To find out how to use CloudWatch, see CloudWatch Tasks .
10.1 - CloudWatch Overview
CloudWatch Overview
This section describes the concepts and details you need to understand the CloudWatch service. This section also includes procedures to complete the most common tasks for CloudWatch.CloudWatch is a Eucalyptus service that collects, aggregates, and dispenses data from your cloud’s resources. This data allows you to make operational and business decisions based on actual performance metrics. You can use CloudWatch to collect metrics about your cloud resources, such as the performance of your instances. You can also publish your own metrics directly to CloudWatch.
CloudWatch monitors the following cloud resources:
- instances
- Elastic Block Store (EBS) volumes
- Auto Scaling instances
- Eucalyptus Load Balancers (ELB)
Alarms
CloudWatch alarms help you make decisions more easily by automatically making changes to the resources you are monitoring, based on rules that you define. For example, you can create alarms that initiate Auto Scaling actions on your behalf. For more information about alarm tasks, see Configuring Alarms .
Common Use Cases
A common use for CloudWatch is to keep your applications and services healthy and running efficiently. For example, CloudWatch can determine that your application runs best when network traffic remains below a certain threshold level on your instances. You can then create an automated procedure to ensure that you always have the right number of instances to match the amount of traffic you have.
Another use for CloudWatch is to diagnose problems by looking at system performance before and after a problem occurs. CloudWatch helps you identify the cause and verify your fix by tracking performance in real time.
10.1.1 - CloudWatch Concepts
This section describes the terminology and concepts you need in order to understand and use CloudWatch.
Metric
A metric is a time-ordered set of data points. You can get metric data from Eucalyptus cloud resources (like instances or volumes), or you can publish your own set of custom metric data points to CloudWatch. You then retrieve statistics about those data points as an ordered set of time-series data.
Data points represent values of a variable over time. For example you can get metrics for the CPU usage of a particular instance, or for the latency of an elastic load balancer (ELB).
Each metric is uniquely defined by a name, a namespace, and zero or more dimensions. Each data point has a time stamp, and (optionally) a unit of measure. When you request statistics, the returned data stream is identified by namespace, metric name, dimension, and (optionally) the unit. For more information about Eucalyptus-supported metrics, see Namespaces, Metrics, and Dimensions .
CloudWatch stores your metric data for two weeks. You can publish metric data from multiple sources, such as incoming network traffic from dozens of different instances, or requested page views from several different web applications. You can request statistics on metric data points that occur within a specified time window.
Namespace
A namespace is a conceptual container for a collection of metrics. Eucalyptus treats metrics in different namespaces as unique. This means that metrics from different services cannot mistakenly be aggregated into the same statistical set.
Namespace names are strings you define when you create a metric. The names must be valid XML characters, typically containing the alphanumeric characters “0-9A-Za-z” plus “."(period), “-” (hyphen), “_” (underscore), “/” (slash), “#” (hash), and “:” (colon). All Eucalyptus services that provide CloudWatch data follow the convention AWS/, such as AWS/EC2 and AWS/ELB. For more information, see Namespaces .
Note
A namespace name must be less than 256 characters. There is no default namespace. You must specify a namespace for each data element you put into CloudWatch.Dimension
A dimension is a name-value pair that uniquely identifies a metric. A dimension helps you design a conceptual structure for your statistics plan. Because dimensions are part of the unique identifier for a metric, metric name, namespace, and dimension key-value pairs define unique metrics.
You specify dimensions when you create a metric with the euwatch-put-data command. Eucalyptus services that report data to CloudWatch also attach dimensions to each metric. You can use dimensions to filter result sets that CloudWatch queries return. For example, you can get statistics for a specific instance by calling euwatch-get-stats with the InstanceID dimension set to a specific instance ID.
For Eucalyptus metrics, CloudWatch can aggregate data across select dimensions. For example, if you request a metric in the AWS/EC2 namespace and do not specify any dimensions, CloudWatch aggregates all data for the specified metric to create the statistic that you requested. However, CloudWatch does not aggregate across dimensions for custom metrics
Note
You can assign up to ten dimensions to a metric.Time Stamp
Each metric data point must be marked with a time stamp. The time stamp can be up to two weeks in the past and up to two hours into the future. If you do not provide a time stamp, CloudWatch creates a time stamp for you based on the time the data element was received.
The time stamp you use in the request must be a dateTime object, with the complete date plus hours, minutes, and seconds. For example: 2007-01-31T23:59:59Z. For more information, go to http://www.w3.org/TR/xmlschema-2/#dateTime . Although it is not required, we recommend you provide the time stamp in the Coordinated Universal Time (UTC or Greenwich Mean Time) time zone. When you retrieve your statistics from CloudWatch, all times reflect the UTC time zone.
Unit
A unit represents a statistic’s measurement in time or amount. For example, the units for the instance NetworkIn metric is Bytes because NetworkIn tracks the number of bytes that an instance receives on all network interfaces.
You can also specify a unit when you create a custom metric. Units help provide conceptual meaning to your data. Metric data points you create that specify a unit of measure, such as Percent, will be aggregated separately. The following list provides some of the more common units that CloudWatch supports:
- Seconds
- Bytes
- Bits
- Percent
- Count
- Bytes/Second (bytes per second)
- Bits/Second (bits per second)
- Count/Second (counts per second)
- None (default when no unit is specified)
Though CloudWatch attaches no significance to a unit, other applications can derive semantic information based on the unit you choose. When you publish data without specifying a unit, CloudWatch associates it with the None unit. When you get statistics without specifying a unit, CloudWatch aggregates all data points of the same unit together. If you have two otherwise identical metrics with different units, two separate data streams will be returned, one for each unit.
Statistic
A statistic is computed aggregation of metric data over a specified period of time. CloudWatch provides statistics based on the metric data points you or Eucalyptus provide. Aggregations are made using the namespace, metric name, dimensions, and the data point unit of measure, within the time period you specify. The following table describes the available statistics.
| Statistic | Description |
|---|
| Minimum | The lowest value observed during the specified period. You can use this value to determine low volumes of activity for your application. |
| Maximum | The highest value observed during the specified period. You can use this value to determine high volumes of activity for your application. |
| Sum | All values submitted for the matching metric added together. You can use this statistic for determining the total volume of a metric. |
| Average | The value of Sum / SampleCount during the specified period. By comparing this statistic with the Minimum and Maximum, you can determine the full scope of a metric and how close the average use is to the Minimum and Maximum. This comparison helps you to know when to increase or decrease your resources as needed. |
| SampleCount | The count (number) of data points used for the statistical calculation. |
Period
A period is the length of time, in seconds, associated with a specific CloudWatch statistic. Each statistic represents an aggregation of the metrics data collected for a specified period of time. You can adjust how the data is aggregated by varying the length of the period. A period can be as short as one minute (60 seconds) or as long as two weeks (1,209,600 seconds).
The values you select for the StartTime and EndTime options determine how many periods CloudWatch returns. For example, if you set values for the Period, EndTime, and StartTime options for 60 seconds, CloudWatch returns an aggregated set of statistics for each minute of the previous hour. If you want statistics aggregated into ten-minute blocks, set Period to 600. For statistics aggregated over the entire hour, use a Period value of 3600.
Periods are also an important part of the CloudWatch alarms feature. When you create an alarm to monitor a specific metric, you are asking CloudWatch to compare that metric to the threshold value that you supplied. You have control over how CloudWatch makes that comparison. You can specify the period over which the comparison is made, as well as how many consecutive periods the threshold must be breached before you are notified.
Aggregation
CloudWatch aggregates statistics according a length of time that you set. You can publish as many data points as you want with the same or similar time stamps. CloudWatch aggregates these data points by period length. You can publish data points for a metric that share not only the same time stamp, but also the same namespace and dimensions.
Subsequent calls to euwatch-get-stats return aggregated statistics about those data points. You can even do this in one euwatch-put-data request. CloudWatch accepts multiple data points in the same euwatch-put-data call with the same time stamp. You can also publish multiple data points for the same or different metrics, with any time stamp. The size of a euwatch-put-data request, however, is limited to 8KB for HTTP GET requests and 40KB for HTTP POST requests. You can include a maximum of 20 data points in one PutMetricData request.
For large data sets that would make the use of euwatch-put-data impractical, CloudWatch allows you to insert a pre-aggregated data set called a StatisticSet. With StatisticSets you give CloudWatch the Min, Max, Sum, and SampleCount of a number of data points. A common use case for StatisticSets is when you are collecting data many times in a minute. For example, if you have a metric for the request latency of a server, it doesn’t make sense to do a euwatch-put-data request with every request. We suggest you collect the latency of all hits to that server, aggregate them together once a minute and send that StatisticSet to CloudWatch.
CloudWatch doesn’t differentiate the source of a metric. If you publish a metric with the same namespace and dimensions from different sources, CloudWatch treats this as a single metric. This can be useful for service metrics in a distributed, scaled system. For example, all the hosts in a web server application could publish identical metrics representing the latency of requests they are processing. CloudWatch treats these as a single metric, allowing you to get the statistics for minimum, maximum, average, and sum of all requests across your application.
Alarm
An alarm watches a single metric over a time period you set, and performs one or more actions based on the value of the metric relative to a given threshold over a number of time periods. CloudWatch alarms will not invoke actions just because they are in a particular state. The state must have changed and been maintained for a specified number of periods.
For example, Auto Scaling works with CloudWatch alarms to perform scaling activities. When an Auto Scaling activity reacts to a CloudWatch alarm, the cooldown period is the amount of time after the activity takes place where further Auto Scaling activity is suspended. This is to allow time for the Auto Scaling activities (such as new instance launches or terminations) to fully complete so that resources are not unnecessarily launched or terminated. You can specify this amount of time; if you don’t specify a cooldown period, Auto Scaling uses a default cooldown period of 300 seconds (5 minutes).
After an alarm invokes an action due to a change in state, the alarm continues to invoke the action for every period that the alarm remains in the new state.
An alarm has three possible states:
: The metric is within the defined threshold.
: The metric is outside of the defined threshold.
: The alarm has just started, the metric is not available, or not enough data is available for the metric to determine the alarm state.
The following lists some common features of alarms:
You can create up to 5000 alarms per Eucalyptus account. To create or update an alarm, use the command.
You can list any or all of the currently configured alarms, and list any alarms in a particular state using the command.
You can disable and enable alarms by using the and commands
You can test an alarm by setting it to any state using the command. This temporary state change lasts only until the next alarm comparison occurs.
Finally, you can view an alarm’s history using the command. CloudWatch preserves alarm history for two weeks. Each state transition is marked with a unique time stamp. In rare cases, your history might show more than one notification for a state change. The time stamp enables you to confirm unique state changes.
10.1.2 - Namespaces, Metrics, and Dimensions
Namespaces, Metrics, and Dimensions
This section discusses the namespaces, metrics, and dimensions that CloudWatch supports for Eucalyptus services.
10.1.2.1 - Namespaces
All Eucalyptus services that provide CloudWatch data use a namespace string, beginning with “AWS/”. This section describes the service namespaces.The following table lists the namespaces for services that push metric data points to CloudWatch.
| Service | Namespace |
|---|
| Elastic Block Store | AWS/EBS |
| Elastic Compute Cloud | AWS/EC2 |
| Auto Scaling | AWS/Autoscaling |
| Elastic Load Balancing | AWS/ELB |
10.1.2.2 - Instance Metrics and Dimensions
This section describes the instance metrics and dimensions available to CloudWatch.
Available Metrics for Instances
| Metric | Description | Unit |
|---|
| CPUUtilization | The percentage of allocated EC2 compute units that are currently in use on the instance. This metric identifies the processing power required to run an application upon a selected instance. | Percent |
| DiskReadOps | Completed read operations from all ephemeral disks available to the instance (if your instance uses EBS, see EBS Metrics.) This metric identifies the rate at which an application reads a disk. This can be used to determine the speed in which an application reads data from a hard disk. | Count |
| DiskWriteOps | Completed write operations to all ephemeral disks available to the instance (if your instance uses Amazon EBS, see Amazon EBS Metrics.) This metric identifies the rate at which an application writes to a hard disk. This can be used to determine the speed in which an application saves data to a hard disk. | Count |
| DiskReadBytes | Bytes read from all ephemeral disks available to the instance (if your instance uses Amazon EBS, see Amazon EBS Metrics.) This metric is used to determine the volume of the data the application reads from the hard disk of the instance. This can be used to determine the speed of the application. | Bytes |
| DiskWriteBytes | Bytes written to all ephemeral disks available to the instance (if your instance uses Amazon EBS, see Amazon EBS Metrics.) This metric is used to determine the volume of the data the application writes onto the hard disk of the instance. This can be used to determine the speed of the application. | Bytes |
| NetworkIn | The number of bytes received on all network interfaces by the instance. This metric identifies the volume of incoming network traffic to an application on a single instance. | Bytes |
| NetworkOut | The number of bytes sent out on all network interfaces by the instance. This metric identifies the volume of outgoing network traffic to an application on a single instance. | Bytes |
| StatusCheckFailed | A combination of StatusCheckFailed_Instance and StatusCheckFailed_System that reports if either of the status checks has failed. Values for this metric are either 0 (zero) or 1 (one.) A zero indicates that the status check passed. A one indicates a status check failure. | Count |
| StatusCheckFailed_Instance | Reports whether the instance has passed the EC2 instance status check in the last 5 minutes. Values for this metric are either 0 (zero) or 1 (one.) A zero indicates that the status check passed. A one indicates a status check failure. | Count |
| StatusCheckFailed_System | Reports whether the instance has passed the EC2 system status check in the last 5 minutes. Values for this metric are either 0 (zero) or 1 (one.) A zero indicates that the status check passed. A one indicates a status check failure. | Count |
Available Dimensions for Instances
You can filter the instance data using any of the dimensions in the following table.
| Dimension | Description |
|---|
| AutoScalingGroupName | This dimension filters the data you request for all instances in a specified capacity group. An AutoScalingGroup is a collection of instances you define if you’re using the Auto Scaling service. This dimension is available only for instance metrics when the instances are in such an Auto Scaling group. |
| ImageId | This dimension filters the data you request for all instances running this Eucalyptus Machine Image (EMI). |
| InstanceId | This dimension filters the data you request for the identified instance only. This helps you pinpoint an exact instance from which to monitor data. |
| InstanceType | This dimension filters the data you request for all instances running with this specified instance type. This helps you categorize your data by the type of instance running. For example, you might compare data from an m1.small instance and an m1.large instance to determine which has the better business value for your application. |
10.1.2.3 - EBS Metrics and Dimensions
This section describes the Elastic Block Store (EBS) metrics and dimensions available to CloudWatch.
Available Metrics for EBS
| Metric | Description | Unit |
|---|
| VolumeReadBytes | The total number of bytes transferred in the period. | Bytes |
| VolumeWriteBytes | The total number of bytes transferred in the period. | Bytes |
| VolumeReadOps | The total number of operations in the period. | Count |
| VolumeWriteOps | The total number of operations in the period. | Count |
| VolumeTotalReadTime | The total number of seconds spent by all operations that completed in the period. If multiple requests are submitted at the same time, this total could be greater than the length of the period. For example, say the period is 5 minutes (300 seconds); if 700 operations completed during that period, and each operation took 1 second, the value would be 700 seconds. | Seconds |
| VolumeTotalWriteTime | The total number of seconds spent by all operations that completed in the period. If multiple requests are submitted at the same time, this total could be greater than the length of the period. For example, say the period is 5 minutes (300 seconds); if 700 operations completed during that period, and each operation took 1 second, the value would be 700 seconds. | Seconds |
| VolumeIdleTime | The total number of seconds in the period when no read or write operations were submitted. | Seconds |
| VolumeQueueLength | The number of read and write operation requests waiting to be completed in the period. | Count |
Available Dimensions for EBS
The only dimension that EBS sends to CloudWatch is the Volume ID. This means that all available statistics are filtered by Volume ID.
10.1.2.4 - Auto Scaling Metrics and Dimensions
This section discusses the Auto Scaling metrics and dimensions available to CloudWatch.
Available Metrics for Auto Scaling
| Metric | Description | Unit |
|---|
| GroupMinSize | The minimum size of the Auto Scaling group. | Count |
| GroupMaxSize | The maximum size of the Auto Scaling group. | Count |
| GroupDesiredCapacity | The number of instances that the Auto Scaling group attempts to maintain. | Count |
| GroupInServiceInstances | The number of instances that are running as part of the Auto Scaling group. This metric does not include instances that are pending or terminating. | Count |
| GroupPendingInstances | The number of instances that are pending. A pending instance is not yet in service. This metric does not include instances that are in service or terminating. | Count |
| GroupTerminatingInstances | The number of instances that are in the process of terminating. This metric does not include instances that are in service or pending. | Count |
| GroupTotalInstances | The total number of instances in the Auto Scaling group. This metric identifies the number of instances that are in service, pending, and terminating. | Count |
Available Dimensions for Auto Scaling
The only dimension that Auto Scaling sends to CloudWatch is the name of the Auto Scaling group. This means that all available statistics are filtered by Auto Scaling group name.
10.1.2.5 - ELB Metrics and Dimensions
This section discusses the Elastic Load Balancing (ELB) metrics and dimensions available to CloudWatch.
Available Metrics for ELB
| Metric | Description | Unit |
|---|
| Latency | Time elapsed after the request leaves the load balancer until it receives the corresponding response. Valid Statistics: Minimum | Maximum |
| RequestCount | The number of requests handled by the load balancer. | Count |
| HealthyHostCount | The number of healthy instances registered with the load balancer in a specified availability zone. Healthy instances are those that have not failed more health checks than the value of the unhealthy threshold. Constraints: You must provide both LoadBalancerName and AvailabilityZone dimensions for this metric.Valid Statistics: Minimum | Maximum |
| UnHealthyHostCount | The number of unhealthy instances registered with the load balancer. These are instances that have failed more health checks than the value of the unhealthy threshold. Constraints: You must provide both LoadBalancerName and AvailabilityZone dimensions for this metric.Valid Statistics: Minimum | Maximum |
| HTTPCode_ELB_4XX | Count of HTTP response codes generated by ELB that are in the 4xx (client error) series. Valid Statistics: Sum | Count |
| HTTPCode_ELB_5XX | Count of HTTP response codes generated by ELB that are in the 5xx (server error) series. ELB can generate 5xx errors if no back-end instances are registered, no healthy back-end instances, or the request rate exceeds ELB’s current available capacity. This response count does not include any responses that were generated by back-end instances. Valid Statistics: Sum | Count |
| HTTPCode_Backend_2XX | Count of HTTP response codes generated by back-end instances that are in the 2xx (success) series. Valid Statistics: Sum | Count |
| HTTPCode_Backend_3XX | Count of HTTP response codes generated by back-end instances that are in the 3xx (user action required) series. Valid Statistics: Sum | Count |
| HTTPCode_Backend_4XX | Count of HTTP response codes generated by back-end instances that are in the 4xx (client error) series. This response count does not include any responses that were generated by ELB. Valid Statistics: Sum | Count |
| HTTPCode_Backend_5XX | Count of HTTP response codes generated by back-end instances that are in the 5xx (server error) series. This response count does not include any responses that were generated by ELB. Valid Statistics: Sum | Count |
Available Dimensions for ELB
You can use the currently available dimensions for ELB to refine the metrics returned by a query. For example, you could use HealthyHostCount and dimensions LoadBalancerName and AvailabilityZone to get the average number of healthy instances behind the specified load balancer within the specified Availability Zone for a given period of time.
You can aggregate ELB data along any of the following dimensions shown in the following table.
| Metric | Description |
|---|
| LoadBalancerName | Limits the metric data to instances that are connected to the specified load balancer. |
| AvailabilityZone | Limits the metric data to load balancers in the specified availability zone. |
10.2 - CloudWatch Tasks
CloudWatch Tasks
This section details the tasks you can perform using CloudWatch.This section expands on the basic concepts presented in the preceding section (see CloudWatch Overview and includes procedures for using CloudWatch. This section also shows you how to view metrics that Eucalyptus services provide to CloudWatch and how to publish custom metrics with CloudWatch.
10.2.1 - Configuring Monitoring
Configuring Monitoring
This section describes how to enable and disable monitoring for your cloud resources.
10.2.1.1 - Enable Monitoring
This section describes steps for enabling monitoring on your cloud resources.To enable monitoring on your resources, following the steps for your resource.
Enable monitoring for an instance
To enable monitoring for a running instance, enter the following command:
euca-monitor-instances [instance_id]
To enable monitoring when you launch an instance, enter the following command:
euca-run-instances [image_id] -k gsg-keypair --monitor
Enable monitoring for a scaling group
To enable monitoring for an existing Auto Scaling group: Create a launch configuration with --monitoring-enabled option. Make a euscale-update-auto-scaling-group request to update your Auto Scaling group with the launch configuration you created in the previous step. Auto Scaling will enable monitoring for new instances that it creates. Choose one of the following actions to deal with all existing instances in the Auto Scaling group:
| To . . . | Do this . . . |
|---|
| Preserve existing instances | Make a euca-monitor-instances request for all existing instances to enable monitoring. |
| Terminate existing instances | Make a euscale-terminate-instance-in-auto-scaling-group request for all existing instances. Auto Scaling will use the updated launch configuration to create replacement instances with monitoring enabled. |
To enable monitoring when you create a new Auto Scaling group: Create a launch configuration with --monitoring-enabled option.
Enable monitoring for a load balancer
Elastic Load Balancing (ELB) sends metrics and dimensions for all load balancers to CloudWatch. By default, you do not need to specifically enable monitoring.
Note
ELB only sends CloudWatch metrics when requests are sent through the load balancer. If there are no requests or data for a given metric, ELB does not report to CloudWatch. If there are requests sent through the load balancer, ELB measures and sends metrics for that load balancer in 60-second intervals.10.2.1.2 - Disable Monitoring
This section describes steps for disabling monitoring on your cloud resources.To disable monitoring on your resources, following the steps for your resource.
Disable monitoring for an instance
To disable monitoring for a running instance, enter the following command:
euca-unmonitor-instances [instance_id]
Disable monitoring for a scaling group
To enable monitoring for an existing Auto Scaling group: Create a launch configuration with --monitoring-disabled option. Make a euscale-update-auto-scaling-group request to update your Auto Scaling group with the launch configuration you created in the previous step. Auto Scaling will disable monitoring for new instances that it creates. Choose one of the following actions to deal with all existing instances in the Auto Scaling group:
| To . . . | Do this . . . |
|---|
| Preserve existing instances | Make a euca-unmonitor-instances request for all existing instances to disable monitoring. |
| Terminate existing instances | Make a euscale-terminate-instance-in-auto-scaling-group request for all existing instances. Auto Scaling will use the updated launch configuration to create replacement instances with monitoring disabled. |
To enable monitoring when you create a new Auto Scaling group: Create a launch configuration with --monitoring-disabled option.
Disable monitoring for a load balancer
There is no way to disable monitoring for a load balancer.
10.2.2 - Viewing and Publishing Metrics
Viewing and Publishing Metrics
This section describes how to view Eucalyptus metrics as well as how to publish your own metrics.
10.2.2.1 - List Available Metrics
You can list available metrics via Euca2ools.To list available metrics:
Enter the following command.
euwatch-list-metrics
Eucalyptus returns a listing of all metrics, as shown in the following partial example output:
Metric Name         Namespace  Dimensions
CPUUtilization      AWS/EC2    {InstanceId=i-5431413d}
CPUUtilization      AWS/EC2    {InstanceType=m1.medium}
DiskReadBytes       AWS/EC2    {InstanceId=i-1d3d4d74}
DiskReadBytes       AWS/EC2    {InstanceType=m1.medium}
DiskReadOps         AWS/EC2    {InstanceId=i-d3c8baba}
DiskReadOps         AWS/EC2    {InstanceType=m1.medium}
DiskWriteBytes      AWS/EC2    {InstanceId=i-6732420e}
DiskWriteBytes      AWS/EC2    {InstanceType=m1.medium}
DiskWriteOps        AWS/EC2    {InstanceId=i-e03d4d89}
DiskWriteOps        AWS/EC2    {InstanceType=m1.medium}
NetworkIn           AWS/EC2    {InstanceId=i-e0304089}
NetworkIn           AWS/EC2    {InstanceType=m1.medium}
NetworkOut          AWS/EC2    {InstanceId=i-69334300}
NetworkOut          AWS/EC2    {InstanceType=m1.medium}
StatusCheckFailed		 AWS/EC2 {InstanceId=i-6f8418e6}
StatusCheckFailed      	  AWS/EC2 {InstanceType=m1.medium}
StatusCheckFailed_Instance      AWS/EC2 {InstanceId=i-6f8418e6}
StatusCheckFailed_Instance      AWS/EC2 {InstanceType=m1.medium}
StatusCheckFailed_System        AWS/EC2 {InstanceId=i-6f8418e6}
StatusCheckFailed_System        AWS/EC2 {InstanceType=m1.medium}
10.2.2.2 - Get Statistics for a Metric
You can get statistics for metrics via Euca2ools.To get statistics for a metric:
Enter the following command.
 euwatch-get-stats -n NAMESPACE -s STAT1,STAT2,...
            			[--dimensions KEY1=VALUE1,KEY2=VALUE2,...]
            			[--start-time YYYY-MM-DDThh:mm:ssZ]
            			[--end-time YYYY-MM-DDThh:mm:ssZ] [--period SECONDS]
            			[--unit UNIT] [--show-empty-fields] [-U URL]
            			[--region USER@REGION] [-I KEY_ID] [-S KEY]
            			[--security-token TOKEN] [--debug] [--debugger]
            			[--version] [-h]
            			METRIC
The following example returns the average CPU utilization for the i-c08804a9 instance at one hour resolution.
euwatch-get-stats --namespace "AWS/EC2" --statistics "Average" \
--dimensions "InstanceId=i-c08804a9" --start-time 2016-12-14T23:00:00.000Z \
--end-time 2016-12-15T23:00:00.000Z --period 3600  CPUUtilization
The following example returns CPU utilization for all of your cloud’s instances.
euwatch-get-stats --namespace "AWS/EC2" --statistics "Average,Minimum,Maximum" \
--start-time 2016-02-14T23:00:00.000Z --end-time 2016-03-14T23:00:00.000Z \
--period 3600 CPUUtilization
10.2.2.3 - Publish Custom Metrics
CloudWatch allows you to publish your own metrics, such as application performance, system health, or customer usage.
Publish a single data point
To publish a single data point for a new or existing metric, call euwatch-put-data with one value and time stamp. For example, the following actions each publish one data point:
euwatch-put-data --metric-name PageViewCount --namespace "TestService" --value 2 --timestamp 2011-03-14T12:00:00.000Z
euwatch-put-data --metric-name PageViewCount --namespace "TestService" --value 4 --timestamp 2011-03-14T12:00:01.000Z
euwatch-put-data --metric-name PageViewCount --namespace "TestService" --value 5 --timestamp 2011-03-14T12:00:02.000Z
You can publish data points with time stamps as granular as one-thousandth of a second. However, CloudWatch aggregates the data to a minimum granularity of 60 seconds. For example, the PageViewCount metric from the previous examples contains three data points with time stamps just seconds apart. CloudWatch aggregates the three data points because they all have time stamps within a 60-second period.
CloudWatch uses 60-second boundaries when aggregating data points. For example, CloudWatch aggregates the data points from the previous example because all three data points fall within the 60-second period that begins at 2011-03-14T12:00:00.000Z and ends at 2011-03-14T12:00:59.999Z.
Publish statistic sets
You can also aggregate your data before you publish to CloudWatch. When you have multiple data points per minute, aggregating data minimizes the number of calls to euwatch-put-data . For example, instead of calling euwatch-put-data multiple times for three data points that are within three seconds of each other, you can aggregate the data into a statistic set that you publish with one call:
euwatch-put-data --metric-name PageViewCount --namespace "TestService" -s "Sum=11,Minimum=2,Maximum=5,SampleCount=3" --timestamp 2011-03-14T12:00:00.000
Publish the value zero
When your data is more sporadic and you have periods that have no associated data, you can choose to publish the value zero (0) for that period or no value at all. You might want to publish zero instead of no value if you use periodic calls to PutMetricData to monitor the health of your application. For example, you can set an Amazon CloudWatch alarm to notify you if your application fails to publish metrics every five minutes. You want such an application to publish zeros for periods with no associated data.
You might also publish zeros if you want to track the total number of data points or if you want statistics such as minimum and average to include data points with the value 0.
10.2.2.4 - Modify Metric Polling Timing
You can modify metrics timing and reporting defaults.When using the default CloudWatch properties, metrics reporting can take around 15 minutes:
- 5 minutes to receive a sensor data point for an instance.
- 5 more minutes to receive a second sensor data point for an instance.
- 1 more minute to calculate the difference between these two and send a single data point to CloudWatch.
- 1 more minute for CloudWatch to put the data in the database, making it available for a call.
- 5 more minutes for info to be available in the database.
Note
The above workflow is sequential and cumulative.The sensor data point timing values can be shortened by changing variables in the CLC.
Note
These changes will increase network traffic as polling will be done more frequently.To modify metrics defaults:Modify the default polling interval CLC variable to a number less than 5.
cloud.monitor.default_poll_interval_mins
This is how often the CLC sends a request to the CC for sensor data. Default value is 5 minutes. Modify the history size CLC variable to a number less than 5.
cloud.monitor.history_size
This is how many data value samples are sent in each sensor data request. The default value is 5. The frequency requests is either 1 minute (if the cloud.monitor.default_poll_interval_mins is 1 minute) or half the value of cloud.monitor.default_poll_interval_mins if that value is greater). So by default, with a cloud.monitor.default_poll_interval_mins of 5 minutes and cloud.monitor.history_size size of 5, every 5 minutes the CLC asks for the last 5 data points from the CC, which should be timed for every 2.5 minutes (e.g., 2.5 minutes ago, 5 minutes ago, 7.5 minutes ago, and 10 minutes ago).
Note
These values may be skewed a bit based on the time the CC uses.10.2.3 - Configuring Alarms
Configuring Alarms
This section describes how to create, test, and delete and alarm.
10.2.3.1 - Create an Alarm
You can create a CloudWatch alarm using a resource’s metric, and then add an action using the action’s dedicated Amazon Resource Name (ARN). You can add the action to any alarm state.
Note
Eucalyptus currently only supports actions for executing Auto Scaling policies.To create an alarm, perform the following step.
Enter the following command:
euwatch-put-metric-alarm [alarm_name] --unit Percent --namespace "AWS/EC2"
-- dimensions "InstanceId=[instance_id]" --statistic [statistic] --metric-name
[metric] --comparison-operator [operator] --threshold [value] --period
[seconds] --evaluation-periods [value] -- alarm-actions [action]
For example, the following triggers an Auto Scaling policy if the average CPUUtilization is less than 10 percent over a 24 hour period.
euwatch-put-metric-alarm test-Alarm --unit Percent --namespace "AWS/EC2"
-- dimensions "InstanceId=i-abc123" --statistic Average --metric-name CPUUtilization
--comparison-operator LessThanThreshold --threshold 10 --period 86400
--evaluation-periods 4 -- alarm-actions arn:aws:autoscaling::429942273585:scalingPolicy:
12ad560b-58b2-4051-a6d3-80e53b674de4:autoScalingGroupName/testgroup01:
policyName/testgroup01-pol01
10.2.3.2 - Test an Alarm
You can test the CloudWatch alarms by temporarily changing the state of your alarm to “ALARM” using the command: euwatch-set-alarm-state .
euwatch-set-alarm-state --alarm-name TestAlarm --state ALARM
10.2.3.3 - Delete an Alarm
To delete an alarm, perform the following step.
Enter the following command:
euwatch-delete-alarms [alarm_name]
For example, to delete an alarm named TestAlarm enter:
euwatch-delete-alarms TestAlarm
11 - Using Object Storage
Using Object Storage
Scalable object storage is composed of two parts: the object storage gateway and the object storage backend. This section explains storage and how to access it.The object storage gateway (OSG) receives user requests and authorizes these requests using the Eucalyptus identity services. For more information about identity services, see Managing Access .
11.1 - Access Object Storage
You can use your favorite S3 client (for example, ) to interact with Eucalyptus.To access object storage:
Replace your S3_URL with the IP address of the OSG you wish to interact with and the service path with /services/objectstorage instead of /services/Walrus . For example:
S3_URL = http://<OSG IP>:8773/services/objectstorage
Note
If you have DNS enabled, you may use the “objectstorage” prefix to access your object storage. Eucalyptus will return a list of IPs that correspond to OSGs that are in the state.12 - Using Route53
Using Route53
Eucalyptus Route53 is an integrated Domain Name System (DNS) web service. Route53 allows end users to access your cloud resources using names that you control.
Route53 seamlessly connects user requests to Eucalyptus controlled infrastructure – including EC2 instances, Elastic Load Balancers, and S3 buckets – it can also be used to route users to external infrastructure.
Note
Route53 is a tech preview service so should be used accordingly.12.1 - Route53 Concepts
This section describes the important concepts for the Route53 service and for Domain Name System (DNS)
Public and Private Hosted Zones
A public hosted zone describes how to route traffic for a public domain, such as example.com, and its subdomains. Information in a public hosted zone is available to anyone that can connect to your Eucalyptus deployment.
A private hosted zone describes how to route traffic for a domain and its subdomains within a VPC managed using Eucalyptus EC2 VPC service. Private zones are useful for repeatable deployments using well-known names.
Resource Record Sets
After you create a hosted zone for your domain, such as example.com, you create resource record sets to tell the Domain Name System (DNS) how to route traffic for that domain.
For example you would create an A record to map the name resource.example.com to the public IP address of an EC2 instance.
DNS Concepts
Important concepts related to underlying DNS functionality are:
- Alias : An alias connects a name to a cloud resource such as an Elastic Load Balancer
- CName : A CNAME resource record redirects to another name. CNAMES are often used with S3 buckets.
- IP Address : An A resource record maps a name to an IP address used to access a resource such as an EC2 instance.
- TTL : The Time To Live (TTL) of a resource record is important for controlling how long clients can cache DNS information.
12.2 - Route53 Usage
This section describes some options for access to the Route53 service and shows some example usage.
Using the AWS CLI
The AWS CLI can be used to access Route53. Use of the Eucalyptus AWS CLI plug-in is assumed in these examples.
To list hosted zones:
# aws route53 list-hosted-zones
HOSTEDZONES	e001e659-32ac-4fd5-b45a-f7e6d6420f9b	/hostedzone/ZAAW4ODX2K7WOL	subdomain.example.com.	3
CONFIG	Private zone for subdomain.example.com in vpc-837bc081de161f8c0	True
To list resource records for a hosted zone:
# aws route53 list-resource-record-sets --hosted-zone-id ZAAW4ODX2K7WOL
RESOURCERECORDSETS	alias.subdomain.example.com.	0	A
RESOURCERECORDSETS	cname.subdomain.example.com.	300	CNAME
RESOURCERECORDS	name.subdomain.example.com
RESOURCERECORDSETS	name.subdomain.example.com.	300	A
RESOURCERECORDS	10.20.30.43
The AWS CLI can be used to create and delete hosted zones and to change resource record sets.
A CloudFormation template can be used to manage Route53 resources. The following template is an example showing the:
- AWS::Route53::HostedZone
- AWS::Route53::RecordSet
- AWS::Route53::RecordSetGroup
CloudFormation resources:
AWSTemplateFormatVersion: 2010-09-09
Description: >-
    Route53 private HostedZone

Parameters:

  Vpc:
    Description: The VPC to create the Zone for
    Type: String

  Zone:
    Description: The zone to create
    Type: String
    Default: example.com

Resources:

  MyHostedZone:
    Type: AWS::Route53::HostedZone
    Properties:
      Name: !Ref Zone
      HostedZoneConfig:
        Comment: !Sub "Private zone for ${Zone} in ${Vpc}"
      VPCs:
        - VPCId: !Ref Vpc
          VPCRegion: !Ref AWS::Region
      HostedZoneTags:
        - Key: example-tag
          Value: !Ref Zone

  MyRecordSet:
    Type: AWS::Route53::RecordSet
    DependsOn: MyHostedZone
    Properties:
      HostedZoneName: !Ref Zone
      Name: !Sub "name.${Zone}"
      ResourceRecords:
        - "10.20.30.43"
      TTL: 300
      Type: A

  MyRecordSetGroup:
    Type: AWS::Route53::RecordSetGroup
    DependsOn: MyHostedZone
    Properties:
      HostedZoneName: !Ref Zone
      RecordSets:
        - Name: !Sub "cname.${Zone}"
          ResourceRecords:
          - !Sub "name.${Zone}"
          TTL: 300
          Type: CNAME
        - Name: !Sub "alias.${Zone}"
          Type: A
          AliasTarget:
            DNSName: !Sub "name.${Zone}"
            EvaluateTargetHealth: no
            HostedZoneId: !Ref MyHostedZone

Outputs:

  HostedZoneId:
    Description: The identifier for the private hosted zone
    Value: !Ref MyHostedZone
The output for the stack will show the identifier for the hosted zone.
12.3 - Route53 Delegated Subdomain
When using Route53 the Hosted Zone is often a subdomain for a domain managed using external DNS. In this case the external DNS must be updated to delegate management of the subdomain to your
hosted zones name servers.
Hosted Zone Name Servers
When you create a public Hosted Zone in Eucalyptus it will be allocated some nameservers. You can use the AWS CLI to determine the Name Servers for your zone:
# aws route53 list-hosted-zones
HOSTEDZONES	87a20e2b-f835-4775-a6ad-16f14033668a	/hostedzone/ZAAKJGJPMUHV32	subdomain.example.com.	2
CONFIG	False
#
# aws route53 list-resource-record-sets --hosted-zone-id ZAAKJGJPMUHV32 --query "ResourceRecordSets[?Type == 'NS']"
subdomain.example.com.	900	NS
RESOURCERECORDS	ns1.mycloud.example.com.
To discover the nameservers, first list the hosted zone to find the identifer and then pass the identifer to list-resource-record-sets. The example above uses a query to output only the NS information.
External Name Server records
The external DNS should be updated to add a Name Server NS record and a corresponding A record to map that name to an IP address:
subdomain.example.com	    NS	ns1.mycloud.example.com.
ns1.mycloud.example.com	A	1.X.Y.123
Note
The external DNS must not have an SOA record for the delegated subdomain as your Hosted Zone in Eucalyptus Route53 is authoritative.13 - Using Simple Queue Service
Using Simple Queue Service
Eucalyptus Simple Queue Service (SQS) is a message queuing service that enables you to decouple your services and distributed systems.
SQS reduces the overhead of managing and operating message oriented middleware and facilitates robust cloud architectures when used with other services such as Auto Scaling.
Note
Simple Queue Service (SQS) is a tech preview service so should be used accordingly.13.1 - Simple Queue Service Concepts
This section describes the important concepts for the Simple Queue Service (SQS)
Queues and Queue URLs
A queue is a named destination for messages in an account. A queue has a URL that uniquely identifies it on the cloud.
Delivery and Visiblity
When a message is delivered to a client it is hidden from other clients for a period to prevent duplicate handling. If the message is not handled by the first client it will later become visible for handling by other clients.
Dead-letter Queues
A dead-letter queue can be used for undeliverable messages. Using a dead-letter queue allows for handling of messages that would otherwise not be processed.
Delay Queue
A delay queue allows messages to be available from a queue after a delay period rather than as soon as messages are sent to the queue.
Polling Style
Short or long polling can be used when receiving messages. For short polling there is an immediate response whether a message is available or not. For long polling a delay of up to 20 seconds is used and the response will occur when a message is available or when the given timeout is reached even if there is no message.
13.2 - Simple Queue Service Overview
Using the AWS CLI
The AWS CLI can be used to access the Simple Queue Service (SQS). Use of the Eucalyptus AWS CLI plug-in is assumed in these examples.
To list queues:
# aws sqs list-queues
QUEUEURLS	http://sqs.mycloud.example.com:8773/000575948401/queue1
QUEUEURLS	http://sqs.mycloud.example.com:8773/000575948401/sqs-1-DeadLetterQueue-N7AHZIWZEW3H5
Send a message:
# aws sqs send-message --queue-url http://sqs.mycloud.example.com:8773/000575948401/queue1 --message-body "TEST MESSAGE"
d41d8cd98f00b204e9800998ecf8427e	2b3ce69548da118bf617bfdd33a06108	daedefab-669b-47a4-a801-8b84e747c11c
Receive a messge:
# aws sqs receive-message --queue-url http://sqs.mycloud.example.com:8773/000575948401/queue1
MESSAGES	TEST MESSAGE	2b3ce69548da118bf617bfdd33a06108	d41d8cd98f00b204e9800998ecf8427e	9cc9bc8c-c201-4a27-9f7f-94924a79968a	000575948401:queue1:9cc9bc8c-c201-4a27-9f7f-94924a79968a:3
A CloudFormation template can be used to manage SQS resources. The following template is an example showing the:
- AWS::SQS::Queue
- AWS::SQS::QueuePolicy
CloudFormation resources:
AWSTemplateFormatVersion: 2010-09-09
Description: >-
  SQS queue and queue policy template

Resources:

  Queue:
    Type: AWS::SQS::Queue
    Properties:
      RedrivePolicy:
        deadLetterTargetArn: !GetAtt 'DeadLetterQueue.Arn'
        maxReceiveCount: 5
      DelaySeconds: '10'
      MaximumMessageSize: '65536'
      MessageRetentionPeriod: '1209600'
      VisibilityTimeout: '20'
      ReceiveMessageWaitTimeSeconds: '5'
      QueueName: queue1

  DeadLetterQueue:
    Type: AWS::SQS::Queue

  QueuePolicy:
    Type: AWS::SQS::QueuePolicy
    Properties:
      PolicyDocument:
        Statement:
          Action: sqs:*
          Principal:
            AWS: !Ref 'AWS::AccountId'
          Effect: Allow
      Queues:
        - !Ref Queue
        - !Ref DeadLetterQueue

Outputs:

  QueueURL:
    Description: URL of the queue
    Value: !Ref 'Queue'

  QueueARN:
    Description: ARN of the queue
    Value: !GetAtt 'Queue.Arn'

  DeadLetterQueueURL:
    Description: URL of the dead letter queue
    Value: !Ref 'DeadLetterQueue'

  DeadLetterQueueARN:
    Description: ARN of the dead letter queue
    Value: !GetAtt 'DeadLetterQueue.Arn'
The output for the stack will show the URLs and ARNs for the created queue resources.
14 - Using CloudFormation
This topic describes the Eucalyptus implementation of the AWS CloudFormation web service, how CloudFormation works, and some details and examples of how to add CloudFormation to your Eucalyptus deployment.
Cloud computing allows for application repeatability and redundancy. This means that you can spin up as many virtual machines as you need, but the application configuration only needs to happen when the images are created. CloudFormation takes this concept to the next level: it allows you to configure an entire set of resources (instances, security groups, user roles and policies, and more) in a single template. Then you can create a stack of all those resources from the template using a single command. So, you don’t just get machine repeatability, you get environment repeatability. CloudFormation allows you to clone environments in different cloud setups, as well as giving applications the ability to be set up and torn down in a repeatable manner.
CloudFormation manages a set of resources, called a stack, in batch operations (create, update, or delete). Stacks are described in templates, which can be simple, as the following example:
Resources:
  MyInstance:
    Type: AWS::EC2::Instance
    Properties:
      ImageId: emi-371ada125a928669e
This stack creates a single instance, based on the image with ID emi-371ada125a928669e. However, this stack is not portable because different clouds might have different image IDs.
CloudFormation allows stack customization through user parameters that are passed in at stack creation time. The following is an example of the template above with a user parameter called MyImageId.
Parameters:
  MyImageId:
    Description: Image id
    Type: String
Resources:
  MyInstance:
    Type: AWS::EC2::Instance
    Properties:
      ImageId: !Ref MyImageId
This stack creates a single instance, but the image ID will be required to be passed in using the command line. For example, the following example uses the euform-create-stack command in Euca2ools:
euform-create-stack --template-file template.yaml -p MyImageId=emi-371ada125a928669e MyStack
or using the AWS CLI:
aws cloudformation create-stack --template-body file://template.yaml --parameters ParameterKey=MyImageId,ParameterValue=emi-371ada125a928669e --stack-name MyStack
These example commands pass the parameter MyImageId with value emi-371ada125a928669e into the stack creation process.
You can also use templates to create multiple resources and associate them with each other. For example, the following template creates an instance with its own security group and ingress rule.
Parameters:
  MyImageId:
    Description: Image id
    Type: String
Resources:
  MySecurityGroup:
    Type: AWS::EC2::SecurityGroup
    Properties:
      GroupDescription: Security Group with Ingress Rule for MyInstance
      SecurityGroupIngress:
        - IpProtocol: tcp
          FromPort: '22'
          ToPort: '22'
          CidrIp: '0.0.0.0/0'
  MyInstance:
    Type: AWS::EC2::Instance
    Properties:
      ImageId: !Ref 'MyImageId'
      SecurityGroups:
        - !Ref 'MySecurityGroup'
Templates can be more complicated than the ones shown above, but CloudFormation allows many resources to be deployed in one operation. Resources from most Eucalyptus services are supported.
To run CloudFormation on Eucalyptus, you need the following:
- A running Eucalyptus cloud, version 4.0 or later, with at least one Cloud Controller, Node Controller, and Cluster Controller up, running and registered
- At least one active running service of each of the following: CloudWatch, AutoScaling, Load Balancing, Compute, and IAM
- A registered active CloudFormation service
Note
Eucalyptus versions earlier than 5 support JSON CloudFormation templates but not the newer YAML formatSupported Resources
The following resources are supported by CloudFormation in Eucalyptus.
| Resource | Description |
|---|
| AWS::AutoScaling::AutoScalingGroup | All properties in the Template Reference section of the AWS CloudFormation User Guide are supported except: HealthCheckType. |
| AWS::AutoScaling::LaunchConfiguration | All properties in the Template Reference section of the AWS CloudFormation User Guide are supported except AssociatePublicIpAddress. |
| AWS::AutoScaling::ScalingPolicy | All properties in the Template Reference section of the AWS CloudFormation User Guide are supported. |
| AWS::CloudFormation::Stack | All properties in the Template Reference section of the AWS CloudFormation User Guide are supported. |
| AWS::CloudFormation::WaitCondition | All properties in the Template Reference section of the AWS CloudFormation User Guide are supported. |
| AWS::CloudFormation::WaitConditionHandle. | All properties in the Template Reference section of the AWS CloudFormation User Guide are supported. |
| AWS::CloudWatch::Alarm | All properties in the Template Reference section of the AWS CloudFormation User Guide are supported. |
| AWS::EC2::CustomerGateway | All properties in the Template Reference section of the AWS CloudFormation User Guide are supported. |
| AWS::EC2::DHCPOptions | All properties in the Template Reference section of the AWS CloudFormation User Guide are supported. |
| AWS::EC2::EIP | All properties in the Template Reference section of the AWS CloudFormation User Guide are supported. |
| AWS::EC2::EIPAssociation | All properties in the Template Reference section of the AWS CloudFormation User Guide are supported except: PrivateIpAddress. |
| AWS::EC2::Instance | All properties in the Template Reference section of the AWS CloudFormation User Guide are supported except: SourceDestCheck, Tags, and Tenancy. |
| AWS::EC2::InternetGateway | All properties in the Template Reference section of the AWS CloudFormation User Guide are supported. |
| AWS::EC2::LaunchTemplate | All properties in the Template Reference section of the AWS CloudFormation User Guide are supported. |
| AWS::EC2::NatGateway | All properties in the Template Reference section of the AWS CloudFormation User Guide are supported. |
| AWS::EC2::NetworkAcl | All properties in the Template Reference section of the AWS CloudFormation User Guide are supported. |
| AWS::EC2::NetworkAclEntry | All properties in the Template Reference section of the AWS CloudFormation User Guide are supported. |
| AWS::EC2::NetworkInterface | All properties in the Template Reference section of the AWS CloudFormation User Guide are supported. |
| AWS::EC2::NetworkInterfaceAttachment | All properties in the Template Reference section of the AWS CloudFormation User Guide are supported. |
| AWS::EC2::Route | All properties in the Template Reference section of the AWS CloudFormation User Guide are supported. |
| AWS::EC2::RouteTable | All properties in the Template Reference section of the AWS CloudFormation User Guide are supported. |
| AWS::EC2::SecurityGroup | All properties in the Template Reference section of the AWS CloudFormation User Guide are supported. |
| AWS::EC2::SecurityGroupEgress | All properties in the Template Reference section of the AWS CloudFormation User Guide are supported. |
| AWS::EC2::SecurityGroupIngress | All properties in the Template Reference section of the AWS CloudFormation User Guide are supported except SourceSecurityGroupId. |
| AWS::EC2::Subnet | All properties in the Template Reference section of the AWS CloudFormation User Guide are supported. |
| AWS::EC2::SubnetNetworkAclAssociation | All properties in the Template Reference section of the AWS CloudFormation User Guide are supported. |
| AWS::EC2::SubnetRouteTableAssociation | All properties in the Template Reference section of the AWS CloudFormation User Guide are supported. |
| AWS::EC2::Volume | All properties in the Template Reference section of the AWS CloudFormation User Guide are supported except: HealthCheckType and Tags. |
| AWS::EC2::VolumeAttachment | All properties in the Template Reference section of the AWS CloudFormation User Guide are supported. |
| AWS::EC2::VPC | All properties in the Template Reference section of the AWS CloudFormation User Guide are supported. |
| AWS::EC2::VPCDHCPOptionsAssociation | All properties in the Template Reference section of the AWS CloudFormation User Guide are supported. |
| AWS::EC2::VPCGatewayAttachment | All properties in the Template Reference section of the AWS CloudFormation User Guide are supported. |
| AWS::ElasticLoadBalancing::LoadBalancer | All properties in the Template Reference section of the AWS CloudFormation User Guide are supported except: AccessLoggingPolicy, ConnectionDrainingPolicy, CrossZone, Policies.InstancePorts, and Policies.LoadBalanerPorts. All other properties are passed through to the LoadBalancing service internally but some features are not implemented so properties may be ignored there. |
| AWS::IAM::AccessKey | All properties in the Template Reference section of the AWS CloudFormation User Guide are supported except Serial. |
| AWS::IAM::Group | All properties in the Template Reference section of the AWS CloudFormation User Guide are supported. |
| AWS::IAM::InstanceProfile | All properties in the Template Reference section of the AWS CloudFormation User Guide are supported. |
| AWS::IAM::ManagedPolicy | All properties in the Template Reference section of the AWS CloudFormation User Guide are supported. |
| AWS::IAM::Policy | All properties in the Template Reference section of the AWS CloudFormation User Guide are supported. |
| AWS::IAM::Role | All properties in the Template Reference section of the AWS CloudFormation User Guide are supported. |
| AWS::IAM::User | All properties in the Template Reference section of the AWS CloudFormation User Guide are supported. |
| AWS::IAM::UserToGroupAddition | All properties in the Template Reference section of the AWS CloudFormation User Guide are supported. |
| AWS::Route53::HostedZone | All properties in the Template Reference section of the AWS CloudFormation User Guide are supported. |
| AWS::Route53::RecordSet | All properties in the Template Reference section of the AWS CloudFormation User Guide are supported. |
| AWS::Route53::RecordSetGroup | All properties in the Template Reference section of the AWS CloudFormation User Guide are supported. |
| AWS::S3::Bucket | All properties in the Template Reference section of the AWS CloudFormation User Guide are supported. |
| AWS::S3::BucketPolicy | All properties in the Template Reference section of the AWS CloudFormation User Guide are supported. |
| AWS::SQS::Queue | All properties in the Template Reference section of the AWS CloudFormation User Guide are supported. |
| AWS::SQS::QueuePolicy | All properties in the Template Reference section of the AWS CloudFormation User Guide are supported. |
The service endpoint for CloudFormation is of the form:
http://cloudformation.mycloud.example.com:8773/
If DNS is not availble for your cloud, then an endpoint with a service path can be used:
http://<host-ip>:8773/services/CloudFormation
CloudFormation follows the same convention as the other user facing services.
14.1 - CloudFormation Use Case
This topic describes a use case for creating a stack, checking the stack progress, and deleting the stack. For this use case, we will use the following template:
Parameters:
  MyImageId:
    Description: Image id
    Type: String
  MyKeyPair:
    Description: Key Pair
    Type: String
Resources:
  MySecurityGroup:
    Type: AWS::EC2::SecurityGroup
    Properties:
      GroupDescription: Security Group with Ingress Rule for MyInstance
      SecurityGroupIngress:
        - IpProtocol: tcp
          FromPort: '22'
          ToPort: '22'
          CidrIp: '0.0.0.0/0'
  MyInstance:
    Type: AWS::EC2::Instance
    Properties:
      ImageId: !Ref 'MyImageId'
      SecurityGroups:
        - !Ref 'MySecurityGroup'
      KeyName: !Ref 'MyKeyPair'
This template creates an instance with a security group that allows global SSH access (port 22), but uses a keypair to log in. It requires two parameters, MyImageId , which is the image ID of the instance to create, and MyKeyPair , which is the name of the keypair to use to log in with. You could use both values with the euca-run-instances or aws ec2 run-instances commands to create an instance manually (for example, euca-run-instances -k mykey emi-371ada125a928669e ) so the arguments needed here are standard instance arguments.
The steps to run this template through the system are explained in the following steps.
Note
These steps require that you have an available image and that the CloudFormation service is runningVerify connectivity to the CloudFormation service.
euform-describe-stacks
# Or
aws cloudformation describe-stacks
You should not see anything returned, including any errors. Create a file called ex_template.yaml that contains the YAML template content shown in the introduction above.
Create a keypair.
euca-create-keypair myKey > myKey.pem
# Or
aws ec2 create-key-pair --key-name myKey > myKey.pem
Set the permissions on the keypair.
Find what resources have been created., run the command and the euca-describe-groups commands. Make note of the output for later. Run:
euca-describe-images -a
# Or
aws ec2 describe-images
Note the output for later use.
Create the stack referencing the existing resources.
# euform-create-stack --template-file ex_template.yaml -p MyImageId=<image_id> -p MyKeyPair=myKey MyStack
arn:aws:cloudformation::000575948401:stack/MyStack/26daf046-3776-4b97-9444-5edae2f2eceb
of with the AWS CLI:
# aws cloudformation create-stack --template-body file://ex_template.yaml --parameters ParameterKey=MyImageId,ParameterValue=emi-371ada125a928669e ParameterKey=MyKeyPair,ParameterValue=myKey --stack-name MyStack
arn:aws:cloudformation::000575948401:stack/MyStack/26daf046-3776-4b97-9444-5edae2f2eceb
Run the checks you want on your stack. Check the status of the stack.
# euform-describe-stacks
STACK	MyStack	CREATE_COMPLETE			2020-10-20T18:31:15.662Z
PARAMETER	MyImageId		emi-371ada125a928669e
PARAMETER	MyKeyPair		myKey
#
# aws cloudformation describe-stacks
STACKS	2020-10-20T18:31:15.662Z	False	2020-10-20T18:31:51.316Z	arn:aws:cloudformation::000575948401:stack/MyStack/26daf046-3776-4b97-9444-5edae2f2eceb	MyStack	CREATE_COMPLETE
PARAMETERS	MyImageId	emi-371ada125a928669e
PARAMETERS	MyKeyPair	myKey
Check the stack at any time to see all the events that have occurred during the stack lifecycle.
# euform-describe-stack-events MyStack
EVENT	MyStack	d87c4381-b765-4d44-a5ba-a952855ffd79	AWS::CloudFormation::Stack	MyStack	arn:aws:cloudformation::000575948401:stack/MyStack/26daf046-3776-4b97-9444-5edae2f2eceb	2020-10-20T18:31:51.310Z	CREATE_COMPLETE
EVENT	MyStack	MyInstance-CREATE_COMPLETE-1603218711063	AWS::EC2::Instance	MyInstance	i-687f112f4c99e9a98	2020-10-20T18:31:51.063Z	CREATE_COMPLETE
EVENT	MyStack	MyInstance-CREATE_IN_PROGRESS-1603218676951	AWS::EC2::Instance	MyInstance	i-687f112f4c99e9a98	2020-10-20T18:31:16.951Z	CREATE_IN_PROGRESS	Resource creation Initiated
EVENT	MyStack	MyInstance-CREATE_IN_PROGRESS-1603218676783	AWS::EC2::Instance	MyInstance		2020-10-20T18:31:16.783Z	CREATE_IN_PROGRESS
EVENT	MyStack	MySecurityGroup-CREATE_COMPLETE-1603218676599	AWS::EC2::SecurityGroup	MySecurityGroup	MyStack-MySecurityGroup-SWUBTU8TQ9MBV	2020-10-20T18:31:16.599Z	CREATE_COMPLETE
EVENT	MyStack	MySecurityGroup-CREATE_IN_PROGRESS-1603218676174	AWS::EC2::SecurityGroup	MySecurityGroup	MyStack-MySecurityGroup-SWUBTU8TQ9MBV	2020-10-20T18:31:16.174Z	CREATE_IN_PROGRESS	Resource creation Initiated
EVENT	MyStack	MySecurityGroup-CREATE_IN_PROGRESS-1603218676038	AWS::EC2::SecurityGroup	MySecurityGroup		2020-10-20T18:31:16.038Z	CREATE_IN_PROGRESS
EVENT	MyStack	9212e1ff-6c7a-4710-96a2-d83606a3c34f	AWS::CloudFormation::Stack	MyStack	arn:aws:cloudformation::000575948401:stack/MyStack/26daf046-3776-4b97-9444-5edae2f2eceb	2020-10-20T18:31:15.780Z	CREATE_IN_PROGRESS	User Initiated
Run euca-describe-instances and euca-describe-groups to see the newly created resources:
# euca-describe-instances i-687f112f4c99e9a98
RESERVATION	r-2381c3e652dd942f2	000575948401	MyStack-MySecurityGroup-SWUBTU8TQ9MBV
INSTANCE	i-687f112f4c99e9a98	emi-371ada125a928669e	euca-192-168-134-181.eucalyptus.mycloud.example.com	euca-172-31-15-210.eucalyptus.internal	running	myKey	0		t2.micro	2020-10-20T18:31:16.920Z	cloud-1a				monitoring-disabled	192.168.134.181	172.31.15.210	vpc-837bc081de161f8c0	subnet-1503566df094fe78a	instance-store					hvm			sg-98da12246d91375e3				x86_64
NETWORKINTERFACE	eni-42a4a3bf7d1075735	subnet-1503566df094fe78a	vpc-837bc081de161f8c0	000575948401	in-use	172.31.15.210	euca-172-31-15-210.eucalyptus.internal	true
ATTACHMENT		eni-attach-cc38f4f4ef78a6469	0	attached	2020-10-20T18:31:16.923Z	true
ASSOCIATION	192.168.134.181		172.31.15.210
GROUP	sg-98da12246d91375e3	MyStack-MySecurityGroup-SWUBTU8TQ9MBV
PRIVATEIPADDRESS	172.31.15.210	euca-172-31-15-210.eucalyptus.internal	primary
TAG	instance	i-687f112f4c99e9a98	aws:cloudformation:logical-id	MyInstance
TAG	instance	i-687f112f4c99e9a98	aws:cloudformation:stack-id	arn:aws:cloudformation::000575948401:stack/MyStack/26daf046-3776-4b97-9444-5edae2f2eceb
TAG	instance	i-687f112f4c99e9a98	aws:cloudformation:stack-name	MyStack
TAG	instance	i-687f112f4c99e9a98	euca:node	10.117.111.18
#
# euca-describe-groups sg-98da12246d91375e3
GROUP	sg-98da12246d91375e3	000575948401	MyStack-MySecurityGroup-SWUBTU8TQ9MBV	Security Group with Ingress Rule for MyInstance	vpc-837bc081de161f8c0
PERMISSION	000575948401	MyStack-MySecurityGroup-SWUBTU8TQ9MBV	ALLOWS	tcp	22	22	FROM	CIDR	0.0.0.0/0	ingress
PERMISSION	000575948401	MyStack-MySecurityGroup-SWUBTU8TQ9MBV	ALLOWS	-1			TO	CIDR	0.0.0.0/0	egress
TAG	security-group	sg-98da12246d91375e3	aws:cloudformation:logical-id	MySecurityGroup
TAG	security-group	sg-98da12246d91375e3	aws:cloudformation:stack-id	arn:aws:cloudformation::000575948401:stack/MyStack/26daf046-3776-4b97-9444-5edae2f2eceb
TAG	security-group	sg-98da12246d91375e3	aws:cloudformation:stack-name	MyStack
To SSH into the instance:
ssh -i myKey.pem root@192.168.134.181
Note
Username might depend on the image, and might be root, centos, ubuntu or ec2-user.Delete the stack.
euform-delete-stack MyStack
# Or
aws cloudformation delete-stack --stack-name MyStack
You can run euform-describe-stacks and all the other describe commands to check the progress until the delete is complete.
14.2 - CloudFormation Templates
This topic details templates that have been tested with Eucalyptus.
Warning
These examples use the older JSON format, YAML format is recommended for Eucalyptus 5AccessKeys.template
{
  "AWSTemplateFormatVersion":"2010-09-09",
  "Parameters":{
    "Username":{
      "Description":"Username",
      "Type":"String"
    }
  },
  "Resources":{
    "Key1":{
      "Type":"AWS::IAM::AccessKey",
      "Properties":{
        "UserName":{"Ref":"Username"},
        "Serial":"1",
        "Status":"Active"
      }
    },
    "Key2":{
      "Type":"AWS::IAM::AccessKey",
      "Properties":{
        "UserName":{"Ref":"Username"},
       "Serial":"1",
       "Status":"Inactive"
      }
    }
  },
  "Outputs":{
    "Key1AK":{
      "Value":{"Ref":"Key1"}
    },
    "Key1SK":{
      "Value":{"Fn::GetAtt":["Key1","SecretAccessKey"]}
    },
    "Key2AK":{
      "Value":{"Ref":"Key2"}
    },
    "Key2SK":{
      "Value":{"Fn::GetAtt":["Key2","SecretAccessKey"]}
    }
  }
}
AutoscalingGroupsAndCloudWatchAlarm.template
{
  "AWSTemplateFormatVersion":"2010-09-09",
  "Parameters":{
    "ImageId":{
      "Description":"Image id",
      "Type":"String"
    }
  },
  "Resources":{
    "LaunchConfig":{
      "Type":"AWS::AutoScaling::LaunchConfiguration",
      "Properties":{
        "ImageId":{"Ref":"ImageId"},
        "InstanceType":"m1.small",
        "BlockDeviceMappings":[
          {"DeviceName":"/dev/sdc","VirtualName":"ephemeral0"},
          {"DeviceName":"/dev/sdc","Ebs":{"VolumeSize":"10"}}
        ],
        "SecurityGroups":[{"Ref":"InstanceSecurityGroup"}]}
      },
      "ASG1":{
        "UpdatePolicy":{
          "AutoScalingRollingUpdate":{
            "MinInstancesInService":"1",
            "MaxBatchSize":"1",
            "PauseTime":"PT12M5S"
          }
        },
        "Type":"AWS::AutoScaling::AutoScalingGroup",
        "Properties":{
          "AvailabilityZones":{"Fn::GetAZs":{"Ref":"AWS::Region"}
        },
        "LaunchConfigurationName":{"Ref":"LaunchConfig"},
        "MaxSize":"3",
        "MinSize":"1"
      }
    },
    "ScaleUpPolicy":{
      "Type":"AWS::AutoScaling::ScalingPolicy",
        "Properties":{
          "AdjustmentType":"ChangeInCapacity",
          "AutoScalingGroupName":{"Ref":"ASG1"},
          "Cooldown":"1",
          "ScalingAdjustment":"1"
        }
      },
      "CPUAlarmHigh":{
        "Type":"AWS::CloudWatch::Alarm",
        "Properties":{
          "EvaluationPeriods":"1",
          "Statistic":"Average",
          "Threshold":"10",
          "AlarmDescription":"Alarm if CPU too high or metric disappears indicating instance is down",
          "Period":"60",
          "AlarmActions":[{"Ref":"ScaleUpPolicy"}],
          "Namespace":"AWS/EC2",
          "Dimensions":[{
            "Name":"AutoScalingGroupName",
            "Value":{"Ref":"ASG1"}
          }],
          "ComparisonOperator":"GreaterThanThreshold",
          "MetricName":"CPUUtilization"
        }
      },
      "InstanceSecurityGroup":{
        "Type":"AWS::EC2::SecurityGroup",
        "Properties":{
          "GroupDescription":"Cloudformation Group",
          "SecurityGroupIngress":[{
            "IpProtocol":"tcp",
            "FromPort":"22",
            "ToPort":"22",
             "CidrIp":"0.0.0.0/0"
          }]
        }
      },
      "IngressRule":{
        "Type":"AWS::EC2::SecurityGroupIngress",
        "Properties":{
          "GroupName":{"Ref":"InstanceSecurityGroup"},
          "FromPort":"80",
          "ToPort":"80",
          "IpProtocol":"tcp",
          "SourceSecurityGroupName":{"Ref":"InstanceSecurityGroup"}
      }
    }
  }
}
BlockDeviceMappings.template
{
  "AWSTemplateFormatVersion":"2010-09-09",
  "Description":"Create an EC2 instance running a specified EMI with block device mappings.",
  "Parameters":{
    "ImageId":{
      "Description":"Image id",
      "Type":"String"
    },
    "KeyName":{
      "Description":"KeyName",
      "Type":"String"
    },
    "SnapshotId":{
      "Type":"String"
    }
  },
  "Resources":{
    "Ec2Instance1":{
      "Type":"AWS::EC2::Instance",
      "Properties":{
        "ImageId":{"Ref":"ImageId"},
        "BlockDeviceMappings":[{"DeviceName":"/dev/sdc","VirtualName":"ephemeral0"}]
      }
    },
    "Ec2Instance2":{
      "Type":"AWS::EC2::Instance",
      "Properties":{
        "ImageId":{"Ref":"ImageId"},
        "KeyName":{"Ref":"KeyName"},
        "BlockDeviceMappings":[{
          "DeviceName":"/dev/sdc",
          "Ebs":{"SnapshotId":{"Ref":"SnapshotId"},"DeleteOnTermination":"false"}
        }]
      }
    },
    "Ec2Instance3":{
      "Type":"AWS::EC2::Instance",
      "Properties":{
        "ImageId":{"Ref":"ImageId"},
        "KeyName":{"Ref":"KeyName"},
        "BlockDeviceMappings":[{
          "DeviceName":"/dev/sdc",
          "Ebs":{"VolumeSize":"10","DeleteOnTermination":"true"}
        }]
      }
    }
  }
}
ConditionsAndFunctions.template
{
  "Mappings":{
    "Mapping01":{
      "Key01":{"Value":["1","2"]},
      "Key02":{"Value":"3"},
      "Key03":{"Value":"4"}
    }
  },
  "AWSTemplateFormatVersion":"2010-09-09",
  "Description":"Create an EC2 instance running a specified EMI, also test functions and conditions.",
  "Parameters":{
    "ImageId":{
      "Description":"Image id",
      "Type":"String",
      "NoEcho":"True"
    },
    "Split":{
      "Default":"1,2,3",
      "Type":"CommaDelimitedList"
    }
  },
  "Resources":{
    "Ec2Instance1":{
      "Type":"AWS::EC2::Instance",
        "Properties":{
          "ImageId":{"Ref":"ImageId"}
        },
      "Condition":"True"
    },
    "Ec2Instance2":{
      "Type":"AWS::EC2::Instance",
      "Properties":{
        "ImageId":{"Ref":"ImageId"}
      },
      "Condition":"False"
    }
  },
  "Conditions":{
    "True":{"Fn::Equals":["x","x"]},
    "False":{"Fn::Not":[{"Condition":"True"}]},
    "NotTrue":{"Fn::Not":[{"Condition":"True"}]},
    "NotFalse":{"Fn::Not":[{"Condition":"False"}]},
    "TrueAndTrue":{"Fn::And":[{"Condition":"True"},{"Condition":"True"}]},
    "TrueAndFalse":{"Fn::And":[{"Condition":"True"},{"Condition":"False"}]},
    "FalseAndTrue":{"Fn::And":[{"Condition":"False"},{"Condition":"True"}]},
    "FalseAndFalse":{"Fn::And":[{"Condition":"False"},{"Condition":"False"}]},
    "TrueOrTrue":{"Fn::Or":[{"Condition":"True"},{"Condition":"True"}]},
    "TrueOrFalse":{"Fn::Or":[{"Condition":"True"},{"Condition":"False"}]},
    "FalseOrTrue":{"Fn::Or":[{"Condition":"False"},{"Condition":"True"}]},
    "FalseOrFalse":{"Fn::Or":[{"Condition":"False"},{"Condition":"False"}]}
  },
  "Outputs":{
    "Region":{
      "Value":{"Ref":"AWS::Region"}
    },
    "JoinAndAZ":{
      "Value":{"Fn::Join":[",",{"Fn::GetAZs":""}]}
    },
    "FindInMap1AndSelect":{
      "Value":{"Fn::Select":["0",{"Fn::FindInMap":["Mapping01","Key01","Value"]}]}
    },
    "FindInMap2AndSelect":{
     "Value":{"Fn::Select":["1","Fn::FindInMap":["Mapping01","Key01","Value"]}]}
    },
    "FindInMap3AndSelect":{
      "Value":{"Fn::FindInMap":["Mapping01","Key02","Value"]}
    },
    "FindInMap4AndSelect":{
      "Value":{"Fn::FindInMap":["Mapping01","Key03","Value"]}
    },
    "GetAtt":{
      "Value":{"Fn::GetAtt":["Ec2Instance1","PrivateIp"]}
    },
    "StackId":{
      "Value":{"Ref":"AWS::StackId"}
    },
    "StackName":{
      "Value":{"Ref":"AWS::StackName"}
    },
    "AccountId":{
      "Value":{"Ref":"AWS::AccountId"}
    },
    "True":{
      "Value":{"Fn::Join" : [",",[{"Fn::If": ["True","True","False"]}]]}},
    },
    "False":{
      "Value":{"Fn::Join" : [",",[{"Fn::If": ["False","True","False"]}]]}},
    },
    "NotTrue":{
      "Value":{"Fn::Join" : [",",[{"Fn::If": ["NotTrue","True","False"]}]]}},
    },
    "NotFalse":{
      "Value":{"Fn::Join" : [",",[{"Fn::If": ["NotFalse","True","False"]}]]}},
    },
    "TrueAndTrue":{
      "Value":{"Fn::Join" : [",",[{"Fn::If": ["TrueAndTrue","True","False"]}]]}},
    },
    "TrueAndFalse":{
      "Value":{"Fn::Join" : [",",[{"Fn::If": ["TrueAndFalse","True","False"]}]]}},
    },
    "FalseAndTrue":{
      "Value":{"Fn::Join" : [",",[{"Fn::If": ["FalseAndTrue","True","False"]}]]}},
    },
    "FalseAndFalse":{
      "Value":{"Fn::Join" : [",",[{"Fn::If": ["FalseAndFalse","True","False"]}]]}},
    },
    "TrueOrTrue":{
      "Value":{"Fn::Join" : [",",[{"Fn::If": ["TrueOrTrue","True","False"]}]]}},
    },
    "TrueOrFalse":{
      "Value":{"Fn::Join" : [",",[{"Fn::If": ["TrueOrFalse","True","False"]}]]}},
    },
    "FalseOrTrue":{
      "Value":{"Fn::Join" : [",",[{"Fn::If": ["FalseOrTrue","True","False"]}]]}},
    },
    "FalseOrFalse":{
      "Value":{"Fn::Join" : [",",[{"Fn::If": ["FalseOrFalse","True","False"]}]]}},
    }
  }
}
ElasticIP.template
This template attaches an Elastic IP to a new and existing instance. You must pass along the existing instance ID.
{
  "AWSTemplateFormatVersion":"2010-09-09",
  "Description":"Create an EC2 instance running a specified EMI and some elastic IP addresses.",
  "Parameters":{
    "ImageId":{
      "Description":"Image id",
      "Type":"String"
    },
    "OtherInstanceId":{
      "Description":"Other instance id",
      "Type":"String"
    }
    },
    "Resources":{
      "Ec2Instance1":{
        "Type":"AWS::EC2::Instance",
        "Properties":{
          "ImageId":{"Ref":"ImageId"}
        }
      },
      "EIP1":{
        "Type":"AWS::EC2::EIP",
        "Properties":{
          "InstanceId":{"Ref":"Ec2Instance1"}
        }
      },
      "EIP2":{
        "Type":"AWS::EC2::EIP",
        "Properties":{
        }
      },
      "EIPAssociation2":{
        "Type":"AWS::EC2::EIPAssociation",
        "Properties":{
          "InstanceId":{"Ref":"OtherInstanceId"},
          "EIP":{"Ref":"EIP2"}
        }
      }
    },
    "Outputs":{
      "Output1":{
        "Value":{"Ref":"EIPAssociation2"}
      }
  }
}
ElasticLoadBalancer.template
There is a hard-coded image ID in the Mapping section here to test FindInMap . Change the value to an instance that exists in your cloud.
{
  "AWSTemplateFormatVersion":"2010-09-09",
  "Description":"Based on the AWS Cloudformation Sample Template for ELB.  Modify this template, and put the correct emi-XXXX in the value fields with a blank key of the AWSRegionArch2AMI mapping.",
  "Parameters":{
    "InstanceType":{
      "Description":"WebServer EC2 instance type",
      "Type":"String",
      "Default":"m1.small",
      "AllowedValues":["t1.micro","m1.small","m1.medium","m1.large","m1.xlarge","m2.xlarge","m2.2xlarge",
                       "m2.4xlarge","m3.xlarge","m3.2xlarge","c1.medium","c1.xlarge","cc1.4xlarge",
                       "cc2.8xlarge","cg1.4xlarge"],
      "ConstraintDescription":"must be a valid EC2 instance type."
    },
    "WebServerPort":{
      "Description":"TCP/IP port of the web server",
      "Type":"String",
      "Default":"8888"
    },
    "KeyName":{
      "Description":"Name of an existing EC2 KeyPair to enable SSH access to the instances",
      "Type":"String",
      "MinLength":"1",
      "MaxLength":"255",
      "AllowedPattern":"[\\x20-\\x7E]*",
      "ConstraintDescription":"can contain only ASCII characters."
    },
    "SSHLocation":{
      "Description":"The IP address range that can be used to SSH to the EC2 instances",
      "Type":"String",
      "MinLength":"9",
      "MaxLength":"18",
      "Default":"0.0.0.0/0",
      "AllowedPattern":"(\\d{1,3})\\.(\\d{1,3})\\.(\\d{1,3})\\.(\\d{1,3})/(\\d{1,2})",
      "ConstraintDescription":"must be a valid IP CIDR range of the form x.x.x.x/x."
    }
  },
  "Mappings":{
    "AWSInstanceType2Arch":{
      "t1.micro":{"Arch":"64"},
      "m1.small":{"Arch":"64"},
      "m1.medium":{"Arch":"64"},
      "m1.large":{"Arch":"64"},
      "m1.xlarge":{"Arch":"64"},
      "m2.xlarge":{"Arch":"64"},
      "m2.2xlarge":{"Arch":"64"},
      "m3.xlarge":{"Arch":"64"},
      "m3.2xlarge":{"Arch":"64"},
      "m2.4xlarge":{"Arch":"64"},
      "c1.medium":{"Arch":"64"},
      "c1.xlarge":{"Arch":"64"}
    },
    "AWSRegionArch2AMI":{
      "":{"32":"emi-ddbacddf","64":"emi-ddbacddf"}
    }
  },
  "Resources":{
    "ElasticLoadBalancer":{
      "Type":"AWS::ElasticLoadBalancing::LoadBalancer",
      "Properties":{
        "AvailabilityZones":{"Fn::GetAZs":""},
        "Instances":[{"Ref":"Ec2Instance1"},{"Ref":"Ec2Instance2"}],
        "Listeners"{"LoadBalancerPort":"80","InstancePort":{"Ref":"WebServerPort"},"Protocol":"HTTP"}],
        "HealthCheck":{
          "Target":{"Fn::Join":["",["HTTP:",{"Ref":"WebServerPort"},"/"]]},
          "HealthyThreshold":"3",
          "UnhealthyThreshold":"5",
          "Interval":"30",
          "Timeout":"5"
        }
      }
    },
    "Ec2Instance1":{
      "Type":"AWS::EC2::Instance",
      "Properties":{
        "SecurityGroups":[{"Ref":"InstanceSecurityGroup"}],
        "KeyName":{"Ref":"KeyName"},
        "InstanceType":{"Ref":"InstanceType"},
        "ImageId":{
          "Fn::FindInMap":[
            "AWSRegionArch2AMI",
            {"Ref":"AWS::Region"},
            {"Fn::FindInMap":["AWSInstanceType2Arch",{"Ref":"InstanceType"},"Arch"]}
          ]
        },
        "UserData":{"Fn::Base64":{"Ref":"WebServerPort"}}
      }
    },
    "Ec2Instance2":{
      "Type":"AWS::EC2::Instance",
      "Properties":{
        "SecurityGroups":[{"Ref":"InstanceSecurityGroup"}],
        "KeyName":{"Ref":"KeyName"},
        "InstanceType":{"Ref":"InstanceType"},
        "ImageId":{
          "Fn::FindInMap":[
            "AWSRegionArch2AMI",
            {"Ref":"AWS::Region"},
            {"Fn::FindInMap":["AWSInstanceType2Arch",{"Ref":"InstanceType"},"Arch"]}
          ]
        },
        "UserData":{"Fn::Base64":{"Ref":"WebServerPort"}}
      }
    },
    "InstanceSecurityGroup":{
      "Type":"AWS::EC2::SecurityGroup",
      "Properties":{
        "GroupDescription":"Enable SSH access and HTTP access on the inbound port",
        "SecurityGroupIngress":[
          {
            "IpProtocol":"tcp",
            "FromPort":"22",
            "ToPort":"22",
            "CidrIp":{"Ref":"SSHLocation"}
          },
          {
             "IpProtocol":"tcp",
             "FromPort":{"Ref":"WebServerPort"},
             "ToPort":{"Ref":"WebServerPort"},
             "CidrIp":"0.0.0.0/0"
          }
        ]
      }
    }
  },
  "Outputs":{
    "URL":{
      "Description":"URL of the sample website",
      "Value":{"Fn::Join":["",["http://",{"Fn::GetAtt":["ElasticLoadBalancer","DNSName"]}]]}
    }
  }
}
IAMGroup.template
{
  "AWSTemplateFormatVersion":"2010-09-09",
  "Resources":{
    "Group1":{
      "Type":"AWS::IAM::Group",
      "Properties":{
        "Path":"/myapplication/",
        "Policies":[{
          "PolicyName":"myapppolicy",
          "PolicyDocument":{
            "Version":"2012-10-17",
            "Statement":[
              {"Effect":"Allow","Action":["ec2:*"],"Resource":["*"]},
              {"Effect":"Deny","Action":["s3:*"],"NotResource":["*"]}
            ]
          }
        }]
      }
    }
  },
  "Outputs":{
    "Group1Ref":{
      "Value":{"Ref":"Group1"}
    },
    "Group1Arn":{
      "Value":{"Fn::GetAtt":["Group1","Arn"]}
    }
  }
}
IAMRole.template
{
  "AWSTemplateFormatVersion":"2010-09-09",
  "Resources":{
    "Role1":{
      "Type":"AWS::IAM::Role",
      "Properties":{
        "AssumeRolePolicyDocument":{
          "Version":"2012-10-17",
          "Statement":[{
            "Effect":"Allow",
            "Principal":{"Service":["ec2.amazonaws.com"]},
            "Action":["sts:AssumeRole"]
          }]
        },
        "Path":"/",
        "Policies":[{
          "PolicyName":"root",
          "PolicyDocument":{
            "Version":"2012-10-17",
            "Statement":[{"Effect":"Allow","Action":"*","Resource":"*"}]
          }
        }]
      }
    },
    "IP1":{
      "Type":"AWS::IAM::InstanceProfile",
      "Properties":{
        "Path":"/",
        "Roles":[{"Ref":"Role1"}]
      }
    }
  },
  "Outputs":{
    "Role1Ref":{
      "Value":{"Ref":"Role1"}
    },
    "Role1Arn":{
      "Value":{"Fn::GetAtt":["Role1","Arn"]}
    },
    "IP1Ref":{
      "Value":{"Ref":"IP1"}
    },
    "IP1Arn":{
      "Value":{"Fn::GetAtt":["IP1","Arn"]}
    }
  }
}
IAM_Users_Groups_and_Policies.template
{
  "AWSTemplateFormatVersion":"2010-09-09",
  "Description":"AWS CloudFormation Sample Template IAM_Users_Groups_and_Policies: Sample template showing how to create IAM users, groups and policies. It creates a single user that is a member of a users group and an admin group. The groups each have different IAM policies associated with them. Note: This example also creates an AWSAccessKeyId/AWSSecretKey pair associated with the new user. The example is somewhat contrived since it creates all of the users and groups, typically you would be creating policies, users and/or groups that contain references to existing users or groups in your environment. Note that you will need to specify the CAPABILITY_IAM flag when you create the stack to allow this template to execute. You can do this through the AWS management console by clicking on the check box acknowledging that you understand this template creates IAM resources or by specifying the CAPABILITY_IAM flag to the cfn-create-stack command line tool or CreateStack API call. ",
  "Parameters":{
    "Password":{
      "NoEcho":"true",
      "Type":"String",
      "Description":"New account password",
      "MinLength":"1",
      "MaxLength":"41"
    }
  },
  "Resources":{
    "CFNUser":{
      "Type":"AWS::IAM::User",
      "Properties":{
        "LoginProfile":{"Password":{"Ref":"Password"}}
      }
    },
    "Role1":{
      "Type":"AWS::IAM::Role",
      "Properties":{
        "AssumeRolePolicyDocument":{
          "Version":"2012-10-17",
          "Statement":[{
            "Effect":"Allow",
            "Principal":{"Service":["ec2.amazonaws.com"]},
            "Action":["sts:AssumeRole"]
          }]
        },
        "Path":"/",
        "Policies":[{
          "PolicyName":"root",
          "PolicyDocument":{
            "Version":"2012-10-17",
            "Statement":[{"Effect":"Allow","Action":"*","Resource":"*"}]
          }
        }]
      }
    },
    "CFNUserGroup":{
      "Type":"AWS::IAM::Group"
    },
    "CFNAdminGroup":{
      "Type":"AWS::IAM::Group"
    },
    "Users":{
      "Type":"AWS::IAM::UserToGroupAddition",
      "Properties":{
        "GroupName":{"Ref":"CFNUserGroup"},
        "Users":[{"Ref":"CFNUser"}]
      }
    },
    "Admins":{
      "Type":"AWS::IAM::UserToGroupAddition",
      "Properties":{
        "GroupName":{"Ref":"CFNAdminGroup"},
        "Users":[{"Ref":"CFNUser"}]
      }
    },
    "CFNUserPolicies":{
      "Type":"AWS::IAM::Policy",
      "Properties":{
        "PolicyName":"CFNUsers",
        "PolicyDocument":{
          "Statement":[{
            "Effect":"Allow",
            "Action":["cloudformation:Describe*","cloudformation:List*","cloudformation:Get*"],
            "Resource":"*"
          }]
        },
        "Groups":[{"Ref":"CFNUserGroup"}],
        "Users":[{"Ref":"CFNUser"}],
        "Roles":[{"Ref":"Role1"}]
      }
    },
    "CFNAdminPolicies":{
      "Type":"AWS::IAM::Policy",
      "Properties":{
        "PolicyName":"CFNAdmins",
        "PolicyDocument":{
          "Statement":[{"Effect":"Allow","Action":"cloudformation:*","Resource":"*"}]
        },
        "Groups":[{"Ref":"CFNAdminGroup"}]
      }
    },
    "CFNKeys":{
      "Type":"AWS::IAM::AccessKey",
      "Properties":{
        "UserName":{"Ref":"CFNUser"}
      }
    }
  },
  "Outputs":{
    "AccessKey":{
      "Value":{"Ref":"CFNKeys"},
      "Description":"AWSAccessKeyId of new user"
    },
    "SecretKey":{
      "Value":{"Fn::GetAtt":["CFNKeys","SecretAccessKey"]},
      "Description":"AWSSecretKey of new user"
    }
  }
}
IAMUser.template
{
  "AWSTemplateFormatVersion":"2010-09-09",
  "Parameters":{
    "Password":{
      "NoEcho":"true",
      "Type":"String",
      "Description":"New account password",
      "MinLength":"1",
      "MaxLength":"41"
    }
  },
  "Resources":{
    "CFNUserGroup":{
      "Type":"AWS::IAM::Group",
      "Properties":{
        "Policies":[{
          "PolicyName":"CFNUsers",
          "PolicyDocument":{
            "Statement":[{
              "Effect":"Allow",
              "Action":["cloudformation:Describe*","cloudformation:List*","cloudformation:Get*"],
              "Resource":"*"
            }]
          }
        }]
      }
    },
    "CFNAdminGroup":{
      "Type":"AWS::IAM::Group"
    },
    "CFNUser":{
      "Type":"AWS::IAM::User",
      "Properties":{
        "LoginProfile":{"Password":{"Ref":"Password"}},
        "Groups":[{"Ref":"CFNUserGroup"},{"Ref":"CFNAdminGroup"}],
        "Policies":[{
          "PolicyName":"CFNUsers",
          "PolicyDocument":{
            "Statement":[{
              "Effect":"Allow",
              "Action":["cloudformation:Describe*","cloudformation:List*","cloudformation:Get*"],
              "Resource":"*"
            }]
          }
        }]
      }
    }
  }
}
SecurityGroupRule.template
{
"AWSTemplateFormatVersion":"2010-09-09",
  "Description":"Create an EC2 instance running a specified EMI, a security group, and an ingress rule.",
  "Parameters":{
    "ImageId":{
      "Description":"Image id",
      "Type":"String"
    }
  },
  "Resources":{
    "Ec2Instance1":{
      "Description":"My instance",
      "Type":"AWS::EC2::Instance",
      "Properties":{
        "ImageId":{"Ref":"ImageId"}
      },
      "DependsOn":"Ec2Instance2"
    },
    "Ec2Instance2":{
      "Type":"AWS::EC2::Instance",
      "Properties":{
        "ImageId":{"Ref":"ImageId"},
        "SecurityGroups":[{"Ref":"InstanceSecurityGroup"}]
      }
    },
    "InstanceSecurityGroup":{
      "Type":"AWS::EC2::SecurityGroup",
      "Properties":{
        "GroupDescription":"Cloudformation Group",
        "SecurityGroupIngress":[{"IpProtocol":"tcp","FromPort":"22","ToPort":"22","CidrIp":"0.0.0.0/0"}]
      }
    },
    "IngressRule":{
      "Type":"AWS::EC2::SecurityGroupIngress",
      "Properties":{
        "GroupName":{"Ref":"InstanceSecurityGroup"},
        "FromPort":"80",
        "ToPort":"80",
        "IpProtocol":"tcp",
        "SourceSecurityGroupName":{"Ref":"InstanceSecurityGroup"}
      }
    }
  }
}
Volumes.template
{
  "AWSTemplateFormatVersion":"2010-09-09",
  "Description":"Create an EC2 instance running a specified EMI and attached volumes.",
  "Parameters":{
    "ImageId":{
      "Description":"Image id",
      "Type":"String"
    }
  },
  "Resources":{
    "Volume1":{
      "Type":"AWS::EC2::Volume",
      "Properties":{
        "Size":"5",
        "AvailabilityZone":{"Fn::GetAtt":["Instance1","AvailabilityZone"]}
      }
    },
    "Volume2":{
      "Type":"AWS::EC2::Volume",
      "Properties":{
        "Size":"5",
        "AvailabilityZone":{"Fn::GetAtt":["Instance1","AvailabilityZone"]}
      }
    },
    "MountPoint1":{
      "Type":"AWS::EC2::VolumeAttachment",
      "Properties":{
        "InstanceId":{"Ref":"Instance1"},
        "VolumeId":{"Ref":"Volume1"},
        "Device":"/dev/sdc"
      }
    },
    "Instance1":{
      "Type":"AWS::EC2::Instance",
      "Properties":{
        "ImageId":{"Ref":"ImageId"}
      }
    },
    "Instance2":{
      "Type":"AWS::EC2::Instance",
      "Properties":{
        "ImageId":{"Ref":"ImageId"},
        "Volumes":[{"VolumeId":{"Ref":"Volume2"},"Device":"/dev/sdc"}]
      }
    }
  }
}
14.3 - Troubleshooting CloudFormation
This topic describes some of the issues that can happen with CloudFormation. It also talks about how you can detect these issues, and offers some ways to fix the issues.
Invalid JSON
JSON must be syntactically valid. For example, if you don’t type in the final } character in a template, the euform-create-stack command returns an error message.
euform-create-stack: error (ValidationError): Unexpected end-of-input:
expected close marker for OBJECT (from [Source: java.io.StringReader@56b3916d;
line: 1, column: 0]) at [Source: java.io.StringReader@56b3916d; line: 38,
column : 849]
If you see an error like this, there is most likely something syntactically wrong with your JSON template. Some editors can detect things like unbalanced parentheses, but in the worst case you can paste your template into this URL http://jsonparseronline.com/ and it will help you find syntax errors.
Invalid Argument
If you try to create, for example, a stack that already exists, you will get a simple error message.
euform-create-stack: error (AlreadyExists): Stack already exists
Invalid Reference
If you use an invalid reference to, for example, a resource that doesn’t exit, Eucalyptus returns a simple error message.
euform-create-stack: error (ValidationError): Template format error: Unresolved resource dependencies [MySecurityGroup2] in the Resources block of the template>
Complex Errors
Not all errors are simple. We recommend that you use euform-describe-stacks (or aws cloudformation describe-stacks) and euform-describe-stack-resources to determine the current state of the stack. If there’s an error, it will usually be shown in the euform-describe-stack-events output. Otherwise, you will have to dig into the cloud-output.log file for further information. You can also manually delete resources if they are causing issues. If a euform-delete-stack fails, you can delete the offending resource and try again.
15 - Using Virtual Private Cloud
Using Virtual Private Cloud
Eucalyptus Virtual Private Cloud (VPC) is an implementation of Amazon VPC that allows you to define a logically isolated virtual network that can contain Eucalyptus resources. A virtual network enhances security by allowing you to have fine-grained, explicit control over network gateways, subnets, IP address ranges, and inbound and outbound connectivity. This section of the User Guide covers how Eucalyptus VPC works and how to use it.
Note
For more information about Amazon Virtual Private Cloud, see the .15.1 - How VPC Works
How VPC Works
Eucalyptus Virtual Private Cloud (VPC) is an implementation of Amazon VPC that allows you to run instances inside an isolated virtual network that you define. Eucalyptus VPC enables you to have control over subnets, internet gateways, and IP address ranges and allocations inside of this virtual network, as well as the ability to define and use multiple layers of security with security groups.
15.1.1 - Default VPCs
Starting with Eucalyptus versions 4.1 and later, when you create an account in your Eucalyptus cloud in VPCMIDO network mode, you get a default VPC with a single public subnet and an attached Internet gateway. All instances that are created in this account that do not explicitly specify a VPC are placed into this default VPC and given a public IP address and behave like ‘classic’ AWS EC2 instances.
15.1.2 - Subnets and IP Addressing
A virtual private cloud (VPC) is a virtual network that is logically isolated from other virtual networks in your Eucalyptus cloud.
Note
For more information about CIDR notation, see the on Wikipedia.Private IP AddressesWhen you create a VPC, you can specify the range of IP addresses for your VPC using Classless Inter-Domain Routing (CIDR) notation. When you launch an instance (VM) in your VPC, you can assign a private IP address to the instance from this IP address range. If you don’t explicitly assign a private IP address, one is assigned to the instance for you.
Public IP Addresses
By default, instances launched into the default subnet in your VPC receive a public IP address. This public IP address is assigned from a pool of public IP addresses, and is not associated with your account. This public IP address can’t be manually added or removed from the VPC instance. The public IP address is mapped to the instance’s private IP address using Network Address Translation (NAT).
You can control whether or not your VPC instances get a public IP address by either enabling/disabling the public IP address attribute of the subnet, or by overriding the subnet’s behavior when launching an instance into the VPC.
If you want a persistent IP address for your VPC instance, you can use the euca-allocate-address to create an elastic IP address, and then use euca-associate-address to assign this address.
Subnets
Once you’ve created a VPC, you can create one or more subnets inside the VPC. A subnet is simply a logical subdivision of a network of IP addresses. Subnets can be used to enable tighter security, allow separate administration of the network by organization, and enable more efficient network traffic by containing traffic between nodes in a subnet and using route tables for traffic that needs to move between subnets.
Note that subnets in a VPC cannot overlap; and the first four IP addresses and the last IP address are reserved for internal use. For example, of the 16 IP addresses of a /28 subnet, 11 are available for instances; of the 256 IP addresses of a /24 subnet, 251 are available for instances. Subnets must be larger than /28 and smaller than /16.
Note
For more information about subnets, see the on Wikipedia.15.2 - Understanding VPC Networking Concepts
Understanding VPC Networking Concepts
This section discusses VPC networking concepts and terminology.
Note
This documentation assumes that you have some knowledge of IP addressing, CIDR, route tables, and subnets. See the links included throughout the documentation for more information on these topics.15.2.1 - Domain Name System (DNS)
The Domain Name System (DNS) is an Internet standard that maps unique DNS names (for example: www.example.com) to the underlying public IP address (for example: 128.0.0.1).
Eucalyptus provides a DNS service with your cloud. By default, EC2 classic (EDGE mode) and VPCMIDO mode default subnet instances that are launched in your Eucalyptus cloud are automatically assigned public and private DNS names from the Eucalyptus DNS service.
15.2.2 - Elastic Network Interfaces (ENIs)
In Eucalyptus VPC, networking to instances (VMs) is delivered in the form of Elastic Network Interfaces (ENIs). ENIs are virtual network interfaces that can be attached to and/or detached from instances in a VPC.
Attributes of an ENI (private address, public address, Elastic IP, MAC address, security groups, and source/destination check flag) follow the ENI as it is detached from an instance and attached to another instance. An instance in a VPC has a default ENI attached, which is called the primary ENI. The Primary ENI cannot be detached.
Additional ENIs (up to a total of eight) can be attached to instances as needed. ENIs in different subnets can be attached to the same instance, but all ENIs and the instance must reside in the same Availability Zone. Users may need to manually bring up and configure secondary ENIs from within instances.
15.2.3 - Route Tables
A route table defines how traffic is directed in your network. Each subnet in your network has to be associated with one (and only one) route table, but a route table can have multiple subnets associated with it. A default route table (which simply contains a local route that allows communication within the VPC) is automatically created for you when you create your VPC. New subnets will get this route table by default, but you can replace it with a custom route table that enables you to explicitly control subnet traffic.
Note
For more information on route tables, see the on Wikipedia.15.2.4 - Internet Gateways
An Internet gateway is an object that runs inside of your VPC and provides communication between VPC instances and the Internet.
To use an Internet gateway in your VPC, you attach the gateway to your VPC, make sure your route tables direct Internet traffic to the Internet gateway, and configure your security groups to allow traffic through.
By default, instances loaded into any non-default VPC have private IP addresses (so they can communicate with other instances in the same VPC), but they do not have public IP addresses. For an instance to be able to communicate with the Internet gateway, it must have an associated public IP address. The default VPC comes with a pre-configured Internet gateway, and all instances that are launched into the default subnet receive a public IP address, so these instances have Internet access.
15.2.5 - Network Address Translation (NAT) Gateways
NAT Gateways enable instances in private VPC subnets to initiate communication with the Internet (and receive responses), but prevents connections to be initiated from the Internet. Traffic bound to the Internet from instances in private subnets should be directed to a NAT gateway (through the use of route tables), which will translate the source address to its own Elastic IP and route it to the Internet. The destination will send a response back to the Elastic IP (i.e., the NAT gateway), where the address translation will be reversed and delivered to the originating private IP.
NAT Gateways should be created in public VPC subnets, and have an Elastic IP associated. Private VPC subnets should have its route table manually updated to direct Internet-bound traffic to a NAT gateway.
15.3 - VPC Security Concepts
VPC Security Concepts
This section discusses VPC security concepts and terminology.
15.3.1 - Security Groups
A security group is a mechanism that allows you to control inbound and outbound traffic for your VPC. A security group has rules that specify what kinds of traffic are allowed in and out of instances (VMs) running in your VPC.
A VPC comes with a default security group that allows inbound traffic from other instances assigned to the same security group, and allows all outbound traffic. You can change the rules for the default security group, but you can’t delete it.
If you don’t specify a security group when you launch an instance in your VPC, the instance will be associated with the default security group.