Getting Started
Getting Started
This section helps you get started using your Eucalyptus cloud, and covers setting up your user credentials, installing and configuring command line tools, and working with images and instances. As a cloud user, you can access the Eucalyptus cloud using a command line interface such as the AWS CLI, or by using a web-based interface such as the Eucalyptus Management Console.
To access Eucalyptus via the command line, you can use the AWS CLI or Euca2ools with access key credentials. To access Eucalyptus with the Management Console, you’ll need a password. Talk to your cloud administrator to get your keys and passwords.
1 - Getting Started with the Eucalyptus Management Console
Getting Started with the Eucalyptus Management Console
This section helps you get started using your Eucalyptus cloud with the Eucalyptus Management Console.To access Eucalyptus with the Management Console, you’ll need a password for the Management Console. Talk to your cloud administrator to get your keys and passwords.
1.1 - Console Login
This screen allows you to log in to the Eucalyptus Management Console with either your Eucalyptus or your Amazon Web Services account. If you’ve forgotten your password, don’t have login credentials, or do not know the URL for the Eucalyptus Management Console for your Eucalyptus account, please contact your system administrator.Navigate to the Eucalyptus Management Console by typing the URL of the Management Console into your browser’s navigation bar. The URL of the Eucalyptus Management Console depends on how the console was installed in your cloud; see your system administrator for the specific URL for your installation. Follow the appropriate instructions below for logging into either your Eucalyptus or your Amazon Web Services cloud.
Log in to your Eucalyptus cloud
This area of the login dialog allows you to log in to your Eucalyptus cloud.Click the Log in to Eucalyptus tab. Type your account name into the Account name text box. Type your user name into the User name text box. Type your password into the Password text box. Click the Log in to Eucalyptus button.
Log in to your Amazon Web Services cloud
This area of the login dialog allows you to log in to your Amazon Web Services cloud.Click the Log in to AWS tab.
Note
To obtain your AWS security credentials, go to Amazon’s page.Enter your AWS access key ID into the Access key ID text box. Enter your AWS secret access key into the Secret access key text box. Click the Log in to AWS button.
1.2 - Launch and Connect to an Instance with the Management Console
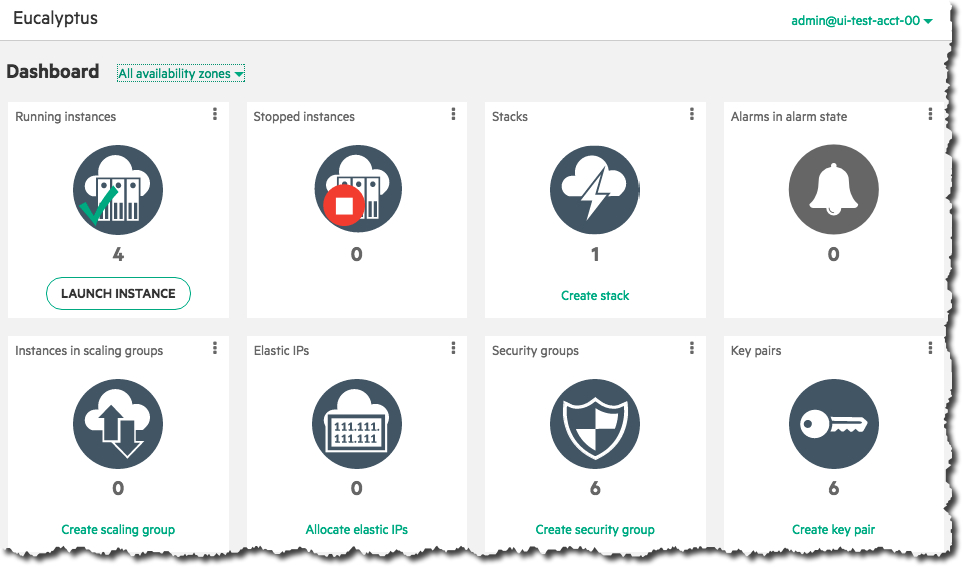
To launch an instance:
Click on the Launch Instance button on the main console page:
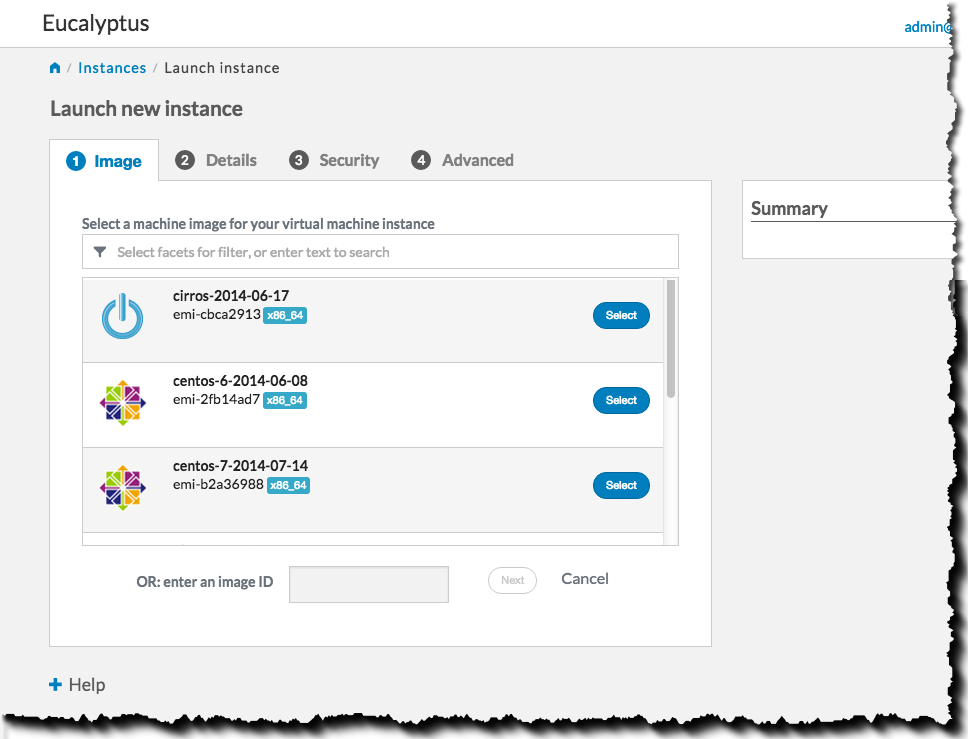
 Select an image from the list (for this example, we’ll select a CentOS image), then click the Next button:
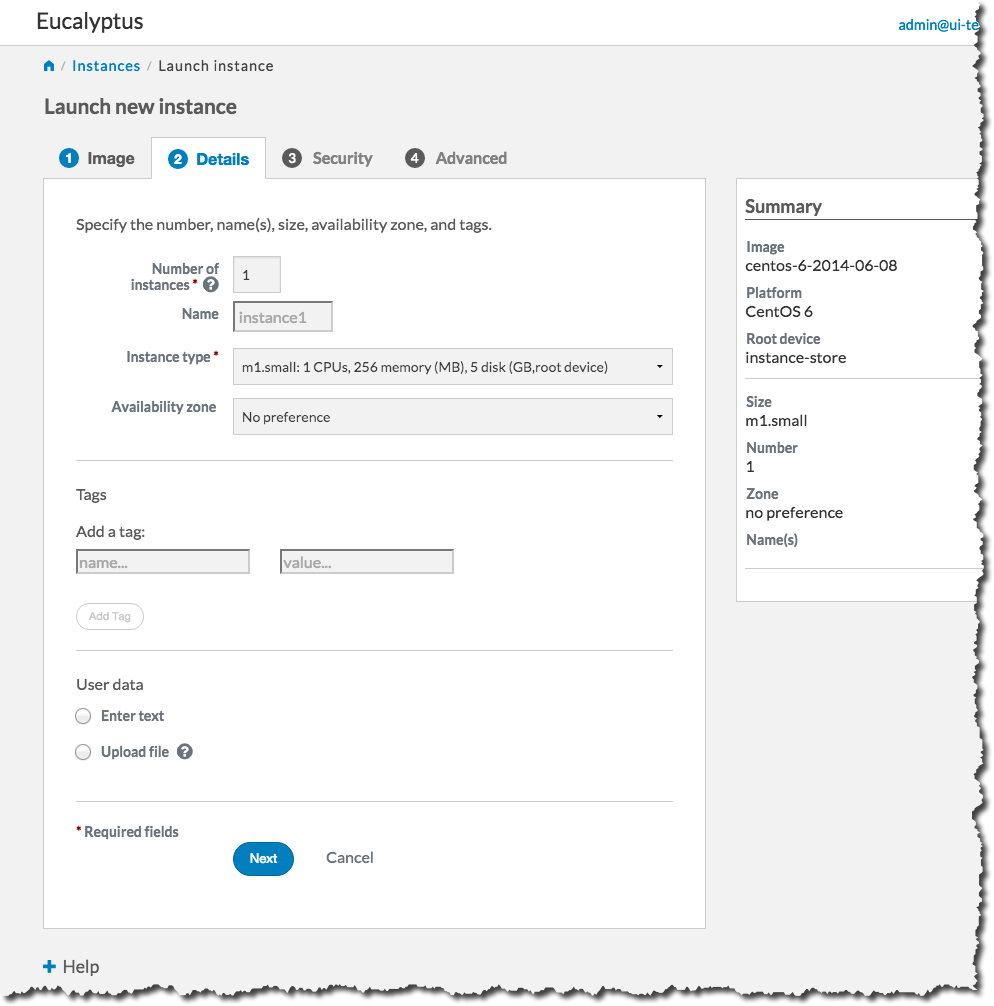
 Select an instance type and availability zone from the Details tab. For this example, select the defaults, and then click the Next button:
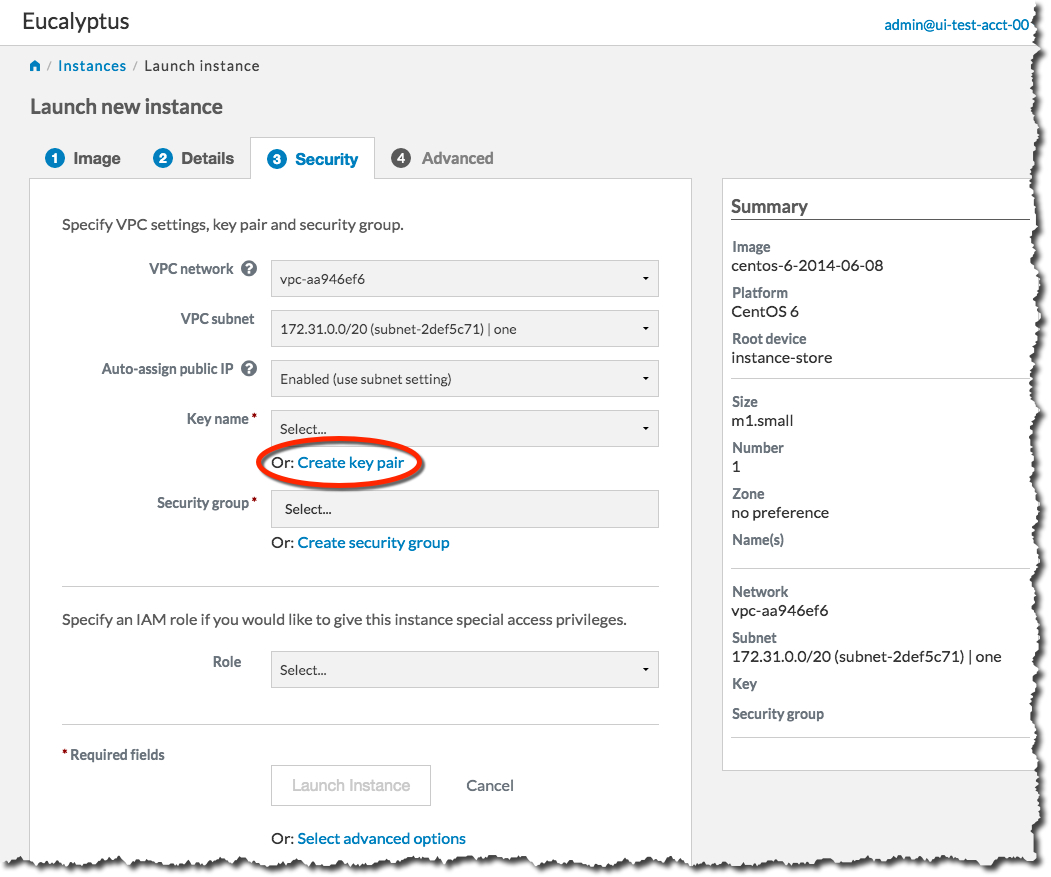
 On the Security tab, we’ll create a key pair and a security group to use with our new instance. A key pair will allow you to access your instance, and a security group allows you to define what kinds of incoming traffic your instance will allow.
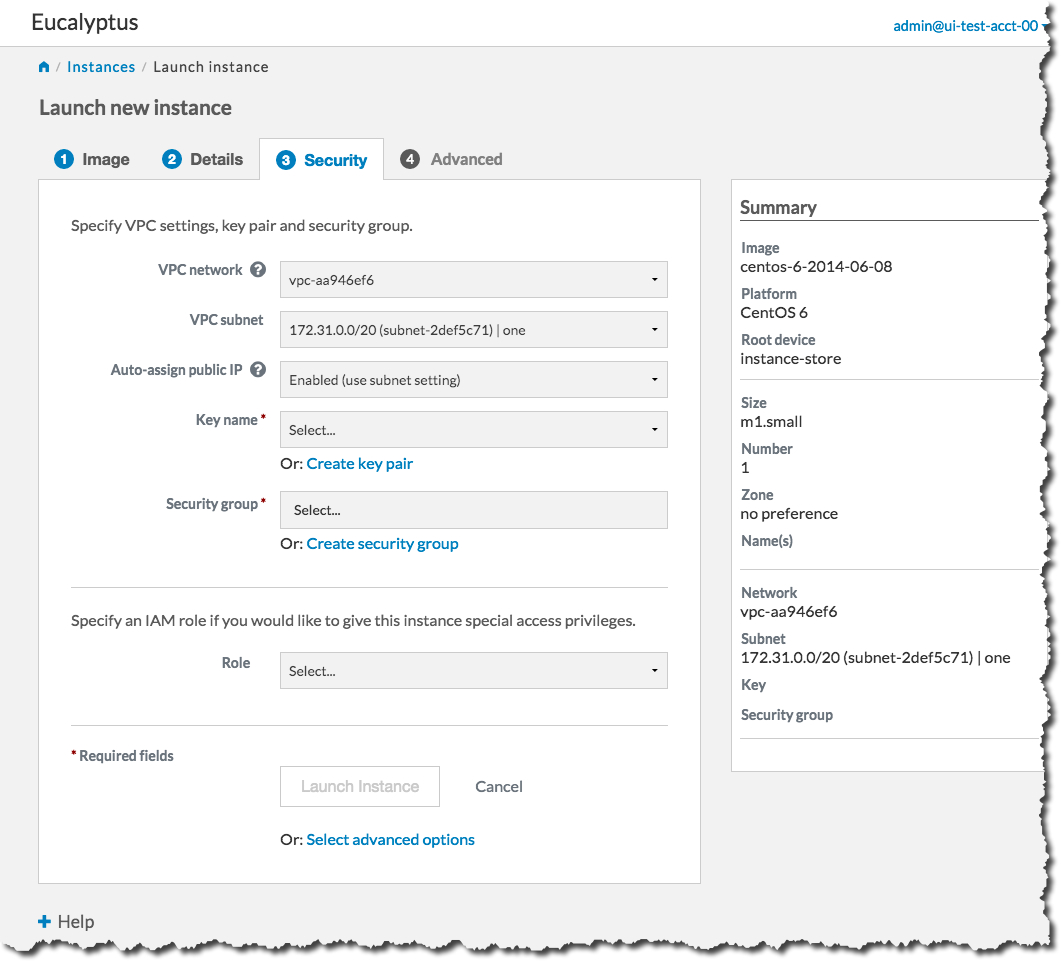 First, we will create a key pair. Click the Create key pair link to bring up the Create key pair dialog:
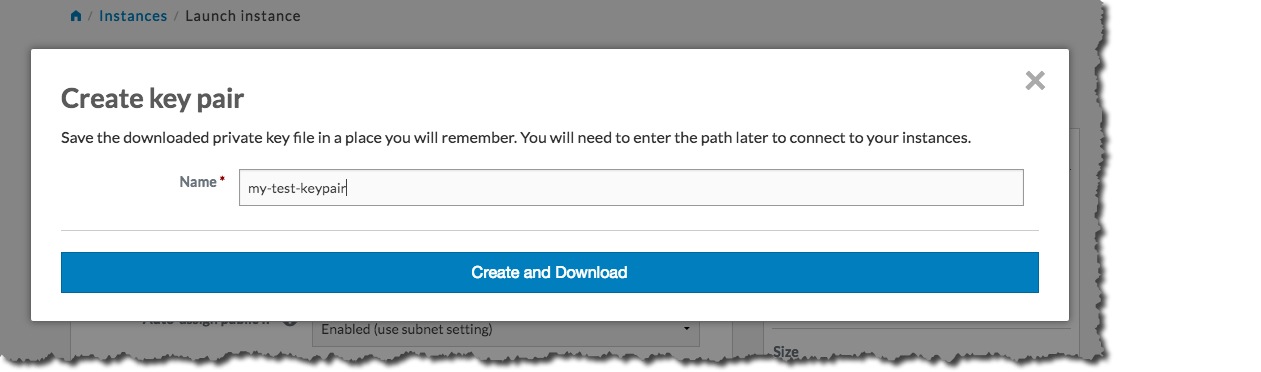
 Type the name of your new key pair into the Name text box, and then click the Create and Download button:
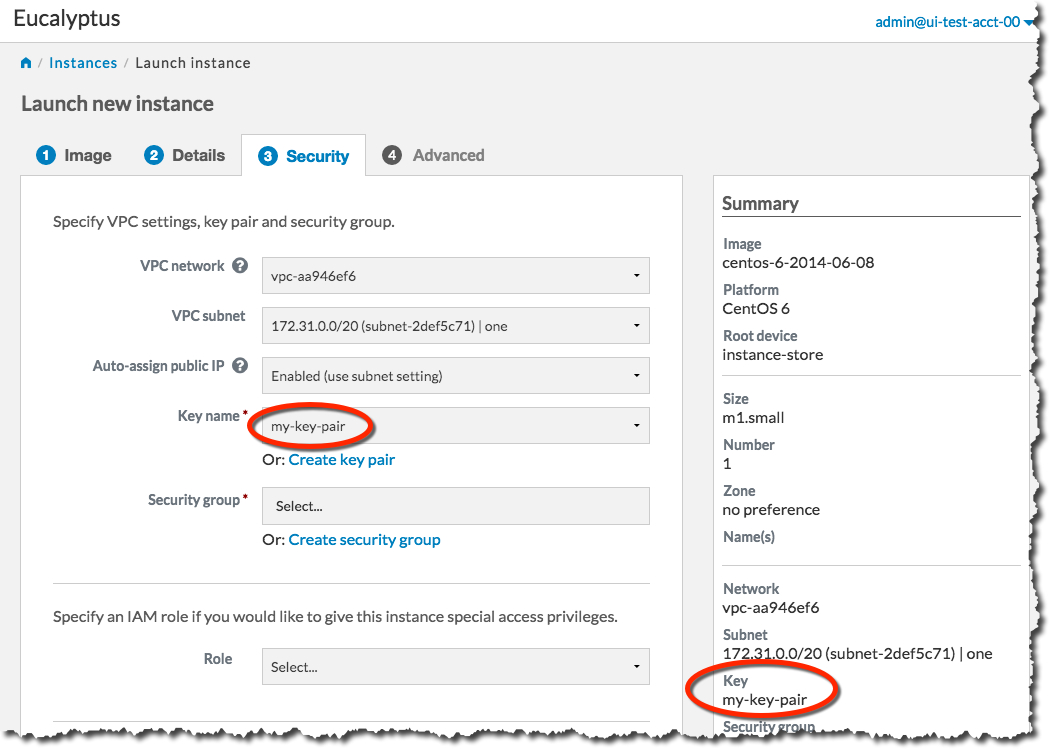
 The key pair automatically downloads to a location on your computer, typically in the Downloads folder. The Create key pair dialog will close, and the Key name text box will be populated with the name of the key pair you just created:
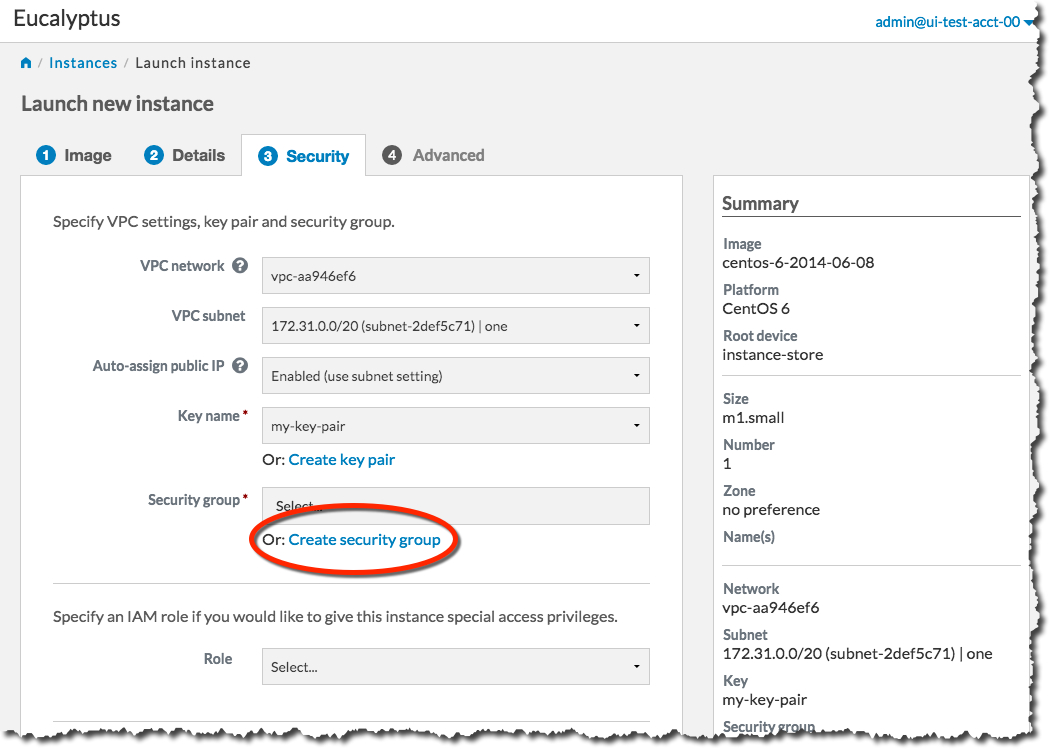
 Next, we will create a security group. Click the Create security group link to bring up the Create security group dialog:
 On the Create security group dialog, type the name of your security group into the Name text box. Type a brief description of your security group into the Description text box. We’ll need to SSH into our instance later, so in the Rules section of the dialog, select the SSH protocol from the Protocol drop-down list box.
Note
In this example, we allow any IP address to access our new instance. For production use, please use appropriate caution when specifying an IP range. For more information on CIDR notation, go to .You need to specify an IP address or a range of IP addresses that can use SSH to access your instance. For this example, click the Open to all addresses link. This will populate the IP Address text box with 0.0.0.0/0, which allows any IP address to access your instance via SSH.
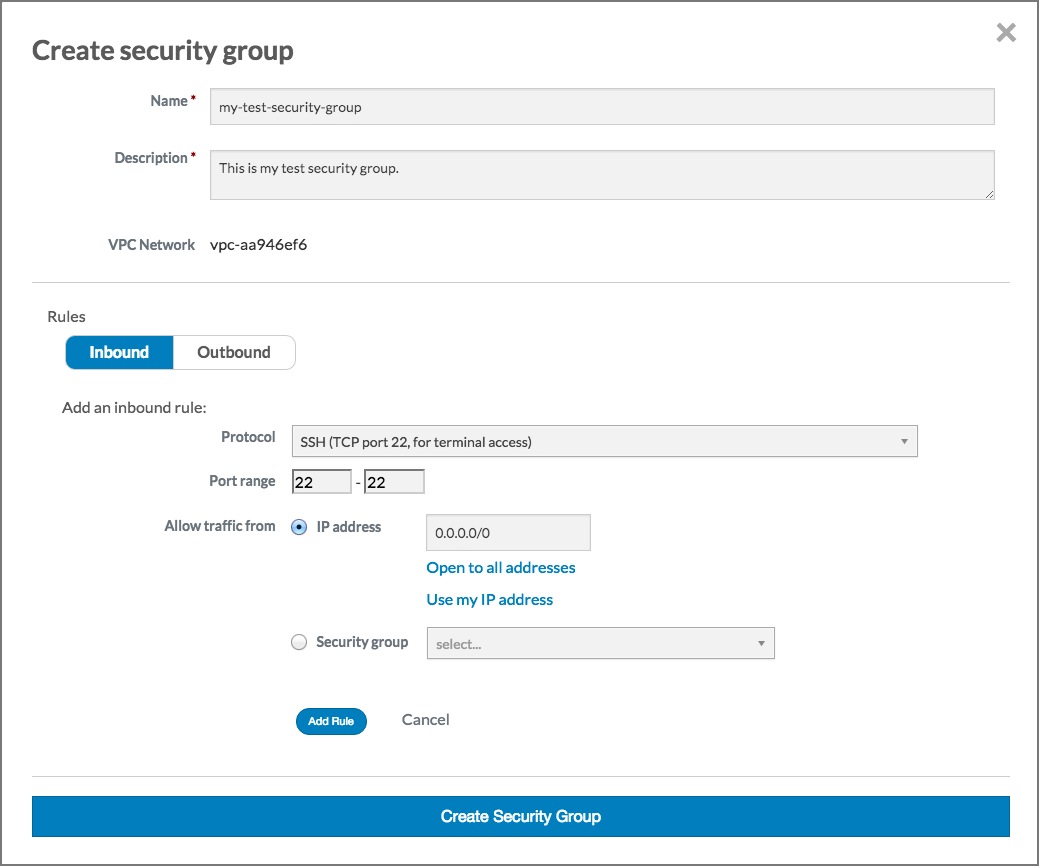
Click the Add rule button. The Create security group dialog should now look something like this:
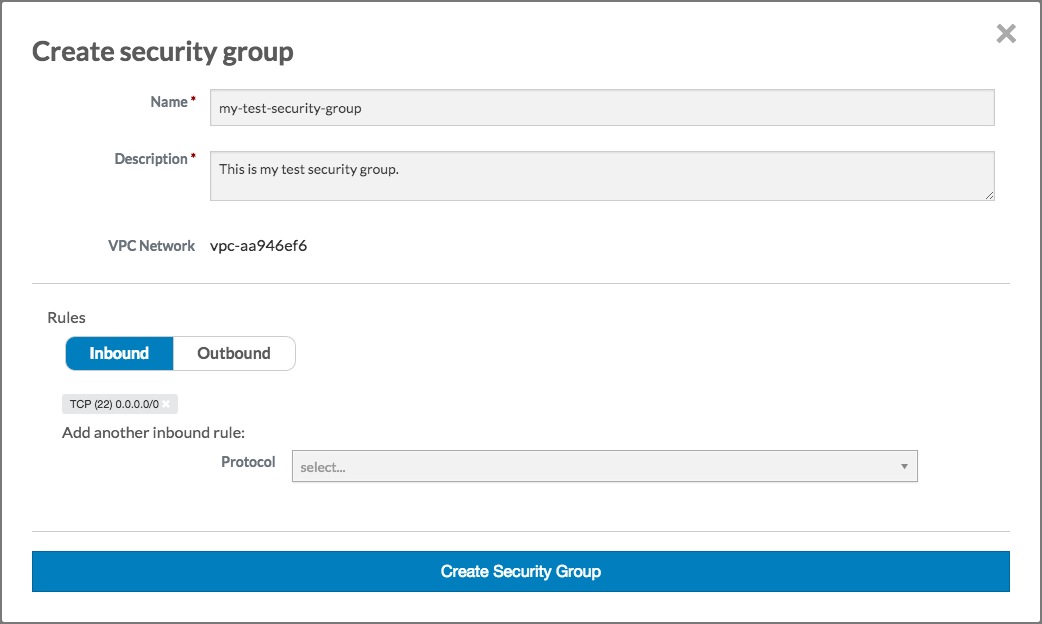
Click the Create security group button. The Create security group dialog will close, and the Security group text box will be populated with the name of the security group you just created:
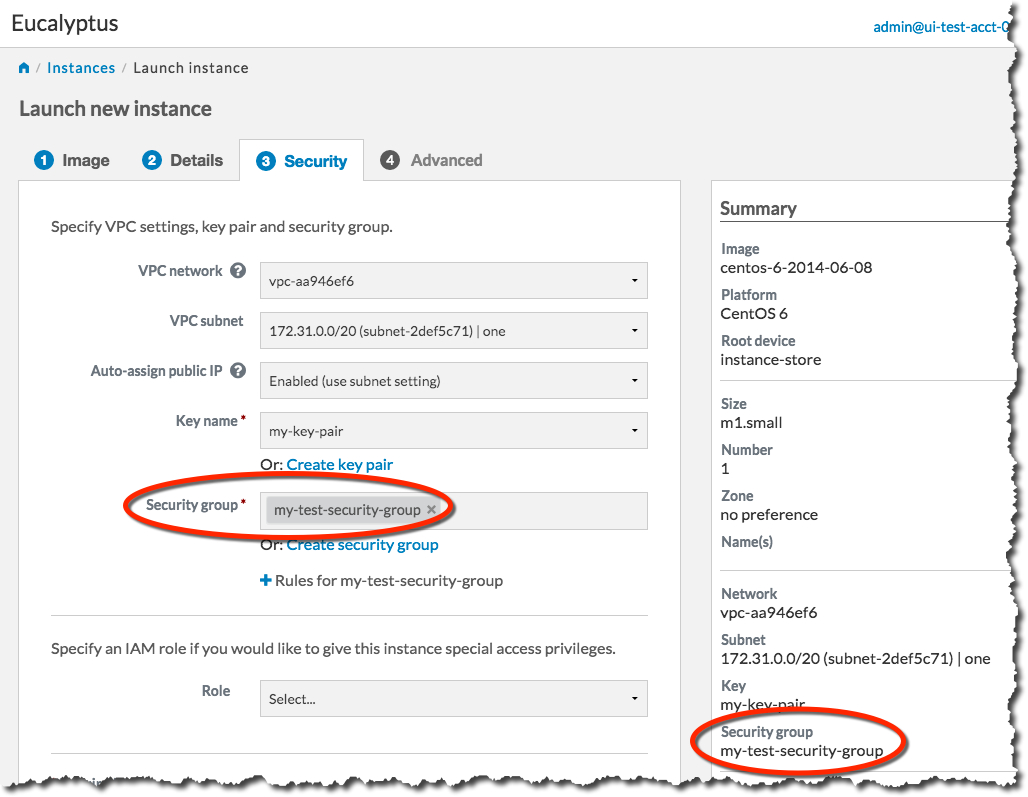
You’re now ready to launch your new instance. Click the Launch Instance button. The Launch Instance dialog will close, and the Instances screen will display. The instance you just created will display at the top of the list with a status of Pending:

When the status of your new instance changes to Running, click the instance in the list to bring up a page showing details of your instance. For example:
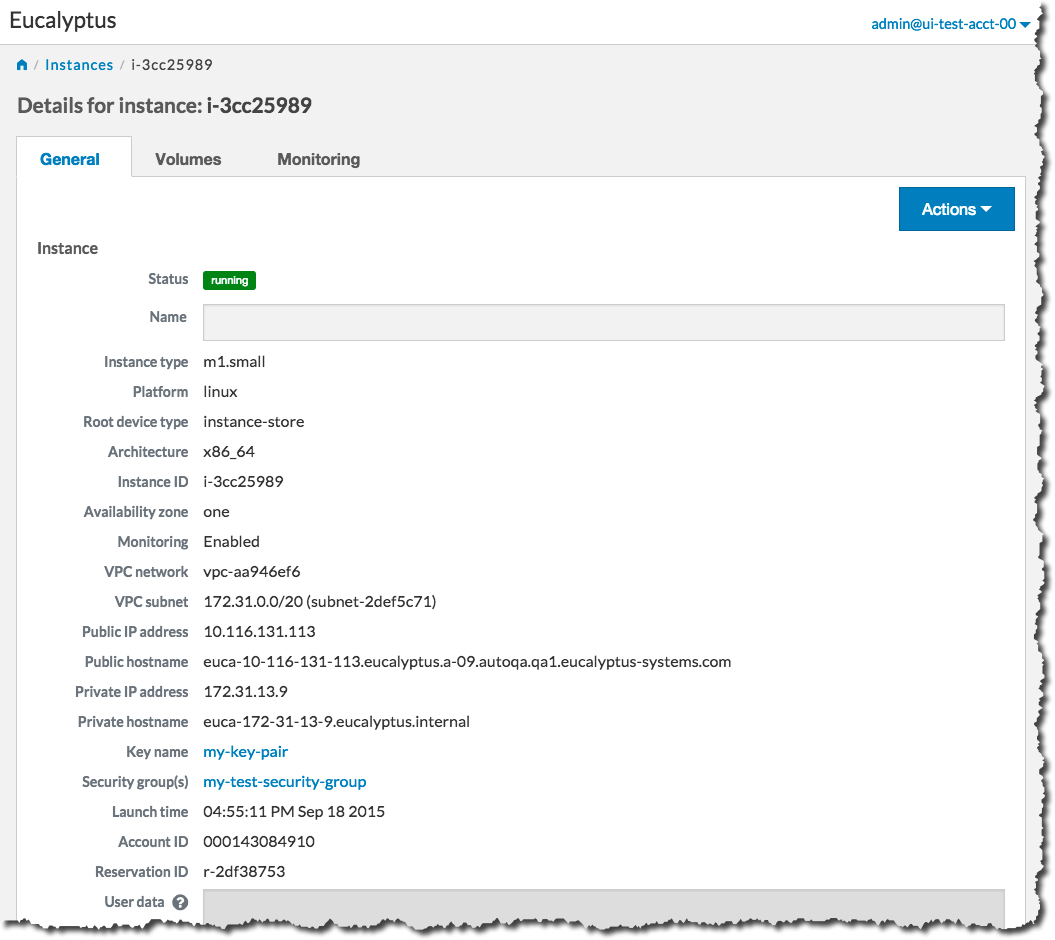
Note the Public IP address and/or the Public hostname fields. You will need this information to connect to your new instance. For example:
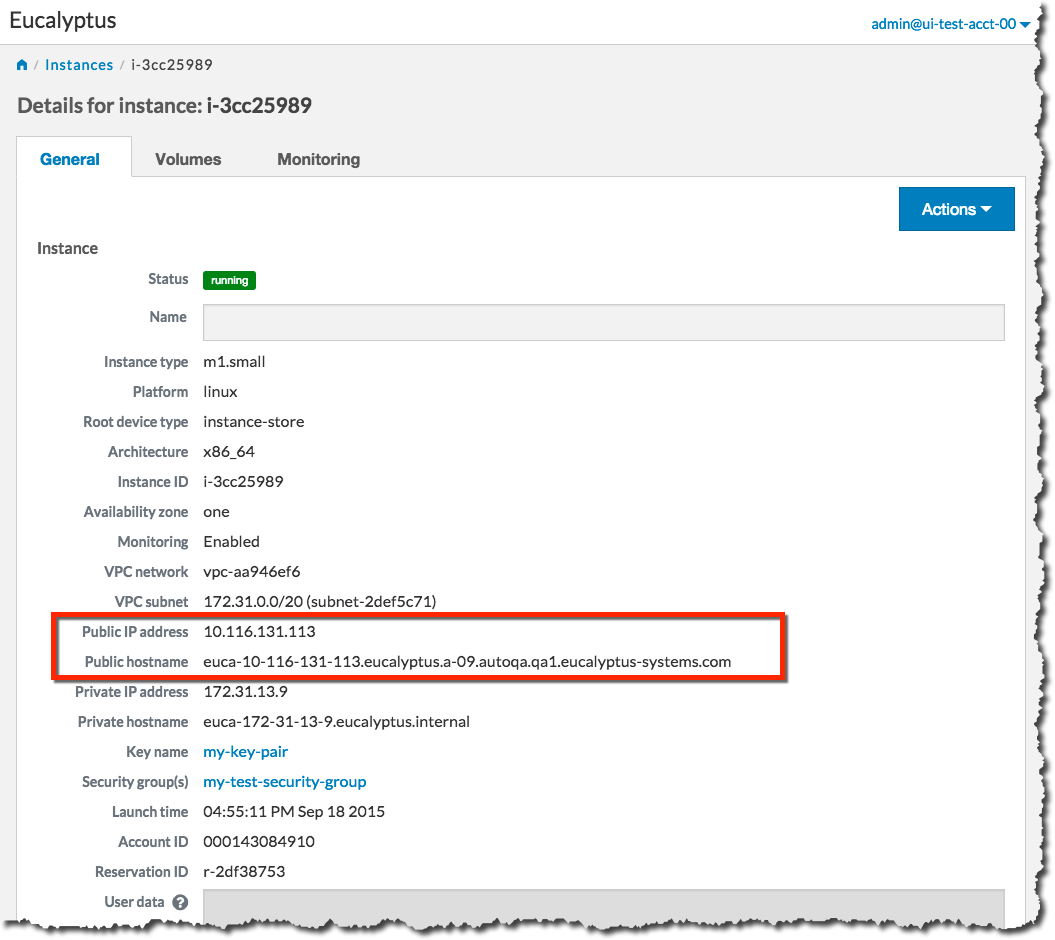
Using the public IP address or hostname of your new instance, you can now use SSH to log into the instance using the private key file you saved when you created a key pair. For example:
ssh -i my-test-keypair.private root@10.111.57.109
1.3 - Set Up A Web Server on an Instance
Once you’ve launched an instance and connected to it, you can test it by setting up a web server.
ssh into your instance.
ssh 192.168.1.1 -l root
Install Apache:
yum install -y httpd
You should see output similar to the following:
Loaded plugins: fastestmirror, security, versionlock
Loading mirror speeds from cached hostfile
 * extras: centos.sonn.com
centos-7-x86_64-os                                       | 3.7 kB     00:00
centos-7-x86_64-updates                                  | 3.4 kB     00:00
centos-7-x86_64-updates/primary_db                       | 5.4 MB     00:00
epel-7-x86_64                                            | 4.4 kB     00:00
epel-7-x86_64/primary_db                                 | 6.3 MB     00:00
extras                                                   | 3.3 kB     00:00
Setting up Install Process
Package httpd-2.2.15-31.el7.centos.x86_64 already installed and latest version
Nothing to do
Start the web server:
systemctl start httpd.service
You should see output similar to the following:
Starting httpd: [ OK ]
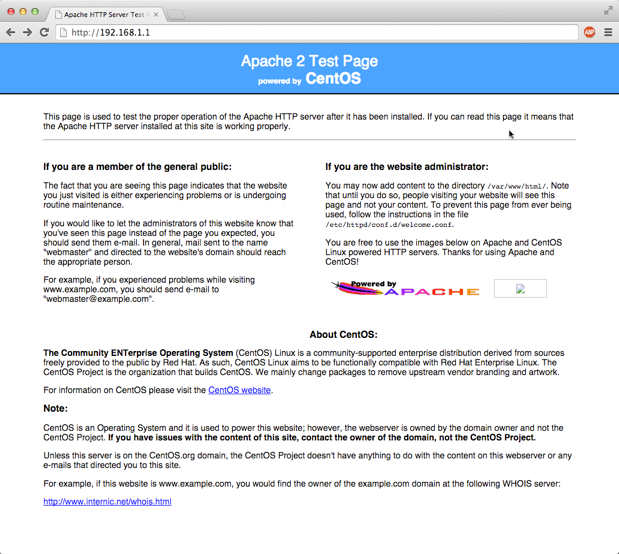
Test connectivity to your instance by using a web browser and connecting to the web service on your instance. For example:
1.4 - Reboot an Instance with the Management Console
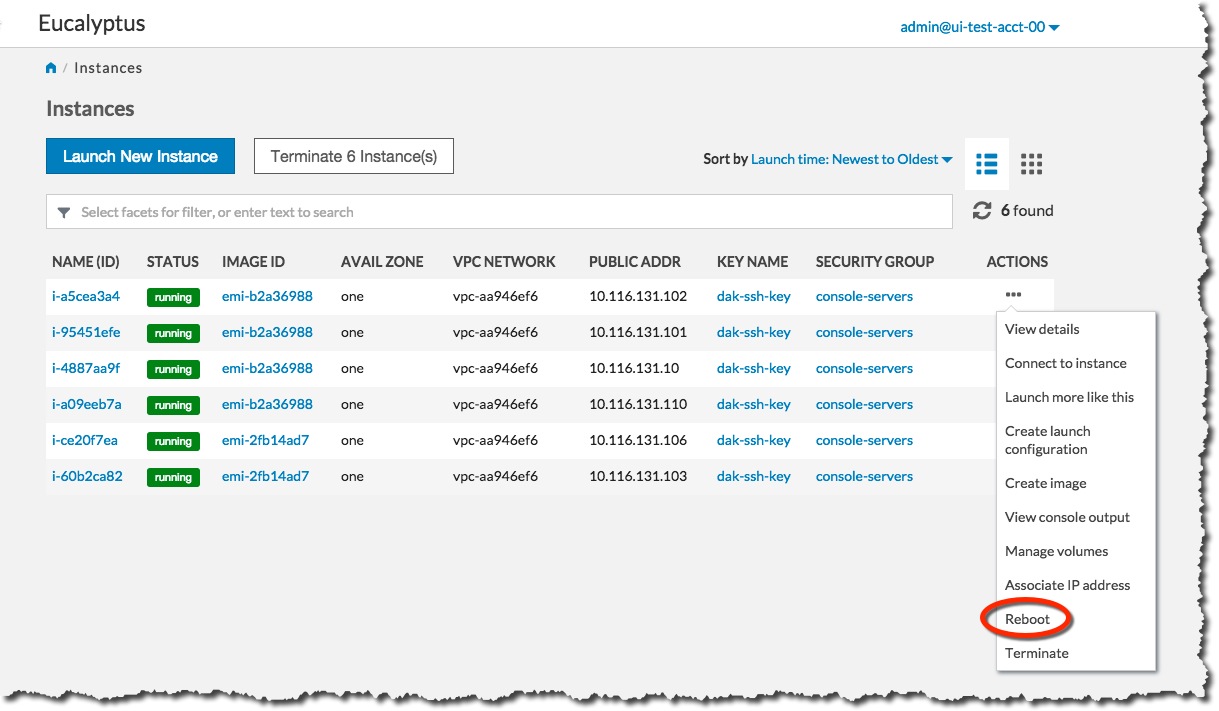
Rebooting preserves the root filesystem of an instance across restarts. To reboot an instance:
On the Instances page, select Reboot from the Actions menu next to the instance you want to reboot.
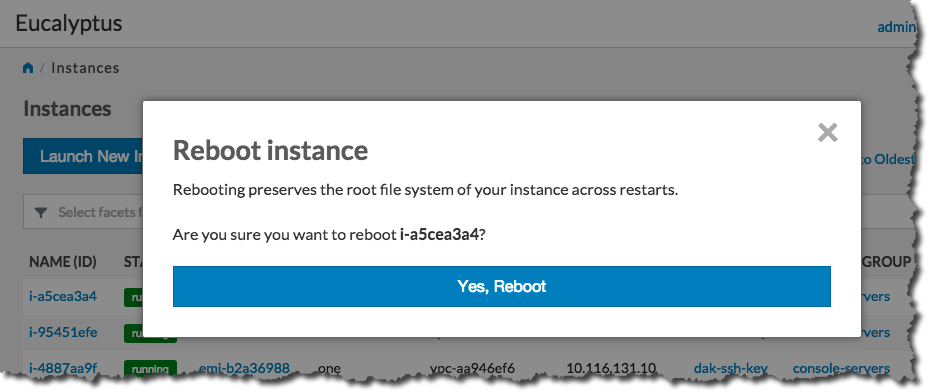
 Click the Yes, Reboot button.
1.5 - Terminate an Instance with the Management Console
Warning
Terminating an instance can cause the instance and all items associated with the instance (data, packages installed, etc.) to be lost. Be sure to save any important work or data before terminating an instance.To terminate instances:
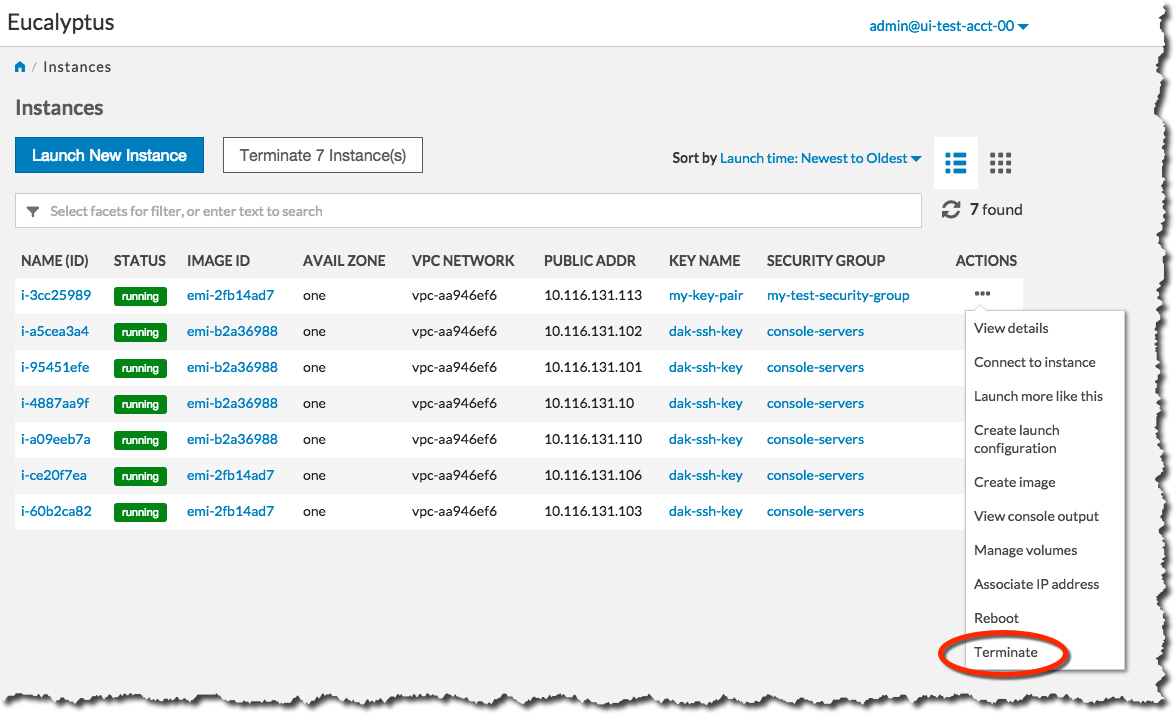
On the Instances page, Select Terminate from the Actions menu next to the instance you want to terminate.
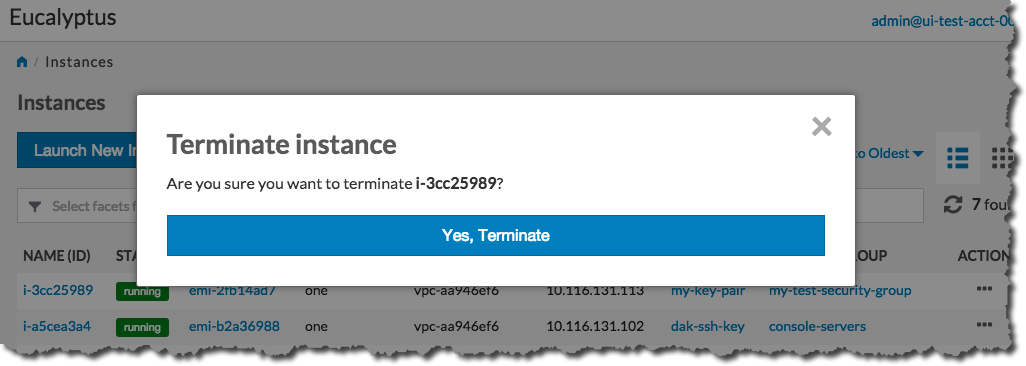
 Click the Yes, Terminate button.
 The Status field of the instance will first change to Shutting-down :
 …and then change to Terminated :

2 - Getting Started with the AWS CLI
This section helps you get started using your Eucalyptus cloud, and covers setting up your user credentials, installing and configuring the AWS CLI, and working with images and instances. As a cloud user, you can access the Eucalyptus cloud using a command line interface such as the AWS CLI, or using a web-based interface such as the Eucalyptus Management Console.
Note
This section primarily deals with using the AWS CLI. For complete documentation on using web-based the Eucalyptus Console, see
Console Login.
The install guide covers “AWS CLI Installation”
Find Image
Enter the following command:
# aws ec2 describe-images
IMAGES	x86_64	2020-10-17T05:29:09.161Z	emi-0ba907069cb1845bc	ubuntu-focal/focal-server-cloudimg-amd64.raw.manifest.xml	machine	ubuntu-focal	000575948401		True	/dev/sda	instance-store	available	hvm
IMAGES	x86_64	2020-10-17T05:24:08.857Z	emi-371ada125a928669e	centos-7/CentOS-7-x86_64-GenericCloud-2003.raw.manifest.xml	machine	centos-7	000575948401		True	/dev/sda	instance-store	available	hvm
Look for the image ID and write it down. The image ID starts with emi- . Once you find a suitable image to use, make sure you have a keypair to use.
Note
Examples use the AWS CLI text output format. You can request this output for a command by adding an “–output text” argument to any command.Create KeyPairs
Enter the following command:
aws ec2 create-key-pair --key-name <keypair_name> > <keypair_name>.private
where <keypair_name> is a unique name for your keypair. For example:
aws ec2 create-key-pair --key-name "alice-keypair" > "alice-keypair.private"
The private key is saved to a file in your local directory. Query the system to view the public key:
# aws ec2 describe-key-pairs
KEYPAIRS	92:40:28:cb:08:54:80:95:8d:69:d9:ab:9a:ff:28:30:40:12:6a:66	alice-keypair
Authorize Security Groups
Before you can log in to an instance, you must authorize access to that instance. This done by configuring a security group for that instance.
A security group is a set of networking rules applied to instances associated with that group. When you first create an instance, it is assigned to a default security group that denies incoming network traffic from all sources. To allow login and usage of a new instance, you must authorize network access to the default security group with the authorize-security-group-ingress command.
To authorize a security group, use authorize-security-group-ingress with the name of the security group, and the options of the network rule permissions you want to apply.
aws ec2 authorize-security-group-ingress [--group-id <value>] [--group-name <value>] [--ip-permissions <value>]
Use the following command to grant unlimited network access using SSH (TCP, port 22) and VNC (TCP, ports 5900 to 5910) to the security group default :
# aws ec2 authorize-security-group-ingress --ip-permissions "IpProtocol=tcp,FromPort=22,ToPort=22,IpRanges={CidrIp=0.0.0.0/0}" --group-name default
# aws ec2 authorize-security-group-ingress --ip-permissions "IpProtocol=tcp,FromPort=5900,ToPort=5910,IpRanges={CidrIp=0.0.0.0/0}" --group-name default
Launch an Instance
Use the run-instances command and provide an image ID. For example:
aws ec2 run-instances --image-id emi-371ada125a928669e
For additional details and options that can be used with the run-instances command. Enter the following command to get the launch status of the instance:
aws ec2 describe-instances --instance-ids <instance_id>
Log in to an Instance
When you create an instance, Eucalyptus assigns the instance two IP addresses: a public IP address and a private IP address. The public IP address provides access to the instance from external network sources; the private IP address provides access to the instance from within the Eucalyptus cloud environment. For more information on Eucalyptus networking modes, see the Eucalyptus Administrator’s Guide.
To use an instance you must log into it via ssh using one of the IP addresses assigned to it. You can obtain the instance’s IP addresses using the describe-instances query as shown in the following example.
To log into a VM instance:
Enter the following command to view the IP addresses of your instance:
# aws ec2 describe-instances
RESERVATIONS	000332850814	r-825a2c9c04e97ee62
GROUPS	sg-84741faf0bd87ea73	default
INSTANCES	0	x86_64	emi-371ada125a928669e	i-131e5853a71c87f16	t2.micro	2020-10-19T16:35:36.120Z	euca-172-31-15-2.eucalyptus.internal	172.31.15.2	euca-192-168-134-74.eucalyptus.mycloud.example.com	192.168.134.74	/dev/sda1	instance-store	True	NORMAL:  -- []	subnet-1343e38b5566c8e90	hvm	vpc-bded94e5dd0a07bc3
MONITORING	disabled
NETWORKINTERFACES	Primary network interface	d0:0d:c1:ba:7d:64	eni-c1ba7d641cb70a7ee	000332850814	euca-172-31-15-2.eucalyptus.internal	172.31.15.2	True	in-usesubnet-1343e38b5566c8e90	vpc-bded94e5dd0a07bc3
ASSOCIATION	euca-192-168-134-74.eucalyptus.mycloud.example.com	192.168.134.74
ATTACHMENT	2020-10-19T16:35:36.125Z	eni-attach-d597b44874e84bbb2	True	0	attached
GROUPS	sg-84741faf0bd87ea73	default
PRIVATEIPADDRESSES	True	euca-172-31-15-2.eucalyptus.internal	172.31.15.2
ASSOCIATION	euca-192-168-134-74.eucalyptus.mycloud.example.com	192.168.134.74
PLACEMENT	cloud-1a
SECURITYGROUPS	sg-84741faf0bd87ea73	default
STATE	16	running
Note that the public IP address is on the INSTANCES line after “mycloud.example.com”, the private address is after “eucalyptus.internal”.
Look for the instance ID on the INSTANCE line and write it down. Use this ID to manipulate and terminate this instance.
Note
Be sure that the security group for the instance allows SSH access.Use SSH to log into the instance, using your private key and the public IP address. For example:
ssh -i alice-keypair.private root@192.168.134.74
You are now logged in to your Linux instance.
Terminate an Instance
The terminate-instances command lets you cancel running VM instances. When you terminate instances, you must specify the ID string of the instance(s) you wish to terminate. You can obtain the ID strings of your instances using the describe-instances or describe-instance-status commands.
Warning
Terminating an instance can cause the instance and all items associated with the instance (data, packages installed, etc.) to be lost. Be sure to save any important work or data to Object Storage or EBS before terminating an instance.To terminate VM instances:
Enter describe-instance-status to obtain the ID of the instances you wish to terminate. Note that an instance ID strings begin with the prefix i- followed by an 8-character string:
# aws ec2 describe-instance-status
INSTANCESTATUSES	cloud-1a	i-131e5853a71c87f16
INSTANCESTATE	16	running
INSTANCESTATUS	ok
DETAILS	reachability	passed
SYSTEMSTATUS	ok
DETAILS	reachability	passed
Enter terminate-instances and the ID string(s) of the instance(s) you wish to terminate:
# aws ec2 terminate-instances --instance-ids i-131e5853a71c87f16
TERMINATINGINSTANCES	i-131e5853a71c87f16
CURRENTSTATE	32	shutting-down
PREVIOUSSTATE	16	running
3 - Getting Started with Euca2ools
This section helps you get started using your Eucalyptus cloud, and covers setting up your user credentials, installing and configuring the command line tools, and working with images and instances.As a cloud user, you can access the Eucalyptus cloud using a command line interface such as Euca2ools, or using a web-based interface such as the Eucalyptus Management Console.
Note
This section primarily deals with using the Eucalyptus command line. For complete documentation on using web-based the Eucalyptus Console, see
Console Login.
To access Eucalyptus via the command line tools, you need keys for Euca2ools. To access Eucalyptus with the Management Console, you’ll need a password for the Management Console. Talk to your cloud administrator to get your keys and passwords.
Find Image
Enter the following command:
# euca-describe-images -a
IMAGE	emi-0ba907069cb1845bc	ubuntu-focal/focal-server-cloudimg-amd64.raw.manifest.xml	000575948401	available	public	x86_64	machine				instance-storehvm
IMAGE	emi-371ada125a928669e	centos-7/CentOS-7-x86_64-GenericCloud-2003.raw.manifest.xml	000575948401	available	public	x86_64	machine				instance-storehvm
Look for the image ID in the second column and write it down. The image ID starts with emi- . Once you find a suitable image to use, make sure you have a keypair to use.
Create KeyPairs
Enter the following command:
euca-create-keypair -f <keypair_name>.private <keypair_name>
where <keypair_name> is a unique name for your keypair. For example:
euca-create-keypair -f "alice-keypair.private" "alice-keypair"
The private key is saved to a file in your local directory. Query the system to view the public key:
# euca-describe-keypairs
KEYPAIR	alice-keypair	92:40:28:cb:08:54:80:95:8d:69:d9:ab:9a:ff:28:30:40:12:6a:66
Authorize Security Groups
Before you can log in to an instance, you must authorize access to that instance. This done by configuring a security group for that instance.
A security group is a set of networking rules applied to instances associated with that group. When you first create an instance, it is assigned to a default security group that denies incoming network traffic from all sources. To allow login and usage of a new instance, you must authorize network access to the default security group with the euca-authorize command.
To authorize a security group, use euca-authorize with the name of the security group, and the options of the network rules you want to apply.
euca-authorize <security_group>
Use the following command to grant unlimited network access using SSH (TCP, port 22) and VNC (TCP, ports 5900 to 5910) to the security group default :
# euca-authorize -P tcp -p 22 -s 0.0.0.0/0 default
# euca-authorize -P tcp -p 5900-5910 -s 0.0.0.0/0 default
Launch an Instance
Use the euca-run-instances command and provide an image ID and the user data file, in the format euca-run-instances <image_id> . For example:
euca-run-instances emi-371ada125a928669e
For additional details and options that can be used with the euca-run-instances command. Enter the following command to get the launch status of the instance:
euca-describe-instances <instance_id>
Log in to an Instance
When you create an instance, Eucalyptus assigns the instance two IP addresses: a public IP address and a private IP address. The public IP address provides access to the instance from external network sources; the private IP address provides access to the instance from within the Eucalyptus cloud environment. For more information on Eucalyptus networking modes, see the Eucalyptus Administrator’s Guide.
To use an instance you must log into it via ssh using one of the IP addresses assigned to it. You can obtain the instance’s IP addresses using the euca-describe-instances query as shown in the following example.
To log into a VM instance:
Enter the following command to view the IP addresses of your instance:
# euca-describe-instances
RESERVATION	r-825a2c9c04e97ee62	000332850814	default
INSTANCE	i-131e5853a71c87f16	emi-371ada125a928669e	euca-192-168-134-74.eucalyptus.mycloud.example.com	euca-172-31-15-2.eucalyptus.internal	running		0		t2.micro	2020-10-19T16:35:36.120Z	cloud-1a				monitoring-disabled	192.168.134.74	172.31.15.2	vpc-bded94e5dd0a07bc3	subnet-1343e38b5566c8e90	instance-store					hvm			sg-84741faf0bd87ea73				x86_64
NETWORKINTERFACE	eni-c1ba7d641cb70a7ee	subnet-1343e38b5566c8e90	vpc-bded94e5dd0a07bc3	000332850814	in-use	172.31.15.2	euca-172-31-15-2.eucalyptus.internal	true
ATTACHMENT		eni-attach-d597b44874e84bbb2	0	attached	2020-10-19T16:35:36.125Z	true
ASSOCIATION	192.168.134.74		172.31.15.2
GROUP	sg-84741faf0bd87ea73	default
PRIVATEIPADDRESS	172.31.15.2	euca-172-31-15-2.eucalyptus.internal	primary
Note that the public IP address appears after the monitoring-disabled text, with the private address immediately following.
Look for the instance ID in the second field of the INSTANCE line and write it down. Use this ID to manipulate and terminate this instance.
Note
Be sure that the security group for the instance allows SSH access.Use SSH to log into the instance, using your private key and the public IP address. For example:
ssh -i alice-keypair.private root@192.168.134.74
You are now logged in to your Linux instance.
Terminate an Instance
The euca-terminate-instances command lets you cancel running VM instances. When you terminate instances, you must specify the ID string of the instance(s) you wish to terminate. You can obtain the ID strings of your instances using the euca-describe-instances or euca-describe-instance-status commands.
Warning
Terminating an instance can cause the instance and all items associated with the instance (data, packages installed, etc.) to be lost. Be sure to save any important work or data to Object Storage or EBS before terminating an instance.To terminate VM instances:
Enter euca-describe-instance-status to obtain the ID of the instances you wish to terminate. Note that an instance ID strings begin with the prefix i-:
# euca-describe-instance-status
INSTANCE	i-131e5853a71c87f16	cloud-1a	running	16	ok	ok	active
SYSTEMSTATUS	reachability	passed
INSTANCESTATUS	reachability	passed
Enter euca-terminate-instances and the ID string(s) of the instance(s) you wish to terminate:
# euca-terminate-instances i-131e5853a71c87f16
INSTANCE	i-131e5853a71c87f16	running	shutting-down